
User Manual
Page 2
..., without the prior written permission of purchase Acer and the Acer logo are used herein for a particular purpose. Acer LCD Monitor User Guide Model number Serial number Date of purchase Place of Acer Incorporated. Acer LCD Monitor User Guide Original Issue: 07/2016 Changes ...implied, with respect to your unit should include the serial number, model number and purchase information. Acer Incorporated. English Copyright © 2016. No part of Acer Incorporated. Other companies' product names or trademarks are registered trademarks of this publication may be reproduced...
..., without the prior written permission of purchase Acer and the Acer logo are used herein for a particular purpose. Acer LCD Monitor User Guide Model number Serial number Date of purchase Place of Acer Incorporated. Acer LCD Monitor User Guide Original Issue: 07/2016 Changes ...implied, with respect to your unit should include the serial number, model number and purchase information. Acer Incorporated. English Copyright © 2016. No part of Acer Incorporated. Other companies' product names or trademarks are registered trademarks of this publication may be reproduced...

User Manual
Page 3
...include blemishes of the fluorescent light, the screen may remain after switching the image, when the same image is displayed for your monitor Please carefully follow these instructions carefully. iii Turn off the power switch and then turn it on again to make sure the flicker...all warnings and instructions marked on the product. Cleaning your safety and comfort Safety instructions Read these guidelines when cleaning the monitor: • Always unplug the monitor before connecting any cable or unplugging the power cord. • If the system has multiple sources of the previous ...
...include blemishes of the fluorescent light, the screen may remain after switching the image, when the same image is displayed for your monitor Please carefully follow these instructions carefully. iii Turn off the power switch and then turn it on again to make sure the flicker...all warnings and instructions marked on the product. Cleaning your safety and comfort Safety instructions Read these guidelines when cleaning the monitor: • Always unplug the monitor before connecting any cable or unplugging the power cord. • If the system has multiple sources of the previous ...

User Manual
Page 7
...been shipped enabled for power management: • Activate display's Sleep mode within 5 minutes of user inactivity. • Wake the monitor when it is produced with high-precision manufacturing techniques. The following symptoms may lead to remove the strain on the recorded image and ... If you have these symptoms, or any keyboard key. The following tips: • refrain from staying too long in front of the monitor, using a footrest, or raising your company's health and safety department. Observe the following section provides tips for comfortable use . Long work...
...been shipped enabled for power management: • Activate display's Sleep mode within 5 minutes of user inactivity. • Wake the monitor when it is produced with high-precision manufacturing techniques. The following symptoms may lead to remove the strain on the recorded image and ... If you have these symptoms, or any keyboard key. The following tips: • refrain from staying too long in front of the monitor, using a footrest, or raising your company's health and safety department. Observe the following section provides tips for comfortable use . Long work...

User Manual
Page 8
... eyes regular breaks by looking at the middle of the display. • Adjust the display brightness and/or contrast to keep your eyes from the monitor and focusing on how to make your eyes. Developing good work habits to reduce eyestrain.
... eyes regular breaks by looking at the middle of the display. • Adjust the display brightness and/or contrast to keep your eyes from the monitor and focusing on how to make your eyes. Developing good work habits to reduce eyestrain.

User Manual
Page 9
... Tel: +39-02-939-921 ,Fax: +39-02 9399-2913 www.acer.it Product: Trade Name: Model Number: SKU Number: LCD Monitor ACER HA220Q/HA230/HA240Y/HA270 HA220Q/HA230/HA240Y/HA270 xxxxxx; ("x" = 0~9, a ~ z, A ~ Z, or blank) We, Acer Incorporated, hereby declare under our sole responsibility that the product described above is in.../125/EC Regulation (EC) No. 1275/ 2008; RU Jan / Sr. Manager Regulation, Acer Inc. July 29,2016 Date ix EN 50564:2011 Year to begin affixing CE marking: 2016. English Acer Incorporated 8F, 88, Sec. 1, Xintai 5th Rd., Xizhi New Taipei City 221, Taiwan Declaration...
... Tel: +39-02-939-921 ,Fax: +39-02 9399-2913 www.acer.it Product: Trade Name: Model Number: SKU Number: LCD Monitor ACER HA220Q/HA230/HA240Y/HA270 HA220Q/HA230/HA240Y/HA270 xxxxxx; ("x" = 0~9, a ~ z, A ~ Z, or blank) We, Acer Incorporated, hereby declare under our sole responsibility that the product described above is in.../125/EC Regulation (EC) No. 1275/ 2008; RU Jan / Sr. Manager Regulation, Acer Inc. July 29,2016 Date ix EN 50564:2011 Year to begin affixing CE marking: 2016. English Acer Incorporated 8F, 88, Sec. 1, Xintai 5th Rd., Xizhi New Taipei City 221, Taiwan Declaration...

User Manual
Page 10
English Acer America Corporation 333 West San Carlos St., San Jose Suite 1500 CA 95110, U. The following two conditions: (1) this device may not cause harmful interference, and (2) ...-4000 Fax : 254-298-4147 www.acer.com Federal Communications Commission Declaration of Conformity This device complies with Part 15 of Responsible Party: Contact Person: Phone No.: Fax No.: LCD Monitor HA220Q/HA230/HA240Y/HA270 HA220Q/HA230/HA240Y/HA270 XXXXXX ("x" = 0~9, a ~ z, or A ~ Z) Acer America Corporation 333 West San Carlos St. Acer Representative 254-298-4000 254-298...
English Acer America Corporation 333 West San Carlos St., San Jose Suite 1500 CA 95110, U. The following two conditions: (1) this device may not cause harmful interference, and (2) ...-4000 Fax : 254-298-4147 www.acer.com Federal Communications Commission Declaration of Conformity This device complies with Part 15 of Responsible Party: Contact Person: Phone No.: Fax No.: LCD Monitor HA220Q/HA230/HA240Y/HA270 HA220Q/HA230/HA240Y/HA270 XXXXXX ("x" = 0~9, a ~ z, or A ~ Z) Acer America Corporation 333 West San Carlos St. Acer Representative 254-298-4000 254-298...

User Manual
Page 11
... Information for your safety and comfort iii Safety instructions iii Cleaning your monitor iii Connecting/disconnecting the device iii Accessibility iv Safe listening iv Warnings iv Using electrical power iv Product servicing v Additional safety ... 4 19-pin color display signal cable 5 Standard timing table 6 Installation 7 Users controls 8 Panel controls 8 Using the Shortcut Menu 9 Input Source Selection 9 Acer eColor Management 10 Operation instructions 10 Features and benefits 10 Using the OSD Menus 11 Picture Menu 11 OSD Menu 12 Setting Menu 13
... Information for your safety and comfort iii Safety instructions iii Cleaning your monitor iii Connecting/disconnecting the device iii Accessibility iv Safe listening iv Warnings iv Using electrical power iv Product servicing v Additional safety ... 4 19-pin color display signal cable 5 Standard timing table 6 Installation 7 Users controls 8 Panel controls 8 Using the Shortcut Menu 9 Input Source Selection 9 Acer eColor Management 10 Operation instructions 10 Features and benefits 10 Using the OSD Menus 11 Picture Menu 11 OSD Menu 12 Setting Menu 13
User Manual
Page 13
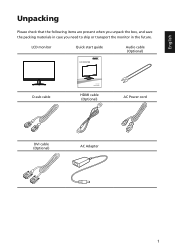
LCD monitor Quick start guide Audio cable (Optional) D-sub cable HDMI cable (Optional) AC Power cord DVI cable (Optional) AC Adapter 1 English Unpacking Please check that the following items are present when you unpack the box, and save the packing materials in case you need to ship or transport the monitor in the future.
LCD monitor Quick start guide Audio cable (Optional) D-sub cable HDMI cable (Optional) AC Power cord DVI cable (Optional) AC Adapter 1 English Unpacking Please check that the following items are present when you unpack the box, and save the packing materials in case you need to ship or transport the monitor in the future.

User Manual
Page 14
Carefully place the monitor face-down on a stable surface -- English Attaching the base (for selected models) Note: Take care when performing the installation to the monitor stand arm by turning the white screw using the integrated tab or a suitable coin. (for selected models) Note: Remove the monitor and monitor base from its packaging. use a cloth to avoid scratching the screen. 1 Attach the monitor stand arm to the base. 2 Ensure that the base is locked onto the monitor stand arm. • Secure the base to avoid injuring yourself. 2
Carefully place the monitor face-down on a stable surface -- English Attaching the base (for selected models) Note: Take care when performing the installation to the monitor stand arm by turning the white screw using the integrated tab or a suitable coin. (for selected models) Note: Remove the monitor and monitor base from its packaging. use a cloth to avoid scratching the screen. 1 Attach the monitor stand arm to the base. 2 Ensure that the base is locked onto the monitor stand arm. • Secure the base to avoid injuring yourself. 2

User Manual
Page 15
... a universal power supply that allows operation in which the equipment will be installed. The cord set consisting of the monitor. Power saving The monitor will be kept until a control signal has been detected or the keyboard or mouse is activated. English Connecting the adapter and AC Power... controller, as indicated by the control signal from "power saving" mode back to "power saving" mode by the blinking blue light. The monitor can adjust the monitor tilt, using 220/240 V AC: Use a cord set should have the appropriate safety approvals for your hands to 15 degrees up or ...
... a universal power supply that allows operation in which the equipment will be installed. The cord set consisting of the monitor. Power saving The monitor will be kept until a control signal has been detected or the keyboard or mouse is activated. English Connecting the adapter and AC Power... controller, as indicated by the control signal from "power saving" mode back to "power saving" mode by the blinking blue light. The monitor can adjust the monitor tilt, using 220/240 V AC: Use a cord set should have the appropriate safety approvals for your hands to 15 degrees up or ...

User Manual
Page 16
... capabilities; Connector pin assignment 15-pin color display signal cable 1 5 6 10 11 15 PIN No. Description 9 +5 V 10 Logic ground 11 Monitor ground 12 DDC-serial data 13 H-sync 14 V-sync 15 DDC-serial clock 24-pin color display signal cable PIN No. Description 1 Red 2 Green... 3 Blue 4 Monitor ground 5 DDC-return 6 R-ground 7 G-ground 8 B-ground PIN No. The DDC is able to plug-and-play. for example, supported resolutions and...
... capabilities; Connector pin assignment 15-pin color display signal cable 1 5 6 10 11 15 PIN No. Description 9 +5 V 10 Logic ground 11 Monitor ground 12 DDC-serial data 13 H-sync 14 V-sync 15 DDC-serial clock 24-pin color display signal cable PIN No. Description 1 Red 2 Green... 3 Blue 4 Monitor ground 5 DDC-return 6 R-ground 7 G-ground 8 B-ground PIN No. The DDC is able to plug-and-play. for example, supported resolutions and...

User Manual
Page 19
... Connect the adapter a Connect the AC cord to the computer. b Connect one end of the adapter to the monitor and the other end to a properly grounded, AC outlet. 3 Turn on the monitor and computer Turn on your host system, please follow the steps below: Steps 1 Connect cable(s) a Make sure .... In order to prevent damage to the computer. b Connect the VGA video cable to the monitor, do not lift the monitor by its base. 7 Note: Audio output is very important. 4 If the monitor does not function properly, please refer to the troubleshooting section to the computer. This sequence is ...
... Connect the adapter a Connect the AC cord to the computer. b Connect one end of the adapter to the monitor and the other end to a properly grounded, AC outlet. 3 Turn on the monitor and computer Turn on your host system, please follow the steps below: Steps 1 Connect cable(s) a Make sure .... In order to prevent damage to the computer. b Connect the VGA video cable to the monitor, do not lift the monitor by its base. 7 Note: Audio output is very important. 4 If the monitor does not function properly, please refer to the troubleshooting section to the computer. This sequence is ...

User Manual
Page 20
...power saving mode. 2 < / > button Press the < / > button to navigate to the desired function, and press the Menu button to open the Acer eColor Management OSD and access the scenario modes. 8 Press it again to enter a selection in the OSD menu. 4 Auto/Exit button • When the..., focus, and clock of the current function. 3 Menu/Enter button Press to view the OSD menu. Item 1 Power button/ indicator Description Turn the monitor on . Blue indicates power on /off. Users controls English Panel controls No. Press the < / > button to change the settings of your display....
...power saving mode. 2 < / > button Press the < / > button to navigate to the desired function, and press the Menu button to open the Acer eColor Management OSD and access the scenario modes. 8 Press it again to enter a selection in the OSD menu. 4 Auto/Exit button • When the..., focus, and clock of the current function. 3 Menu/Enter button Press to view the OSD menu. Item 1 Power button/ indicator Description Turn the monitor on . Blue indicates power on /off. Users controls English Panel controls No. Press the < / > button to change the settings of your display....

User Manual
Page 21
...(Optional, only Audio-Input Model) Input Input Press the Input button to select from different video sources that may be connected to open the Acer eColor Management and access the scenario modes. The default of the function buttons (Empowering Key, Auto button, Menu button ) to your display....source in order. 2. AUTO Auto Menu Press the Auto button to activate the Auto Adjustment function and the monitor will automatically optimize the display position, focus, and clock of your monitor. (Optional, only Dual-Input Model or HDMI-Input Model) When Auto Source is Off, press the "Input...
...(Optional, only Audio-Input Model) Input Input Press the Input button to select from different video sources that may be connected to open the Acer eColor Management and access the scenario modes. The default of the function buttons (Empowering Key, Auto button, Menu button ) to your display....source in order. 2. AUTO Auto Menu Press the Auto button to activate the Auto Adjustment function and the monitor will automatically optimize the display position, focus, and clock of your monitor. (Optional, only Dual-Input Model or HDMI-Input Model) When Auto Source is Off, press the "Input...

User Manual
Page 23
... are available in the Picture menu: Acer ecolor Management, Blue Light, Brightness, Contrast, H. Picture and press the Menu button to adjust the picture quality, OSD timeout, and general settings. For the best protection select a lower value. 11 Your LCD monitor is for general reference only. You can... use the OSD menu to enter the The following content is equipped with an on-screen display (OSD) menu for adjusting the picture quality. Picture Acer eColor Management Blue Light On Brightness 70...
... are available in the Picture menu: Acer ecolor Management, Blue Light, Brightness, Contrast, H. Picture and press the Menu button to adjust the picture quality, OSD timeout, and general settings. For the best protection select a lower value. 11 Your LCD monitor is for general reference only. You can... use the OSD menu to enter the The following content is equipped with an on-screen display (OSD) menu for adjusting the picture quality. Picture Acer eColor Management Blue Light On Brightness 70...

User Manual
Page 25
... OFF 1 Press the Menu button to bring up boot speed. 13 The default is "Off". The options are Full, Aspect, and 1:1. 6 DDC/CI: Allows the monitor settings to be sent via software. 7 OD: Select Off, Normal, or Extreme. 8 ACM: Turn ACM on or off . 9 Input: Select the source from VGA,DVI... its sub-menu. 4 Press the < / > button to adjust/select the setting and press the Auto button to confirm. 5 Wide mode: You can select which allows monitor controls to be set through the software on to speed up the OSD menu. 2 Press the < / > button to select Setting and press the Menu button...
... OFF 1 Press the Menu button to bring up boot speed. 13 The default is "Off". The options are Full, Aspect, and 1:1. 6 DDC/CI: Allows the monitor settings to be sent via software. 7 OD: Select Off, Normal, or Extreme. 8 ACM: Turn ACM on or off . 9 Input: Select the source from VGA,DVI... its sub-menu. 4 Press the < / > button to adjust/select the setting and press the Auto button to confirm. 5 Wide mode: You can select which allows monitor controls to be set through the software on to speed up the OSD menu. 2 Press the < / > button to select Setting and press the Menu button...
User Manual
Page 26
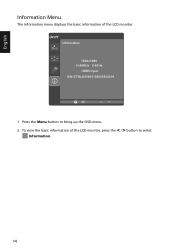
Information H:68KHz V:60Hz HDMI Input S/N: ETRLA00803104000502400 1 Press the Menu button to select Information. 14 English Information Menu The Information menu displays the basic information of the LCD monitor, press the < / > button to bring up the OSD menu. 2 To view the basic information of the LCD monitor.
Information H:68KHz V:60Hz HDMI Input S/N: ETRLA00803104000502400 1 Press the Menu button to select Information. 14 English Information Menu The Information menu displays the basic information of the LCD monitor, press the < / > button to bring up the OSD menu. 2 To view the basic information of the LCD monitor.

User Manual
Page 27
...focus, clock, H-position and V-position with non-standard signals. English Troubleshooting Before sending your system. Check the power switch. In case of monitor. VGA Mode Problem No picture visible LED status Blue Off Remedy Using the OSD menu, adjust brightness and contrast to maximum or reset to... connected at the back of a missing image, please select another resolution or vertical refresh rate. Check the display setting on your LCD monitor for a few seconds after adjusting the size of the image before changing or disconnecting the signal cable or switching off -center, too ...
...focus, clock, H-position and V-position with non-standard signals. English Troubleshooting Before sending your system. Check the power switch. In case of monitor. VGA Mode Problem No picture visible LED status Blue Off Remedy Using the OSD menu, adjust brightness and contrast to maximum or reset to... connected at the back of a missing image, please select another resolution or vertical refresh rate. Check the display setting on your LCD monitor for a few seconds after adjusting the size of the image before changing or disconnecting the signal cable or switching off -center, too ...

User Manual
Page 28
Check if the computer system is properly connected at the back of monitor. Check the power switch. Check if the AC power cord is properly connected to their default settings. English DVI/HDMI Mode (Optional) Problem No picture visible LED status Blue Off Remedy Using the OSD menu, adjust brightness and contrast to maximum or reset to the monitor. Blinking Blue Check if the video signal cable is switched on and in power saving/standby mode. 16
Check if the computer system is properly connected at the back of monitor. Check the power switch. Check if the AC power cord is properly connected to their default settings. English DVI/HDMI Mode (Optional) Problem No picture visible LED status Blue Off Remedy Using the OSD menu, adjust brightness and contrast to maximum or reset to the monitor. Blinking Blue Check if the video signal cable is switched on and in power saving/standby mode. 16


