User Manual
Page 3
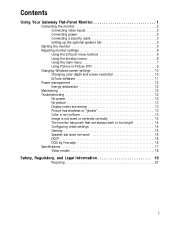
Contents Using Your Gateway Flat-Panel Monitor 1 Connecting the monitor 2 Connecting video inputs 2 Connecting power 2 Connecting a security cable 3 Setting up the optional speaker bar 3 Starting the monitor 5 Adjusting monitor settings 6 Using the EzTouch menu buttons 6 Using the shortcut menu 6 Using the main menu 7 Using Picture-in-Picture (PIP 9 Changing Windows screen settings 10 Changing color depth and screen resolution 10 EzTune software 11 Power management 12 Energy declaration 12 Maintaining 12 Troubleshooting 12 No power 12 No picture 13 Display colors are wrong...
Contents Using Your Gateway Flat-Panel Monitor 1 Connecting the monitor 2 Connecting video inputs 2 Connecting power 2 Connecting a security cable 3 Setting up the optional speaker bar 3 Starting the monitor 5 Adjusting monitor settings 6 Using the EzTouch menu buttons 6 Using the shortcut menu 6 Using the main menu 7 Using Picture-in-Picture (PIP 9 Changing Windows screen settings 10 Changing color depth and screen resolution 10 EzTune software 11 Power management 12 Energy declaration 12 Maintaining 12 Troubleshooting 12 No power 12 No picture 13 Display colors are wrong...
User Manual
Page 5
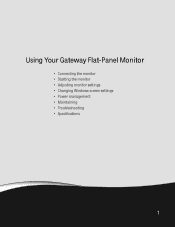
Using Your Gateway Flat-Panel Monitor • Connecting the monitor • Starting the monitor • Adjusting monitor settings • Changing Windows screen settings • Power management • Maintaining • Troubleshooting • Specifications 1
Using Your Gateway Flat-Panel Monitor • Connecting the monitor • Starting the monitor • Adjusting monitor settings • Changing Windows screen settings • Power management • Maintaining • Troubleshooting • Specifications 1

User Manual
Page 6
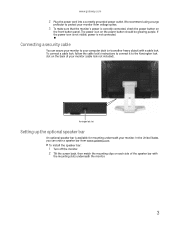
... video cables to the blue VGA video connector on the monitor. Connecting power To connect power: 1 Position your monitor so you can reach the back, then connect the power cord to hear the audio. You may need to set up the monitor, first unpack the box, unwrap the components, then make your source device's user guide for more information. See your cable connections. Using Your Gateway Flat-Panel Monitor Connecting the monitor To set your computer. Important For best audio performance, if your computer has a digital video connector (DVI), connect a DVI video cable...
... video cables to the blue VGA video connector on the monitor. Connecting power To connect power: 1 Position your monitor so you can reach the back, then connect the power cord to hear the audio. You may need to set up the monitor, first unpack the box, unwrap the components, then make your source device's user guide for more information. See your cable connections. Using Your Gateway Flat-Panel Monitor Connecting the monitor To set your computer. Important For best audio performance, if your computer has a digital video connector (DVI), connect a DVI video cable...
User Manual
Page 7
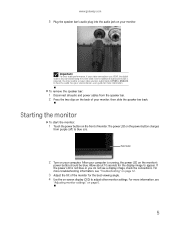
... the monitor. 3 Connecting a security cable You can order a speaker bar from voltage spikes. 3 To make sure that the monitor's power is correctly connected, check the power button on each side of your monitor. If the power icon is not visible, power is available for mounting underneath your monitor (cable lock not included). To install the speaker bar: 1 Turn off the monitor. 2 Tilt the screen back, then match the mounting clips on the front button panel. We recommend using...
... the monitor. 3 Connecting a security cable You can order a speaker bar from voltage spikes. 3 To make sure that the monitor's power is correctly connected, check the power button on each side of your monitor. If the power icon is not visible, power is available for mounting underneath your monitor (cable lock not included). To install the speaker bar: 1 Turn off the monitor. 2 Tilt the screen back, then match the mounting clips on the front button panel. We recommend using...
User Manual
Page 9
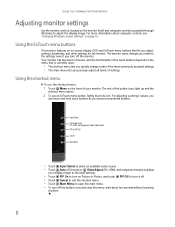
...'s audio plug into the audio jack on your computer. Power button 2 Turn on your monitor. For more troubleshooting information, see "Troubleshooting" on ). To remove the speaker bar: 1 Disconnect all audio and power cables from purple (off) to appear. After your source device's user guide for the display image to blue (on page 12. 3 Adjust the tilt of your monitor, then slide the speaker bar back. Allow about 10 seconds for more information, see a display image, check the connections...
...'s audio plug into the audio jack on your computer. Power button 2 Turn on your monitor. For more troubleshooting information, see "Troubleshooting" on ). To remove the speaker bar: 1 Disconnect all audio and power cables from purple (off) to appear. After your source device's user guide for the display image to blue (on page 12. 3 Adjust the tilt of your monitor, then slide the speaker bar back. Allow about 10 seconds for more information, see a display image, check the connections...
User Manual
Page 10
... video source. • Touch Auto (VGA mode) or Video Adjust (DVI, HDMI, and component modes) to adjust your monitor. For adjusting a setting's values, you can touch and hold touch buttons as you turn off . • Touch Cancel to exit the shortcut menu. • Touch Main Menu to open : • The shortcut menu lets you quickly change some of your display image to the ideal settings. • Touch PIP On to turn on the monitor itself) and computer controls (accessible through Windows) to adjust the display image. Using Your Gateway Flat-Panel Monitor Adjusting monitor settings Use...
... video source. • Touch Auto (VGA mode) or Video Adjust (DVI, HDMI, and component modes) to adjust your monitor. For adjusting a setting's values, you can touch and hold touch buttons as you turn off . • Touch Cancel to exit the shortcut menu. • Touch Main Menu to open : • The shortcut menu lets you quickly change some of your display image to the ideal settings. • Touch PIP On to turn on the monitor itself) and computer controls (accessible through Windows) to adjust the display image. Using Your Gateway Flat-Panel Monitor Adjusting monitor settings Use...
User Manual
Page 11
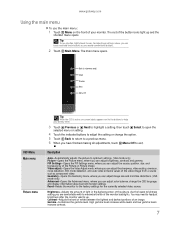
.... Reset-Resets the monitor to optimum settings. (VGA mode only) Picture-Opens the Picture menu, where you can adjust color balance, change the option. 5 Touch Back to return to a previous menu. 6 When you identify them. 3 Touch Previous or Next to highlight a setting, then touch Select to open the selected menu or setting. 4 Touch the indicated buttons to adjust the setting or change the OSD language, and display information about current monitor settings. Use the lowest brightness setting you can adjust the source, position, size, and transparency of the monitor backlights...
.... Reset-Resets the monitor to optimum settings. (VGA mode only) Picture-Opens the Picture menu, where you can adjust color balance, change the option. 5 Touch Back to return to a previous menu. 6 When you identify them. 3 Touch Previous or Next to highlight a setting, then touch Select to open the selected menu or setting. 4 Touch the indicated buttons to adjust the setting or change the OSD language, and display information about current monitor settings. Use the lowest brightness setting you can adjust the source, position, size, and transparency of the monitor backlights...
User Manual
Page 12
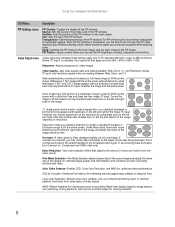
... the source image and adapts the frame rate of the PIP window. The PIP window can set the PIP brightness, contrast, saturation, and tint/hue. Video Adjust menu Unless otherwise indicated, these anomalies, turn Overscan on. (Component and HDMI video only) Noise Reduction-Uses noise reduction filters that adapt to fill the entire screen with a distortion-free and black bar-free image. PC input: sets resolution aspect ratios and scaling between Wide, Zoom, 1:1, and Panoramic modes. Panoramic mode uses...
... the source image and adapts the frame rate of the PIP window. The PIP window can set the PIP brightness, contrast, saturation, and tint/hue. Video Adjust menu Unless otherwise indicated, these anomalies, turn Overscan on. (Component and HDMI video only) Noise Reduction-Uses noise reduction filters that adapt to fill the entire screen with a distortion-free and black bar-free image. PC input: sets resolution aspect ratios and scaling between Wide, Zoom, 1:1, and Panoramic modes. Panoramic mode uses...
User Manual
Page 13
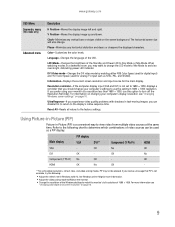
... turn off the Resolution Reminder. Information-Displays the current screen resolution and input source for digital input) and YUV Color Space (used as NTSC, PAL, and SECAM). UltraResponse-If you experience video quality problems with shadows in Windows to the following : ■ Adjust the refresh rate in fast-moving images, you prefer using your monitor at the same time. If you can be allowed. For information on page 10. LED Mode-Changes the brightness...
... turn off the Resolution Reminder. Information-Displays the current screen resolution and input source for digital input) and YUV Color Space (used as NTSC, PAL, and SECAM). UltraResponse-If you experience video quality problems with shadows in Windows to the following : ■ Adjust the refresh rate in fast-moving images, you prefer using your monitor at the same time. If you can be allowed. For information on page 10. LED Mode-Changes the brightness...
User Manual
Page 14
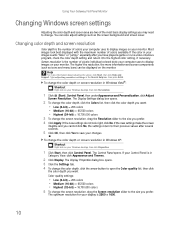
.... Screen resolution is the number of pixels (individual colored dots) your computer uses to display images on your display is in Category View, click Appearance and Themes. 2 Click Display. The higher the resolution, the more information about adjusting the screen, click Start, then click Help and Support. The Display Properties dialog box opens. 3 Click the Settings tab. 4 To change . If the new settings make the screen illegible and you prefer. The Control Panel opens. Type adjusting monitor settings in Windows Vista...
.... Screen resolution is the number of pixels (individual colored dots) your computer uses to display images on your display is in Category View, click Appearance and Themes. 2 Click Display. The higher the resolution, the more information about adjusting the screen, click Start, then click Help and Support. The Display Properties dialog box opens. 3 Click the Settings tab. 4 To change . If the new settings make the screen illegible and you prefer. The Control Panel opens. Type adjusting monitor settings in Windows Vista...
User Manual
Page 15
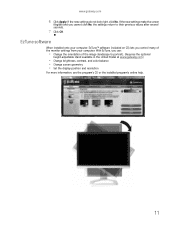
... the image (landscape to portrait). (Requires the optional height-adjustable stand available in the United States at www.gateway.com.) • Change brightness, contrast, and color balance • Change screen geometry • Set the display position and resolution For more information, see the program's CD or the installed program's online help. 11 If the new settings do not look right, click No. If the new settings make the screen illegible...
... the image (landscape to portrait). (Requires the optional height-adjustable stand available in the United States at www.gateway.com.) • Change brightness, contrast, and color balance • Change screen geometry • Set the display position and resolution For more information, see the program's CD or the installed program's online help. 11 If the new settings do not look right, click No. If the new settings make the screen illegible...
User Manual
Page 16
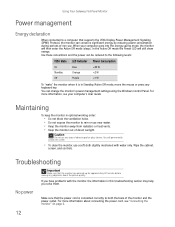
When your computer goes into the energy saving mode, the monitor will still show orange. In the Active Off mode the Power LED will then enter the Active Off mode (sleep). Use these conventions and the power can be reduced to a computer that supports the VESA Display Power Management Signaling (DPMS) Protocol, the monitor can conserve significant energy by reducing power consumption during periods of non-use. Using Your Gateway Flat-Panel Monitor Power management Energy declaration When connected to the following levels: VESA State LED Indicator Power Consumption On Blue
When your computer goes into the energy saving mode, the monitor will still show orange. In the Active Off mode the Power LED will then enter the Active Off mode (sleep). Use these conventions and the power can be reduced to a computer that supports the VESA Display Power Management Signaling (DPMS) Protocol, the monitor can conserve significant energy by reducing power consumption during periods of non-use. Using Your Gateway Flat-Panel Monitor Power management Energy declaration When connected to the following levels: VESA State LED Indicator Power Consumption On Blue
User Manual
Page 17
...; Touch Menu, Main Menu, then touch Auto to automatically adjust the display image to the ideal settings. (VGA mode only) • Remove any key on the keyboard to bring the monitor out of sleep mode. • Restart your computer with the monitor turned on . • Make sure that the video cable is connected securely to the back of the monitor and computer. For more information about connecting the power cord, see "Connecting the monitor" on page 2. • Make...
...; Touch Menu, Main Menu, then touch Auto to automatically adjust the display image to the ideal settings. (VGA mode only) • Remove any key on the keyboard to bring the monitor out of sleep mode. • Restart your computer with the monitor turned on . • Make sure that the video cable is connected securely to the back of the monitor and computer. For more information about connecting the power cord, see "Connecting the monitor" on page 2. • Make...
User Manual
Page 18
... read your video device's user guide or the help tools within your video device's software. For information on adjusting settings in Windows, see 1680 × 1050 available in the Windows display control panel. • Make sure that you do not see "Changing color depth and screen resolution" on your video card can display at 480p, 720p, or 1080i, either no video is displayed or you to make changes to match the monitor's optimal (native) 1680 × 1050 setting. You...
... read your video device's user guide or the help tools within your video device's software. For information on adjusting settings in Windows, see 1680 × 1050 available in the Windows display control panel. • Make sure that you do not see "Changing color depth and screen resolution" on your video card can display at 480p, 720p, or 1080i, either no video is displayed or you to make changes to match the monitor's optimal (native) 1680 × 1050 setting. You...
User Manual
Page 19
... (Start), Control Panel, Sounds and Audio Devices, the Volume tab, then click Advanced. To adjust the audio device's output volume, see the device's user guide. Which should I checked all HD resolutions. For optimum volume control using the speaker bar, we recommend that the speaker bar's pink microphone plug is a headphone jack on the monitor. Also make sure that you can , if your HDMI audio source is set to an external audio amplifier. • Yes, you set the Windows volume...
... (Start), Control Panel, Sounds and Audio Devices, the Volume tab, then click Advanced. To adjust the audio device's output volume, see the device's user guide. Which should I checked all HD resolutions. For optimum volume control using the speaker bar, we recommend that the speaker bar's pink microphone plug is a headphone jack on the monitor. Also make sure that you can , if your HDMI audio source is set to an external audio amplifier. • Yes, you set the Windows volume...
User Manual
Page 20
... the video source device does not have a DVI or HDMI connection, it ? DCDi creates new information through interpolation which then issues a set -top box) and the digital display (monitor, digital television/DTV, or projector). HDCP encrypts the transmission of video that stands for decryption. How to reduce jagged edges along diagonal lines caused by Faroudja is a video mode algorithm that match. You lose the signal...
... the video source device does not have a DVI or HDMI connection, it ? DCDi creates new information through interpolation which then issues a set -top box) and the digital display (monitor, digital television/DTV, or projector). HDCP encrypts the transmission of video that stands for decryption. How to reduce jagged edges along diagonal lines caused by Faroudja is a video mode algorithm that match. You lose the signal...
User Manual
Page 21
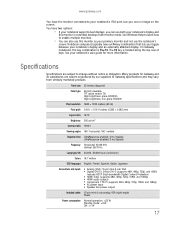
...:10 Brightness 300 cd/m2 Contrast ratio 1000:1 Viewing angles 160° horizontal, 160° vertical Response time UltraResponse enabled: 4 ms (typical) UltraResponse disabled: 5 ms (typical) Frequency Horizontal: 30-83 KHz Vertical: 56-75 Hz Lamp type/life 40,000 -50,000 hours (minimum) Colors 16.7 million OSD languages English, French, Spanish, Italian, Japanese Connections and inputs ■ Analog (VGA): 15-pin mini d-sub VGA ■ Digital (DVI-D): 24-pin DVI-D (supports...
...:10 Brightness 300 cd/m2 Contrast ratio 1000:1 Viewing angles 160° horizontal, 160° vertical Response time UltraResponse enabled: 4 ms (typical) UltraResponse disabled: 5 ms (typical) Frequency Horizontal: 30-83 KHz Vertical: 56-75 Hz Lamp type/life 40,000 -50,000 hours (minimum) Colors 16.7 million OSD languages English, French, Spanish, Italian, Japanese Connections and inputs ■ Analog (VGA): 15-pin mini d-sub VGA ■ Digital (DVI-D): 24-pin DVI-D (supports...
User Manual
Page 22
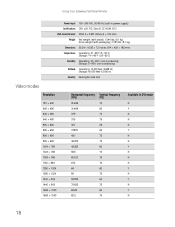
Using Your Gateway Flat-Panel Monitor Power input 100~240 VAC, 50/60 Hz (built-in power supply) Certifications CSA, cUS, FCC Class B, CE, NOM, VCCI Wall mount bracket VESA 4 × 3.937 inches (4 × 100 mm) Weight Net weight (with stand): 13.44 lbs. (6.1 kg) Gross weight (with packaging): 17.85 lbs. (8.1 kg) Dimensions 20.24 × 16.85 × 7.2 inches (514 ...Horizontal frequency (kHz) 31.469 31.469 37.9 37.5 35.1 37.879 48.1 46.875 48.363 56.5 60.123 67.5 64 80 55.935 70.635 65.29 82.3 Vertical frequency (Hz) 70 60 72 75 56 60 72 75 60 70 75 75 60 75 60 75 60 75 Available in DVI mode...
Using Your Gateway Flat-Panel Monitor Power input 100~240 VAC, 50/60 Hz (built-in power supply) Certifications CSA, cUS, FCC Class B, CE, NOM, VCCI Wall mount bracket VESA 4 × 3.937 inches (4 × 100 mm) Weight Net weight (with stand): 13.44 lbs. (6.1 kg) Gross weight (with packaging): 17.85 lbs. (8.1 kg) Dimensions 20.24 × 16.85 × 7.2 inches (514 ...Horizontal frequency (kHz) 31.469 31.469 37.9 37.5 35.1 37.879 48.1 46.875 48.363 56.5 60.123 67.5 64 80 55.935 70.635 65.29 82.3 Vertical frequency (Hz) 70 60 72 75 56 60 72 75 60 70 75 75 60 75 60 75 60 75 Available in DVI mode...
User Manual
Page 24
... power cord or plug is damaged. ■ Liquid has been spilled into a grounding-type outlet. Replacement parts and accessories Use only replacement parts and accessories recommended by Gateway. 20 Retain all safety and operating instructions for your work surface. ■ The product should only be operated from the wall outlet and refer servicing to rest on it is important that the switch is set...
... power cord or plug is damaged. ■ Liquid has been spilled into a grounding-type outlet. Replacement parts and accessories Use only replacement parts and accessories recommended by Gateway. 20 Retain all safety and operating instructions for your work surface. ■ The product should only be operated from the wall outlet and refer servicing to rest on it is important that the switch is set...
User Manual
Page 25
... process. You can do your Gateway notebook, see "Changing power-saving settings" in the online User Guide. Sleep mode uses less energy to dispose of your computer after it has entered Sleep mode, move the mouse, press a key on how you have been used batteries properly. Your computer was delivered in Sleep mode, the power indicator flashes. Finally, we suggest that potentially hazardous substances are not...
... process. You can do your Gateway notebook, see "Changing power-saving settings" in the online User Guide. Sleep mode uses less energy to dispose of your computer after it has entered Sleep mode, move the mouse, press a key on how you have been used batteries properly. Your computer was delivered in Sleep mode, the power indicator flashes. Finally, we suggest that potentially hazardous substances are not...

