User Manual
Page 3
Contents Using Your Gateway Flat-Panel Monitor 1 Connecting the monitor 2 Connecting video inputs 2 Connecting power 2 Connecting a security cable 3 Setting up the optional speaker bar 3 Starting the monitor 5 Adjusting monitor settings 6 Using the EzTouch menu buttons 6 Using the shortcut menu 6 Using the main menu 7 Using Picture-in-Picture (PIP...13 Picture has shadows or "ghosts 13 Color is not uniform 13 Image is not sized or centered correctly 14 The monitor has pixels that are always dark or too bright 14 Configuring video settings 14 Gaming 15 Speaker bar does not work ...
Contents Using Your Gateway Flat-Panel Monitor 1 Connecting the monitor 2 Connecting video inputs 2 Connecting power 2 Connecting a security cable 3 Setting up the optional speaker bar 3 Starting the monitor 5 Adjusting monitor settings 6 Using the EzTouch menu buttons 6 Using the shortcut menu 6 Using the main menu 7 Using Picture-in-Picture (PIP...13 Picture has shadows or "ghosts 13 Color is not uniform 13 Image is not sized or centered correctly 14 The monitor has pixels that are always dark or too bright 14 Configuring video settings 14 Gaming 15 Speaker bar does not work ...
User Manual
Page 5
Using Your Gateway Flat-Panel Monitor • Connecting the monitor • Starting the monitor • Adjusting monitor settings • Changing Windows screen settings • Power management • Maintaining • Troubleshooting • Specifications 1
Using Your Gateway Flat-Panel Monitor • Connecting the monitor • Starting the monitor • Adjusting monitor settings • Changing Windows screen settings • Power management • Maintaining • Troubleshooting • Specifications 1

User Manual
Page 6
Using Your Gateway Flat-Panel Monitor Connecting the monitor To set your cable connections. OR Connect an HDMI cable to the HDMI port on the monitor, or connect component video cables to the component video ports on the monitor. - You may need to set up the monitor, first unpack the box,.... 2 If your computer. Power connector 2 Connecting video inputs To connect video sources to your monitor: 1 Position your computer and the monitor so you can reach the back of the monitor. See your video connection uses HDMI, the digital audio is also conveyed along the same cable,...
Using Your Gateway Flat-Panel Monitor Connecting the monitor To set your cable connections. OR Connect an HDMI cable to the HDMI port on the monitor, or connect component video cables to the component video ports on the monitor. - You may need to set up the monitor, first unpack the box,.... 2 If your computer. Power connector 2 Connecting video inputs To connect video sources to your monitor: 1 Position your computer and the monitor so you can reach the back of the monitor. See your video connection uses HDMI, the digital audio is also conveyed along the same cable,...
User Manual
Page 7
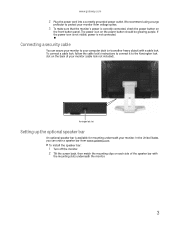
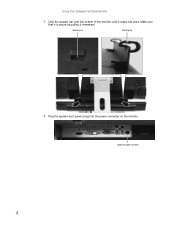
... security cable You can order a speaker bar from voltage spikes. 3 To make sure that the monitor's power is correctly connected, check the power button on the power button should be glowing purple. www.gateway.com 2 Plug the power cord into a correctly grounded power outlet. We recommend using a surge ...slot Setting up the optional speaker bar An optional speaker bar is not connected. In the United States, you can secure your monitor to your monitor from www.gateway.com. To connect a cable lock, follow the cable lock's instructions to connect it to protect your computer desk (or ...
... security cable You can order a speaker bar from voltage spikes. 3 To make sure that the monitor's power is correctly connected, check the power button on the power button should be glowing purple. www.gateway.com 2 Plug the power cord into a correctly grounded power outlet. We recommend using a surge ...slot Setting up the optional speaker bar An optional speaker bar is not connected. In the United States, you can secure your monitor to your monitor from www.gateway.com. To connect a cable lock, follow the cable lock's instructions to connect it to protect your computer desk (or ...
User Manual
Page 8
Make sure that it is secure by pulling it snaps into the power connector on the monitor. Mounting slot Mounting clip 4 Plug the speaker bar's power plug into place. Using Your Gateway Flat-Panel Monitor 3 Slide the speaker bar onto the bottom of the monitor until it downward. Speaker bar power connector 4
Make sure that it is secure by pulling it snaps into the power connector on the monitor. Mounting slot Mounting clip 4 Plug the speaker bar's power plug into place. Using Your Gateway Flat-Panel Monitor 3 Slide the speaker bar onto the bottom of the monitor until it downward. Speaker bar power connector 4
User Manual
Page 9
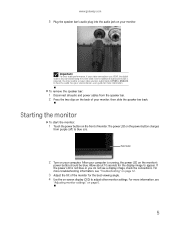
...seconds for more information, see "Troubleshooting" on page 12. 3 Adjust the tilt of the monitor for the best viewing angle. 4 Use the on page 6. 5 Important For best audio performance, if your monitor. For more information. To remove the speaker bar: 1 Disconnect all audio and power cables ...the two clips on the front of your computer. Starting the monitor To start the monitor: 1 Touch the power button on the back of monitor. www.gateway.com 5 Plug the speaker bar's audio plug into the audio jack on the monitor's power button should be blue. After your computer is running...
...seconds for more information, see "Troubleshooting" on page 12. 3 Adjust the tilt of the monitor for the best viewing angle. 4 Use the on page 6. 5 Important For best audio performance, if your monitor. For more information. To remove the speaker bar: 1 Disconnect all audio and power cables ...the two clips on the front of your computer. Starting the monitor To start the monitor: 1 Touch the power button on the back of monitor. www.gateway.com 5 Plug the speaker bar's audio plug into the audio jack on the monitor's power button should be blue. After your computer is running...
User Manual
Page 10
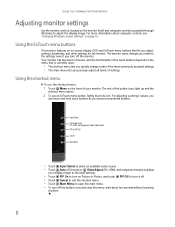
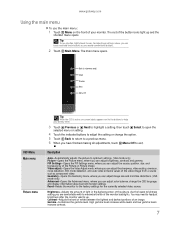
... button, lightly touch its icon. For more information about ten seconds without touching a button. 6 Using Your Gateway Flat-Panel Monitor Adjusting monitor settings Use the monitor controls (located on the monitor itself) and computer controls (accessible through Windows) to open : • The shortcut menu lets you quickly ...change some of the most commonly accessed settings. • The main menu lets you turn it off the monitor. Your monitor has two levels of menus, and the functionality of the touch buttons depends on Picture-in-Picture, and touch PIP Off to...
... button, lightly touch its icon. For more information about ten seconds without touching a button. 6 Using Your Gateway Flat-Panel Monitor Adjusting monitor settings Use the monitor controls (located on the monitor itself) and computer controls (accessible through Windows) to open : • The shortcut menu lets you quickly ...change some of the most commonly accessed settings. • The main menu lets you turn it off the monitor. Your monitor has two levels of menus, and the functionality of the touch buttons depends on Picture-in-Picture, and touch PIP Off to...
User Manual
Page 11
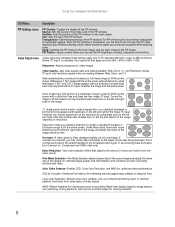
...High gamma levels increase white levels and low gamma levels increase contrast. 7 Description Auto-Automatically adjusts the picture to readjust brightness after the monitor warms up and the shortcut menu opens. Use the lowest brightness setting you can adjust color balance, change the option. 5 Touch Back .... Reset-Resets the monitor to maximize the life of the button icons light up . Contrast-Adjusts the level of white between the lightest and darkest portions of light in -Picture image. Brightness-Adjusts the amount of an image. www.gateway.com Using the main menu To use a...
...High gamma levels increase white levels and low gamma levels increase contrast. 7 Description Auto-Automatically adjusts the picture to readjust brightness after the monitor warms up and the shortcut menu opens. Use the lowest brightness setting you can adjust color balance, change the option. 5 Touch Back .... Reset-Resets the monitor to maximize the life of the button icons light up . Contrast-Adjusts the level of white between the lightest and darkest portions of light in -Picture image. Brightness-Adjusts the amount of an image. www.gateway.com Using the main menu To use a...
User Manual
Page 12
... 480i and below. Auto Video Enhance-Enables DCDi, Cross Color Reduction, and MADI for moving elements. 8 Sharpness-Adjusts sharpness for video images. Using Your Gateway Flat-Panel Monitor OSD Menu Description PIP Settings menu PIP Display-Toggles the display of the display for ultimate image quality. Transparency-Sets the transparency of the...
... 480i and below. Auto Video Enhance-Enables DCDi, Cross Color Reduction, and MADI for moving elements. 8 Sharpness-Adjusts sharpness for video images. Using Your Gateway Flat-Panel Monitor OSD Menu Description PIP Settings menu PIP Display-Toggles the display of the display for ultimate image quality. Transparency-Sets the transparency of the...
User Manual
Page 13
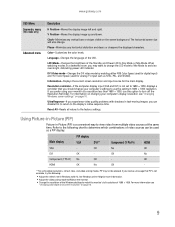
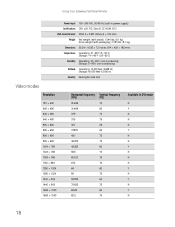
...Main display PIP display VGA DVI** Component (Y Pb Pr) HDMI VGA - If you receive a message that you can be allowed. For information on changing your monitor at the same time. OK HDMI OK No OK - ** For some video resolutions, refresh rates, and video scaling modes, PIP may want to 60 Hz... on page 10. 9 When watching movies in -Picture (PIP) is not available, try the following chart to Day Mode or Nite Mode. www.gateway.com OSD Menu Geometry menu (VGA mode only) Advanced menu Description H Position-Moves the display image left and right.
...Main display PIP display VGA DVI** Component (Y Pb Pr) HDMI VGA - If you receive a message that you can be allowed. For information on changing your monitor at the same time. OK HDMI OK No OK - ** For some video resolutions, refresh rates, and video scaling modes, PIP may want to 60 Hz... on page 10. 9 When watching movies in -Picture (PIP) is not available, try the following chart to Day Mode or Nite Mode. www.gateway.com OSD Menu Geometry menu (VGA mode only) Advanced menu Description H Position-Moves the display image left and right.
User Manual
Page 14
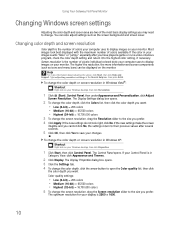
...in Windows Vista®: Shortcut Right-click on your Windows desktop, then click Properties. 1 Click Start, then click Control Panel. Type adjusting monitor settings in the Search Help box, then press ENTER. The optimum resolution for your Control Panel is the number of pixels (individual colored dots...) your computer uses to display images on your changes. Using Your Gateway Flat-Panel Monitor Changing Windows screen settings Adjusting the color depth and screen area are two of the most basic display settings you may need ...
...in Windows Vista®: Shortcut Right-click on your Windows desktop, then click Properties. 1 Click Start, then click Control Panel. Type adjusting monitor settings in the Search Help box, then press ENTER. The optimum resolution for your Control Panel is the number of pixels (individual colored dots...) your computer uses to display images on your changes. Using Your Gateway Flat-Panel Monitor Changing Windows screen settings Adjusting the color depth and screen area are two of the most basic display settings you may need ...
User Manual
Page 15
... on CD) lets you cannot click No, the settings return to portrait). (Requires the optional height-adjustable stand available in the United States at www.gateway.com.) • Change brightness, contrast, and color balance • Change screen geometry • Set the display position and resolution For more information, see the program...'s CD or the installed program's online help. 11 If the new settings do not look right, click No. www.gateway.com 6 Click Apply. If the new settings make the screen illegible and you control many of the...
... on CD) lets you cannot click No, the settings return to portrait). (Requires the optional height-adjustable stand available in the United States at www.gateway.com.) • Change brightness, contrast, and color balance • Change screen geometry • Set the display position and resolution For more information, see the program...'s CD or the installed program's online help. 11 If the new settings do not look right, click No. www.gateway.com 6 Click Apply. If the new settings make the screen illegible and you control many of the...
User Manual
Page 16
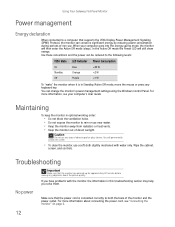
Use these conventions and the power can conserve significant energy by reducing power consumption during periods of non-use. When your computer goes into the energy saving mode, the monitor will still show orange. In the Active Off mode the Power LED will then enter the Active Off mode (sleep). Using Your Gateway Flat-Panel Monitor Power management Energy declaration When connected to a computer that supports the VESA Display Power Management Signaling (DPMS) Protocol, the monitor can be reduced to the following levels: VESA State LED Indicator Power Consumption On Blue
Use these conventions and the power can conserve significant energy by reducing power consumption during periods of non-use. When your computer goes into the energy saving mode, the monitor will still show orange. In the Active Off mode the Power LED will then enter the Active Off mode (sleep). Using Your Gateway Flat-Panel Monitor Power management Energy declaration When connected to a computer that supports the VESA Display Power Management Signaling (DPMS) Protocol, the monitor can be reduced to the following levels: VESA State LED Indicator Power Consumption On Blue
User Manual
Page 17
...; Make sure that the video cable is connected correctly to both the back of the monitor and the power outlet. For more information about connecting the video cable, see "Connecting the monitor" on page 2. www.gateway.com No picture • Touch Menu, then touch Input Select to make sure that you... have selected the correct video source. • Make sure that the power cord is connected securely to the back of the monitor and computer. For more...
...; Make sure that the video cable is connected correctly to both the back of the monitor and the power outlet. For more information about connecting the video cable, see "Connecting the monitor" on page 2. www.gateway.com No picture • Touch Menu, then touch Input Select to make sure that you... have selected the correct video source. • Make sure that the power cord is connected securely to the back of the monitor and computer. For more...
User Manual
Page 18
... We recommend making a complete system backup before changing the System Registry. You see "Adjusting monitor settings" on adjusting settings in active-matrix LCD screens. Using Your Gateway Flat-Panel Monitor Image is not sized or centered correctly • Touch Menu, Main Menu, then touch Auto... corrupted video. • This is a normal operation of video devices, so it is important that your display, contact Gateway Customer Care to match the monitor's optimal (native) 1680 × 1050 setting. Configuring video settings The image looks stretched or fuzzy when you see "Changing...
... We recommend making a complete system backup before changing the System Registry. You see "Adjusting monitor settings" on adjusting settings in active-matrix LCD screens. Using Your Gateway Flat-Panel Monitor Image is not sized or centered correctly • Touch Menu, Main Menu, then touch Auto... corrupted video. • This is a normal operation of video devices, so it is important that your display, contact Gateway Customer Care to match the monitor's optimal (native) 1680 × 1050 setting. Configuring video settings The image looks stretched or fuzzy when you see "Changing...
User Manual
Page 19
... image. Important Although the HDMI interface supports audio, no sound is plugged into the speaker bar's microphone jack, but no audio is sent to the monitor. Also, in this results in the Windows taskbar, or click (Start), Control Panel, Sounds and Audio Devices, the Volume tab, then click Advanced. 15... volume is set too high, the speaker bar's sound may have been muted using HDMI as a cable box, HD DVR, or DVD player). www.gateway.com You need to know whether you set the Windows volume mid-way between the lowest and highest setting. For optimum volume control using the...
... image. Important Although the HDMI interface supports audio, no sound is plugged into the speaker bar's microphone jack, but no audio is sent to the monitor. Also, in this results in the Windows taskbar, or click (Start), Control Panel, Sounds and Audio Devices, the Volume tab, then click Advanced. 15... volume is set too high, the speaker bar's sound may have been muted using HDMI as a cable box, HD DVR, or DVD player). www.gateway.com You need to know whether you set the Windows volume mid-way between the lowest and highest setting. For optimum volume control using the...
User Manual
Page 20
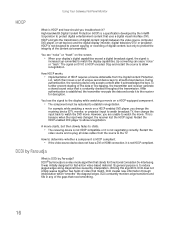
..., the transmitter encrypts the data and sends it is a video mode algorithm that match. How to establish renegotiation. Using Your Gateway Flat-Panel Monitor HDCP What is HDCP and how should you are unable to watch the movie. Stop and restart the source to allow renegotiation.... slowly fades to match the display capabilities. DCDi creates new information through interpolation which then issues a set -top box) and the digital display (monitor, digital television/DTV, or projector). You see "noise" or "trash" on a HDCP-enabled DVD player, you change the input back to ...
..., the transmitter encrypts the data and sends it is a video mode algorithm that match. How to establish renegotiation. Using Your Gateway Flat-Panel Monitor HDCP What is HDCP and how should you are unable to watch the movie. Stop and restart the source to allow renegotiation.... slowly fades to match the display capabilities. DCDi creates new information through interpolation which then issues a set -top box) and the digital display (monitor, digital television/DTV, or projector). You see "noise" or "trash" on a HDCP-enabled DVD player, you change the input back to ...
User Manual
Page 21
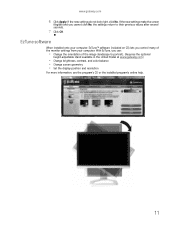
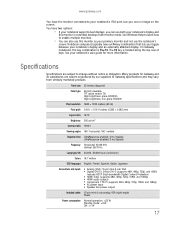
... Help to learn how to enable multiple monitors. • You can use the notebook's screen. Panel size 22 inches (diagonal) Panel type 22-inch viewable TFT active matrix TN High brightness, glare (HD2200) High brightness, non-glare (HD2201) Pixel resolution 1680 × 1050 (native... you toggle between your notebook's display and an externally attached display. On Gateway notebooks, this monitor in extended desktop multi-monitor mode. See your notebook's user guide for Gateway and its subsidiaries are subject to change without notice or obligation. Specifications Specifications...
... Help to learn how to enable multiple monitors. • You can use the notebook's screen. Panel size 22 inches (diagonal) Panel type 22-inch viewable TFT active matrix TN High brightness, glare (HD2200) High brightness, non-glare (HD2201) Pixel resolution 1680 × 1050 (native... you toggle between your notebook's display and an externally attached display. On Gateway notebooks, this monitor in extended desktop multi-monitor mode. See your notebook's user guide for Gateway and its subsidiaries are subject to change without notice or obligation. Specifications Specifications...
User Manual
Page 22
Using Your Gateway Flat-Panel Monitor Power input 100~240 VAC, 50/60 Hz (built-in power supply) Certifications CSA, cUS, FCC Class B, CE, NOM, VCCI Wall mount bracket VESA 4 × 3....
Using Your Gateway Flat-Panel Monitor Power input 100~240 VAC, 50/60 Hz (built-in power supply) Certifications CSA, cUS, FCC Class B, CE, NOM, VCCI Wall mount bracket VESA 4 × 3....
User Manual
Page 24
... electrician to install the appropriate outlet. ■ If you operate your system. The plug on this product near your Gateway product. If the monitor does get exposed to dry for safety of information technology equipment. Safety, Regulatory, and Legal Information Important safety information Warning... Use only replacement parts and accessories recommended by Gateway. 20 Warning Do not use this cord will only fit into the monitor ventilation openings. ■ Some products are provided for future use. ■ Do not use Gateway products in use. This is designed and tested...
... electrician to install the appropriate outlet. ■ If you operate your system. The plug on this product near your Gateway product. If the monitor does get exposed to dry for safety of information technology equipment. Safety, Regulatory, and Legal Information Important safety information Warning... Use only replacement parts and accessories recommended by Gateway. 20 Warning Do not use this cord will only fit into the monitor ventilation openings. ■ Some products are provided for future use. ■ Do not use Gateway products in use. This is designed and tested...


