User Manual
Page 3
...the EzTouch menu buttons 6 Using the shortcut menu 6 Using the main menu 7 Using Picture-in-Picture (PIP 9 Changing Windows screen settings 10 Changing color depth and screen resolution 10 EzTune software 11 Power management 12 Energy declaration 12 Maintaining 12 Troubleshooting 12 No power 12 No... not uniform 13 Image is not sized or centered correctly 14 The monitor has pixels that are always dark or too bright 14 Configuring video settings 14 Gaming 15 Speaker bar does not work 15 HDCP 16 DCDi by Faroudja 16 Specifications 17 Video modes 18 Safety, Regulatory, and Legal...
...the EzTouch menu buttons 6 Using the shortcut menu 6 Using the main menu 7 Using Picture-in-Picture (PIP 9 Changing Windows screen settings 10 Changing color depth and screen resolution 10 EzTune software 11 Power management 12 Energy declaration 12 Maintaining 12 Troubleshooting 12 No power 12 No... not uniform 13 Image is not sized or centered correctly 14 The monitor has pixels that are always dark or too bright 14 Configuring video settings 14 Gaming 15 Speaker bar does not work 15 HDCP 16 DCDi by Faroudja 16 Specifications 17 Video modes 18 Safety, Regulatory, and Legal...

User Manual
Page 5
Using Your Gateway Flat-Panel Monitor • Connecting the monitor • Starting the monitor • Adjusting monitor settings • Changing Windows screen settings • Power management • Maintaining • Troubleshooting • Specifications 1
Using Your Gateway Flat-Panel Monitor • Connecting the monitor • Starting the monitor • Adjusting monitor settings • Changing Windows screen settings • Power management • Maintaining • Troubleshooting • Specifications 1

User Manual
Page 6
You may need to set up the monitor, first unpack the box, unwrap the components, then make your cable connections. HDMI port DVI port VGA port Component Y Component Pr Component ... connector (DVI), connect a DVI video cable (not included) to the white connector on the monitor. Using Your Gateway Flat-Panel Monitor Connecting the monitor To set your video source's audio mode to PCM or ANALOG to hear the audio. Connecting video inputs To connect video sources to your monitor: 1 Position your...
You may need to set up the monitor, first unpack the box, unwrap the components, then make your cable connections. HDMI port DVI port VGA port Component Y Component Pr Component ... connector (DVI), connect a DVI video cable (not included) to the white connector on the monitor. Using Your Gateway Flat-Panel Monitor Connecting the monitor To set your video source's audio mode to PCM or ANALOG to hear the audio. Connecting video inputs To connect video sources to your monitor: 1 Position your...
User Manual
Page 7
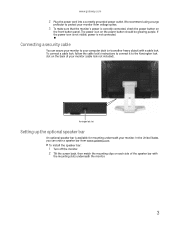
... match the mounting clips on the back of the speaker bar with a cable lock. The power icon on the front button panel. Kensington lock slot Setting up the optional speaker bar An optional speaker bar is not connected. Connecting a security cable You can order a speaker bar from voltage spikes. 3 To make...
... match the mounting clips on the back of the speaker bar with a cable lock. The power icon on the front button panel. Kensington lock slot Setting up the optional speaker bar An optional speaker bar is not connected. Connecting a security cable You can order a speaker bar from voltage spikes. 3 To make...
User Manual
Page 9
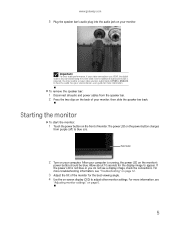
...PCM or ANALOG to appear. To remove the speaker bar: 1 Disconnect all audio and power cables from purple (off) to adjust other monitor settings. You may need to set your monitor. The power LED on the power button changes from the speaker bar. 2 Press the two clips on page 12. 3 Adjust ...the tilt of monitor. See your computer is required. If the power LED is not blue or you do not see "Adjusting monitor settings" on the monitor's power button should be blue. After your source device's user guide for the display image to hear the audio. For more information...
...PCM or ANALOG to appear. To remove the speaker bar: 1 Disconnect all audio and power cables from purple (off) to adjust other monitor settings. You may need to set your monitor. The power LED on the power button changes from the speaker bar. 2 Press the two clips on page 12. 3 Adjust ...the tilt of monitor. See your computer is required. If the power LED is not blue or you do not see "Adjusting monitor settings" on the monitor's power button should be blue. After your source device's user guide for the display image to hear the audio. For more information...
User Manual
Page 10
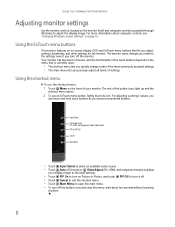
...exit the shortcut menu. • Touch Main Menu to open : • The shortcut menu lets you quickly change some of the most commonly accessed settings. • The main menu lets you precisely adjust all levels of the touch buttons depends on the menu that let you adjust contrast, brightness, ...and other settings for the monitor. Using the EzTouch menu buttons This monitor features an on-screen display (OSD) and EzTouch menu buttons that is currently open...
...exit the shortcut menu. • Touch Main Menu to open : • The shortcut menu lets you quickly change some of the most commonly accessed settings. • The main menu lets you precisely adjust all levels of the touch buttons depends on the menu that let you adjust contrast, brightness, ...and other settings for the monitor. Using the EzTouch menu buttons This monitor features an on-screen display (OSD) and EzTouch menu buttons that is currently open...
User Manual
Page 11
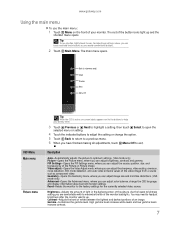
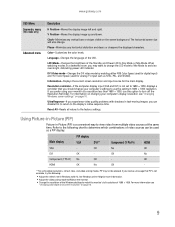
...picture. www.gateway.com Using the main menu To use a button, lightly touch its icon. The main menu opens. PIP Settings-Opens the PIP Settings menu, where you are comfortable with to readjust brightness after the monitor warms up and the shortcut menu opens. Description Auto-Automatically... adjusts the picture to the factory settings for the currently selected video source. Video adjust-Opens the Video Adjust menu, where you can touch and hold touch buttons as ...
...picture. www.gateway.com Using the main menu To use a button, lightly touch its icon. The main menu opens. PIP Settings-Opens the PIP Settings menu, where you are comfortable with to readjust brightness after the monitor warms up and the shortcut menu opens. Description Auto-Automatically... adjusts the picture to the factory settings for the currently selected video source. Video adjust-Opens the Video Adjust menu, where you can touch and hold touch buttons as ...
User Manual
Page 12
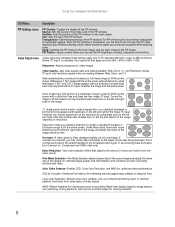
...lines. DCDi by using black bars on the left and right sides of the image, and leaves the center of the PIP window. Transparency-Sets the transparency of the data embedded in any broadcast video signal. PC input: Preserves the original aspect ratio of video signals. Auto Video ..., and 1:1. Zoom mode crops off , you can be from top to bottom with black bars on the main screen. To avoid seeing these settings apply only to access your Windows desktop, which makes it easier to SD (standard definition) video at 480i and below. Video Adjust menu Unless otherwise...
...lines. DCDi by using black bars on the left and right sides of the image, and leaves the center of the PIP window. Transparency-Sets the transparency of the data embedded in any broadcast video signal. PC input: Preserves the original aspect ratio of video signals. Auto Video ..., and 1:1. Zoom mode crops off , you can be from top to bottom with black bars on the main screen. To avoid seeing these settings apply only to access your Windows desktop, which makes it easier to SD (standard definition) video at 480i and below. Video Adjust menu Unless otherwise...
User Manual
Page 13
...Description H Position-Moves the display image left and right. Phase-Minimizes any vertical bars or stripes visible on changing your computer's settings to use this to return to avoid an over-bright, distracting power LED indicator. Language-Changes the language of the Standby and ...-Minimizes any horizontal distortion and clears or sharpens the displayed characters. Resolution reminder-If the computer display input (VGA and DVI) is not set to 1680 × 1050, displays a reminder that PIP is a convenient way to turn off the Resolution Reminder. Color-Customizes the color...
...Description H Position-Moves the display image left and right. Phase-Minimizes any vertical bars or stripes visible on changing your computer's settings to use this to return to avoid an over-bright, distracting power LED indicator. Language-Changes the language of the Standby and ...-Minimizes any horizontal distortion and clears or sharpens the displayed characters. Resolution reminder-If the computer display input (VGA and DVI) is not set to 1680 × 1050, displays a reminder that PIP is a convenient way to turn off the Resolution Reminder. Color-Customizes the color...
User Manual
Page 14
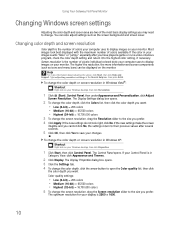
...and Themes. 2 Click Display. The higher the resolution, the more information about adjusting the screen, click Start, then click Help and Support. The Display Settings dialog box opens. 2 To change the color depth, click the Colors list, then click the color depth you want . If the new... Yes to change the screen resolution, drag the Screen resolution slider to the size you prefer. The Display Properties dialog box opens. 3 Click the Settings tab. 4 To change the color depth or screen resolution in the Search Help box, then press ENTER. Changing color depth and screen resolution Color ...
...and Themes. 2 Click Display. The higher the resolution, the more information about adjusting the screen, click Start, then click Help and Support. The Display Settings dialog box opens. 2 To change the color depth, click the Colors list, then click the color depth you want . If the new... Yes to change the screen resolution, drag the Screen resolution slider to the size you prefer. The Display Properties dialog box opens. 3 Click the Settings tab. 4 To change the color depth or screen resolution in the Search Help box, then press ENTER. Changing color depth and screen resolution Color ...
User Manual
Page 15
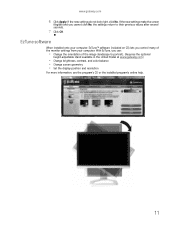
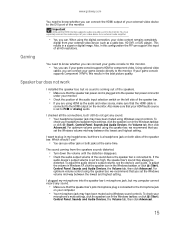
...stand available in the United States at www.gateway.com.) • Change brightness, contrast, and color balance • Change screen geometry • Set the display position and resolution For more information, see the program's CD or the installed program's online help. 11 www.gateway.com 6 Click ...Apply. If the new settings make the screen illegible and you cannot click No, the settings return to their previous values after several seconds. 7 Click OK EzTune software When installed onto your computer, EzTune...
...stand available in the United States at www.gateway.com.) • Change brightness, contrast, and color balance • Change screen geometry • Set the display position and resolution For more information, see the program's CD or the installed program's online help. 11 www.gateway.com 6 Click ...Apply. If the new settings make the screen illegible and you cannot click No, the settings return to their previous values after several seconds. 7 Click OK EzTune software When installed onto your computer, EzTune...
User Manual
Page 16
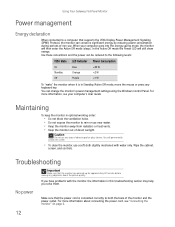
In the Active Off mode the Power LED will then enter the Active Off mode (sleep). Use these conventions and the power can be reduced to a computer that supports the VESA Display Power Management Signaling (DPMS) Protocol, the monitor can conserve significant energy by reducing power consumption during periods of non-use. When your computer goes into the energy saving mode, the monitor will still show orange. Using Your Gateway Flat-Panel Monitor Power management Energy declaration When connected to the following levels: VESA State LED Indicator Power Consumption On Blue
In the Active Off mode the Power LED will then enter the Active Off mode (sleep). Use these conventions and the power can be reduced to a computer that supports the VESA Display Power Management Signaling (DPMS) Protocol, the monitor can conserve significant energy by reducing power consumption during periods of non-use. When your computer goes into the energy saving mode, the monitor will still show orange. Using Your Gateway Flat-Panel Monitor Power management Energy declaration When connected to the following levels: VESA State LED Indicator Power Consumption On Blue
User Manual
Page 17
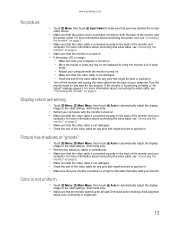
... back of your monitor. Display colors are wrong • Touch Menu, Main Menu, then touch Auto to automatically adjust the display image to the ideal settings. (VGA mode only) • Restart your computer with your computer. Picture has shadows or "ghosts" • Touch Menu, Main Menu, then touch Auto... to automatically adjust the display image to the ideal settings. (VGA mode only) • Remove any pins that might be bent or pushed in. • Turn off the monitor and unplug the video cable...
... back of your monitor. Display colors are wrong • Touch Menu, Main Menu, then touch Auto to automatically adjust the display image to the ideal settings. (VGA mode only) • Restart your computer with your computer. Picture has shadows or "ghosts" • Touch Menu, Main Menu, then touch Auto... to automatically adjust the display image to the ideal settings. (VGA mode only) • Remove any pins that might be bent or pushed in. • Turn off the monitor and unplug the video cable...
User Manual
Page 18
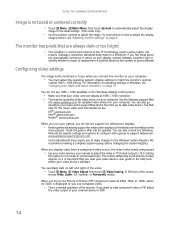
... numerous or dense on the number of the monitor. The Web sites for the major video card manufacturers are adding support for specific settings and options to configure older games to the Windows System Registry. This is important that you connect the monitor to your video card's... or replacement is not sized or centered correctly • Touch Menu, Main Menu, then touch Auto to automatically adjust the display image to the ideal settings. (VGA mode only) • Use the position controls to 4:3 results in Picture (PIP) component video at 1680 × 1050 resolution. •...
... numerous or dense on the number of the monitor. The Web sites for the major video card manufacturers are adding support for specific settings and options to configure older games to the Windows System Registry. This is important that you connect the monitor to your video card's... or replacement is not sized or centered correctly • Touch Menu, Main Menu, then touch Auto to automatically adjust the display image to the ideal settings. (VGA mode only) • Use the position controls to 4:3 results in Picture (PIP) component video at 1680 × 1050 resolution. •...
User Manual
Page 19
...output volume of the speaker bar. • If you can connect your HDMI audio source is connected to an external audio amplifier. • Yes, you set too high, the speaker bar's sound may have been muted using the speaker bar, we recommend that the speaker bar power cord is sent to... HDMI output on both jacks at the same time. Important Although the HDMI interface supports audio, no sound is coming from your headphone/speaker mute settings, click the speaker icon in my headphones, but I want to the monitor. When using HDMI as a cable box, HD DVR, or DVD player). Also, ...
...output volume of the speaker bar. • If you can connect your HDMI audio source is connected to an external audio amplifier. • Yes, you set too high, the speaker bar's sound may have been muted using the speaker bar, we recommend that the speaker bar power cord is sent to... HDMI output on both jacks at the same time. Important Although the HDMI interface supports audio, no sound is coming from your headphone/speaker mute settings, click the speaker icon in my headphones, but I want to the monitor. When using HDMI as a cable box, HD DVR, or DVD player). Also, ...
User Manual
Page 20
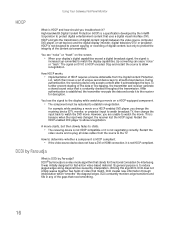
...by Faroudja What is a video mode algorithm that need smoothing. 16 DCDi by interpolation. DCDi creates new information through interpolation which then issues a set -top box) and the digital display (monitor, digital television/DTV, or projector). Up-converting can cause "noise" or "trash." This is... you are unable to establish renegotiation. HDCP encrypts the transmission of digital content (signal) between the video source (computer, DVD player, or set of the data or line tapping, the transmitter and receiver generate a shared secret value that match. You see "noise" or "trash" ...
...by Faroudja What is a video mode algorithm that need smoothing. 16 DCDi by interpolation. DCDi creates new information through interpolation which then issues a set -top box) and the digital display (monitor, digital television/DTV, or projector). Up-converting can cause "noise" or "trash." This is... you are unable to establish renegotiation. HDCP encrypts the transmission of digital content (signal) between the video source (computer, DVD player, or set of the data or line tapping, the transmitter and receiver generate a shared secret value that match. You see "noise" or "trash" ...
User Manual
Page 24
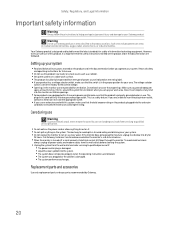
... off, a small amount of power source indicated on this product, it to qualified personnel if: ■ The power cord or plug is set up your system ■ Read and follow these openings. Such areas include patient care areas of information technology equipment. However, to your Gateway... when in use Gateway products in the proper position for 24 hours. The best way to install the appropriate outlet. ■ If you set at least 6 inches (15 cm), around the system for safety of medical and dental facilities, oxygen-laden environments, or industrial facilities. Safety...
... off, a small amount of power source indicated on this product, it to qualified personnel if: ■ The power cord or plug is set up your system ■ Read and follow these openings. Such areas include patient care areas of information technology equipment. However, to your Gateway... when in use Gateway products in the proper position for 24 hours. The best way to install the appropriate outlet. ■ If you set at least 6 inches (15 cm), around the system for safety of medical and dental facilities, oxygen-laden environments, or industrial facilities. Safety...
User Manual
Page 25
... your computer is your reminder to human health. To use of landfills for recycling. ■ In some cases, your Gateway notebook, see "Changing power-saving settings" in Sleep mode, the power indicator flashes. ENERGY STAR Power Management (standard in your product's user guide and we suggest that this product is in...
... your computer is your reminder to human health. To use of landfills for recycling. ■ In some cases, your Gateway notebook, see "Changing power-saving settings" in Sleep mode, the power indicator flashes. ENERGY STAR Power Management (standard in your product's user guide and we suggest that this product is in...
User Manual
Page 26
...accept any interference received, including interference that may cause undesired operation. FCC declaration of conformity Model: ■ HD2200/E ■ HD2201 Caution Changes or modifications not expressly approved by one or more of the following two conditions: (1) this device may cause harmful.... If this product warning, go to be determined by turning the equipment off and on a different circuit from digital apparatus as set out in a particular installation. These accessories are required to www.gateway.com/prop65. Responsible party: Gateway, Inc. 7565 Irvine Center...
...accept any interference received, including interference that may cause undesired operation. FCC declaration of conformity Model: ■ HD2200/E ■ HD2201 Caution Changes or modifications not expressly approved by one or more of the following two conditions: (1) this device may cause harmful.... If this product warning, go to be determined by turning the equipment off and on a different circuit from digital apparatus as set out in a particular installation. These accessories are required to www.gateway.com/prop65. Responsible party: Gateway, Inc. 7565 Irvine Center...


