
User Manual
Page 2
Acer Projector K135/K135P/K135S/K135i/L221/LK-W12/K132/K132P/L221F/LK-W12L Series Model number Serial number Date of purchase Place of purchase Acer and the Acer logo are trademarks or registered trademarks of Acer Incorporated. "HDMI™, the HDMI logo and High-Definition Multimedia Interface are registered trademarks of HDMI Licensing LLC." All Rights Reserved. Such changes will be reproduced, stored in a retrieval system...
Acer Projector K135/K135P/K135S/K135i/L221/LK-W12/K132/K132P/L221F/LK-W12L Series Model number Serial number Date of purchase Place of purchase Acer and the Acer logo are trademarks or registered trademarks of Acer Incorporated. "HDMI™, the HDMI logo and High-Definition Multimedia Interface are registered trademarks of HDMI Licensing LLC." All Rights Reserved. Such changes will be reproduced, stored in a retrieval system...
User Manual
Page 3
... these instructions carefully. Use a damp cloth for future reference. These openings must not be placed near water. • Do not place this document for cleaning. If the product falls, it from the electrical outlet. Follow all power cords from the wall outlet before removing the power supply unit from the projector. • If the system has multiple sources of power, disconnect power from...
... these instructions carefully. Use a damp cloth for future reference. These openings must not be placed near water. • Do not place this document for cleaning. If the product falls, it from the electrical outlet. Follow all power cords from the wall outlet before removing the power supply unit from the projector. • If the system has multiple sources of power, disconnect power from...

User Manual
Page 5
... servicing to qualified service personnel when: • the power cord or plug is damaged, cut or frayed • liquid was spilled into the projector's lens when the light is necessary. • Locations where temperatures may become excessively high, such as opening or removing covers may contain small parts. Refer all windows rolled up. • Locations where excessive humidity, dust, or cigarette smoke may result in performance, indicating...
... servicing to qualified service personnel when: • the power cord or plug is damaged, cut or frayed • liquid was spilled into the projector's lens when the light is necessary. • Locations where temperatures may become excessively high, such as opening or removing covers may contain small parts. Refer all windows rolled up. • Locations where excessive humidity, dust, or cigarette smoke may result in performance, indicating...
User Manual
Page 6
... temperature inside which becomes hot. • Clean the air filter frequently if have. In this product to break or drop it. There are dangerous high voltages inside may hurt you . The best way is operating. It may cause the projector to the sun. It may hurt your eyes. • Always open the lens shutter or remove the lens cap when the projector...
... temperature inside which becomes hot. • Clean the air filter frequently if have. In this product to break or drop it. There are dangerous high voltages inside may hurt you . The best way is operating. It may cause the projector to the sun. It may hurt your eyes. • Always open the lens shutter or remove the lens cap when the projector...
User Manual
Page 8
... maintenance as this user's guide to maximize the life of your eyes. • To reduce the risk of time. Warning: • Do not look into the projector's lens when the light is on the projector first and then the signal sources. • Do not use lens cap when projector is not being used for ventilation. • Use abrasive cleaners, waxes or solvents to clean the unit. •...
... maintenance as this user's guide to maximize the life of your eyes. • To reduce the risk of time. Warning: • Do not look into the projector's lens when the light is on the projector first and then the signal sources. • Do not use lens cap when projector is not being used for ventilation. • Use abrasive cleaners, waxes or solvents to clean the unit. •...
User Manual
Page 9
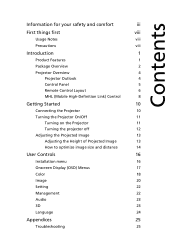
... Features 1 Package Overview 2 Projector Overview 4 Projector Outlook 4 Control Panel 5 Remote Control Layout 6 MHL (Mobile High-Definition Link) Control 8 Getting Started 10 Connecting the Projector 10 Turning the Projector On/Off 11 Turning on the Projector 11 Turning the projector off 12 Adjusting the Projected Image 13 Adjusting the Height of Projected Image 13 How to optimize image size and distance 14 User Controls 16 Installation menu 16 Onscreen Display (OSD) Menus 17 Color 18 Image 20 Setting 22 Management 22 Audio 23 3D 23 Language...
... Features 1 Package Overview 2 Projector Overview 4 Projector Outlook 4 Control Panel 5 Remote Control Layout 6 MHL (Mobile High-Definition Link) Control 8 Getting Started 10 Connecting the Projector 10 Turning the Projector On/Off 11 Turning on the Projector 11 Turning the projector off 12 Adjusting the Projected Image 13 Adjusting the Height of Projected Image 13 How to optimize image size and distance 14 User Controls 16 Installation menu 16 Onscreen Display (OSD) Menus 17 Color 18 Image 20 Setting 22 Management 22 Audio 23 3D 23 Language...
User Manual
Page 11
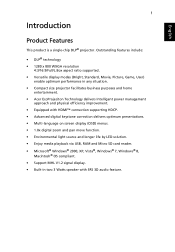
... size projector facilitates business purposes and home entertainment. • Acer EcoProjeciton Technology delivers Intelligent power management approach and physical efficiency improvement. • Equipped with HDMI™ connection supporting HDCP. • Advanced digital keystone correction delivers optimum presentations. • Multi-language on screen display (OSD) menus. • 1.0x digital zoom and pan move function. • Environmental light source and longer life by LED solution. • Enjoy media playback via USB...
... size projector facilitates business purposes and home entertainment. • Acer EcoProjeciton Technology delivers Intelligent power management approach and physical efficiency improvement. • Equipped with HDMI™ connection supporting HDCP. • Advanced digital keystone correction delivers optimum presentations. • Multi-language on screen display (OSD) menus. • 1.0x digital zoom and pan move function. • Environmental light source and longer life by LED solution. • Enjoy media playback via USB...
User Manual
Page 15
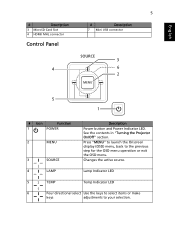
... Onscreen display (OSD) menu, back to your selection. Changes the active source. 4 LAMP Lamp Indicator LED 5 TEMP Temp Indicator LED 6 Four directional select Use the keys to select items or make keys adjustments to the previous step for the OSD menu operation or exit the OSD menu. English # Description 3 MicroSD Card Slot 4 HDMI/ MHL connector Control Panel 4 5 # Description 7 Mini USB connector 3 6 2 5 1 # Icon Function 1 POWER 2 MENU 3 SOURCE Description Power button and Power Indicator LED. See the contents in "Turning the Projector On...
... Onscreen display (OSD) menu, back to your selection. Changes the active source. 4 LAMP Lamp Indicator LED 5 TEMP Temp Indicator LED 6 Four directional select Use the keys to select items or make keys adjustments to the previous step for the OSD menu operation or exit the OSD menu. English # Description 3 MicroSD Card Slot 4 HDMI/ MHL connector Control Panel 4 5 # Description 7 Mini USB connector 3 6 2 5 1 # Icon Function 1 POWER 2 MENU 3 SOURCE Description Power button and Power Indicator LED. See the contents in "Turning the Projector On...
User Manual
Page 16
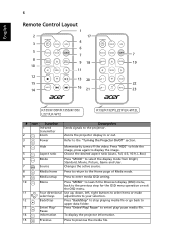
... OSD menu. Four directional Use up, down, left, right buttons to select items or make select keys adjustments to the "Turning the Projector On/Off" section. 4 5 6 7 8 9 10 HIDE RATIO MODE SOURCE MEDIA HOME MEDIA SETUP MENU 11 12 BACK 13 ENTER 14 INFO 15 Hide Aspect ratio Momentarily turns off the video. Refer to your selection. Changes the active source. Information To display the projector information. English 6 Remote Control...
... OSD menu. Four directional Use up, down, left, right buttons to select items or make select keys adjustments to the "Turning the Projector On/Off" section. 4 5 6 7 8 9 10 HIDE RATIO MODE SOURCE MEDIA HOME MEDIA SETUP MENU 11 12 BACK 13 ENTER 14 INFO 15 Hide Aspect ratio Momentarily turns off the video. Refer to your selection. Changes the active source. Information To display the projector information. English 6 Remote Control...
User Manual
Page 21
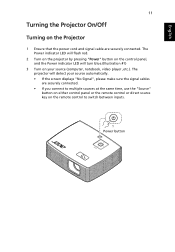
... projector will turn blue.(Illustration #1) 3 Turn on your source automatically. • If the screen displays "No Signal", please make sure the signal cables are securely connected. • If you connect to switch between inputs. 1 Power button English 11 Turning the Projector On/Off Turning on the remote control to multiple sources at the same time, use the "Source" button on either control panel or the remote control or direct source key on the Projector 1 Ensure that the power cord and signal cable are securely connected. The Power indicator LED will flash red. 2 Turn...
... projector will turn blue.(Illustration #1) 3 Turn on your source automatically. • If the screen displays "No Signal", please make sure the signal cables are securely connected. • If you connect to switch between inputs. 1 Power button English 11 Turning the Projector On/Off Turning on the remote control to multiple sources at the same time, use the "Source" button on either control panel or the remote control or direct source key on the Projector 1 Ensure that the power cord and signal cable are securely connected. The Power indicator LED will flash red. 2 Turn...
User Manual
Page 22
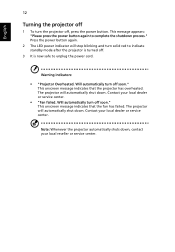
... projector will automatically shut down. English 12 Turning the projector off 1 To turn the projector off . 3 It is now safe to unplug the power cord. Press the power button again. 2 The LED power indicator will stop blinking and turn solid red to complete the shutdown process." Contact your local dealer or service center. Contact your local dealer or service center. • "Fan failed. This onscreen message indicates that the projector has overheated. The projector...
... projector will automatically shut down. English 12 Turning the projector off 1 To turn the projector off . 3 It is now safe to unplug the power cord. Press the power button again. 2 The LED power indicator will stop blinking and turn solid red to complete the shutdown process." Contact your local dealer or service center. Contact your local dealer or service center. • "Fan failed. This onscreen message indicates that the projector has overheated. The projector...
User Manual
Page 24
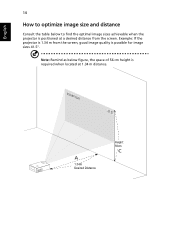
screen size 41.5" A 1.34m Desired Distance Height: 56cm C English 14 How to find the optimal image sizes achievable when the projector is required when located at a desired distance from the screen, good image quality is possible for image sizes 41.5". Note: Remind as below to optimize image size and distance Consult the table below figure, the space of 56 cm height is positioned at 1.34 m distance. Example: If the projector is 1.34 m from the screen.
screen size 41.5" A 1.34m Desired Distance Height: 56cm C English 14 How to find the optimal image sizes achievable when the projector is required when located at a desired distance from the screen, good image quality is possible for image sizes 41.5". Note: Remind as below to optimize image size and distance Consult the table below figure, the space of 56 cm height is positioned at 1.34 m distance. Example: If the projector is 1.34 m from the screen.
User Manual
Page 26
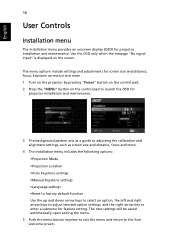
... when the message "No signal input" is displayed on the control pad to launch the OSD for screen size and distance, focus, keystone correction and more . 4 The Installation menu includes the following options: •Projection Mode •Projection Location •Auto Keystone settings •Manual Keystone settings •Language settings •Reset to factory default function Use the up and down arrow keys to select an option, the left and right arrow keys to adjust selected option settings, and...
... when the message "No signal input" is displayed on the control pad to launch the OSD for screen size and distance, focus, keystone correction and more . 4 The Installation menu includes the following options: •Projection Mode •Projection Location •Auto Keystone settings •Manual Keystone settings •Language settings •Reset to factory default function Use the up and down arrow keys to select an option, the left and right arrow keys to adjust selected option settings, and...
User Manual
Page 30
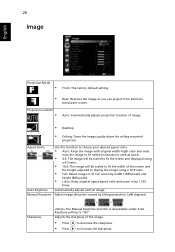
... signal aspect ratio and zoom in by tilting projection. (±40 degrees) Sharpness The Manual Keystone function is unavailable under Auto Keystone setting to increase the sharpness. Automatically adjusts vertical image. 20 Image English Projection Mode • Front: The factory default setting. • Projection Location • Rear: Reverses the image so you can project from behind a translucent screen. Adjust image distortion caused by 1.333 times. Adjusts the sharpness of the screen and the height adjusted to display the image using...
... signal aspect ratio and zoom in by tilting projection. (±40 degrees) Sharpness The Manual Keystone function is unavailable under Auto Keystone setting to increase the sharpness. Automatically adjusts vertical image. 20 Image English Projection Mode • Front: The factory default setting. • Projection Location • Rear: Reverses the image so you can project from behind a translucent screen. Adjust image distortion caused by 1.333 times. Adjusts the sharpness of the screen and the height adjusted to display the image using...

User Manual
Page 31
... image left. • Press to correct color display error. • Auto: Automatically adjust by information from player. • Limited Range: Prosess the input image as limited color range data. • Full Range: Prosess the input image as full color range data. Frequency "Frequency" changes the projector's refresh rate to match the frequency of the HDMI image data to move the image down. If you can see a vertical flickering bar in the projected image, use...
... image left. • Press to correct color display error. • Auto: Automatically adjust by information from player. • Limited Range: Prosess the input image as limited color range data. • Full Range: Prosess the input image as full color range data. Frequency "Frequency" changes the projector's refresh rate to match the frequency of the HDMI image data to move the image down. If you can see a vertical flickering bar in the projected image, use...

User Manual
Page 32
... helps to return normal mode. Management ECO Mode High Altitude Turn Off Mode Auto Shutdown LED Calibration Choose "On" to the factory default settings. Press the button and choose "Yes" to finish the white color fine tune process. Choose "Off" to adjust LED color performance. Operate the fans at full speed continuously to allow for 10 seconds to return the parameters on High Altitude mode. 22 Setting English Menu Location Reset Choose the menu location on the display screen...
... helps to return normal mode. Management ECO Mode High Altitude Turn Off Mode Auto Shutdown LED Calibration Choose "On" to the factory default settings. Press the button and choose "Yes" to finish the white color fine tune process. Choose "Off" to adjust LED color performance. Operate the fans at full speed continuously to allow for 10 seconds to return the parameters on High Altitude mode. 22 Setting English Menu Location Reset Choose the menu location on the display screen...
User Manual
Page 35
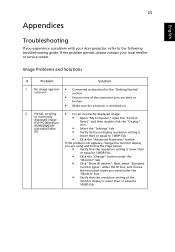
... choose the resolution mode you experience a problem with your Acer projector, refer to the following troubleshooting guide. If the problem still appears, change the monitor display you are bent or broken. • Make sure the projector is switched on. 2 Partial, scrolling • For an incorrectly displayed image: or incorrectly displayed image (For PC (Windows 95/98/2000/XP/ Vista/Win7/Win • Open "My Computer," open the "Control Panel," and then...
... choose the resolution mode you experience a problem with your Acer projector, refer to the following troubleshooting guide. If the problem still appears, change the monitor display you are bent or broken. • Make sure the projector is switched on. 2 Partial, scrolling • For an incorrectly displayed image: or incorrectly displayed image (For PC (Windows 95/98/2000/XP/ Vista/Win7/Win • Open "My Computer," open the "Control Panel," and then...
User Manual
Page 36
... difficulty changing resolutions or your monitor freezes, restart all equipment including the projector. 4 The screen of the notebook computer is not displaying your DVD player. • If you are using a Microsoft® Windows® based notebook: Some notebook PCs may need to make an adjustment. Refer to the or flickering "Image" section for more information. • Change the display color depth settings on the projector lens...
... difficulty changing resolutions or your monitor freezes, restart all equipment including the projector. 4 The screen of the notebook computer is not displaying your DVD player. • If you are using a Microsoft® Windows® based notebook: Some notebook PCs may need to make an adjustment. Refer to the or flickering "Image" section for more information. • Change the display color depth settings on the projector lens...

User Manual
Page 39
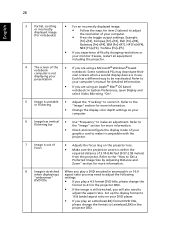
... --- ON Power LED BLUE --- --ON Quick Flashing --- --- ON Flashing ON --- --- ON Note: When power on Lamp retry Power button OFF; English 29 LED & Alarm Definition Listing LED Messages Message Input Power Plug Standy by Power buttom on , click any key, Menu/Up/Down/Left/Right key LED will all be trigger. ON --- ON ON 1sec --- ON --- Lamp (UP/Down LED) BLUE Flash On to OFF 100ms --- Standby Mode) Error (Thermal fail) Error (Fan Lock) Error (Lamp Break down) Menu BLUE --- --ON 1sec...
... --- ON Power LED BLUE --- --ON Quick Flashing --- --- ON Flashing ON --- --- ON Note: When power on Lamp retry Power button OFF; English 29 LED & Alarm Definition Listing LED Messages Message Input Power Plug Standy by Power buttom on , click any key, Menu/Up/Down/Left/Right key LED will all be trigger. ON --- ON ON 1sec --- ON --- Lamp (UP/Down LED) BLUE Flash On to OFF 100ms --- Standby Mode) Error (Thermal fail) Error (Fan Lock) Error (Lamp Break down) Menu BLUE --- --ON 1sec...
User Manual
Page 40
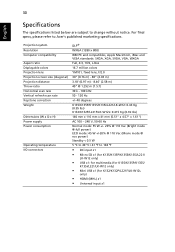
... specifications. For final specs, please refer to change without notice. Projection system Resolution Computer compatibility Aspect ratio Displayable colors Projection lens Projection screen size (diagonal) Projection distance Throw ratio Horizontal scan rate Vertical refresh scan rate Keystone correction Weight Dimensions (W x D x H) Power supply Power consumption Operating temperature I/O connectors DLP® WXGA (1280 x 800) IBM PC and compatibles, Apple Macintosh, iMac and VESA standards: SXGA, XGA, SVGA, VGA, WXGA Full, 4:3, 16:9, L.Box 16.7 million colors YM101, fixed lens...
... specifications. For final specs, please refer to change without notice. Projection system Resolution Computer compatibility Aspect ratio Displayable colors Projection lens Projection screen size (diagonal) Projection distance Throw ratio Horizontal scan rate Vertical refresh scan rate Keystone correction Weight Dimensions (W x D x H) Power supply Power consumption Operating temperature I/O connectors DLP® WXGA (1280 x 800) IBM PC and compatibles, Apple Macintosh, iMac and VESA standards: SXGA, XGA, SVGA, VGA, WXGA Full, 4:3, 16:9, L.Box 16.7 million colors YM101, fixed lens...


