
User Manual
Page 3
... LCD screen has 99.99% or more effective pixels. iii Special notes on the product. Cleaning your safety and comfort Safety instructions Read these guidelines when cleaning the monitor: • Always unplug the monitor before cleaning. • Use a soft cloth to make sure the flicker disappears. • You may remain after switching the image, when the same image is recovered slowly by changing the image or turning off...
... LCD screen has 99.99% or more effective pixels. iii Special notes on the product. Cleaning your safety and comfort Safety instructions Read these guidelines when cleaning the monitor: • Always unplug the monitor before cleaning. • Use a soft cloth to make sure the flicker disappears. • You may remain after switching the image, when the same image is recovered slowly by changing the image or turning off...
User Manual
Page 4
...Turn the volume down if you can hear it clearly and comfortably and without distortion. • After setting the volume level, do not increase it could result in installation unless proper ventilation is easily accessible and located as close to the equipment operator as they may touch dangerous voltage points or short-out parts that the power...stand or table. When you plug the power cord into the product. • To avoid dmage of power available, consult your dealer or local power company. • Do not allow anything to rest on a bed, sofa, rug or other similar surface. English...
...Turn the volume down if you can hear it clearly and comfortably and without distortion. • After setting the volume level, do not increase it could result in installation unless proper ventilation is easily accessible and located as close to the equipment operator as they may touch dangerous voltage points or short-out parts that the power...stand or table. When you plug the power cord into the product. • To avoid dmage of power available, consult your dealer or local power company. • Do not allow anything to rest on a bed, sofa, rug or other similar surface. English...
User Manual
Page 5
... grounded before inserting the power cord plug. Product servicing Do not attempt to service this product, make sure that the total rating of all servicing to replace the power cord set . Warning! Also, make sure that is not properly grounded may expose you need for details. If power strips are used with this product yourself, as opening or removing covers may result in a grounded power outlet. Using a power outlet that the total...
... grounded before inserting the power cord plug. Product servicing Do not attempt to service this product, make sure that the total rating of all servicing to replace the power cord set . Warning! Also, make sure that is not properly grounded may expose you need for details. If power strips are used with this product yourself, as opening or removing covers may result in a grounded power outlet. Using a power outlet that the total...
User Manual
Page 6
... atmosphere are covered by the operating instructions, since improper adjustment of used equipment, as grain, dust or metal powders. Areas with a potentially explosive atmosphere and obey all signs and instructions. Potentially explosive atmospheres include areas where you would normally be advised to turn off the device near depots, storage and distribution areas; English Note: Adjust only those controls that...
... atmosphere are covered by the operating instructions, since improper adjustment of used equipment, as grain, dust or metal powders. Areas with a potentially explosive atmosphere and obey all signs and instructions. Potentially explosive atmospheres include areas where you would normally be advised to turn off the device near depots, storage and distribution areas; English Note: Adjust only those controls that...
User Manual
Page 7
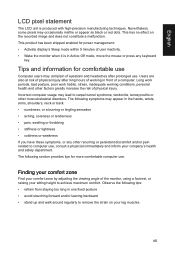
... black or red dots. Long work periods, bad posture, poor work habits, stress, inadequate working in front of a computer. Finding your comfort zone Find your comfort zone by adjusting the viewing angle of the monitor, using a footrest, or raising your sitting height to remove the strain on the recorded image and does not constitute a malfunction. Tips and information for power management: • Activate display's Sleep mode...
... black or red dots. Long work periods, bad posture, poor work habits, stress, inadequate working in front of a computer. Finding your comfort zone Find your comfort zone by adjusting the viewing angle of the monitor, using a footrest, or raising your sitting height to remove the strain on the recorded image and does not constitute a malfunction. Tips and information for power management: • Activate display's Sleep mode...
User Manual
Page 8
... a istant point. • Blink frequently to keep your display to an awkward viewing angle. • Avoid looking at the middle of the display. • Adjust the display brightness and/or contrast to make your eyes. Display • Keep your display clean. • Keep your head at a higher level than the top edge of the display so your eyes point downward when looking at bright light sources, such as a piece...
... a istant point. • Blink frequently to keep your display to an awkward viewing angle. • Avoid looking at the middle of the display. • Adjust the display brightness and/or contrast to make your eyes. Display • Keep your display clean. • Keep your head at a higher level than the top edge of the display so your eyes point downward when looking at bright light sources, such as a piece...
User Manual
Page 11
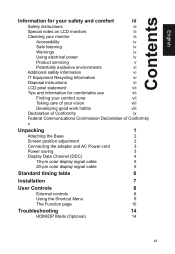
... zone vii Taking care of your vision viii Developing good work habits viii Declaration of Conformity ix Federal Communications Commission Declaration of Conformity x Unpacking 1 Attaching the Base 2 Screen position adjustment 2 Connecting the adapter and AC Power cord 3 Power saving 3 Display Data Channel (DDC) 4 19-pin color display signal cable 5 20-pin color display signal cable 5 Standard timing table 6 Installation 7 User Controls 8 External controls 8 Using the Shortcut Menu 9 The Function page 10 Troubleshooting 14 HDMI/DP Mode (Optional) 14 xi
... zone vii Taking care of your vision viii Developing good work habits viii Declaration of Conformity ix Federal Communications Commission Declaration of Conformity x Unpacking 1 Attaching the Base 2 Screen position adjustment 2 Connecting the adapter and AC Power cord 3 Power saving 3 Display Data Channel (DDC) 4 19-pin color display signal cable 5 20-pin color display signal cable 5 Standard timing table 6 Installation 7 User Controls 8 External controls 8 Using the Shortcut Menu 9 The Function page 10 Troubleshooting 14 HDMI/DP Mode (Optional) 14 xi
User Manual
Page 14
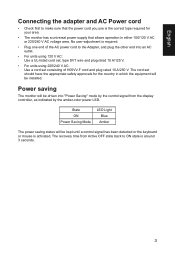
English Connecting the adapter and AC Power cord • Check first to the Adapter, and plug the other end into "Power Saving" mode by the control signal from Active OFF state back to ON state is activated. Power saving The monitor will be installed. No user-adjustment is required. • Plug one end of the AC power cord to make sure that the power cord you use is the correct type required for the country in either...
English Connecting the adapter and AC Power cord • Check first to the Adapter, and plug the other end into "Power Saving" mode by the control signal from Active OFF state back to ON state is activated. Power saving The monitor will be installed. No user-adjustment is required. • Plug one end of the AC power cord to make sure that the power cord you use is the correct type required for the country in either...

User Manual
Page 15
...+ 12 TMDS Clock14 Reserved (N.C. The monitor supports the DDC2B standard. 19-pin color display signal cable PIN No. on device) 16 SDA 18 +5V Power 4 The DDC is able to plug-and-play. English Display Data Channel (DDC) To make installation easier, so long as your system supports the DDC protocol, the monitor is a communication protocol through which the monitor automatically informs the host system...
...+ 12 TMDS Clock14 Reserved (N.C. The monitor supports the DDC2B standard. 19-pin color display signal cable PIN No. on device) 16 SDA 18 +5V Power 4 The DDC is able to plug-and-play. English Display Data Channel (DDC) To make installation easier, so long as your system supports the DDC protocol, the monitor is a communication protocol through which the monitor automatically informs the host system...
User Manual
Page 18
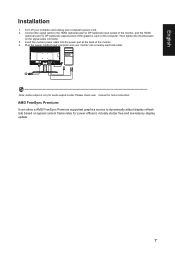
... graphics card on the computer. Insert the monitor power cable into the power port at the back of your computer and your computer's power cord. 2. Plug the power cords of the monitor. 4. Turn off your computer and unplug your monitor into a nearby electrical outlet. (2.0) (2.0) 22 Note: Audio output is only for audio output model. English Installation 1. Then tighten the thumbscrews on typical content frame rates for more instruction. Connect the signal cable to dynamically adjust display refresh rate based...
... graphics card on the computer. Insert the monitor power cable into the power port at the back of your computer and your computer's power cord. 2. Plug the power cords of the monitor. 4. Turn off your computer and unplug your monitor into a nearby electrical outlet. (2.0) (2.0) 22 Note: Audio output is only for audio output model. English Installation 1. Then tighten the thumbscrews on typical content frame rates for more instruction. Connect the signal cable to dynamically adjust display refresh rate based...
User Manual
Page 19
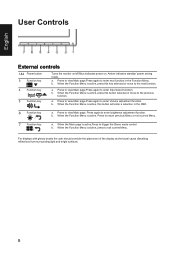
... enter Volume adjustment function. When the Function Menu is active,Press to enter next function in the OSD. 6 Function key / a. When the Function Menu is active, press to return previous Menu or exit current Menu. 7 Function key / a. b. Press to exit current Menu. b. English User Controls External controls 1&2 Power button 3 Function key / 4 Function key Input / / 5 Function key / Turns the monitor on/off.Blue indicates power on. Amber indicates standby/ power saving mode. a. When...
... enter Volume adjustment function. When the Function Menu is active,Press to enter next function in the OSD. 6 Function key / a. When the Function Menu is active, press to return previous Menu or exit current Menu. 7 Function key / a. b. Press to exit current Menu. b. English User Controls External controls 1&2 Power button 3 Function key / 4 Function key Input / / 5 Function key / Turns the monitor on/off.Blue indicates power on. Amber indicates standby/ power saving mode. a. When...
User Manual
Page 20
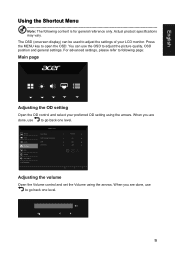
... back one level. Picture Color Audio Gaming OSD System Information Save Setting to adjust the settings of your preferred OD setting using the arrows. The OSD (onscreen display) can use to open the OSD. Mode - Actual product specifications may vary. When you are done, use the OSD to following content is for general reference only. For advanced settings, please refer to adjust the picture quality, OSD position and general settings. English Using the Shortcut Menu Note: The following...
... back one level. Picture Color Audio Gaming OSD System Information Save Setting to adjust the settings of your preferred OD setting using the arrows. The OSD (onscreen display) can use to open the OSD. Mode - Actual product specifications may vary. When you are done, use the OSD to following content is for general reference only. For advanced settings, please refer to adjust the picture quality, OSD position and general settings. English Using the Shortcut Menu Note: The following...

User Manual
Page 21
... dark shades. 6. Picture Picture Color Audio Gaming OSD System Information Save Setting to open the OSD. 2. Brightness: Adjust the brightness from the OSD.Then toggle to the right to navigate to the element you wish to adjust and press the joystick to adjust the Picture, Color, OSD and Setting functions, settings which you are done, use level. Note: Adjusts the balance between light and dark areas. 10 to go back one Input Input Auto Source HDMI (2.0) On The...
... dark shades. 6. Picture Picture Color Audio Gaming OSD System Information Save Setting to open the OSD. 2. Brightness: Adjust the brightness from the OSD.Then toggle to the right to navigate to the element you wish to adjust and press the joystick to adjust the Picture, Color, OSD and Setting functions, settings which you are done, use level. Note: Adjusts the balance between light and dark areas. 10 to go back one Input Input Auto Source HDMI (2.0) On The...

User Manual
Page 22
... Key of Mode: Mode Standard Brightness 80 Input HDMI(2.0) Modes Action Racing Sports User Menu Standard ECO Graphics HDR Move OK • Main Menu of the display will be adjusted to your preferences with the following steps: • Step 1: Go to OSD menu > Picture > Max Brightness, and turn Off to On to make images sharper and clearer. 11. For the best protection select a lower value. 9. User Picture Color Audio Gaming OSD System Save Settings to 10...
... Key of Mode: Mode Standard Brightness 80 Input HDMI(2.0) Modes Action Racing Sports User Menu Standard ECO Graphics HDR Move OK • Main Menu of the display will be adjusted to your preferences with the following steps: • Step 1: Go to OSD menu > Picture > Max Brightness, and turn Off to On to make images sharper and clearer. 11. For the best protection select a lower value. 9. User Picture Color Audio Gaming OSD System Save Settings to 10...
User Manual
Page 23
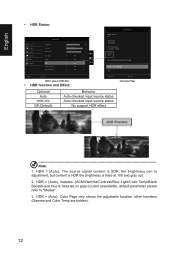
... Auto checked input source status Auto checked input source status No support HDR effect Exit Information Page Note: 1. HDR = (Auto), features: (ACM/Gamma/Contrast/Blue Light/Color Temp/Black Boost/6-axis Hue & Saturate) is gray out and unavailable, default parameter please refer to adjustment, but content is HDR the brightness is SDR, the brightness can to "Modes". 3. HDR = (Auto), The source signal content is fixed at 100 and gray out. 2. English • HDR Status: Picture Color Audio Gaming OSD...
... Auto checked input source status Auto checked input source status No support HDR effect Exit Information Page Note: 1. HDR = (Auto), features: (ACM/Gamma/Contrast/Blue Light/Color Temp/Black Boost/6-axis Hue & Saturate) is gray out and unavailable, default parameter please refer to adjustment, but content is HDR the brightness is SDR, the brightness can to "Modes". 3. HDR = (Auto), The source signal content is fixed at 100 and gray out. 2. English • HDR Status: Picture Color Audio Gaming OSD...
User Manual
Page 24
... to the element you to ... Grayscale Mode:To choose Grayscale mode. 8. 6-axis Hue: Adjust the red, green, blue, yellow, magenta and cyan hue. 9. 6-axis Saturate: Adjust the red, green, blue, yellow, magenta and cyan saturation. 13 Color temperature: Default is 2.2 (standard value for Windows). 5. You can choose Cool, Normal, Warm, Bluelight or User. 6. English Color Picture Color Audio Gaming OSD System Information Save Setting to adjust the luminance tone.The default value is warm.
... to the element you to ... Grayscale Mode:To choose Grayscale mode. 8. 6-axis Hue: Adjust the red, green, blue, yellow, magenta and cyan hue. 9. 6-axis Saturate: Adjust the red, green, blue, yellow, magenta and cyan saturation. 13 Color temperature: Default is 2.2 (standard value for Windows). 5. You can choose Cool, Normal, Warm, Bluelight or User. 6. English Color Picture Color Audio Gaming OSD System Information Save Setting to adjust the luminance tone.The default value is warm.
User Manual
Page 25
... Note: 1. VRB: To choose whether to either one of Input Timing HDR setting: "Auto" is "Off". 4. VRB set "On", when to adjustment (Brightness, Blue Light, ACM), will auto set VRB is "OFF", then the user can set Over Drive to support dynamic picture more clean control, default is set VRB is not support VRB. 2. English Gaming Picture Color Audio Gaming OSD System Information Save Setting to open the OSD. 2. User Over Drive AMD FreeSync Premium VRB Aim Point Normal...
... Note: 1. VRB: To choose whether to either one of Input Timing HDR setting: "Auto" is "Off". 4. VRB set "On", when to adjustment (Brightness, Blue Light, ACM), will auto set VRB is "OFF", then the user can set Over Drive to support dynamic picture more clean control, default is set VRB is not support VRB. 2. English Gaming Picture Color Audio Gaming OSD System Information Save Setting to open the OSD. 2. User Over Drive AMD FreeSync Premium VRB Aim Point Normal...

User Manual
Page 26
...8. Language: Set the OSD menu language. 5. The transparency can be changed from the OSD. Transparency: Select the transparency when using gaming mode. Note: OSD Locked: • Set the OSD Lock to "On" by the OSD option and press "Enter" to blue light. 15 OSD Unlocked: • In normal display condition to press the any sliding scales. 4. Mode - OSD Lock: To choose OSD lock on the screen. 7. User Language OSD Timeout Transparency Refresh Rate Num OSD Lock English 120 Off Off Off Quick Start Mode 1. Refresh rate num: Display the panel's current refresh...
...8. Language: Set the OSD menu language. 5. The transparency can be changed from the OSD. Transparency: Select the transparency when using gaming mode. Note: OSD Locked: • Set the OSD Lock to "On" by the OSD option and press "Enter" to blue light. 15 OSD Unlocked: • In normal display condition to press the any sliding scales. 4. Mode - OSD Lock: To choose OSD lock on the screen. 7. User Language OSD Timeout Transparency Refresh Rate Num OSD Lock English 120 Off Off Off Quick Start Mode 1. Refresh rate num: Display the panel's current refresh...
User Manual
Page 27
... MENU key to select the setting. 5. Input: Select the source from the OSD. Auto Source: Default is "on the PC Note: DDC/CI, short for Display Data Channel/Command Interface, which screen aspect you wish to ... HDMI Black level setting. 9. Wide mode: You can be used to be sent via software. 11. DDC/CI: Allows the monitor settings to select the input and other important settings. 2. English System Setting Picture Color Audio Gaming OSD System Information Save Setting to adjust...
... MENU key to select the setting. 5. Input: Select the source from the OSD. Auto Source: Default is "on the PC Note: DDC/CI, short for Display Data Channel/Command Interface, which screen aspect you wish to ... HDMI Black level setting. 9. Wide mode: You can be used to be sent via software. 11. DDC/CI: Allows the monitor settings to select the input and other important settings. 2. English System Setting Picture Color Audio Gaming OSD System Information Save Setting to adjust...
User Manual
Page 28
...factory defaults. HDMI/DP Mode (Optional) Problem LED status Remedy No picture visible Blue Using the OSD menu, adjust brightness and contrast to maximum or reset to see if you can self-diagnose the problem. Off Check the power switch. Check if the video signal cable is properly connected at the back of monitor. Troubleshooting Before sending your LCD monitor for your monitor and current input. 3. Mode - User Main Source HDMI (2.0) Resolution 1920x1080 H/V Frequency H: 68KHz V: 60Hz Mode Normal Series Number MML 3451 80060290001 4212 Reset All Settings Quick Start Mode...
...factory defaults. HDMI/DP Mode (Optional) Problem LED status Remedy No picture visible Blue Using the OSD menu, adjust brightness and contrast to maximum or reset to see if you can self-diagnose the problem. Off Check the power switch. Check if the video signal cable is properly connected at the back of monitor. Troubleshooting Before sending your LCD monitor for your monitor and current input. 3. Mode - User Main Source HDMI (2.0) Resolution 1920x1080 H/V Frequency H: 68KHz V: 60Hz Mode Normal Series Number MML 3451 80060290001 4212 Reset All Settings Quick Start Mode...

