

User Manual
Page 1
...5 Rear panel view 6 Remote control 7 Connecting devices 9 Wall mount preparation / removing the base 9 Basic connections 9 Enjoying analog and digital TV 10 Connecting external audio/video devices 12 Connecting a DVD, VCR, STB or audio/video equipment 12 Connecting a camera, camcorder or game console 13 Connecting a PC or notebook computer 14 Selecting the input source 14 Channel controls 15 Channel list 15 Favourite channel list 16 Electronic programme guide 16 OSD navigation 18 Navigating the OSD with the remote control 18 Adjusting the OSD settings 19 OSD Menus 21 Picture...
...5 Rear panel view 6 Remote control 7 Connecting devices 9 Wall mount preparation / removing the base 9 Basic connections 9 Enjoying analog and digital TV 10 Connecting external audio/video devices 12 Connecting a DVD, VCR, STB or audio/video equipment 12 Connecting a camera, camcorder or game console 13 Connecting a PC or notebook computer 14 Selecting the input source 14 Channel controls 15 Channel list 15 Favourite channel list 16 Electronic programme guide 16 OSD navigation 18 Navigating the OSD with the remote control 18 Adjusting the OSD settings 19 OSD Menus 21 Picture...

User Manual
Page 3
... product from the wall outlet and refer servicing to avoid injury from the type of time. 4. Refer all applicable laws. Use only with the cart, stand, tripod, bracket, or table specified by the manufacturer, or sold with all servicing to qualified service personnel. 18.Unplug this product where the cord will not to rest on the power cord. Use the remote control carefully. For detailed...
... product from the wall outlet and refer servicing to avoid injury from the type of time. 4. Refer all applicable laws. Use only with the cart, stand, tripod, bracket, or table specified by the manufacturer, or sold with all servicing to qualified service personnel. 18.Unplug this product where the cord will not to rest on the power cord. Use the remote control carefully. For detailed...
User Manual
Page 4
... controls that has a third pin for grounding. f If the product exhibits a distinct change in your accessories box) for home entertainment purposes only. The overall system load must not exceed 80% of the global environment, please recycle. Do not defeat the safety purpose of the grounding-type plug by the operating instructions.Improper adjustment of power supply cord set (provided in performance, indicating a need for service...
... controls that has a third pin for grounding. f If the product exhibits a distinct change in your accessories box) for home entertainment purposes only. The overall system load must not exceed 80% of the global environment, please recycle. Do not defeat the safety purpose of the grounding-type plug by the operating instructions.Improper adjustment of power supply cord set (provided in performance, indicating a need for service...
User Manual
Page 5
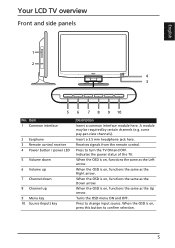
... arrow. When the OSD is on , functions the same as the Right arrow. Press to turn the TV ON and OFF. Insert a 3.5 mm headphone jack here. English Your LCD TV overview Front and side panels 1 2 4 3 5 No. Item 1 Common interface 2 Earphone 3 Remote control receiver 4 Power button / power LED 5 Volume down 6 Volume up 7 Channel down 8 Channel up 9 Menu key 10 Source (Input) key 6 7 8 9 10 Description Insert a common interface module here.
... arrow. When the OSD is on , functions the same as the Right arrow. Press to turn the TV ON and OFF. Insert a 3.5 mm headphone jack here. English Your LCD TV overview Front and side panels 1 2 4 3 5 No. Item 1 Common interface 2 Earphone 3 Remote control receiver 4 Power button / power LED 5 Volume down 6 Volume up 7 Channel down 8 Channel up 9 Menu key 10 Source (Input) key 6 7 8 9 10 Description Insert a common interface module here.

User Manual
Page 7
... to display and select the audio signal. Press to toggle scaling mode between 4:3, 16:9 and Letterbox 1, 2, 3 modes. Press to launch Electronic Programme Guide (EPG) mode (Digital TV mode only). See "Selecting the input source" on page 16. Press to previous Menu. 7 Item 1 POWER 2 DISPLAY 3 GUIDE 4 SOURCE 5 WIDE 6 MPX 7 MENU 8 Back/CANCEL Description Press to display or change input/channel information (dependent on /off. Press to back to select correct source/input mode. English Remote control General keys 2 1 DISPLAY GUIDE...
... to display and select the audio signal. Press to toggle scaling mode between 4:3, 16:9 and Letterbox 1, 2, 3 modes. Press to launch Electronic Programme Guide (EPG) mode (Digital TV mode only). See "Selecting the input source" on page 16. Press to previous Menu. 7 Item 1 POWER 2 DISPLAY 3 GUIDE 4 SOURCE 5 WIDE 6 MPX 7 MENU 8 Back/CANCEL Description Press to display or change input/channel information (dependent on /off. Press to back to select correct source/input mode. English Remote control General keys 2 1 DISPLAY GUIDE...

User Manual
Page 9
Basic connections Connecting the power cord 1. Remove the base. 2 1 1 2 2. Remove the three screws from inside the stand. 3. Assemble the wall mount following the instructions included with the wall mount. Connect the plug to the wall outlet as shown. 9 Connect the AC cord into the AC input on the back of the set. 2. English Connecting devices Wall mount preparation / removing the base Caution: Disassemble the base carefully otherwise the plastic parts and/or TV body may be damaged. 1.
Basic connections Connecting the power cord 1. Remove the base. 2 1 1 2 2. Remove the three screws from inside the stand. 3. Assemble the wall mount following the instructions included with the wall mount. Connect the plug to the wall outlet as shown. 9 Connect the AC cord into the AC input on the back of the set. 2. English Connecting devices Wall mount preparation / removing the base Caution: Disassemble the base carefully otherwise the plastic parts and/or TV body may be damaged. 1.
User Manual
Page 10
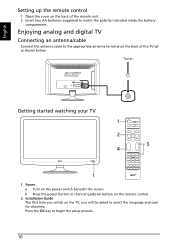
... 1 2 3 4 1 1. Installation Guide The first time you will be asked to the appropriate antenna terminal on the TV, you switch on the back of the remote unit. 2. Enjoying analog and digital TV Connecting an antenna/cable Connect the antenna cable to select the language and scan for channels. Open the cover on the power switch beneath the screen. Power a Turn on the back of the TV set as shown below. b Press the power button or channel up...
... 1 2 3 4 1 1. Installation Guide The first time you will be asked to the appropriate antenna terminal on the TV, you switch on the back of the remote unit. 2. Enjoying analog and digital TV Connecting an antenna/cable Connect the antenna cable to select the language and scan for channels. Open the cover on the power switch beneath the screen. Power a Turn on the back of the TV set as shown below. b Press the power button or channel up...
User Manual
Page 12
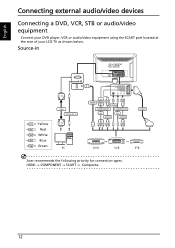
English Connecting external audio/video devices Connecting a DVD, VCR, STB or audio/video equipment Connect your DVD player, VCR or audio/video equipment using the SCART port located at the rear of your LCD TV as shown below. Source-in D-Sub Y Yellow R Red W White B Blue G Green VGA PC-Audio in D-Sub PC HDMI GB R W R S Y S-Video WR COMPONENT COMPOSITE AV AUDIO AV AUDIO GB R W R S Y W R SCART or or DVD VCR STB Acer recommends the following priority for connection types: HDMI -> COMPONENT -> SCART -> Composite. 12
English Connecting external audio/video devices Connecting a DVD, VCR, STB or audio/video equipment Connect your DVD player, VCR or audio/video equipment using the SCART port located at the rear of your LCD TV as shown below. Source-in D-Sub Y Yellow R Red W White B Blue G Green VGA PC-Audio in D-Sub PC HDMI GB R W R S Y S-Video WR COMPONENT COMPOSITE AV AUDIO AV AUDIO GB R W R S Y W R SCART or or DVD VCR STB Acer recommends the following priority for connection types: HDMI -> COMPONENT -> SCART -> Composite. 12

User Manual
Page 14
... setting your PC's external monitor resolution to select the correct input source. D-Sub D-Sub Selecting the input source Once you have connected your PC or notebook computer to see the list SOURCE of available source connections: • TV • SCART • Component • D-Sub • HDMI • AV • S-Video 14 Press the SOURCE button on your TV, connect your antenna or external equipment to the TV, you need...
... setting your PC's external monitor resolution to select the correct input source. D-Sub D-Sub Selecting the input source Once you have connected your PC or notebook computer to see the list SOURCE of available source connections: • TV • SCART • Component • D-Sub • HDMI • AV • S-Video 14 Press the SOURCE button on your TV, connect your antenna or external equipment to the TV, you need...

User Manual
Page 16
English Favourite channel list The favourite channel list allows you press the FAV key, the TV will display a list of a button. TELETEXT SUBTITLE INDEX SIZE HOLD REVEAL 16 To set a favourite channel: Press the FAV key on the remote control to select a channel, and then press OK. Use the up or down directional keys to exit. Electronic programme guide The electronic programme guide (EPG) is an onscreen service DISPLAY GUIDE GUIDE available on digital and cable TV...
English Favourite channel list The favourite channel list allows you press the FAV key, the TV will display a list of a button. TELETEXT SUBTITLE INDEX SIZE HOLD REVEAL 16 To set a favourite channel: Press the FAV key on the remote control to select a channel, and then press OK. Use the up or down directional keys to exit. Electronic programme guide The electronic programme guide (EPG) is an onscreen service DISPLAY GUIDE GUIDE available on digital and cable TV...

User Manual
Page 18
... : Picture, Audio, Channel management, Settings and Advanced. Please see "Front and side panels" on the control panel. 2 OK Select your desired menu by using the up /down directional keys to switch between the five menus. Press OK or the right directional key to navigate these menus (Picture, Audio, Channel management, Settings and Advanced) are described in this section. Press BACK or the left /right will adjust the different settings...
... : Picture, Audio, Channel management, Settings and Advanced. Please see "Front and side panels" on the control panel. 2 OK Select your desired menu by using the up /down directional keys to switch between the five menus. Press OK or the right directional key to navigate these menus (Picture, Audio, Channel management, Settings and Advanced) are described in this section. Press BACK or the left /right will adjust the different settings...

User Manual
Page 19
.... 4. Press MENU to adjust the picture quality, audio settings, channel settings and general settings. The Channel management menu can be used to adjust the current Scenario Mode, Brightness, Contrast, Hue, Colour, Sharpness and other image-related qualities. 1. The Picture menu can be used to adjust Auto scan, Time Zone, Manual Scan, Channel Edit and other important channel-related settings. 19 English Adjusting the OSD settings The OSD can be used to adjust the the current Scenario Mode, Treble, Bass, Balance, Steady Sound, Sound Effects...
.... 4. Press MENU to adjust the picture quality, audio settings, channel settings and general settings. The Channel management menu can be used to adjust the current Scenario Mode, Brightness, Contrast, Hue, Colour, Sharpness and other image-related qualities. 1. The Picture menu can be used to adjust Auto scan, Time Zone, Manual Scan, Channel Edit and other important channel-related settings. 19 English Adjusting the OSD settings The OSD can be used to adjust the the current Scenario Mode, Treble, Bass, Balance, Steady Sound, Sound Effects...

User Manual
Page 20
.... The options available on the TV signal source and model. English Adjusting settings 1. The Settings menu can be used to adjust. 3. Using the directional keys, select Settings from the OSD. The Advanced menu can be available with an analog signal and vice versa. 20 Press the MENU key to bring up the OSD. 2. Adjusting advanced settings 1. Then navigate to the feature you wish to adjust the screen Menu Language, Accessibility, Sleep, Parental Control, Demo and other important...
.... The options available on the TV signal source and model. English Adjusting settings 1. The Settings menu can be used to adjust. 3. Using the directional keys, select Settings from the OSD. The Advanced menu can be available with an analog signal and vice versa. 20 Press the MENU key to bring up the OSD. 2. Adjusting advanced settings 1. Then navigate to the feature you wish to adjust the screen Menu Language, Accessibility, Sleep, Parental Control, Demo and other important...

User Manual
Page 21
... via specific Gamma corrections and saturation adjustments. Precise audio can be heard. Colour Change the colour depth of the following settings: Scenario mode Scenario mode provides preset viewing modes designed to watch your favourite video and audio settings. This is suited for optimal enjoyment of the image. Game mode carefully details the exquisite graphics of programme. This menu provides the following scenarios: Standard, Movie, Game, Sport, Concert, User...
... via specific Gamma corrections and saturation adjustments. Precise audio can be heard. Colour Change the colour depth of the following settings: Scenario mode Scenario mode provides preset viewing modes designed to watch your favourite video and audio settings. This is suited for optimal enjoyment of the image. Game mode carefully details the exquisite graphics of programme. This menu provides the following scenarios: Standard, Movie, Game, Sport, Concert, User...
User Manual
Page 22
... settings: Scenario mode Scenario mode provides preset audio modes designed to give you the best sound quality when listening to a particular kind of programme. Precise audio can be heard. and smoothly presents motion images. Colour temp This setting adjusts the colour temperature of modern video games, providing lifelike entertainment while protecting your favourite video and audio settings. 22 Game mode carefully details the exquisite graphics of the image. English Hue Change...
... settings: Scenario mode Scenario mode provides preset audio modes designed to give you the best sound quality when listening to a particular kind of programme. Precise audio can be heard. and smoothly presents motion images. Colour temp This setting adjusts the colour temperature of modern video games, providing lifelike entertainment while protecting your favourite video and audio settings. 22 Game mode carefully details the exquisite graphics of the image. English Hue Change...

User Manual
Page 23
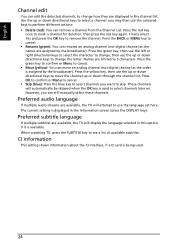
... following settings: Auto scan Auto scan allows you to change the setting. Balance Change the balance between input sources and changing channels. Use the directional keys to scan for new or deleted channels. Digital Audio This allows you to select Start and press the OK key. Analog manual scan You can manually add a digital channel by adjusting the settings here. Sound effects Turn Sound Effects on , Treble and Bass settings are listed. Time zone If there are multiple time zones in the audio output level. English...
... following settings: Auto scan Auto scan allows you to change the setting. Balance Change the balance between input sources and changing channels. Use the directional keys to scan for new or deleted channels. Digital Audio This allows you to select Start and press the OK key. Analog manual scan You can manually add a digital channel by adjusting the settings here. Sound effects Turn Sound Effects on , Treble and Bass settings are listed. Time zone If there are multiple time zones in the audio output level. English...
User Manual
Page 24
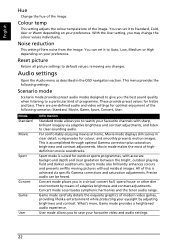
... analog channel (not digital channel as the names are limited to 5 characters. Press the yellow key, then use the up or down directional keys to change how they are displayed in the channel list. When watching TV, press the SUBTITLE key to mark a channel for deletion, then press the red key again. Use the up or down directional keys to select a channel, you may then use the language set...
... analog channel (not digital channel as the names are limited to 5 characters. Press the yellow key, then use the up or down directional keys to change how they are displayed in the channel list. When watching TV, press the SUBTITLE key to mark a channel for deletion, then press the red key again. Use the up or down directional keys to select a channel, you may then use the language set...

User Manual
Page 26
... modes (1, 2, 3). Demo Displays a banner highlighting the television's key features. This menu provides the following settings: Advanced picture adjust Select this setting to default values, removing any changes. 26 Other settings provide advanced adjustments that adjust the position of the image if you are using a HDMI connection. Reset advanced Return all settings to adjust the size of the image if you are available. English Accessibility You can set a time delay, after which the TV will turn off. HDMI scan info Use this option to adjust...
... modes (1, 2, 3). Demo Displays a banner highlighting the television's key features. This menu provides the following settings: Advanced picture adjust Select this setting to default values, removing any changes. 26 Other settings provide advanced adjustments that adjust the position of the image if you are using a HDMI connection. Reset advanced Return all settings to adjust the size of the image if you are available. English Accessibility You can set a time delay, after which the TV will turn off. HDMI scan info Use this option to adjust...

User Manual
Page 27
... sure the antenna cable is not under strong fluorescent lighting. • Try to high-rise buildings or hills. Turn off one of your TV signal is correctly set to the warranty card for each. Remote control does not work • Check the batteries of its service life. Using a highly directional antenna may be considered. There is no picture or sound • Make sure the power cord is properly...
... sure the antenna cable is not under strong fluorescent lighting. • Try to high-rise buildings or hills. Turn off one of your TV signal is correctly set to the warranty card for each. Remote control does not work • Check the batteries of its service life. Using a highly directional antenna may be considered. There is no picture or sound • Make sure the power cord is properly...

User Manual
Page 28
power consumption Power saving Mechanical Dimensions (W x H x D mm) Weight (kg) Weight (lbs.) Analog TV system Colour system Sound system Stereo system Subtitle Digital TV system Digital TV standard Sound system Stereo system Frequency Resolution Terminal Analog/Digital Tuner In SCART Component in AV-in HDMI PC D-sub in PC audio in SPDIF out Headphone out Service Port M190HQMF / M190HQML M220HQMF / M220HQML 1366 x 768 600:1 30000:1 5 ms 1920 x 1080 100 to 240 V AC (50~60 Hz...
power consumption Power saving Mechanical Dimensions (W x H x D mm) Weight (kg) Weight (lbs.) Analog TV system Colour system Sound system Stereo system Subtitle Digital TV system Digital TV standard Sound system Stereo system Frequency Resolution Terminal Analog/Digital Tuner In SCART Component in AV-in HDMI PC D-sub in PC audio in SPDIF out Headphone out Service Port M190HQMF / M190HQML M220HQMF / M220HQML 1366 x 768 600:1 30000:1 5 ms 1920 x 1080 100 to 240 V AC (50~60 Hz...


