

User Manual CastMaster
Page 2
... projector supports multiple CastMaster devices. The software is pairing done. Go to Mobile 4. Off The device is upgrading automatically. Host is supplied. You are now a developer! 3. LED Status List of your USB drive. (Format by Host and in USB port of CastMaster Main button LED indicator Side button LED indicator Main button LED indicator Red Red flashing White Red Red flashing Off Red White Red flashing Red flashing Side button LED indicator Status Descriptions Pairing Red The device is starting...
... projector supports multiple CastMaster devices. The software is pairing done. Go to Mobile 4. Off The device is upgrading automatically. Host is supplied. You are now a developer! 3. LED Status List of your USB drive. (Format by Host and in USB port of CastMaster Main button LED indicator Side button LED indicator Main button LED indicator Red Red flashing White Red Red flashing Off Red White Red flashing Red flashing Side button LED indicator Status Descriptions Pairing Red The device is starting...

User Manual Media
Page 1
... EZCastPro Management to do Full screen, L/R, 4- English 1 Acer Projector Gateway Introduction The Acer Projector Gateway (APG) is in AP mode). • Supports firmware upgrade via USB flash drive. Networking APG features • With high-performance wireless projection via an acer USB WiFi adapter or an RJ-45 port for wired connections (only for media contents playback via the built-in WiFi con-current mode when doing networking display. • Users can mirror or extend...
... EZCastPro Management to do Full screen, L/R, 4- English 1 Acer Projector Gateway Introduction The Acer Projector Gateway (APG) is in AP mode). • Supports firmware upgrade via USB flash drive. Networking APG features • With high-performance wireless projection via an acer USB WiFi adapter or an RJ-45 port for wired connections (only for media contents playback via the built-in WiFi con-current mode when doing networking display. • Users can mirror or extend...
User Manual Media
Page 2
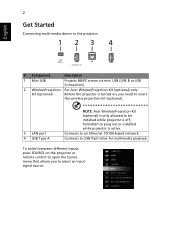
... projector is turned on the projector or remote control to open the Source menu that allows you need to insert the wireless projection-kit (optional). 3 LAN port 4 USB Type A NOTE: Acer WirelessProjection-Kit (optional) is only allowed to the projector 1 23 4 # Component Description 1 Mini USB Projects NB/PC screen via mini USB (USB B or USB Connection). 2 WirelessProjection- To switch between different inputs, press SOURCE on , you to an Ethernet 10/100-based network. Connects to select an input signal source...
... projector is turned on the projector or remote control to open the Source menu that allows you need to insert the wireless projection-kit (optional). 3 LAN port 4 USB Type A NOTE: Acer WirelessProjection-Kit (optional) is only allowed to the projector 1 23 4 # Component Description 1 Mini USB Projects NB/PC screen via mini USB (USB B or USB Connection). 2 WirelessProjection- To switch between different inputs, press SOURCE on , you to an Ethernet 10/100-based network. Connects to select an input signal source...

User Manual Media
Page 15
... time Video repeat mode Music repeat mode Options Original, Full Screen 3 sec, 5 sec, 10 sec Sequence, Single Sequence, Single Software Upgrade Instructions There are 2 ways to start . Via Network (1) Connect a Acer WirelessPrejection-Kit dongle (optional) or a RJ45 cable to the projector. (Make sure it connects to the internet.) (2) Press "MENU" to open the OSD menu. (3) Go to "Setting" > "Firmware Upgrade" Select "Network" and press Enter to do this: Via USB flash drive (1) Download new firmware...
... time Video repeat mode Music repeat mode Options Original, Full Screen 3 sec, 5 sec, 10 sec Sequence, Single Sequence, Single Software Upgrade Instructions There are 2 ways to start . Via Network (1) Connect a Acer WirelessPrejection-Kit dongle (optional) or a RJ45 cable to the projector. (Make sure it connects to the internet.) (2) Press "MENU" to open the OSD menu. (3) Go to "Setting" > "Firmware Upgrade" Select "Network" and press Enter to do this: Via USB flash drive (1) Download new firmware...

User Manual Media
Page 16
... isn't supported). Install Acer WirelessPrejection-Kit dongle (optional) to the projector or connect a LAN cable to LAN/WiFi and display over network (either LAN or WiFi). For NB/PC, EZCastPro installer can be downloaded from Acer global website. Step 3. Adjust projector source to the projector. Download and install the software/app on your device. - Make sure your device to it. Step 4. Then enter the password shown on the splash screen and...
... isn't supported). Install Acer WirelessPrejection-Kit dongle (optional) to the projector or connect a LAN cable to LAN/WiFi and display over network (either LAN or WiFi). For NB/PC, EZCastPro installer can be downloaded from Acer global website. Step 3. Adjust projector source to the projector. Download and install the software/app on your device. - Make sure your device to it. Step 4. Then enter the password shown on the splash screen and...

User Manual Media
Page 21
English 21 Network Setting Network Setting includes WiFi, WiFi Password Change, and Software Upgrade. (1) WiFi To set available network for your projector's access. (2) WiFi Password Change
English 21 Network Setting Network Setting includes WiFi, WiFi Password Change, and Software Upgrade. (1) WiFi To set available network for your projector's access. (2) WiFi Password Change
User Manual Media
Page 28
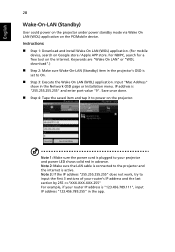
....255" does not work, try to your router IP address is active. Input "Mac Address" show in the app. Note 2: Make sure the LAN cable is connected to power on the internet. English 28 Wake-On-LAN (Standby) User could power on the projector under power standby mode via Wake On LAN (WOL) application on Google store / Apple APP store. Instructions: Step 1: Download and install Wake On LAN (WOL) application. (For...
....255" does not work, try to your router IP address is active. Input "Mac Address" show in the app. Note 2: Make sure the LAN cable is connected to power on the internet. English 28 Wake-On-LAN (Standby) User could power on the projector under power standby mode via Wake On LAN (WOL) application on Google store / Apple APP store. Instructions: Step 1: Download and install Wake On LAN (WOL) application. (For...
User Manual
Page 5
...; When switching the projector off .. For safety reasons, do not use non-compliant parts when adding or changing components. v • the power cord or plug is damaged, cut or frayed • liquid was spilled into the projector's lens when the lamp is on the projector first and then signal sources • Do not place the product in following the operating instructions Note: Adjust only those controls that...
...; When switching the projector off .. For safety reasons, do not use non-compliant parts when adding or changing components. v • the power cord or plug is damaged, cut or frayed • liquid was spilled into the projector's lens when the lamp is on the projector first and then signal sources • Do not place the product in following the operating instructions Note: Adjust only those controls that...

User Manual
Page 6
... deformed or even cause a fire. The only user serviceable part is the lamp which has its tilt angles should be sure to change the lamp when is showing warning message. • When changing the lamp, please allow unit to cool down, and follow all changing instructions. • Reset the "Lamp Hour Reset" function from the Onscreen display "Management > Lamp Settings" menu after replacing the lamp module. • Do not attempt to disassemble...
... deformed or even cause a fire. The only user serviceable part is the lamp which has its tilt angles should be sure to change the lamp when is showing warning message. • When changing the lamp, please allow unit to cool down, and follow all changing instructions. • Reset the "Lamp Hour Reset" function from the Onscreen display "Management > Lamp Settings" menu after replacing the lamp module. • Do not attempt to disassemble...
User Manual
Page 8
... moistened with mild detergent to clean the display housing. • Disconnect the power plug from the Onscreen display "Management > Lamp Settings" menu after replacing the lamp module. • When switching the projector off, please ensure the projector completes its cooling cycle before disconnecting power. • Turn on the unit provided for a long period of its life, it shows warning messages. • Reset the "Lamp Hour Reset" function from AC outlet if...
... moistened with mild detergent to clean the display housing. • Disconnect the power plug from the Onscreen display "Management > Lamp Settings" menu after replacing the lamp module. • When switching the projector off, please ensure the projector completes its cooling cycle before disconnecting power. • Turn on the unit provided for a long period of its life, it shows warning messages. • Reset the "Lamp Hour Reset" function from AC outlet if...
User Manual
Page 9
... Started 7 Connecting the Projector 7 Turning the Projector On/Off 8 Turning on the Projector 8 Turning the projector off 9 Adjusting the Projected Image 10 Adjusting the Height of Projected Image 10 How to optimize image size and distance 11 How to get a preferred image size by adjusting distance and zoom 15 User Controls 19 Onscreen Display (OSD) Menus 19 Color 20 Image 22 Source 23 Setting 23 Management 25 Information 26 Acer LAN webpage management 27 How to login in 27 System Status 28 Change Password 28
... Started 7 Connecting the Projector 7 Turning the Projector On/Off 8 Turning on the Projector 8 Turning the projector off 9 Adjusting the Projected Image 10 Adjusting the Height of Projected Image 10 How to optimize image size and distance 11 How to get a preferred image size by adjusting distance and zoom 15 User Controls 19 Onscreen Display (OSD) Menus 19 Color 20 Image 22 Source 23 Setting 23 Management 25 Information 26 Acer LAN webpage management 27 How to login in 27 System Status 28 Change Password 28

User Manual
Page 13
... 3 78 # Description 1 Control panel 2 Focus ring 3 Zoom ring 4 Remote control receiver 5 Projection lens 6 Quick-release lever Rear / Left side 24 5 76 # Description 7 Adjuster foot 8 Air outlet 9 Security bar 10 Lamp cover 11 Air inlet 2 3 4 5 6 7 89 1 10 11 12 13 # Description 1 Speaker 2 Mini USB connector 3 RS232 connector 4 PC analog signal/HDTV/component video input connector (VGA IN) 5 USB connector (WIRELESS KIT) 6 HDMI input connector 7 Audio input connector # Description 8 LAN (RJ45 Port for 10/100M Ethernet) 9 USB connector (5V...
... 3 78 # Description 1 Control panel 2 Focus ring 3 Zoom ring 4 Remote control receiver 5 Projection lens 6 Quick-release lever Rear / Left side 24 5 76 # Description 7 Adjuster foot 8 Air outlet 9 Security bar 10 Lamp cover 11 Air inlet 2 3 4 5 6 7 89 1 10 11 12 13 # Description 1 Speaker 2 Mini USB connector 3 RS232 connector 4 PC analog signal/HDTV/component video input connector (VGA IN) 5 USB connector (WIRELESS KIT) 6 HDMI input connector 7 Audio input connector # Description 8 LAN (RJ45 Port for 10/100M Ethernet) 9 USB connector (5V...
User Manual
Page 14
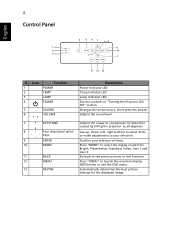
... back to select the display mode from Bright, Presentation, Standard, Video, User 1 and User 2. Changes the active source, short press the button. 4 Control Panel English 4 567 8 1 6 2 10 3 9 7 11 12 13 # Icon Function 1 POWER 2 TEMP 3 LAMP 4 POWER 5 SOURCE 6 VOLUME 7 KEYSTONE 8 Four directional select keys 9 ENTER 10 MODE 11 BACK 12 MENU 13 RESYNC Description Power Indicator LED Temp Indicator LED Lamp Indicator LED See the contents in "Turning the Projector On/ Off" section. Adjusts the sound level. Adjusts the image to compensate for the...
... back to select the display mode from Bright, Presentation, Standard, Video, User 1 and User 2. Changes the active source, short press the button. 4 Control Panel English 4 567 8 1 6 2 10 3 9 7 11 12 13 # Icon Function 1 POWER 2 TEMP 3 LAMP 4 POWER 5 SOURCE 6 VOLUME 7 KEYSTONE 8 Four directional select keys 9 ENTER 10 MODE 11 BACK 12 MENU 13 RESYNC Description Power Indicator LED Temp Indicator LED Lamp Indicator LED See the contents in "Turning the Projector On/ Off" section. Adjusts the sound level. Adjusts the image to compensate for the...
User Manual
Page 19
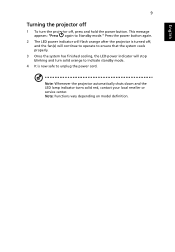
... vary depending on model definition. This message appears: "Press again to Standby mode." Note: Whenever the projector automatically shuts down and the LED lamp indicator turns solid red, contact your local reseller or service center. Press the power button again. 2 The LED power indicator will flash orange after the projector is now safe to unplug the power cord. English 9 Turning the projector off 1 To turn the projector off , and the fan(s) will continue to operate to ensure that...
... vary depending on model definition. This message appears: "Press again to Standby mode." Note: Whenever the projector automatically shuts down and the LED lamp indicator turns solid red, contact your local reseller or service center. Press the power button again. 2 The LED power indicator will flash orange after the projector is now safe to unplug the power cord. English 9 Turning the projector off 1 To turn the projector off , and the fan(s) will continue to operate to ensure that...
User Manual
Page 30
.... • EcoPro: Dims the projector lamp to the very low status which will extend the lamp life to 20,000 hours. • User 1/User 2: Memorize user's settings. • 3D: Only available for 3D input signal. : Once EcoPro is enabled, ECO Mode switches to EcoPro at the same time. : After the above setting is done, if user changes to other Dislay mode settings rather than EcoPro, ECO Mode switches to "Off". : When EcoPro...
.... • EcoPro: Dims the projector lamp to the very low status which will extend the lamp life to 20,000 hours. • User 1/User 2: Memorize user's settings. • 3D: Only available for 3D input signal. : Once EcoPro is enabled, ECO Mode switches to EcoPro at the same time. : After the above setting is done, if user changes to other Dislay mode settings rather than EcoPro, ECO Mode switches to "Off". : When EcoPro...
User Manual
Page 33
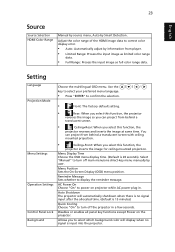
... screen with ceiling mounted projection. • Ceiling+Front: When you select this function, the projector reverses and inverts the image at same time. Adjust the color range of the HDMI image data to correct color display error. • Auto: Automatically adjust by Smart Detection. Menu Position Sets the On-Screen Display (OSD) menu position. Setting Language Projection Mode Menu Settings Operation Settings Control Panel Lock Background Choose the multilingual OSD menu. Menu Display Time Choose the OSD menu display time. (Default is input into the projector. Select "Manual...
... screen with ceiling mounted projection. • Ceiling+Front: When you select this function, the projector reverses and inverts the image at same time. Adjust the color range of the HDMI image data to correct color display error. • Auto: Automatically adjust by Smart Detection. Menu Position Sets the On-Screen Display (OSD) menu position. Setting Language Projection Mode Menu Settings Operation Settings Control Panel Lock Background Choose the multilingual OSD menu. Menu Display Time Choose the OSD menu display time. (Default is input into the projector. Select "Manual...

User Manual
Page 34
Note: Functions vary depending on model definition. Default is "Off". Choose to select your desired startup screen. English 24 Startup Screen USB 5V (Standby) VGA OUT (Standby) Firmware Upgrade Use this function to upgrade firmware via USB drive or network. Default is "Off". If you change the setting, the changes will take effect when you exit the OSD menu. Choose "On" to enable VGA OUT connection. Choose "On" to supply 5V/1.5A pwoer while in standby mode.
Note: Functions vary depending on model definition. Default is "Off". Choose to select your desired startup screen. English 24 Startup Screen USB 5V (Standby) VGA OUT (Standby) Firmware Upgrade Use this function to upgrade firmware via USB drive or network. Default is "Off". If you change the setting, the changes will take effect when you exit the OSD menu. Choose "On" to enable VGA OUT connection. Choose "On" to supply 5V/1.5A pwoer while in standby mode.
User Manual
Page 35
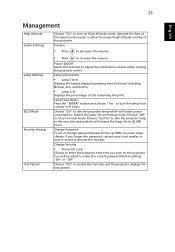
... High Altitude Audio Settings Lamp Settings ECO Mode Security Settings Test Pattern Choose "On" to turn on -screen steps. Change Password To set or change password please follow up OSD on High Altitude mode. Operate the fans at full speed continuously to allow for proper high altitude cooling of the remaining lamp life. Lamp Information • Lamp Timer Displays the lamp's elapsed operating time (in hours) including Normal, Eco, and EcoPro. • Lamp Life Displays the percentage of the projector. If you turn the lamp hour counter...
... High Altitude Audio Settings Lamp Settings ECO Mode Security Settings Test Pattern Choose "On" to turn on -screen steps. Change Password To set or change password please follow up OSD on High Altitude mode. Operate the fans at full speed continuously to allow for proper high altitude cooling of the remaining lamp life. Lamp Information • Lamp Timer Displays the lamp's elapsed operating time (in hours) including Normal, Eco, and EcoPro. • Lamp Life Displays the percentage of the projector. If you turn the lamp hour counter...

User Manual
Page 40
... remote control so it in front of focus: • While displaying the on-screen menu, adjust the focus ring. (The image size should not change; English 30 Appendices Troubleshooting If you are adjusting the zoom, not the focus.) • Check the projection lens to see if it needs cleaning. • If the image is flickering or unstable for a short while, then plug it is more directly in and press the power button again. 2 Image problems...
... remote control so it in front of focus: • While displaying the on-screen menu, adjust the focus ring. (The image size should not change; English 30 Appendices Troubleshooting If you are adjusting the zoom, not the focus.) • Check the projection lens to see if it needs cleaning. • If the image is flickering or unstable for a short while, then plug it is more directly in and press the power button again. 2 Image problems...
User Manual
Page 41
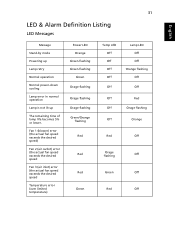
...speed Fan 3 (air inlet) error (the actual fan speed exceeds the desired speed Temperature error (over limited temperature) Power LED Orange Green flashing Green flashing Green Orage flashing Orage flashing Orage flashing Green/Orange flashing Red Red Red Green Temp LED Off Off Off Off Off Off Off Off Red Orage flashing Green Red 31 Lamp LED Off Off Orange flashing Off Off Red Orage flashing Orange Off Off Off Off English LED & Alarm Definition Listing LED Messages Message Stand-by mode Powering up Lamp retry Normal operation Normal power-down cooling Lamp error in normal operation Lamp is...
...speed Fan 3 (air inlet) error (the actual fan speed exceeds the desired speed Temperature error (over limited temperature) Power LED Orange Green flashing Green flashing Green Orage flashing Orage flashing Orage flashing Green/Orange flashing Red Red Red Green Temp LED Off Off Off Off Off Off Off Off Red Orage flashing Green Red 31 Lamp LED Off Off Orange flashing Off Off Red Orage flashing Orange Off Off Off Off English LED & Alarm Definition Listing LED Messages Message Stand-by mode Powering up Lamp retry Normal operation Normal power-down cooling Lamp error in normal operation Lamp is...


