
User Manual
Page 3
... external power supply unit: • Install the power supply unit before connecting the power cord to the AC power outlet. • Unplug the power cord before cleaning. These openings must not be blocked by unplugging all warnings and instructions marked on the product. Never spill liquid of the product and to ensure reliable operation of any kind into this product through cabinet slots as possible. Keep this...
... external power supply unit: • Install the power supply unit before connecting the power cord to the AC power outlet. • Unplug the power cord before cleaning. These openings must not be blocked by unplugging all warnings and instructions marked on the product. Never spill liquid of the product and to ensure reliable operation of any kind into this product through cabinet slots as possible. Keep this...
User Manual
Page 5
... the projector's lens when the lamp is something wrong with your projector. v Product servicing Do not attempt to service this product from walls and free flow of air around the projector is necessary. • Locations where temperatures may become excessively high, such as opening or removing covers may hurt your eyes. • Turn on . For safety reasons, do not use non-compliant parts when adding or changing components. It Warning! Keep...
... the projector's lens when the lamp is something wrong with your projector. v Product servicing Do not attempt to service this product from walls and free flow of air around the projector is necessary. • Locations where temperatures may become excessively high, such as opening or removing covers may hurt your eyes. • Turn on . For safety reasons, do not use non-compliant parts when adding or changing components. It Warning! Keep...
User Manual
Page 6
... when the projector is showing warning message. • When changing the lamp, please allow unit to cool down, and follow all changing instructions. • Reset the "Lamp Hour Reset" function from the Onscreen display "Management" menu after replacing the lamp module. • Do not attempt to break on the projector or remote controller. • The lamp becomes extremely hot during operation. It can lead to removing the lamp assembly for mounting the projector and...
... when the projector is showing warning message. • When changing the lamp, please allow unit to cool down, and follow all changing instructions. • Reset the "Lamp Hour Reset" function from the Onscreen display "Management" menu after replacing the lamp module. • Do not attempt to break on the projector or remote controller. • The lamp becomes extremely hot during operation. It can lead to removing the lamp assembly for mounting the projector and...
User Manual
Page 7
...from your body. Use the device only in these areas instruct you suspect interference, switch off all wireless or radio transmitting devices when using wireless function (Optional) Warning! This device meets RF exposure guidelines when used normally, and it may be using equipment that could be... device to : wireless LAN (WLAN), Bluetooth and/or 3G. To successfully transmit data files or messages, this device requires a good quality connection to do the following conditions. vii Operating environment for using your machine under the following : • Always keep the device more ...
...from your body. Use the device only in these areas instruct you suspect interference, switch off all wireless or radio transmitting devices when using wireless function (Optional) Warning! This device meets RF exposure guidelines when used normally, and it may be using equipment that could be... device to : wireless LAN (WLAN), Bluetooth and/or 3G. To successfully transmit data files or messages, this device requires a good quality connection to do the following conditions. vii Operating environment for using your machine under the following : • Always keep the device more ...

User Manual
Page 10
... shows warning messages. • Reset the "Lamp Hour Reset" function from the Onscreen display "Management" menu after replacing the lamp module. • When switching the projector off the product before disconnecting power. • Turn on the projector first and then the signal sources. • Do not use lens cap when projector is on. x First thing first Usage notes Do: • Turn off , please ensure the projector completes its cooling cycle before cleaning. • Use...
... shows warning messages. • Reset the "Lamp Hour Reset" function from the Onscreen display "Management" menu after replacing the lamp module. • When switching the projector off the product before disconnecting power. • Turn on the projector first and then the signal sources. • Do not use lens cap when projector is on. x First thing first Usage notes Do: • Turn off , please ensure the projector completes its cooling cycle before cleaning. • Use...
User Manual
Page 11
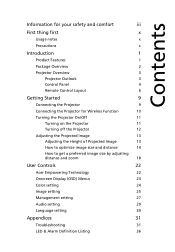
...3 Control Panel 4 Remote Control Layout 6 Getting Started 9 Connecting the Projector 9 Connecting the Projector for Wireless Function 10 Turning the Projector On/Off 11 Turning on the Projector 11 Turning off the Projector 12 Adjusting the Projected Image 13 Adjusting the Height of Projected Image 13 How to optimize image size and distance 14 How to get a preferred image size by adjusting distance and zoom 18 User Controls 22 Acer Empowering Technology 22 Onscreen Display (OSD) Menus 23 Color setting 24 Image setting 25 Management setting 27 Audio setting...
...3 Control Panel 4 Remote Control Layout 6 Getting Started 9 Connecting the Projector 9 Connecting the Projector for Wireless Function 10 Turning the Projector On/Off 11 Turning on the Projector 11 Turning off the Projector 12 Adjusting the Projected Image 13 Adjusting the Height of Projected Image 13 How to optimize image size and distance 14 How to get a preferred image size by adjusting distance and zoom 18 User Controls 22 Acer Empowering Technology 22 Onscreen Display (OSD) Menus 23 Color setting 24 Image setting 25 Management setting 27 Audio setting...

User Manual
Page 13
...) mode extends lamp life • Empowering Key reveals Acer Empowering Technology utilities (Acer eView, eTimer, eOpening Management) for easy adjustment of settings • P1165/P1165P/P1265/P1265P: Equipped with DVI connection supporting HDCP P5260i/P5270/P5280/P5370W series: Equipped with DVI and HDMI™ connections supporting HDCP • Advanced digital keystone correction optimizes presentations • Multi-language onscreen display (OSD) menus • Full-function remote control • Manual focus projection lens zooms up...
...) mode extends lamp life • Empowering Key reveals Acer Empowering Technology utilities (Acer eView, eTimer, eOpening Management) for easy adjustment of settings • P1165/P1165P/P1265/P1265P: Equipped with DVI connection supporting HDCP P5260i/P5270/P5280/P5370W series: Equipped with DVI and HDMI™ connections supporting HDCP • Advanced digital keystone correction optimizes presentations • Multi-language onscreen display (OSD) menus • Full-function remote control • Manual focus projection lens zooms up...

User Manual
Page 14
Projector with lens cap Power cord VGA cable Compostive video cable 2 x Batteries Carrying case DVI-D Cable (P5260i/P5270/P5280/ P5370W Series) #A #B Security card Acer Projector 2 x User's Guide (Wireless CD for P5260i Series) PgUp Quick Start Guide PgDn Remote control (#B for P5260i Series ) Wireless antenna (P5260i Series) Check to make sure your dealer immediately if any thing is complete. English 2 Package Overview This projector comes with USB PnS (Wireless Quick Start Guide handy drive (P5260i Series) for...
Projector with lens cap Power cord VGA cable Compostive video cable 2 x Batteries Carrying case DVI-D Cable (P5260i/P5270/P5280/ P5370W Series) #A #B Security card Acer Projector 2 x User's Guide (Wireless CD for P5260i Series) PgUp Quick Start Guide PgDn Remote control (#B for P5260i Series ) Wireless antenna (P5260i Series) Check to make sure your dealer immediately if any thing is complete. English 2 Package Overview This projector comes with USB PnS (Wireless Quick Start Guide handy drive (P5260i Series) for...

User Manual
Page 16
... the image to compensate for 10/100M Ethernet) Control Panel 12 3 9 4 8 5 7 4 # Function 1 LAMP 2 Empowering key 3 TEMP 4 Keystone 6 Description Lamp Indicator LED Unique Acer functions: eOpening, eView, eTimer. English 4 # Description 1 Audio input connector (1) 2 RS232 connector 3 USB connector 4 S-Video input connector 5 Composite video input connector 6 Monitor loop-through output connector (VGA-Out) 7 PC analog signal/HDTV/component video input connector (1) 8 DVI input connector (for digital signal with HDCP function) 9 KensingtonTM lock port 10 Power socket 11 HDMI...
... the image to compensate for 10/100M Ethernet) Control Panel 12 3 9 4 8 5 7 4 # Function 1 LAMP 2 Empowering key 3 TEMP 4 Keystone 6 Description Lamp Indicator LED Unique Acer functions: eOpening, eView, eTimer. English 4 # Description 1 Audio input connector (1) 2 RS232 connector 3 USB connector 4 S-Video input connector 5 Composite video input connector 6 Monitor loop-through output connector (VGA-Out) 7 PC analog signal/HDTV/component video input connector (1) 8 DVI input connector (for digital signal with HDCP function) 9 KensingtonTM lock port 10 Power socket 11 HDMI...
User Manual
Page 18
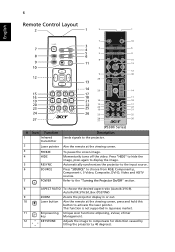
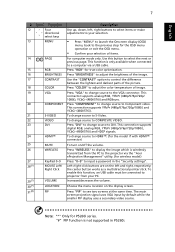
Auto/Full/4:3/16:9/L.Box (P5370W) 9 ZOOM Zooms the projector display in Japanese market. 11 Empowering Unique Acer functions: eOpening, eView, eTimer key Management. 12 KEYSTONE Adjusts the image to activate the laser pointer. This function is not supported in or out. 10 Laser button Aim the remote at the viewing screen. 3 FREEZE To pause the screen image. 4 HIDE Momentarily turns off the video. transmitter 2 Laser pointer Aim the remote at...
Auto/Full/4:3/16:9/L.Box (P5370W) 9 ZOOM Zooms the projector display in Japanese market. 11 Empowering Unique Acer functions: eOpening, eView, eTimer key Management. 12 KEYSTONE Adjusts the image to activate the laser pointer. This function is not supported in or out. 10 Laser button Aim the remote at the viewing screen. 3 FREEZE To pause the screen image. 4 HIDE Momentarily turns off the video. transmitter 2 Laser pointer Aim the remote at...
User Manual
Page 19
..." utility. (for wireless model) Press "0~9" to DVI. This connection supports YPbPr (480p/576p/720p/1080i) and YCbCr (480i/576i). Press "PIP" to HDMI™. (for the OSD menu operation or exit the OSD menu. • Confirm your PC. The main screen projection signal uses VGA input by default while the smaller PIP display uses a secondary video source. To change source to input a password in P5260i. To enable this button to Component video. Press "RGB" for...
..." utility. (for wireless model) Press "0~9" to DVI. This connection supports YPbPr (480p/576p/720p/1080i) and YCbCr (480i/576i). Press "PIP" to HDMI™. (for the OSD menu operation or exit the OSD menu. • Confirm your PC. The main screen projection signal uses VGA input by default while the smaller PIP display uses a secondary video source. To change source to input a password in P5260i. To enable this button to Component video. Press "RGB" for...
User Manual
Page 23
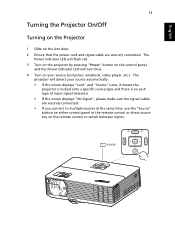
... Power indicator LED will flash red. 3 Turn on the projector by pressing "Power" button on the control panel, and the Power indicator LED will detect your source (computer, notebook, video player ,etc.). The projector will turn blue. 4 Turn on your source automatically. • If the screen displays "Lock" and "Source" icons, it means the projector is locked onto a specific source type and there is no such type of input signal detected. • If the screen displays "No Signal", please make sure the signal cables are securely connected...
... Power indicator LED will flash red. 3 Turn on the projector by pressing "Power" button on the control panel, and the Power indicator LED will detect your source (computer, notebook, video player ,etc.). The projector will turn blue. 4 Turn on your source automatically. • If the screen displays "Lock" and "Source" icons, it means the projector is locked onto a specific source type and there is no such type of input signal detected. • If the screen displays "No Signal", please make sure the signal cables are securely connected...

User Manual
Page 24
... the LAMP indicator turns solid RED, please contact your local dealer or service center: "Fan fail. Warning: Do not turn the projector back on the projector immediately after powering off, the Power indicator LED will flash RED rapidly and the fan(s) will continue to operate for about to happen: "Projector Overheated. Warning indicators: • If the projector automatically shuts down and the TEMP indicator turns solid RED, this is about 120 seconds. Lamp will automatically turn off the projector, press the "Power" button...
... the LAMP indicator turns solid RED, please contact your local dealer or service center: "Fan fail. Warning: Do not turn the projector back on the projector immediately after powering off, the Power indicator LED will flash RED rapidly and the fan(s) will continue to operate for about to happen: "Projector Overheated. Warning indicators: • If the projector automatically shuts down and the TEMP indicator turns solid RED, this is about 120 seconds. Lamp will automatically turn off the projector, press the "Power" button...
User Manual
Page 26
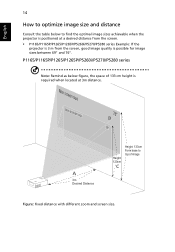
... the screen, good image quality is required when located at 3m distance. P1165/P1165P/P1265/P1265P/P5260i/P5270/P5280 series Note: Remind as below to top of 133 cm height is possible for image sizes between 69" and 76". English 14 How to optimize image size and distance Consult the table below figure, the space of image Figure: Fixed distance with different zoom and screen size.
... the screen, good image quality is required when located at 3m distance. P1165/P1165P/P1265/P1265P/P5260i/P5270/P5280 series Note: Remind as below to top of 133 cm height is possible for image sizes between 69" and 76". English 14 How to optimize image size and distance Consult the table below figure, the space of image Figure: Fixed distance with different zoom and screen size.
User Manual
Page 39
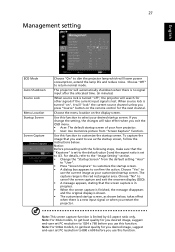
... display is shown. • The customized startup screen, as shown below . Note: For XGA models, to get best quality for the next channel. 27 Management setting English ECO Mode Auto Shutdown Source Lock Menu Location Startup Screen Screen Capture Choose "On" to dim the projector lamp which will take effect when you exit the OSD menu. • Acer: The default startup screen of your Acer projector. • User: Use memorize picture from the default setting "Acer" to "User...
... display is shown. • The customized startup screen, as shown below . Note: For XGA models, to get best quality for the next channel. 27 Management setting English ECO Mode Auto Shutdown Source Lock Menu Location Startup Screen Screen Capture Choose "On" to dim the projector lamp which will take effect when you exit the OSD menu. • Acer: The default startup screen of your Acer projector. • User: Use memorize picture from the default setting "Acer" to "User...
User Manual
Page 40
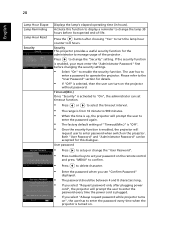
... factory default setting of -life. Timeout(Min.) Once "Security" is selected, then the user can be between 4 and 8 characters long. • If you select "Always request password while projector turns on", the user has to turn on . Please refer to the "User Password" section for details. • If "Off" is activated to change the "Security" setting. 28 English Lamp Hour Elapse Lamp Reminding Lamp Hour Reset Security Displays the lamp's elapsed operating time (in hours...
... factory default setting of -life. Timeout(Min.) Once "Security" is selected, then the user can be between 4 and 8 characters long. • If you select "Always request password while projector turns on", the user has to turn on . Please refer to the "User Password" section for details. • If "Off" is activated to change the "Security" setting. 28 English Lamp Hour Elapse Lamp Reminding Lamp Hour Reset Security Displays the lamp's elapsed operating time (in hours...

User Manual
Page 41
...". Lock User Startup Screen • Default Lock User Startup Screen is "ON", users cannot change startup screen anymore and avoid other users change the "Administrator Password". • The factory default of any warning notifications. Audio setting Volume • • Mute • • Power On/Off Volume • Alarm Volume • Press to increase the volume. Press to decrease the volume. English 29 Reset Administrator Password The "Administrator Password" can be accepted by projector...
...". Lock User Startup Screen • Default Lock User Startup Screen is "ON", users cannot change startup screen anymore and avoid other users change the "Administrator Password". • The factory default of any warning notifications. Audio setting Volume • • Mute • • Power On/Off Volume • Alarm Volume • Press to increase the volume. Press to decrease the volume. English 29 Reset Administrator Password The "Administrator Password" can be accepted by projector...
User Manual
Page 43
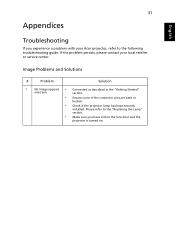
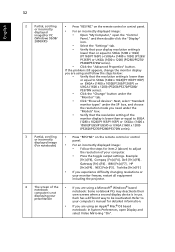
... following troubleshooting guide. If the problem persists, please contact your Acer projector, refer to the "Replacing the Lamp" section. • Make sure you experience a problem with your local reseller or service center. Image Problems and Solutions # Problem Solution 1 No image appears • Connected as described in the "Getting Started" onscreen section. • Ensure none of the connector pins are bent or broken. • Check if the projector lamp...
... following troubleshooting guide. If the problem persists, please contact your Acer projector, refer to the "Replacing the Lamp" section. • Make sure you experience a problem with your local reseller or service center. Image Problems and Solutions # Problem Solution 1 No image appears • Connected as described in the "Getting Started" onscreen section. • Ensure none of the connector pins are bent or broken. • Check if the projector lamp...
User Manual
Page 44
... the remote control or control or incorrectly displayed image (For notebooks) panel. • For an incorrectly displayed image: • Follow the steps for detailed information. • If you are using an Apple® Mac® OS based notebook: In System Preferences, open the "Control (Windows 95/98/ 2000/XP)) Panel," and then double-click the "Display" icon. • Select the "Settings" tab. • Verify that the resolution setting...
... the remote control or control or incorrectly displayed image (For notebooks) panel. • For an incorrectly displayed image: • Follow the steps for detailed information. • If you are using an Apple® Mac® OS based notebook: In System Preferences, open the "Control (Windows 95/98/ 2000/XP)) Panel," and then double-click the "Display" icon. • Select the "Settings" tab. • Verify that the resolution setting...
User Manual
Page 53
41 English Specifications The specifications listed below are subject to Acer's published marketing specifications. Projection system Resolution Computer compatibility Video compatibility Aspect ratio Displayable colors Projection lens Projection screen size (diagonal) Projection distance Throw ratio Horizontal scan rate Vertical refresh scan rate Lamp type Keystone correction Audio Weight Dimensions (W x D x H) Remote control DLP® P1165/P1165P: Native: SVGA (800 x 600) , Maximum: SXGA (1280 x 1024), WXGA+ (1440 x 900) P1265/P1265P: Native: XGA (1024 x 768), Maximum: SXGA+ (1400...
41 English Specifications The specifications listed below are subject to Acer's published marketing specifications. Projection system Resolution Computer compatibility Video compatibility Aspect ratio Displayable colors Projection lens Projection screen size (diagonal) Projection distance Throw ratio Horizontal scan rate Vertical refresh scan rate Lamp type Keystone correction Audio Weight Dimensions (W x D x H) Remote control DLP® P1165/P1165P: Native: SVGA (800 x 600) , Maximum: SXGA (1280 x 1024), WXGA+ (1440 x 900) P1265/P1265P: Native: XGA (1024 x 768), Maximum: SXGA+ (1400...


