
User Manual (3D)
Page 4
Plug the USB cable in to view 3D content. Note: You may need to purchase additional software. 4 Ensure you have installed the drivers, you will open the setup Wizard if you have the NVIDIA 3D glasses and IR-transmitter. This will need to set up the 3D environment. English 4 Important: Only NVIDIA graphics cards are supported. 2 Download and install the 3D drivers and 3D...
Plug the USB cable in to view 3D content. Note: You may need to purchase additional software. 4 Ensure you have installed the drivers, you will open the setup Wizard if you have the NVIDIA 3D glasses and IR-transmitter. This will need to set up the 3D environment. English 4 Important: Only NVIDIA graphics cards are supported. 2 Download and install the 3D drivers and 3D...

User Manual (3D)
Page 7
... graphics card. Using DLP 3D / NVIDIA 3DTV Play technology Requires DLP 3D glasses. Note: Please refer to the NVIDIA 3DTV Play website: www.nvidia.com/3dtv. English 7 1 Open the stereoscopic player and set the viewing method by going to get the 3D effects. Note: You need to your graphics card's documentation. 2 Download and install the latest drivers for the...
... graphics card. Using DLP 3D / NVIDIA 3DTV Play technology Requires DLP 3D glasses. Note: Please refer to the NVIDIA 3DTV Play website: www.nvidia.com/3dtv. English 7 1 Open the stereoscopic player and set the viewing method by going to get the 3D effects. Note: You need to your graphics card's documentation. 2 Download and install the latest drivers for the...
User Manual
Page 5
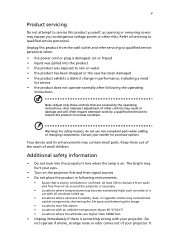
.... At least 50cm clearance from the wall outlet and refer servicing to qualified service personnel when: • the power cord or plug is necessary. • Locations where temperatures may become excessively high, such as opening or removing covers may hurt your projector. Consult your projector. Keep them out of the reach of air around the projector is damaged, cut or frayed • liquid was exposed...
.... At least 50cm clearance from the wall outlet and refer servicing to qualified service personnel when: • the power cord or plug is necessary. • Locations where temperatures may become excessively high, such as opening or removing covers may hurt your projector. Consult your projector. Keep them out of the reach of air around the projector is damaged, cut or frayed • liquid was exposed...
User Manual
Page 6
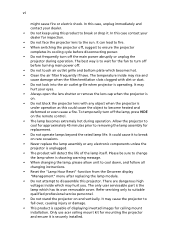
...; Do not look into the air outlet grille when projector is to wait for ceiling mount installation. The best way is operating. Please be sure to change the lamp when is showing warning message. • When changing the lamp, please allow unit to cool down, and follow all changing instructions. • Reset the "Lamp Hour Reset" function from the Onscreen display "Management" menu after replacing the lamp module. • Do not attempt...
...; Do not look into the air outlet grille when projector is to wait for ceiling mount installation. The best way is operating. Please be sure to change the lamp when is showing warning message. • When changing the lamp, please allow unit to cool down, and follow all changing instructions. • Reset the "Lamp Hour Reset" function from the Onscreen display "Management" menu after replacing the lamp module. • Do not attempt...
User Manual
Page 8
... warnings, precautions and maintenance as this user's guide to change the lamp when it will burn out and may cause electric shock. • When changing the lamp, please allow unit to clean the display housing. • Disconnect the power plug from the Onscreen display "Management" menu after replacing the lamp module. • When switching the projector off, please ensure the projector completes its life, it shows warning messages. • Reset the "Lamp Hour Reset...
... warnings, precautions and maintenance as this user's guide to change the lamp when it will burn out and may cause electric shock. • When changing the lamp, please allow unit to clean the display housing. • Disconnect the power plug from the Onscreen display "Management" menu after replacing the lamp module. • When switching the projector off, please ensure the projector completes its life, it shows warning messages. • Reset the "Lamp Hour Reset...
User Manual
Page 9
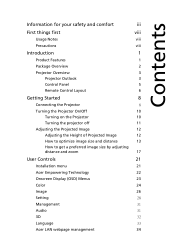
...2 Projector Overview 3 Projector Outlook 3 Control Panel 5 Remote Control Layout 6 Getting Started 8 Connecting the Projector 8 Turning the Projector On/Off 10 Turning on the Projector 10 Turning the projector off 11 Adjusting the Projected Image 12 Adjusting the Height of Projected Image 12 How to optimize image size and distance 13 How to get a preferred image size by adjusting distance and zoom 17 User Controls 21 Installation menu 21 Acer Empowering Technology 22 Onscreen Display (OSD) Menus 23 Color 24 Image 26 Setting 28 Management 31 Audio 31...
...2 Projector Overview 3 Projector Outlook 3 Control Panel 5 Remote Control Layout 6 Getting Started 8 Connecting the Projector 8 Turning the Projector On/Off 10 Turning on the Projector 10 Turning the projector off 11 Adjusting the Projected Image 12 Adjusting the Height of Projected Image 12 How to optimize image size and distance 13 How to get a preferred image size by adjusting distance and zoom 17 User Controls 21 Installation menu 21 Acer Empowering Technology 22 Onscreen Display (OSD) Menus 23 Color 24 Image 26 Setting 28 Management 31 Audio 31...
User Manual
Page 10
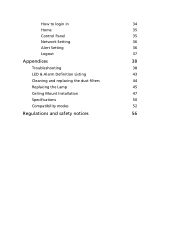
How to login in 34 Home 35 Control Panel 35 Network Setting 36 Alert Setting 36 Logout 37 Appendices 38 Troubleshooting 38 LED & Alarm Definition Listing 43 Cleaning and replacing the dust filters 44 Replacing the Lamp 45 Ceiling Mount Installation 47 Specifications 50 Compatibility modes 52 Regulations and safety notices 56
How to login in 34 Home 35 Control Panel 35 Network Setting 36 Alert Setting 36 Logout 37 Appendices 38 Troubleshooting 38 LED & Alarm Definition Listing 43 Cleaning and replacing the dust filters 44 Replacing the Lamp 45 Ceiling Mount Installation 47 Specifications 50 Compatibility modes 52 Regulations and safety notices 56

User Manual
Page 11
... Technology utilities (Acer eView, eTimer, ePower, e3D Management) for easy adjustment of settings • Equipped with HDMI™ connections supporting HDCP • Advanced digital keystone correction optimizes presentations • Smart detection delivers quick, intelligent source detection • Multi-language onscreen display (OSD) menus • Full-function remote control • Manual focus projection lens zooms up to 1.1x • 2x digital zoom and pan function • Microsoft® Windows® 2000...
... Technology utilities (Acer eView, eTimer, ePower, e3D Management) for easy adjustment of settings • Equipped with HDMI™ connections supporting HDCP • Advanced digital keystone correction optimizes presentations • Smart detection delivers quick, intelligent source detection • Multi-language onscreen display (OSD) menus • Full-function remote control • Manual focus projection lens zooms up to 1.1x • 2x digital zoom and pan function • Microsoft® Windows® 2000...
User Manual
Page 12
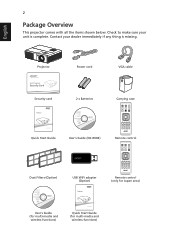
... sure your dealer immediately if any thing is complete. MENU LAMP SOURC E R E SYNC TEMP POWER Projector Power cord VGA cable Security card 2 x Batteries ©2013, Acer Inc. P1276/ P1373W/B/ P1273/n/B/i Series Acer Projector P/N:MC.JG811.003 Carrying case SOURCE ZOOM FREEZE HIDE MEDIA SETUP Quick Start Guide User's Guide (CD-ROM) Remote control SOURCE ZOOM FREEZE HIDE MEDIA SETUP RATIO Dust Filters (Option) ©2013, Acer Inc. English 2 Package Overview This projector comes with all the items shown below. Contact...
... sure your dealer immediately if any thing is complete. MENU LAMP SOURC E R E SYNC TEMP POWER Projector Power cord VGA cable Security card 2 x Batteries ©2013, Acer Inc. P1276/ P1373W/B/ P1273/n/B/i Series Acer Projector P/N:MC.JG811.003 Carrying case SOURCE ZOOM FREEZE HIDE MEDIA SETUP Quick Start Guide User's Guide (CD-ROM) Remote control SOURCE ZOOM FREEZE HIDE MEDIA SETUP RATIO Dust Filters (Option) ©2013, Acer Inc. English 2 Package Overview This projector comes with all the items shown below. Contact...
User Manual
Page 16
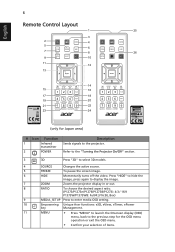
.../P1276/P1273B/P1273i: 4:3 / 16:9 P1373W/P1373WB: Full/4:3/16:9/L.Box) 9 MEDIA_SETUP Press to enter media OSD setting. 10 Empowering Unique Acer functions: e3D, eView, eTimer, ePower key Management. 11 MENU • Press "MENU" to launch the Onscreen display (OSD) menu, back to select 3D models. 4 SOURCE Changes the active source. 5 FREEZE To pause the screen image. 6 HIDE Momentarily turns off the video. Refer to the "Turning the Projector...
.../P1276/P1273B/P1273i: 4:3 / 16:9 P1373W/P1373WB: Full/4:3/16:9/L.Box) 9 MEDIA_SETUP Press to enter media OSD setting. 10 Empowering Unique Acer functions: e3D, eView, eTimer, ePower key Management. 11 MENU • Press "MENU" to launch the Onscreen display (OSD) menu, back to select 3D models. 4 SOURCE Changes the active source. 5 FREEZE To pause the screen image. 6 HIDE Momentarily turns off the video. Refer to the "Turning the Projector...
User Manual
Page 20
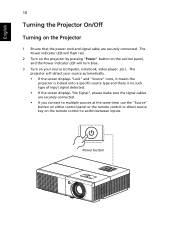
... the screen displays "No Signal", please make sure the signal cables are securely connected. • If you connect to multiple sources at the same time, use the "Source" button on either control panel or the remote control or direct source key on the Projector 1 Ensure that the power cord and signal cable are securely connected. English 10 Turning the Projector On/Off Turning on the remote control to switch between inputs. Power button MENU LAMP SOURCE RE SYNC TEMP POWER The Power indicator LED will flash red. 2 Turn on the projector by pressing "Power" button on the control panel...
... the screen displays "No Signal", please make sure the signal cables are securely connected. • If you connect to multiple sources at the same time, use the "Source" button on either control panel or the remote control or direct source key on the Projector 1 Ensure that the power cord and signal cable are securely connected. English 10 Turning the Projector On/Off Turning on the remote control to switch between inputs. Power button MENU LAMP SOURCE RE SYNC TEMP POWER The Power indicator LED will flash red. 2 Turn on the projector by pressing "Power" button on the control panel...

User Manual
Page 31
...more . 1 Turn on the projector by pressing "Power" button on the control pad. 2 Press the menu button on the screen. English 21 User Controls Installation menu The installation menu provides an onscreen display (OSD) for screen size and distance, focus, keystone correction and more . 4 The Installation menu includes the following options: • Projection Mode • Projection Location • Auto Keystone settings • Manual Keystone settings • Language settings • LAN/WiFi settings • LAN IP / Mask settings • Reset to factory default function Use the...
...more . 1 Turn on the projector by pressing "Power" button on the control pad. 2 Press the menu button on the screen. English 21 User Controls Installation menu The installation menu provides an onscreen display (OSD) for screen size and distance, focus, keystone correction and more . 4 The Installation menu includes the following options: • Projection Mode • Projection Location • Auto Keystone settings • Manual Keystone settings • Language settings • LAN/WiFi settings • LAN IP / Mask settings • Reset to factory default function Use the...

User Manual
Page 36
...: The factory default setting. • Projection Location • Rear: Reverses the image so you can project from behind a translucent screen. "Full" and "L.Box" functions are only supported in by 1.333 times. Automatically adjusts vertical image. Auto: Automatically adjusts projection location of the image. • Press to decrease the sharpness. • Press to increase the sharpness. Adjusts the sharpness of image. • Desktop Aspect Ratio Auto Keystone Manual Keystone • Ceiling: Turns the image upside down for ceiling-mounted projection. Use this...
...: The factory default setting. • Projection Location • Rear: Reverses the image so you can project from behind a translucent screen. "Full" and "L.Box" functions are only supported in by 1.333 times. Automatically adjusts vertical image. Auto: Automatically adjusts projection location of the image. • Press to decrease the sharpness. • Press to increase the sharpness. Adjusts the sharpness of image. • Desktop Aspect Ratio Auto Keystone Manual Keystone • Ceiling: Turns the image upside down for ceiling-mounted projection. Use this...

User Manual
Page 38
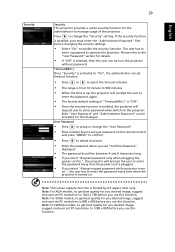
... screen capture and exit the onscreen display (OSD). • A message appears, stating that the screen capture is in your Acer projector. • User: Use memorize picture from the default setting "Acer" to "User". • Press "Screen Capture" to customize the startup screen. • A dialog box appears to confirm the action. This function is only available when a composite video or S-Video input signal is selected and its system format is a new input signal...
... screen capture and exit the onscreen display (OSD). • A message appears, stating that the screen capture is in your Acer projector. • User: Use memorize picture from the default setting "Acer" to "User". • Press "Screen Capture" to customize the startup screen. • A dialog box appears to confirm the action. This function is only available when a composite video or S-Video input signal is selected and its system format is a new input signal...
User Manual
Page 39
... resolution to "On", the administrator can turn on the projector . Both "User Password" and "Administrator Password" can be between 4 and 8 characters long. • If you select "Request password only when plugging the power cord in.", the projector will request user to setup or change the "Security" setting. User Password • Press to enter password when switch on the projector without password. Note: For XGA models, to get best quality for you desired image...
... resolution to "On", the administrator can turn on the projector . Both "User Password" and "Administrator Password" can be between 4 and 8 characters long. • If you select "Request password only when plugging the power cord in.", the projector will request user to setup or change the "Security" setting. User Password • Press to enter password when switch on the projector without password. Note: For XGA models, to get best quality for you desired image...
User Manual
Page 40
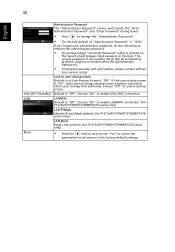
... the administrator password: • An unique 6-digit "Universal Password" which will be used in the box). If you forgot your administrator password, do the following to change that arbitrarily. This unique password is the number which is printed on all menus to enable VGA OUT connection. Default is "Off". 30 English VGA OUT (Standby) LAN Reset Administrator Password The "Administrator Password" can be accepted by projector anytime no...
... the administrator password: • An unique 6-digit "Universal Password" which will be used in the box). If you forgot your administrator password, do the following to change that arbitrarily. This unique password is the number which is printed on all menus to enable VGA OUT connection. Default is "Off". 30 English VGA OUT (Standby) LAN Reset Administrator Password The "Administrator Password" can be accepted by projector anytime no...
User Manual
Page 41
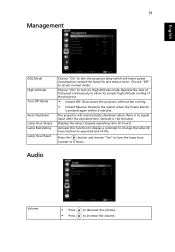
... the system when the Power button is 120 minutes) Displays the lamp's elapsed operating time (in hours). to turn the lamp hour counter to return normal mode. 31 Management English ECO Mode High Altitude Turn Off Mode Auto Shutdown Lamp Hour Elapse Lamp Reminding Lamp Hour Reset Choose "On" to dim the projector lamp which will automatically shutdown when there is no signal input after the allocated time. (default is pressed again within 2 minutes. Operate the fans at full speed continuously...
... the system when the Power button is 120 minutes) Displays the lamp's elapsed operating time (in hours). to turn the lamp hour counter to return normal mode. 31 Management English ECO Mode High Altitude Turn Off Mode Auto Shutdown Lamp Hour Elapse Lamp Reminding Lamp Hour Reset Choose "On" to dim the projector lamp which will automatically shutdown when there is no signal input after the allocated time. (default is pressed again within 2 minutes. Operate the fans at full speed continuously...
User Manual
Page 48
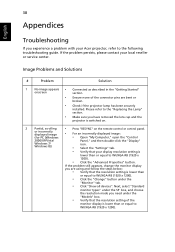
... "Change" button under the "Models" box. • Verify that the resolution setting is switched on. 2 Partial, scrolling • Press "RESYNC" on the remote control or control panel. If the problem persists, please contact your Acer projector, refer to the "Replacing the Lamp" section. • Make sure you need under the "Monitor" tab. • Click "Show all devices". Please refer to the following troubleshooting guide. 38 Appendices English Troubleshooting...
... "Change" button under the "Models" box. • Verify that the resolution setting is switched on. 2 Partial, scrolling • Press "RESYNC" on the remote control or control panel. If the problem persists, please contact your Acer projector, refer to the "Replacing the Lamp" section. • Make sure you need under the "Monitor" tab. • Click "Show all devices". Please refer to the following troubleshooting guide. 38 Appendices English Troubleshooting...

User Manual
Page 49
... "How to Get a Preferred Image Size by Adjusting Distance and Zoom" section for more information. • Check and reconfigure the display mode of your computer. • Press the toggle output settings. Refer to your presentation • If you are using an Apple® Mac® OS based notebook: In System Preferences, open Display and select Video Mirroring "On". 5 Image is in use. Example: [Fn]+[F4], Compaq...
... "How to Get a Preferred Image Size by Adjusting Distance and Zoom" section for more information. • Check and reconfigure the display mode of your computer. • Press the toggle output settings. Refer to your presentation • If you are using an Apple® Mac® OS based notebook: In System Preferences, open Display and select Video Mirroring "On". 5 Image is in use. Example: [Fn]+[F4], Compaq...

User Manual
Page 60
... listed below are subject to Acer's published marketing specifications. Projection system Resolution Computer compatibility Video compatibility Aspect ratio Displayable colors Projection lens Projection screen size (diagonal) Projection distance Throw ratio Horizontal scan rate Vertical refresh scan rate Lamp type Keystone correction Audio Weight Dimensions (L x W x H) Remote control Digital Zoom Power supply DLP® P1373WB/P1373W: Native: WXGA (1280 x 800), Maximum: UXGA (1600 x 1200), 1080p(1920x1080) P1273/P1273n/P1273B/P1273i/P1276: Native: XGA (1024 x 768), Maximum: UXGA (1600...
... listed below are subject to Acer's published marketing specifications. Projection system Resolution Computer compatibility Video compatibility Aspect ratio Displayable colors Projection lens Projection screen size (diagonal) Projection distance Throw ratio Horizontal scan rate Vertical refresh scan rate Lamp type Keystone correction Audio Weight Dimensions (L x W x H) Remote control Digital Zoom Power supply DLP® P1373WB/P1373W: Native: WXGA (1280 x 800), Maximum: UXGA (1600 x 1200), 1080p(1920x1080) P1273/P1273n/P1273B/P1273i/P1276: Native: XGA (1024 x 768), Maximum: UXGA (1600...


