
User Manual (3D)
Page 4
... to purchase additional software. 4 Ensure you have installed the drivers, you will open the setup Wizard if you have the NVIDIA 3D glasses and IR-transmitter. This will need to set up the environment. 1 Position the infra-red transmitter so that it has maximum coverage. English 4 Important: Only NVIDIA graphics cards are supported. 2 Download and install the 3D drivers and 3D...
... to purchase additional software. 4 Ensure you have installed the drivers, you will open the setup Wizard if you have the NVIDIA 3D glasses and IR-transmitter. This will need to set up the environment. 1 Position the infra-red transmitter so that it has maximum coverage. English 4 Important: Only NVIDIA graphics cards are supported. 2 Download and install the 3D drivers and 3D...

User Manual (3D)
Page 7
... will need to view content at . To download software and use an NVIDIA 3DTV Play ready projector with DLP glasses, refer to do the following. 1 Ensure your graphics card. Note: Please refer to View > Viewing Method > NVIDIA 3D Vision. 2 Open the 3D content in order to your graphics card's documentation. 2 Download and install the latest drivers for the latest driver version. 3 You should...
... will need to view content at . To download software and use an NVIDIA 3DTV Play ready projector with DLP glasses, refer to do the following. 1 Ensure your graphics card. Note: Please refer to View > Viewing Method > NVIDIA 3D Vision. 2 Open the 3D content in order to your graphics card's documentation. 2 Download and install the latest drivers for the latest driver version. 3 You should...
User Manual
Page 5
... work by the operating instructions, since improper adjustment of small children. It Keep them out of the reach of other risks. Do not operate if smoke, strange noise or odor comes out of air around the projector are necessary. • Locations where temperatures may become excessively high, such as opening or removing covers may contaminate optical components, shorten the life span and darken the image. • Locations...
... work by the operating instructions, since improper adjustment of small children. It Keep them out of the reach of other risks. Do not operate if smoke, strange noise or odor comes out of air around the projector are necessary. • Locations where temperatures may become excessively high, such as opening or removing covers may contaminate optical components, shorten the life span and darken the image. • Locations...
User Manual
Page 6
... projector lens with dirt or dust. • Do not look into the air outlet grille when projector is securely installed. It may hurt you need to change the lamp. • The product will detect the life of displaying inverted images for changing the lamp, when lamp warning message displays. • Do not attempt to disassemble this product to break or drop it to become hot. • Clean the air filter...
... projector lens with dirt or dust. • Do not look into the air outlet grille when projector is securely installed. It may hurt you need to change the lamp. • The product will detect the life of displaying inverted images for changing the lamp, when lamp warning message displays. • Do not attempt to disassemble this product to break or drop it to become hot. • Clean the air filter...

User Manual
Page 8
... not open or disassemble the product as recommended in direct sunlight. Warning: • Do not look into the projector's lens when the lamp is not being used for changing the lamp, when lamp warning message displays. • When switching the projector off the product before disconnecting power. • Turn on the projector first and then the signal sources. • Do not use lens cap when projector is in operation. • When the lamp reaches...
... not open or disassemble the product as recommended in direct sunlight. Warning: • Do not look into the projector's lens when the lamp is not being used for changing the lamp, when lamp warning message displays. • When switching the projector off the product before disconnecting power. • Turn on the projector first and then the signal sources. • Do not use lens cap when projector is in operation. • When the lamp reaches...

User Manual
Page 11
... "3D" button on , the projector dynamically adjusts the power consumption of the lamp according to the brightness of the lamp by up to 70% when no input signal can be enhanced. - English 1 Introduction Product Features This product is a single-chip DLP® projector, including the following outstanding features: • DLP® technology • P5227/P1285i/P1285B: Native 1024 x 768 XGA resolution, Auto/4:3/16:9 aspect ratio supported P5327W...
... "3D" button on , the projector dynamically adjusts the power consumption of the lamp according to the brightness of the lamp by up to 70% when no input signal can be enhanced. - English 1 Introduction Product Features This product is a single-chip DLP® projector, including the following outstanding features: • DLP® technology • P5227/P1285i/P1285B: Native 1024 x 768 XGA resolution, Auto/4:3/16:9 aspect ratio supported P5327W...
User Manual
Page 13
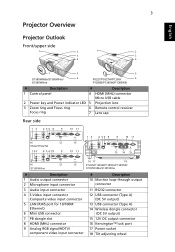
.../P1285i/ 6 P1285B/P1385Wi/P1385WB # Description # Description 1 Control panel 4 HDMI (MHL) connector Micro USB cable 2 Power key and Power indicator LED 5 Projection lens 3 Zoom ring and Focus ring Focus ring 6 Remote control receiver 7 Lens cap Rear side 1 3 4 56 8 9 AUDIO IN-1 S-VIDEO AUDIO IN-2 AUDIO OUT VIDEO HDMI -1/ MHL USB MINI-B VGA IN -2 VGA IN -1 LAN USB -A 16 12 P5227/P5327W 10 VGA-OUT 11 RS232 DC 12V OUT 15 123 4 5 678 9 AUDIO IN S-VIDEO MIC IN AUDIO OUT VIDEO HDMI -1/ MHL USB MINI-B VGA IN -2 VGA IN -1 LAN USB -A 16 12...
.../P1285i/ 6 P1285B/P1385Wi/P1385WB # Description # Description 1 Control panel 4 HDMI (MHL) connector Micro USB cable 2 Power key and Power indicator LED 5 Projection lens 3 Zoom ring and Focus ring Focus ring 6 Remote control receiver 7 Lens cap Rear side 1 3 4 56 8 9 AUDIO IN-1 S-VIDEO AUDIO IN-2 AUDIO OUT VIDEO HDMI -1/ MHL USB MINI-B VGA IN -2 VGA IN -1 LAN USB -A 16 12 P5227/P5327W 10 VGA-OUT 11 RS232 DC 12V OUT 15 123 4 5 678 9 AUDIO IN S-VIDEO MIC IN AUDIO OUT VIDEO HDMI -1/ MHL USB MINI-B VGA IN -2 VGA IN -1 LAN USB -A 16 12...

User Manual
Page 15
... SETUP 3 ZOOM 4 MODE 5 Keystone Description Refer to Component video. Four directional selection keys Selects items or makes adjustments to your selection. 6 Keypad 0~9 Press "0~9" to input a password in the "Setting" > "Security" OSD. 7 VGA To change source to HDMI™ (or DVI). (for P1285i/P1285B/P1385Wi/ P1385WB/S1385WHBe/S1385WHie) Zooms the projector display in or out. This connector supports YPbPr/YCbCr. 9 S-VIDEO To change source to S-Video. 10 HDMI™/DVI To change source to the projector. Chooses a display mode. Opens...
... SETUP 3 ZOOM 4 MODE 5 Keystone Description Refer to Component video. Four directional selection keys Selects items or makes adjustments to your selection. 6 Keypad 0~9 Press "0~9" to input a password in the "Setting" > "Security" OSD. 7 VGA To change source to HDMI™ (or DVI). (for P1285i/P1285B/P1385Wi/ P1385WB/S1385WHBe/S1385WHie) Zooms the projector display in or out. This connector supports YPbPr/YCbCr. 9 S-VIDEO To change source to S-Video. 10 HDMI™/DVI To change source to the projector. Chooses a display mode. Opens...

User Manual
Page 16
... Press to open the 3D menu for adjusting 3D settings. 24 Laser Emits visible laser pointer light for S1385WHBe/ S1385WHie) 22 USB B To change source to SD/USB A. This function is only available when connected to a computer via a USB cable. 17 VIDEO To change source to the previous step for the projectors sold in JPEG format. (for presentation purposes. Use this button to hide screen image; This projector only supports files in...
... Press to open the 3D menu for adjusting 3D settings. 24 Laser Emits visible laser pointer light for S1385WHBe/ S1385WHie) 22 USB B To change source to SD/USB A. This function is only available when connected to a computer via a USB cable. 17 VIDEO To change source to the previous step for the projectors sold in JPEG format. (for presentation purposes. Use this button to hide screen image; This projector only supports files in...
User Manual
Page 35
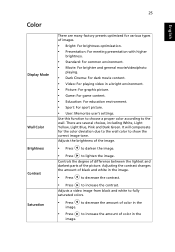
Color Display Mode Wall Color Brightness Contrast Saturation 25 There are several choices, including White, Light Yellow, Light Blue, Pink and Dark Green. Use this function to choose a proper color according to show the correct image tone. It will compensate for various types of black and white in the image. • Press to decrease the contrast. • Press to increase the amount of color in a bright environment...
Color Display Mode Wall Color Brightness Contrast Saturation 25 There are several choices, including White, Light Yellow, Light Blue, Pink and Dark Green. Use this function to choose a proper color according to show the correct image tone. It will compensate for various types of black and white in the image. • Press to decrease the contrast. • Press to increase the amount of color in a bright environment...
User Manual
Page 36
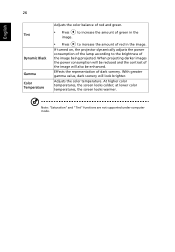
...higher color temperatures, the screen looks colder; English 26 Tint Dynamic Black Gamma Color Temperature Adjusts the color balance of red and green. • Press to increase the amount of green in the image. • Press to the brightness of the image being projected....are not supported under computer mode. If turned on, the projector dynamically adjusts the power consumption of the lamp according to increase the amount of red in the image. at lower color temperatures, the screen looks warmer. Adjusts the color temperature. When projecting darker images the power consumption will ...
...higher color temperatures, the screen looks colder; English 26 Tint Dynamic Black Gamma Color Temperature Adjusts the color balance of red and green. • Press to increase the amount of green in the image. • Press to the brightness of the image being projected....are not supported under computer mode. If turned on, the projector dynamically adjusts the power consumption of the lamp according to increase the amount of red in the image. at lower color temperatures, the screen looks warmer. Adjusts the color temperature. When projecting darker images the power consumption will ...
User Manual
Page 37
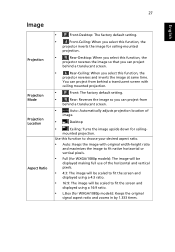
... image at same time. mounted projection. You can project from behind a translucent screen. • Auto: Automatically adjusts projection location of the horizontal and vertical pixels. • 4:3: The image will be scaled to fit the screen and displayed using a 4:3 ratio. • 16:9: The image will be scaled to fit the screen and displayed using a 16:9 ratio. • L.Box (for ceiling- 27 English Image Projection Projection Mode Projection Location Aspect Ratio • Front-Desktop: The factory default setting. • Front-Ceiling...
... image at same time. mounted projection. You can project from behind a translucent screen. • Auto: Automatically adjusts projection location of the horizontal and vertical pixels. • 4:3: The image will be scaled to fit the screen and displayed using a 4:3 ratio. • 16:9: The image will be scaled to fit the screen and displayed using a 16:9 ratio. • L.Box (for ceiling- 27 English Image Projection Projection Mode Projection Location Aspect Ratio • Front-Desktop: The factory default setting. • Front-Ceiling...
User Manual
Page 41
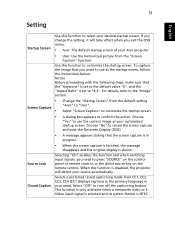
... "Keystone" is set to "4:3". Choose "Yes" to use as your customized startup screen. To capture the image that the screen capture is in your Acer projector. • User: Use the memorized picture from the "Screen Capture" function. 31 Setting English Startup Screen Screen Capture Source Lock Closed Caption Use this function to select your source automatically. Use this function is shown. This function is only available when a composite video or SVideo input signal...
... "Keystone" is set to "4:3". Choose "Yes" to use as your customized startup screen. To capture the image that the screen capture is in your Acer projector. • User: Use the memorized picture from the "Screen Capture" function. 31 Setting English Startup Screen Screen Capture Source Lock Closed Caption Use this function to select your source automatically. Use this function is shown. This function is only available when a composite video or SVideo input signal...
User Manual
Page 44
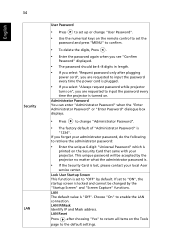
... to input the password every time the projector is turned on the remote control to set to change "User Password". • Use the numerical keys on . Choose "On" to the default settings. Administrator Password You can enter "Administrator Password" when the "Enter Administrator Password" or "Enter Password" dialogue box displays. • Press to "ON", the startup screen is "Off". LAN Reset Press after plugging power cord", you are requested to input the password every time the power cord is...
... to input the password every time the projector is turned on the remote control to set to change "User Password". • Use the numerical keys on . Choose "On" to the default settings. Administrator Password You can enter "Administrator Password" when the "Enter Administrator Password" or "Enter Password" dialogue box displays. • Press to "ON", the startup screen is "Off". LAN Reset Press after plugging power cord", you are requested to input the password every time the power cord is...
User Manual
Page 47
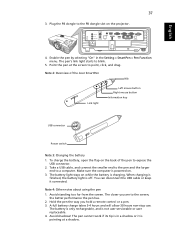
... user replaceable. 4. You can disconnect the USB cable or keep it is in the Setting > SmartPen > Pen Function menu. To charge the battery, open the flap on while the battery is off. Take a USB cable, and connect the smaller end to the pen and the larger end to expose the USB connector. 2. AUDIO IN S-VIDEO MIC IN AUDIO OUT VIDEO HDMI -1/ MHL USB MINI-B VGA IN -2 VGA IN -1 VGA-OUT RS232 LAN USB -A Wireless...
... user replaceable. 4. You can disconnect the USB cable or keep it is in the Setting > SmartPen > Pen Function menu. To charge the battery, open the flap on while the battery is off. Take a USB cable, and connect the smaller end to the pen and the larger end to expose the USB connector. 2. AUDIO IN S-VIDEO MIC IN AUDIO OUT VIDEO HDMI -1/ MHL USB MINI-B VGA IN -2 VGA IN -1 VGA-OUT RS232 LAN USB -A Wireless...
User Manual
Page 48
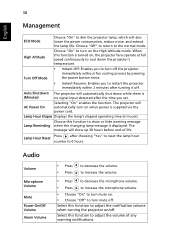
... Displays the lamp's elapsed operating time (in hours). Choose "Off" to return to adjust the volume of life. English 38 Management ECO Mode High Altitude Turn Off Mode Choose "On" to decrease the volume. Audio Volume Microphone Volume Mute Power On/Off Volume Alarm Volume • Press • Press to dim the projector lamp, which will show or hide warning message Lamp Reminding when the changing lamp message is (Minutes) no signal input...
... Displays the lamp's elapsed operating time (in hours). Choose "Off" to return to adjust the volume of life. English 38 Management ECO Mode High Altitude Turn Off Mode Choose "On" to decrease the volume. Audio Volume Microphone Volume Mute Power On/Off Volume Alarm Volume • Press • Press to dim the projector lamp, which will show or hide warning message Lamp Reminding when the changing lamp message is (Minutes) no signal input...

User Manual
Page 52
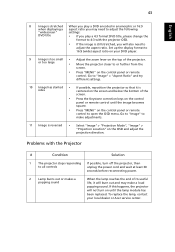
... use. Each has a different way to be reactivated. Refer to your computer's manual for item 2 (above) to adjust the resolution of your computer. • Press the toggle output settings. Refer to flickering bar the "Image" section for more information. • Check and reconfigure the display mode of focus • Adjust the focus ring on the projector lens. • Make sure the projection screen is within the required distance...
... use. Each has a different way to be reactivated. Refer to your computer's manual for item 2 (above) to adjust the resolution of your computer. • Press the toggle output settings. Refer to flickering bar the "Image" section for more information. • Check and reconfigure the display mode of focus • Adjust the focus ring on the projector lens. • Make sure the projection screen is within the required distance...
User Manual
Page 53
... control panel or remote control until the lamp module has been replaced. or too large • Move the projector closer to or further from the screen. • Press "MENU" on the OSD and adjust the projection direction. Go to "Image" to make a loud popping sound. Set up the display format to 16:9 (wide) aspect ratio on your local dealer or Acer service center. If this happens, the projector...
... control panel or remote control until the lamp module has been replaced. or too large • Move the projector closer to or further from the screen. • Press "MENU" on the OSD and adjust the projection direction. Go to "Image" to make a loud popping sound. Set up the display format to 16:9 (wide) aspect ratio on your local dealer or Acer service center. If this happens, the projector...
User Manual
Page 54
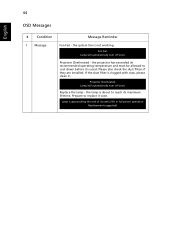
... installed. Lamp will automatically turn off soon. Lamp is approaching the end of its maximum lifetime. Fan Fail. the lamp is clogged with dust, please clean it soon. Replacement suggested! Lamp will automatically turn off soon. Replace the lamp - If the dust filter is about to reach its useful life in full power operation. Projector Overheated - Projector Overheated. Prepare to cool down before it is not working. 44 English OSD Messages # Condition 1 Message Message Reminder Fan...
... installed. Lamp will automatically turn off soon. Lamp is approaching the end of its maximum lifetime. Fan Fail. the lamp is clogged with dust, please clean it soon. Replacement suggested! Lamp will automatically turn off soon. Replace the lamp - If the dust filter is about to reach its useful life in full power operation. Projector Overheated - Projector Overheated. Prepare to cool down before it is not working. 44 English OSD Messages # Condition 1 Message Message Reminder Fan...
User Manual
Page 55
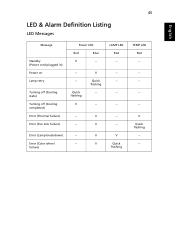
failure) V V V Quick flashing TEMP LED Red -- --- -- -- 45 LED & Alarm Definition Listing LED Messages English Message Standby (Power cord plugged in) Power on Lamp retry Turning off (Cooling state) Turning off (Cooling completed) Error (Thermal failure) Error (Fan lock failure) Power LED Red Blue V -- --- V -- V Quick flashing --- Error (Color wheel -- V LAMP LED Red -- ---- -- --- Quick flashing V V Quick flashing -- -- -- Error (Lamp breakdown) --
failure) V V V Quick flashing TEMP LED Red -- --- -- -- 45 LED & Alarm Definition Listing LED Messages English Message Standby (Power cord plugged in) Power on Lamp retry Turning off (Cooling state) Turning off (Cooling completed) Error (Thermal failure) Error (Fan lock failure) Power LED Red Blue V -- --- V -- V Quick flashing --- Error (Color wheel -- V LAMP LED Red -- ---- -- --- Quick flashing V V Quick flashing -- -- -- Error (Lamp breakdown) --


