

3D manual
Page 2
Acer Projector Series Operation Guide Original Issue: 09/2010 Model number Serial number Date of purchase Place of purchase © 2010 All Rights Reserved.
Acer Projector Series Operation Guide Original Issue: 09/2010 Model number Serial number Date of purchase Place of purchase © 2010 All Rights Reserved.

3D manual
Page 3
... USB cable in to an available USB port on , you . Important: Only NVIDIA graphics cards are unsure, there is an automatic tool at . English 3 The Acer projector you will be projected at full brightness. Using NVIDIA 3D technology Before you can enjoy the benefits of the page that 3D is enabled.
... USB cable in to an available USB port on , you . Important: Only NVIDIA graphics cards are unsure, there is an automatic tool at . English 3 The Acer projector you will be projected at full brightness. Using NVIDIA 3D technology Before you can enjoy the benefits of the page that 3D is enabled.

3D manual
Page 4
Select the second menu option on the left-hand side of the window. 7 Set 3D to open the OSD. English 4 2 Right-click anywhere on the projector remote control to Nvidia 3D Vision. This will open the setup Wizard if you haven't previously set up the 3D environment. 3 Follow the onscreen instructions to set up the 3D environment. 4 Check the Enable Stereoscopic option and select the correct display device. 5 Set the refresh rate to 120Hz from the appropriate drop-down menu. 6 Press the menu button on the desktop and select NVIDIA Control Panel.
Select the second menu option on the left-hand side of the window. 7 Set 3D to open the OSD. English 4 2 Right-click anywhere on the projector remote control to Nvidia 3D Vision. This will open the setup Wizard if you haven't previously set up the 3D environment. 3 Follow the onscreen instructions to set up the 3D environment. 4 Check the Enable Stereoscopic option and select the correct display device. 5 Set the refresh rate to 120Hz from the appropriate drop-down menu. 6 Press the menu button on the desktop and select NVIDIA Control Panel.

3D manual
Page 5
English 5 8 Alternatively, press the Empowering Key on your projector's remote control to view 3D content. Using the stereoscopic player You need to view content at . The instructions below explain how to view 3D content ... is available at www.3dtv.at fullscreen resolution in order to View > Viewing Method > NVIDIA 3D Vision. 2 Open the 3D content in order to open Acer eView Management. From the 3D options, select Nvidia 3D Vision. Note: You need to have different procedures. 1 Open the stereoscopic player and set the viewing...
English 5 8 Alternatively, press the Empowering Key on your projector's remote control to view 3D content. Using the stereoscopic player You need to view content at . The instructions below explain how to view 3D content ... is available at www.3dtv.at fullscreen resolution in order to View > Viewing Method > NVIDIA 3D Vision. 2 Open the 3D content in order to open Acer eView Management. From the 3D options, select Nvidia 3D Vision. Note: You need to have different procedures. 1 Open the stereoscopic player and set the viewing...

3D manual
Page 6
... 6 Using DLP 3D technology Before you can enjoy the benefits of the window. 3 Set 3D to DLP 3D. Select the second menu option on the projector remote control to 120Hz on your graphics card supports 3D playback. Setting up the environment. 1 Set the refresh rate to open the OSD. Note: Please...
... 6 Using DLP 3D technology Before you can enjoy the benefits of the window. 3 Set 3D to DLP 3D. Select the second menu option on the projector remote control to 120Hz on your graphics card supports 3D playback. Setting up the environment. 1 Set the refresh rate to open the OSD. Note: Please...

3D manual
Page 7
Important: If you have an NVIDIA graphics card and the NVIDIA 3D Vision drivers installed, you find that the 3D content is not displaying properly, try selecting 3D Sync Invert from the projector OSD or Acer eView Management. English 7 4 Alternatively, press the Empowering Key on your projector's remote control to use the DLP 3D technology. From the 3D options, select DLP 3D. 5 If you may need to disable the Stereoscopic feature to open Acer eView Management.
Important: If you have an NVIDIA graphics card and the NVIDIA 3D Vision drivers installed, you find that the 3D content is not displaying properly, try selecting 3D Sync Invert from the projector OSD or Acer eView Management. English 7 4 Alternatively, press the Empowering Key on your projector's remote control to use the DLP 3D technology. From the 3D options, select DLP 3D. 5 If you may need to disable the Stereoscopic feature to open Acer eView Management.

3D manual
Page 9
...option on the left-hand side of the available input formats. 1 Press the menu button on your Acer 3D-enabled projector. Connect your DVD player to the projector using your projector's remote control to open Acer eView Management. From the 3D options, select DLP 3D. 4 If you find that supports 3D playback,... you have a DVD player that the 3D content is not displaying properly, try selecting 3D Sync Invert from the projector OSD or Acer eView Management. English 9 Watching 3D DVD content If you can watch 3D DVD contant using any of the window. 2 Set 3D ...
...option on the left-hand side of the available input formats. 1 Press the menu button on your Acer 3D-enabled projector. Connect your DVD player to the projector using your projector's remote control to open Acer eView Management. From the 3D options, select DLP 3D. 4 If you find that supports 3D playback,... you have a DVD player that the 3D content is not displaying properly, try selecting 3D Sync Invert from the projector OSD or Acer eView Management. English 9 Watching 3D DVD content If you can watch 3D DVD contant using any of the window. 2 Set 3D ...

User Manual
Page 2
... purchase information in new editions of this publication without obligation to notify any means, electronically, mechanically, by any person of Acer Incorporated. All correspondence concerning your projector. Acer Projector X111/X1140/X1140A/X1240/X1340W/P1340W Series User's Guide Original Issue: 4/2012 Changes may be made periodically to their respective companies. No part of merchantability or...
... purchase information in new editions of this publication without obligation to notify any means, electronically, mechanically, by any person of Acer Incorporated. All correspondence concerning your projector. Acer Projector X111/X1140/X1140A/X1240/X1340W/P1340W Series User's Guide Original Issue: 4/2012 Changes may be made periodically to their respective companies. No part of merchantability or...

User Manual
Page 3
... may touch dangerous voltage points or short-out parts that the power outlet you need to disconnect power to unplug the power cord from the projector. • If the system has multiple sources of any kind onto or into this document for Accessibility Be sure that could be blocked by unplugging...
... may touch dangerous voltage points or short-out parts that the power outlet you need to disconnect power to unplug the power cord from the projector. • If the system has multiple sources of any kind onto or into this document for Accessibility Be sure that could be blocked by unplugging...
User Manual
Page 5
.... For safety reasons, do not use non-compliant parts when adding or changing components. Your device and its enhancements may hurt your projector. Additional safety information • Do not look into the product • the product was exposed to rain or water •... normally after following environments: • Space that is something wrong with all servicing to qualified service personnel. It Warning! Consult your projector. Refer all windows rolled up. • Locations where excessive humidity, dust, or cigarette smoke may result in damage and will often...
.... For safety reasons, do not use non-compliant parts when adding or changing components. Your device and its enhancements may hurt your projector. Additional safety information • Do not look into the product • the product was exposed to rain or water •... normally after following environments: • Space that is something wrong with all servicing to qualified service personnel. It Warning! Consult your projector. Refer all windows rolled up. • Locations where excessive humidity, dust, or cigarette smoke may result in damage and will often...
User Manual
Page 6
... 45 minutes prior to removing the lamp assembly for mounting the projector and ensure it is operating. Only use acer ceiling mount kit for replacement. • Do not operate lamps... beyond the rated lamp life. In this product to break or drop it to break on . • Do not block the projector lens.... • Do not attempt to suitable qualified professional service personnel. • Do not stand the projector on the remote control. • The lamp becomes extremely hot during operation. The best way is ...
... 45 minutes prior to removing the lamp assembly for mounting the projector and ensure it is operating. Only use acer ceiling mount kit for replacement. • Do not operate lamps... beyond the rated lamp life. In this product to break or drop it to break on . • Do not block the projector lens.... • Do not attempt to suitable qualified professional service personnel. • Do not stand the projector on the remote control. • The lamp becomes extremely hot during operation. The best way is ...

User Manual
Page 7
... local, state or federal laws. For more information on the Waste from Electrical and Electronics Equipment (WEEE) regulations, visit http://www.acer-group.com/public/ Sustainability/sustainability01.htm Mercury advisory For projectors or electronic products containing an LCD/CRT monitor or display: "Lamp(s) contain Mercury, Dispose Properly." For lamp-specific disposal information...
... local, state or federal laws. For more information on the Waste from Electrical and Electronics Equipment (WEEE) regulations, visit http://www.acer-group.com/public/ Sustainability/sustainability01.htm Mercury advisory For projectors or electronic products containing an LCD/CRT monitor or display: "Lamp(s) contain Mercury, Dispose Properly." For lamp-specific disposal information...

User Manual
Page 8
... precautions and maintenance as this user's guide to maximize the life of its cooling cycle before disconnecting power. • Turn on the projector provided for a long period of the lamp itself. To replace the lamp, follow the procedures listed under the following conditions: • ...8226; Reset the "Lamp Hour Reset" function from the Onscreen Display "Management" menu after replacing the lamp module. • When switching the projector off the product before cleaning. • Use a soft cloth moistened with mild detergent to clean the display housing. • Disconnect the power...
... precautions and maintenance as this user's guide to maximize the life of its cooling cycle before disconnecting power. • Turn on the projector provided for a long period of the lamp itself. To replace the lamp, follow the procedures listed under the following conditions: • ...8226; Reset the "Lamp Hour Reset" function from the Onscreen Display "Management" menu after replacing the lamp module. • When switching the projector off the product before cleaning. • Use a soft cloth moistened with mild detergent to clean the display housing. • Disconnect the power...

User Manual
Page 9
... the Projector 8 Turning Off the Projector 9 Adjusting the Projected Image 10 Adjusting the Height of the Projected Image 10 How to Optimize Image Size and Distance 11 How to Get a Preferred Image Size by Adjusting Distance and Zoom 13 User Controls 15 Installation Menu 15 Acer Empowering ...Technology 16 Onscreen Display (OSD) Menus 18 Color 19 Image 21 Setting 24 Management 27 Audio (X1140A/X1240/X1340W/P1340W) 28 3D 29 Language 30
... the Projector 8 Turning Off the Projector 9 Adjusting the Projected Image 10 Adjusting the Height of the Projected Image 10 How to Optimize Image Size and Distance 11 How to Get a Preferred Image Size by Adjusting Distance and Zoom 13 User Controls 15 Installation Menu 15 Acer Empowering ...Technology 16 Onscreen Display (OSD) Menus 18 Color 19 Image 21 Setting 24 Management 27 Audio (X1140A/X1240/X1340W/P1340W) 28 3D 29 Language 30
User Manual
Page 11
...aspect ratio supported X1240: Native 1024 x 768 XGA resolution Auto / 4:3 / 16:9 aspect ratio supported X1340W/P1340W: Native 1280 x 800 WXGA resolution Auto/ Full / 4:3 /16:9 / L.Box aspect ratio supported • Acer ColorBoost technology delivers vivid, life-like images • High brightness and contrast ratio • Versatile display modes ... functions help decrease lamp power consumption and further extend lamp life Dynamic Black: If turned on, the projector dynamically adjusts the power consumption of the lamp according to 70% when no input signal can be detected for 5 seconds. •...
...aspect ratio supported X1240: Native 1024 x 768 XGA resolution Auto / 4:3 / 16:9 aspect ratio supported X1340W/P1340W: Native 1280 x 800 WXGA resolution Auto/ Full / 4:3 /16:9 / L.Box aspect ratio supported • Acer ColorBoost technology delivers vivid, life-like images • High brightness and contrast ratio • Versatile display modes ... functions help decrease lamp power consumption and further extend lamp life Dynamic Black: If turned on, the projector dynamically adjusts the power consumption of the lamp according to 70% when no input signal can be detected for 5 seconds. •...
User Manual
Page 12
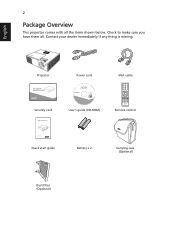
Contact your dealer immediately if any thing is missing. Projector Acer Projector Security Card Security card Power cord VGA cable Acer Projector This CD contains • User's manual • Quick Start Guide • Acrobat® Reader® www.acer.com User's guide (CD-ROM) Remote control Quick Start Guide Quick start guide Battery x 2 Carrying case (Optional) Dust filter (Optional) English 2 Package Overview This projector comes with all . Check to make sure you have them all the items shown below.
Contact your dealer immediately if any thing is missing. Projector Acer Projector Security Card Security card Power cord VGA cable Acer Projector This CD contains • User's manual • Quick Start Guide • Acrobat® Reader® www.acer.com User's guide (CD-ROM) Remote control Quick Start Guide Quick start guide Battery x 2 Carrying case (Optional) Dust filter (Optional) English 2 Package Overview This projector comes with all . Check to make sure you have them all the items shown below.
User Manual
Page 13
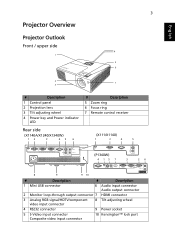
English Projector Overview Projector Outlook Front / upper side 1 3 4 5 6 2 7 3 # Description 1 Control panel 2 Projection lens 3 Tilt adjusting wheel 4 Power key and Power indicator LED Rear side (X1140A/X1240/X1340W) 12 3 45 6 # Description 5 Zoom ring 6 Focus ring 7 Remote control receiver (X111/X1140) 1 3 4 5 (P1340W) 4 15 7 3 26 8 9 9 10 # Description # Description 1 Mini USB connector 6 Audio input connector Audio output connector...
English Projector Overview Projector Outlook Front / upper side 1 3 4 5 6 2 7 3 # Description 1 Control panel 2 Projection lens 3 Tilt adjusting wheel 4 Power key and Power indicator LED Rear side (X1140A/X1240/X1340W) 12 3 45 6 # Description 5 Zoom ring 6 Focus ring 7 Remote control receiver (X111/X1140) 1 3 4 5 (P1340W) 4 15 7 3 26 8 9 9 10 # Description # Description 1 Mini USB connector 6 Audio input connector Audio output connector...
User Manual
Page 14
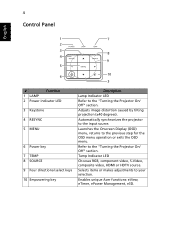
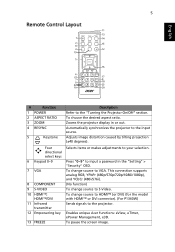
Adjusts image distortion caused by tilting projection (±40 degrees). Selects items or makes adjustments to the "Turning the Projector On/ Off" section. Enables unique Acer functions: eView, eTimer, ePower Management, e3D. Refer to your selection. Temp Indicator LED Chooses RGB, component video, S-Video, composite video, HDMI or HDTV source. 4 Control ... to the previous step for the OSD menu operation or exits the OSD menu. Launches the Onscreen Display (OSD) menu, returns to the "Turning the Projector On/ Off" section. Automatically synchronizes the...
Adjusts image distortion caused by tilting projection (±40 degrees). Selects items or makes adjustments to the "Turning the Projector On/ Off" section. Enables unique Acer functions: eView, eTimer, ePower Management, e3D. Refer to your selection. Temp Indicator LED Chooses RGB, component video, S-Video, composite video, HDMI or HDTV source. 4 Control ... to the previous step for the OSD menu operation or exits the OSD menu. Launches the Onscreen Display (OSD) menu, returns to the "Turning the Projector On/ Off" section. Automatically synchronizes the...
User Manual
Page 15
...ASPECT RATIO 3 ZOOM 4 RESYNC 5 Keystone Description Refer to input a password in or out. To choose the desired aspect ratio. Enables unique Acer functions: eView, eTimer, ePower Management, e3D. Adjusts image distortion caused by tilting projection (±40 degrees). To change source to HDMI™... (or DVI) (for the model with HDMI™ or DVI connector). (For P1340W) Sends signals to your selection. Automatically synchronizes the projector to S-Video. This connection supports analog RGB, YPbPr (480p/576p/720p/1080i/1080p), and YCbCr (480i/576i...
...ASPECT RATIO 3 ZOOM 4 RESYNC 5 Keystone Description Refer to input a password in or out. To choose the desired aspect ratio. Enables unique Acer functions: eView, eTimer, ePower Management, e3D. Adjusts image distortion caused by tilting projection (±40 degrees). To change source to HDMI™... (or DVI) (for the model with HDMI™ or DVI connector). (For P1340W) Sends signals to your selection. Automatically synchronizes the projector to S-Video. This connection supports analog RGB, YPbPr (480p/576p/720p/1080i/1080p), and YCbCr (480i/576i...
User Manual
Page 17
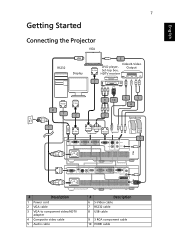
English USB 7 Getting Started Connecting the Projector VGA RS232 RS232 8 7 1 USB Display D-Sub 2 5 Video/S-Video DVD player, Output D-Sub Set-top box, HDTV receiver 2 R WY RB G 9 10 RB G 3 6 5 4 Speakers Y D-Sub HDTV adapter D-Sub RS232 5 RS232 # Description 1 Power cord 2 VGA cable 3 VGA to component video/HDTV adapter 4 Composite video cable 5 Audio cable # Description 6 S-Video cable 7 RS232 cable 8 USB cable 9 3 RCA component cable 10 HDMI cable
English USB 7 Getting Started Connecting the Projector VGA RS232 RS232 8 7 1 USB Display D-Sub 2 5 Video/S-Video DVD player, Output D-Sub Set-top box, HDTV receiver 2 R WY RB G 9 10 RB G 3 6 5 4 Speakers Y D-Sub HDTV adapter D-Sub RS232 5 RS232 # Description 1 Power cord 2 VGA cable 3 VGA to component video/HDTV adapter 4 Composite video cable 5 Audio cable # Description 6 S-Video cable 7 RS232 cable 8 USB cable 9 3 RCA component cable 10 HDMI cable


