

3D manual
Page 3
... infra-red transmitter so that 3D is necessary to set up a 3D environment Once you have installed the drivers, you turn it has maximum coverage. If you will need to do not wish to an available USB port on , you do the following. 1 Ensure your graphics card is supported. Plug the USB cable in to view 3D content, you are supported. 2 Download and install...
... infra-red transmitter so that 3D is necessary to set up a 3D environment Once you have installed the drivers, you turn it has maximum coverage. If you will need to do not wish to an available USB port on , you do the following. 1 Ensure your graphics card is supported. Plug the USB cable in to view 3D content, you are supported. 2 Download and install...

3D manual
Page 6
... the menu button on the projector remote control to purchase additional software. 4 Ensure you have the correct DLP-compatible 3D glasses. English 6 Using DLP 3D technology Before you can enjoy the benefits of the window. 3 Set 3D to do the following. 1 Ensure your graphics card supports 3D playback. Note: You may need to DLP 3D. Setting up a 3D environment Once you have installed the drivers, you...
... the menu button on the projector remote control to purchase additional software. 4 Ensure you have the correct DLP-compatible 3D glasses. English 6 Using DLP 3D technology Before you can enjoy the benefits of the window. 3 Set 3D to do the following. 1 Ensure your graphics card supports 3D playback. Note: You may need to DLP 3D. Setting up a 3D environment Once you have installed the drivers, you...
User Manual
Page 5
... become excessively high, such as opening or removing covers may expose you to qualified service personnel when: • the power cord or plug is damaged, cut or frayed • liquid was spilled into the projector's lens when the lamp is on the projector first and then signal sources. • Do not place the product in the following the operating instructions Note: Adjust only those controls that is...
... become excessively high, such as opening or removing covers may expose you to qualified service personnel when: • the power cord or plug is damaged, cut or frayed • liquid was spilled into the projector's lens when the lamp is on the projector first and then signal sources. • Do not place the product in the following the operating instructions Note: Adjust only those controls that is...
User Manual
Page 6
... dealer for the fan to the sun. It may cause the projector to break on the remote control. • The lamp becomes extremely hot during operation. Please be sure to change the lamp when warning messages display. • When changing the lamp, please allow the projector to cool down, and follow all changing instructions. • Reset the "Lamp Hour Reset" function from the Onscreen Display "Management" menu after replacing the lamp module. • Do...
... dealer for the fan to the sun. It may cause the projector to break on the remote control. • The lamp becomes extremely hot during operation. Please be sure to change the lamp when warning messages display. • When changing the lamp, please allow the projector to cool down, and follow all changing instructions. • Reset the "Lamp Hour Reset" function from the Onscreen Display "Management" menu after replacing the lamp module. • Do...

User Manual
Page 8
... cooling cycle before disconnecting power. • Turn on the projector first and then the signal sources. • Do not use lens cap when projector is in operation. • When the lamp reaches the end of its life, it shows warning messages. • Reset the "Lamp Hour Reset" function from the Onscreen Display "Management" menu after replacing the lamp module. • When switching the projector off the product before cleaning. • Use a soft cloth moistened with...
... cooling cycle before disconnecting power. • Turn on the projector first and then the signal sources. • Do not use lens cap when projector is in operation. • When the lamp reaches the end of its life, it shows warning messages. • Reset the "Lamp Hour Reset" function from the Onscreen Display "Management" menu after replacing the lamp module. • When switching the projector off the product before cleaning. • Use a soft cloth moistened with...

User Manual
Page 9
...Projector Outlook 3 Control Panel 4 Remote Control Layout 5 Getting Started 7 Connecting the Projector 7 Turning the Projector On/Off 8 Turning On the Projector 8 Turning Off the Projector 9 Adjusting the Projected Image 10 Adjusting the Height of the Projected Image 10 How to Optimize Image Size and Distance 11 How to Get a Preferred Image Size by Adjusting Distance and Zoom 13 User Controls 15 Installation Menu 15 Acer Empowering Technology 16 Onscreen Display (OSD) Menus 18 Color 19 Image 21 Setting 24 Management 27 Audio (X1140A/X1240/X1340W/P1340W...
...Projector Outlook 3 Control Panel 4 Remote Control Layout 5 Getting Started 7 Connecting the Projector 7 Turning the Projector On/Off 8 Turning On the Projector 8 Turning Off the Projector 9 Adjusting the Projected Image 10 Adjusting the Height of the Projected Image 10 How to Optimize Image Size and Distance 11 How to Get a Preferred Image Size by Adjusting Distance and Zoom 13 User Controls 15 Installation Menu 15 Acer Empowering Technology 16 Onscreen Display (OSD) Menus 18 Color 19 Image 21 Setting 24 Management 27 Audio (X1140A/X1240/X1340W/P1340W...
User Manual
Page 11
...-chip DLP® projector, including the following outstanding features: • DLP® technology • X111/X1140/X1140A: Native 800 x 600 SVGA resolution Auto / 4:3 / 16:9 aspect ratio supported X1240: Native 1024 x 768 XGA resolution Auto / 4:3 / 16:9 aspect ratio supported X1340W/P1340W: Native 1280 x 800 WXGA resolution Auto/ Full / 4:3 /16:9 / L.Box aspect ratio supported • Acer ColorBoost technology delivers vivid, life-like images • High brightness and contrast ratio • Versatile display modes...
...-chip DLP® projector, including the following outstanding features: • DLP® technology • X111/X1140/X1140A: Native 800 x 600 SVGA resolution Auto / 4:3 / 16:9 aspect ratio supported X1240: Native 1024 x 768 XGA resolution Auto / 4:3 / 16:9 aspect ratio supported X1340W/P1340W: Native 1280 x 800 WXGA resolution Auto/ Full / 4:3 /16:9 / L.Box aspect ratio supported • Acer ColorBoost technology delivers vivid, life-like images • High brightness and contrast ratio • Versatile display modes...
User Manual
Page 15
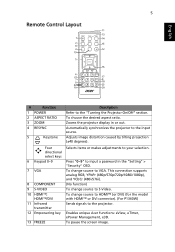
... 1 POWER 2 ASPECT RATIO 3 ZOOM 4 RESYNC 5 Keystone Description Refer to the input source. Zooms the projector display in the "Setting" > "Security" OSD. Automatically synchronizes the projector to the "Turning the Projector On/Off" section. To change source to HDMI™ (or DVI) (for the model with HDMI™ or DVI connector). (For P1340W) Sends signals to the projector. To change source to your selection. To choose the desired aspect ratio. Press "0~9" to S-Video. Adjusts image distortion...
... 1 POWER 2 ASPECT RATIO 3 ZOOM 4 RESYNC 5 Keystone Description Refer to the input source. Zooms the projector display in the "Setting" > "Security" OSD. Automatically synchronizes the projector to the "Turning the Projector On/Off" section. To change source to HDMI™ (or DVI) (for the model with HDMI™ or DVI connector). (For P1340W) Sends signals to the projector. To change source to your selection. To choose the desired aspect ratio. Press "0~9" to S-Video. Adjusts image distortion...

User Manual
Page 18
Turning the Projector On/Off Turning On the Projector 1 Ensure that the power cord and signal cable are securely connected. • If you connect to switch between inputs. 1&2 The Power LED will light red. 2 Turn on the projector by pressing (POWER) on the control panel or remote control, and the Power indicator LED will detect your computer, please make sure the signal cables are securely connected. The projector will turn blue. 3 Turn on the remote control to multiple sources at the same time, use "SOURCE" on the control panel or remote control, or the...
Turning the Projector On/Off Turning On the Projector 1 Ensure that the power cord and signal cable are securely connected. • If you connect to switch between inputs. 1&2 The Power LED will light red. 2 Turn on the projector by pressing (POWER) on the control panel or remote control, and the Power indicator LED will detect your computer, please make sure the signal cables are securely connected. The projector will turn blue. 3 Turn on the remote control to multiple sources at the same time, use "SOURCE" on the control panel or remote control, or the...

User Manual
Page 25
... the projector by pressing remote control. (POWER) on the control panel or 2 Press "MENU" on the control panel or remote control to launch the OSD for projector installation and maintenance. (X111/X1140) (X1140A/X1240/ X1340W/P1340W) 3 The background pattern acts as a guide to adjusting the calibration and alignment settings, such as screen size and distance, focus and more. 4 The Installation menu includes the following options: • Projection method • Keystone settings • Language settings • Reset to factory default functions Use...
... the projector by pressing remote control. (POWER) on the control panel or 2 Press "MENU" on the control panel or remote control to launch the OSD for projector installation and maintenance. (X111/X1140) (X1140A/X1240/ X1340W/P1340W) 3 The background pattern acts as a guide to adjusting the calibration and alignment settings, such as screen size and distance, focus and more. 4 The Installation menu includes the following options: • Projection method • Keystone settings • Language settings • Reset to factory default functions Use...

User Manual
Page 29
... correct image tone. There are many factory presets optimized for various types of the picture. Adjusts the brightness of black and white in a bright environment. • Picture: For graphic picture. • Game: For game content. • Education: For education environment. • User: Memorize user's settings. Color (X111/X1140) 19 (X1140A/X1240/X1340W/P1340W) English Display Mode Wall Color Brightness Contrast There are several choices, including White, Light Yellow, Light Blue...
... correct image tone. There are many factory presets optimized for various types of the picture. Adjusts the brightness of black and white in a bright environment. • Picture: For graphic picture. • Game: For game content. • Education: For education environment. • User: Memorize user's settings. Color (X111/X1140) 19 (X1140A/X1240/X1340W/P1340W) English Display Mode Wall Color Brightness Contrast There are several choices, including White, Light Yellow, Light Blue...
User Manual
Page 30
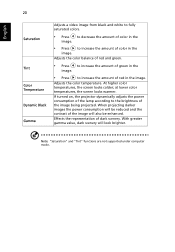
... screen looks colder; If turned on, the projector dynamically adjusts the power consumption of the lamp according to the brightness of dark scenery. Effects the representation of the image being projected. With greater gamma value, dark scenery will look brighter. at lower color temperatures, the screen looks warmer. Note: "Saturation" and "Tint" functions are not supported under computer mode. Adjusts the color balance of red and green...
... screen looks colder; If turned on, the projector dynamically adjusts the power consumption of the lamp according to the brightness of dark scenery. Effects the representation of the image being projected. With greater gamma value, dark scenery will look brighter. at lower color temperatures, the screen looks warmer. Note: "Saturation" and "Tint" functions are not supported under computer mode. Adjusts the color balance of red and green...

User Manual
Page 35
... video or SVideo input signal is selected and its system format is in standby mode and the VGA IN (or (Standby) VGA IN 1) and VGA OUT sockets are correctly connected to the factory default settings. Notice: Before proceeding with the following steps, make sure that the screen capture is NTSC. Select "Off" to confirm the action. 25 English Use this function slightly increases the standby power consumption. Reset...
... video or SVideo input signal is selected and its system format is in standby mode and the VGA IN (or (Standby) VGA IN 1) and VGA OUT sockets are correctly connected to the factory default settings. Notice: Before proceeding with the following steps, make sure that the screen capture is NTSC. Select "Off" to confirm the action. 25 English Use this function slightly increases the standby power consumption. Reset...
User Manual
Page 36
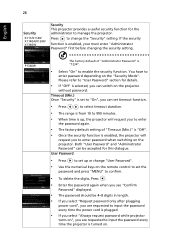
... you select "Always request password while projector turns on", you to enter password when switching on the projector without password. You have to change "User Password". • Use the numerical keys on the "Security Mode". Both "User Password" and "Administrator Password" can switch on the projector. P1340W The factory default of "Timeout (Min.)" is "Off". • Once the security function is up or change the "Security" setting. Please refer to enable the...
... you select "Always request password while projector turns on", you to enter password when switching on the projector without password. You have to change "User Password". • Use the numerical keys on the "Security Mode". Both "User Password" and "Administrator Password" can switch on the projector. P1340W The factory default of "Timeout (Min.)" is "Off". • Once the security function is up or change the "Security" setting. Please refer to enable the...
User Manual
Page 37
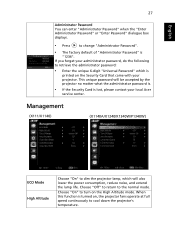
..., and extend the lamp life. Choose "On" to change "Administrator Password". • The factory default of "Administrator Password" is lost, please contact your administrator password, do the following to cool down the projector's temperature. Management (X111/X1140) (X1140A/X1240/X1340W/P1340W) ECO Mode High Altitude Choose "On" to the normal mode. Choose "Off" to return to dim the projector lamp, which is turned on the Security Card...
..., and extend the lamp life. Choose "On" to change "Administrator Password". • The factory default of "Administrator Password" is lost, please contact your administrator password, do the following to cool down the projector's temperature. Management (X111/X1140) (X1140A/X1240/X1340W/P1340W) ECO Mode High Altitude Choose "On" to the normal mode. Choose "Off" to return to dim the projector lamp, which is turned on the Security Card...
User Manual
Page 41
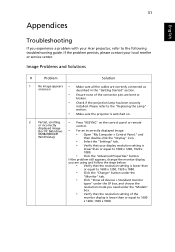
... "RESYNC" on the control panel or remote or incorrectly control. If the problem still appears, change the monitor display you need under the "Models" box. • Verify that the resolution setting is lower than or equal to the "Replacing the Lamp" section. • Make sure the projector is lower than or equal to 1600 x 1200, 1920 x 1080. • Click the "Change" button under the "Monitor...
... "RESYNC" on the control panel or remote or incorrectly control. If the problem still appears, change the monitor display you need under the "Models" box. • Verify that the resolution setting is lower than or equal to the "Replacing the Lamp" section. • Make sure the projector is lower than or equal to 1600 x 1200, 1920 x 1080. • Click the "Change" button under the "Monitor...

User Manual
Page 42
... the toggle output settings. Set up the display format to 16:9 (wide) aspect ratio on the projector lens. • Make sure the projection screen is within the required distance: 4.9 to 19.7 feet (1.5 to 6 meters) Refer to the "How to Get a Preferred Image Size by Adjusting Distance and Zoom" section for more information. • Change the display color setting on the control panel or remote control. • For an incorrectly displayed image: • Follow...
... the toggle output settings. Set up the display format to 16:9 (wide) aspect ratio on the projector lens. • Make sure the projection screen is within the required distance: 4.9 to 19.7 feet (1.5 to 6 meters) Refer to the "How to Get a Preferred Image Size by Adjusting Distance and Zoom" section for more information. • Change the display color setting on the control panel or remote control. • For an incorrectly displayed image: • Follow...
User Manual
Page 43
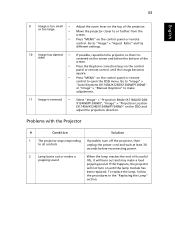
... a popping sound When the lamp reaches the end of the projector. If this happens, the projector will burn out and may make adjustments. 11 Image is sides centered on the screen and below the bottom of the screen. • Press the Keystone correction keys on the control panel or remote control. Go to "Image" > "Auto Keystone (X1140A/X1240/X1340W/P1340W)" or "Image" > "Manual Keystone" to open the OSD menu. Go to "Image" > "Aspect...
... a popping sound When the lamp reaches the end of the projector. If this happens, the projector will burn out and may make adjustments. 11 Image is sides centered on the screen and below the bottom of the screen. • Press the Keystone correction keys on the control panel or remote control. Go to "Image" > "Auto Keystone (X1140A/X1240/X1340W/P1340W)" or "Image" > "Manual Keystone" to open the OSD menu. Go to "Image" > "Aspect...

User Manual
Page 44
... operating temperature and must be allowed to cool down before it is clogged with dust, please clean it soon. the system fan is about to replace it . the projector has exceeded its useful life in full power operation. Lamp will automatically turn off soon. Fan Fail. Projector Overheated. the lamp is not working. Prepare to reach its maximum lifetime. If the dust filter is used. 34 English OSD Messages # Condition 1 Message Message...
... operating temperature and must be allowed to cool down before it is clogged with dust, please clean it soon. the system fan is about to replace it . the projector has exceeded its useful life in full power operation. Lamp will automatically turn off soon. Fan Fail. Projector Overheated. the lamp is not working. Prepare to reach its maximum lifetime. If the dust filter is used. 34 English OSD Messages # Condition 1 Message Message...

User Manual
Page 45
35 English LED & Alarm Definition Listing LED Messages Message Standby (Power cord plugged in) Power on Lamp retry Turning off (Cooling state) Turning off (Cooling completed) Error (Thermal failure) Error (Fan lock failure) Power LED Red Blue V -- --- V -- V LAMP LED Red -- ---- -- --- V Quick flashing --- Error (Lamp breakdown) -- Error (Color wheel -- Quick flashing V V Quick flashing -- -- -- failure) V V V Quick flashing TEMP LED Red -- --- -- --
35 English LED & Alarm Definition Listing LED Messages Message Standby (Power cord plugged in) Power on Lamp retry Turning off (Cooling state) Turning off (Cooling completed) Error (Thermal failure) Error (Fan lock failure) Power LED Red Blue V -- --- V -- V LAMP LED Red -- ---- -- --- V Quick flashing --- Error (Lamp breakdown) -- Error (Color wheel -- Quick flashing V V Quick flashing -- -- -- failure) V V V Quick flashing TEMP LED Red -- --- -- --


