
User Manual
Page 4
... this product. • Use the product only with the performance of this product where people will probably cause unexpected short current or damage rotor devices, lamp. Contact your dealer or local power company. • Do not allow anything to rest on the cord. • If an extension cord is used , the...
... this product. • Use the product only with the performance of this product where people will probably cause unexpected short current or damage rotor devices, lamp. Contact your dealer or local power company. • Do not allow anything to rest on the cord. • If an extension cord is used , the...
User Manual
Page 5
... reach of other risks. Additional safety information • Do not look into the product • the product was spilled into the projector's lens when the lamp is on the projector first and then signal sources. • Do not place the product in performance, indicating a need for purchase options. At least 50cm...
... reach of other risks. Additional safety information • Do not look into the product • the product was spilled into the projector's lens when the lamp is on the projector first and then signal sources. • Do not place the product in performance, indicating a need for purchase options. At least 50cm...
User Manual
Page 6
...servicing only to suitable qualified professional service personnel. • Do not stand the projector on rare occasions. • Never replace the lamp assembly or any object when the projector is to wait for approximately 45 minutes prior to the sun. It may rise and cause...vertically. There are clogged with any electronic components unless the projector is on the remote control. • The lamp becomes extremely hot during operation. Only use acer ceiling mount kit for ceiling mount installation. The only user serviceable part is operating. In this case, unplug ...
...servicing only to suitable qualified professional service personnel. • Do not stand the projector on rare occasions. • Never replace the lamp assembly or any object when the projector is to wait for approximately 45 minutes prior to the sun. It may rise and cause...vertically. There are clogged with any electronic components unless the projector is on the remote control. • The lamp becomes extremely hot during operation. Only use acer ceiling mount kit for ceiling mount installation. The only user serviceable part is operating. In this case, unplug ...

User Manual
Page 7
... more information on the Waste from Electrical and Electronics Equipment (WEEE) regulations, visit http://www.acer-group.com/public/ Sustainability/sustainability01.htm Mercury advisory For projectors or electronic products containing an LCD/CRT monitor or display: "Lamp(s) contain Mercury, Dispose Properly." For more information, contact the Electronic Industries Alliance at high volumes...
... more information on the Waste from Electrical and Electronics Equipment (WEEE) regulations, visit http://www.acer-group.com/public/ Sustainability/sustainability01.htm Mercury advisory For projectors or electronic products containing an LCD/CRT monitor or display: "Lamp(s) contain Mercury, Dispose Properly." For more information, contact the Electronic Industries Alliance at high volumes...

User Manual
Page 8
... product to rain or moisture. • Please do not open or disassemble the product as recommended in direct sunlight. To replace the lamp, follow all warnings, precautions and maintenance as this user's guide to maximize the life of your unit. viii First Thing First Usage ... moistened with mild detergent to clean the display housing. • Disconnect the power plug from the Onscreen Display "Management" menu after replacing the lamp module. • When switching the projector off the product before disconnecting power. • Turn on the projector first and then the signal sources...
... product to rain or moisture. • Please do not open or disassemble the product as recommended in direct sunlight. To replace the lamp, follow all warnings, precautions and maintenance as this user's guide to maximize the life of your unit. viii First Thing First Usage ... moistened with mild detergent to clean the display housing. • Disconnect the power plug from the Onscreen Display "Management" menu after replacing the lamp module. • When switching the projector off the product before disconnecting power. • Turn on the projector first and then the signal sources...

User Manual
Page 10
Appendices 31 Troubleshooting 31 LED & Alarm Definition Listing 35 Replacing the Lamp 36 Ceiling Mount Installation 37 Specifications 40 Compatibility Modes 42 Regulations and safety notices 46
Appendices 31 Troubleshooting 31 LED & Alarm Definition Listing 35 Replacing the Lamp 36 Ceiling Mount Installation 37 Specifications 40 Compatibility Modes 42 Regulations and safety notices 46
User Manual
Page 11
...X1240: Native 1024 x 768 XGA resolution Auto / 4:3 / 16:9 aspect ratio supported X1340W/P1340W: Native 1280 x 800 WXGA resolution Auto/ Full / 4:3 /16:9 / L.Box aspect ratio supported • Acer ColorBoost technology delivers vivid, life-like images • High brightness and contrast ratio • Versatile...1080p) supported • Lower power consumption and economy (ECO) mode extends lamp life • Dynamic Black / Extreme Dimming functions help decrease lamp power consumption and further extend lamp life Dynamic Black: If turned on, the projector dynamically adjusts the power ...
...X1240: Native 1024 x 768 XGA resolution Auto / 4:3 / 16:9 aspect ratio supported X1340W/P1340W: Native 1280 x 800 WXGA resolution Auto/ Full / 4:3 /16:9 / L.Box aspect ratio supported • Acer ColorBoost technology delivers vivid, life-like images • High brightness and contrast ratio • Versatile...1080p) supported • Lower power consumption and economy (ECO) mode extends lamp life • Dynamic Black / Extreme Dimming functions help decrease lamp power consumption and further extend lamp life Dynamic Black: If turned on, the projector dynamically adjusts the power ...
User Manual
Page 14
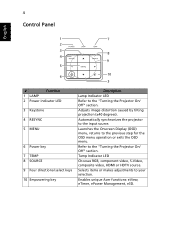
... Chooses RGB, component video, S-Video, composite video, HDMI or HDTV source. Refer to the "Turning the Projector On/ Off" section. 4 Control Panel English 1 7 2 3 8 4 9 5 6 10 3 # Function 1 LAMP 2 Power indicator LED 3 Keystone 4 RESYNC 5 MENU 6 Power key 7 TEMP 8 SOURCE 9 Four directional select keys 10 Empowering key Description...
... Chooses RGB, component video, S-Video, composite video, HDMI or HDTV source. Refer to the "Turning the Projector On/ Off" section. 4 Control Panel English 1 7 2 3 8 4 9 5 6 10 3 # Function 1 LAMP 2 Power indicator LED 3 Keystone 4 RESYNC 5 MENU 6 Power key 7 TEMP 8 SOURCE 9 Four directional select keys 10 Empowering key Description...
User Manual
Page 19
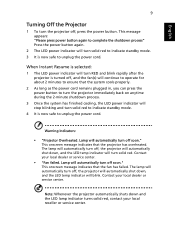
... power indicator will stop blinking and turn solid red to indicate standby mode. 4 It is now safe to unplug the power cord. The lamp will automatically turn off soon." Contact your local reseller or service center. This message appears: "Please press power button again to complete the ...button again. 2 The LED power indicator will turn solid red to indicate standby mode. 3 It is now safe to unplug the power cord. Lamp will automatically turn off , the projector will automatically shut down, and the LED temp indicator will turn solid red. Note: Whenever the projector ...
... power indicator will stop blinking and turn solid red to indicate standby mode. 4 It is now safe to unplug the power cord. The lamp will automatically turn off soon." Contact your local reseller or service center. This message appears: "Please press power button again to complete the ...button again. 2 The LED power indicator will turn solid red to indicate standby mode. 3 It is now safe to unplug the power cord. Lamp will automatically turn off , the projector will automatically shut down, and the LED temp indicator will turn solid red. Note: Whenever the projector ...
User Manual
Page 27
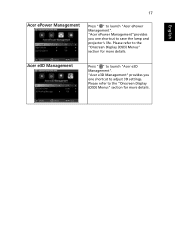
"Acer e3D Management" provides you one shortcut to the "Onscreen Display (OSD) Menus" section for more details. English 17 Acer ePower Management Press " " to launch "Acer e3D Management". Acer e3D Management Press " " to launch "Acer ePower Management". Please refer to adjust 3D settings. Please refer to save the lamp and projector's life. "Acer ePower Management"provides you one shortcut to the "Onscreen Display (OSD) Menus" section for more details.
"Acer e3D Management" provides you one shortcut to the "Onscreen Display (OSD) Menus" section for more details. English 17 Acer ePower Management Press " " to launch "Acer e3D Management". Acer e3D Management Press " " to launch "Acer ePower Management". Please refer to adjust 3D settings. Please refer to save the lamp and projector's life. "Acer ePower Management"provides you one shortcut to the "Onscreen Display (OSD) Menus" section for more details.
User Manual
Page 30
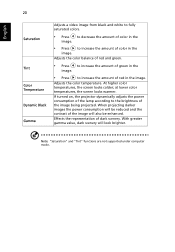
... the image. • Press to increase the amount of the image being projected. If turned on, the projector dynamically adjusts the power consumption of the lamp according to the brightness of color in the image. Adjusts the color temperature.
... the image. • Press to increase the amount of the image being projected. If turned on, the projector dynamically adjusts the power consumption of the lamp according to the brightness of color in the image. Adjusts the color temperature.
User Manual
Page 37
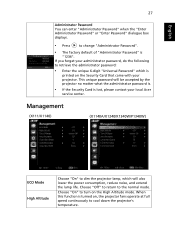
...) (X1140A/X1240/X1340W/P1340W) ECO Mode High Altitude Choose "On" to the normal mode. Choose "On" to cool down the projector's temperature. This unique password will also lower the power consumption, reduce noise, and extend the lamp life. English 27 Administrator... Password You can enter "Administrator Password" when the "Enter Administrator Password" or "Enter Password" dialogue box displays. • Press to change "Administrator Password". • The factory default of "Administrator Password" is lost, please contact your local Acer...
...) (X1140A/X1240/X1340W/P1340W) ECO Mode High Altitude Choose "On" to the normal mode. Choose "On" to cool down the projector's temperature. This unique password will also lower the power consumption, reduce noise, and extend the lamp life. English 27 Administrator... Password You can enter "Administrator Password" when the "Enter Administrator Password" or "Enter Password" dialogue box displays. • Press to change "Administrator Password". • The factory default of "Administrator Password" is lost, please contact your local Acer...
User Manual
Page 38
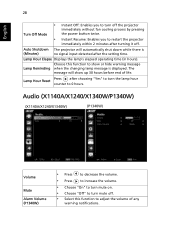
... down while there is displayed. Audio (X1140A/X1240/X1340W/P1340W) (X1140A/X1240/X1340W) (P1340W) Volume Mute Alarm Volume (P1340W) • Press to decrease the volume. • Press to increase the volume. • Choose "On" to turn mute on. • Choose "Off" to turn the lamp hour counter to 0 hours. English 28 • Instant Off...
... down while there is displayed. Audio (X1140A/X1240/X1340W/P1340W) (X1140A/X1240/X1340W) (P1340W) Volume Mute Alarm Volume (P1340W) • Press to decrease the volume. • Press to increase the volume. • Choose "On" to turn mute on. • Choose "Off" to turn the lamp hour counter to 0 hours. English 28 • Instant Off...
User Manual
Page 41
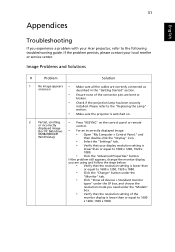
...the control panel or remote or incorrectly control. Please refer to 1600 x 1200, 1920 x 1080. If the problem persists, please contact your Acer projector, refer to 1600 x 1200, 1920 x 1080. • Click the "Advanced Properties" button. 31 Appendices English Troubleshooting If you ...are bent or broken. • Check if the projection lamp has been securely installed. displayed image (For PC (Windows • For an incorrectly displayed image: 95/98/2000/XP/ • Open...
...the control panel or remote or incorrectly control. Please refer to 1600 x 1200, 1920 x 1080. If the problem persists, please contact your Acer projector, refer to 1600 x 1200, 1920 x 1080. • Click the "Advanced Properties" button. 31 Appendices English Troubleshooting If you ...are bent or broken. • Check if the projection lamp has been securely installed. displayed image (For PC (Windows • For an incorrectly displayed image: 95/98/2000/XP/ • Open...
User Manual
Page 43
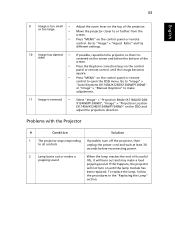
...; Press the Keystone correction keys on the control panel or remote control until the lamp module has been replaced. 33 English 9 Image is reversed • Select "Image" > "Projection Mode (X1140A/X1240/ X1340W/P1340W)", "Image" > "Projection Location (X1140A/X1240/X1340W/P1340W)" on the OSD and adjust the projection direction. Go to "Image" > "Auto Keystone...
...; Press the Keystone correction keys on the control panel or remote control until the lamp module has been replaced. 33 English 9 Image is reversed • Select "Image" > "Projection Mode (X1140A/X1240/ X1340W/P1340W)", "Image" > "Projection Location (X1140A/X1240/X1340W/P1340W)" on the OSD and adjust the projection direction. Go to "Image" > "Auto Keystone...

User Manual
Page 44
...the system fan is about to reach its maximum lifetime. the projector has exceeded its useful life in full power operation. Replace the lamp - the lamp is not working. Please also check the dust filters if they are installed. If the dust filter is clogged with dust, please clean... of its recommended operating temperature and must be allowed to replace it soon. Prepare to cool down before it . Lamp is used. Projector Overheated. Replacement suggested! Fan Fail. Lamp will automatically turn off soon. 34 English OSD Messages # Condition 1 Message Message Reminder Fan Fail...
...the system fan is about to reach its maximum lifetime. the projector has exceeded its useful life in full power operation. Replace the lamp - the lamp is not working. Please also check the dust filters if they are installed. If the dust filter is clogged with dust, please clean... of its recommended operating temperature and must be allowed to replace it soon. Prepare to cool down before it . Lamp is used. Projector Overheated. Replacement suggested! Fan Fail. Lamp will automatically turn off soon. 34 English OSD Messages # Condition 1 Message Message Reminder Fan Fail...

User Manual
Page 45
Quick flashing V V Quick flashing -- -- -- V LAMP LED Red -- ---- -- --- failure) V V V Quick flashing TEMP LED Red -- --- -- -- Error (Lamp breakdown) -- V Quick flashing --- V -- Error (Color wheel -- 35 English LED & Alarm Definition Listing LED Messages Message Standby (Power cord plugged in) Power on Lamp retry Turning off (Cooling state) Turning off (Cooling completed) Error (Thermal failure) Error (Fan lock failure) Power LED Red Blue V -- ---
Quick flashing V V Quick flashing -- -- -- V LAMP LED Red -- ---- -- --- failure) V V V Quick flashing TEMP LED Red -- --- -- -- Error (Lamp breakdown) -- V Quick flashing --- V -- Error (Color wheel -- 35 English LED & Alarm Definition Listing LED Messages Message Standby (Power cord plugged in) Power on Lamp retry Turning off (Cooling state) Turning off (Cooling completed) Error (Thermal failure) Error (Fan lock failure) Power LED Red Blue V -- ---
User Manual
Page 46
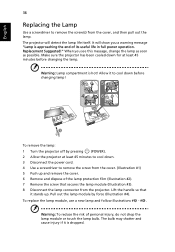
... #2). 7 Remove the screw that it stands up and remove the cover. 6 Remove and dispose of personal injury, do not drop the lamp module or touch the lamp bulb. The bulb may shatter and cause injury if it to cool down . 3 Disconnect the power cord. 4 Use a screwdriver to remove... the screw(s) from the cover, and then pull out the lamp. It will detect the lamp life itself. Allow it is hot! English 36 Replacing the Lamp Use a screwdriver to remove the screw from the cover. (Illustration #1) 5 Push up . The projector will show...
... #2). 7 Remove the screw that it stands up and remove the cover. 6 Remove and dispose of personal injury, do not drop the lamp module or touch the lamp bulb. The bulb may shatter and cause injury if it to cool down . 3 Disconnect the power cord. 4 Use a screwdriver to remove... the screw(s) from the cover, and then pull out the lamp. It will detect the lamp life itself. Allow it is hot! English 36 Replacing the Lamp Use a screwdriver to remove the screw from the cover. (Illustration #1) 5 Push up . The projector will show...


