

User Manual (3D)
Page 3
... connected your projector to a DVD or Blu-ray player, please read sections "Using DLP 3D / NVIDIA 3DTV Play technology" on and how to change the battery. Note: Require DLP Link 3D glasses and support 96Hz, 100Hz, 120Hz sync signal. Important: When you need 3D glasses to support 144Hz sync signal for instructions how to turn them on page 4. If you do not wish to view...
... connected your projector to a DVD or Blu-ray player, please read sections "Using DLP 3D / NVIDIA 3DTV Play technology" on and how to change the battery. Note: Require DLP Link 3D glasses and support 96Hz, 100Hz, 120Hz sync signal. Important: When you need 3D glasses to support 144Hz sync signal for instructions how to turn them on page 4. If you do not wish to view...

User Manual (3D)
Page 4
... www.3dtv.at. English 4 Using DLP 3D / NVIDIA 3DTV Play technology Requires DLP 3D glasses. To download software and use an NVIDIA 3DTV Play ready projector with DLP glasses, refer to 100/120 Hz on most of LED projectors. Note: Blu-ray 3D content over an HDMI 1.4a or later connection, this will be set automatically. 2 Press the menu button on the left-hand side...
... www.3dtv.at. English 4 Using DLP 3D / NVIDIA 3DTV Play technology Requires DLP 3D glasses. To download software and use an NVIDIA 3DTV Play ready projector with DLP glasses, refer to 100/120 Hz on most of LED projectors. Note: Blu-ray 3D content over an HDMI 1.4a or later connection, this will be set automatically. 2 Press the menu button on the left-hand side...

User Manual
Page 5
.... Warning! Consult your eyes. RG2 IEC 62471-5:2015 • Turn on . v Product servicing Do not attempt to service this product from walls and free flow of air around the projector are covered by the operating instructions, since improper adjustment of small children. Additional safety information • Do not look into the product • the product was spilled into the projector's lens when the lamp...
.... Warning! Consult your eyes. RG2 IEC 62471-5:2015 • Turn on . v Product servicing Do not attempt to service this product from walls and free flow of air around the projector are covered by the operating instructions, since improper adjustment of small children. Additional safety information • Do not look into the product • the product was spilled into the projector's lens when the lamp...

User Manual
Page 6
... to wait for changing the lamp, when lamp warning message displays. • Do not attempt to fire. • When switching the projector off, please ensure the projector completes its cooling cycle before turning main power off. • Do not touch the air outlet grille and bottom plate which may hurt your projector. Only use acer ceiling mount kit for mounting the projector and ensure it is under operation as this...
... to wait for changing the lamp, when lamp warning message displays. • Do not attempt to fire. • When switching the projector off, please ensure the projector completes its cooling cycle before turning main power off. • Do not touch the air outlet grille and bottom plate which may hurt your projector. Only use acer ceiling mount kit for mounting the projector and ensure it is under operation as this...
User Manual
Page 8
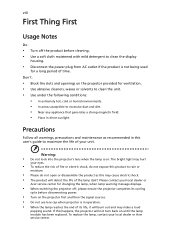
The bright light may hurt your local dealer or Acer service center for changing the lamp, when lamp warning message displays. • When switching the projector off the product before disconnecting power. • Turn on the projector first and then the signal sources. • Do not use lens cap when projector is in operation. • When the lamp reaches the end of its cooling cycle before cleaning. • Use a soft cloth moistened with mild...
The bright light may hurt your local dealer or Acer service center for changing the lamp, when lamp warning message displays. • When switching the projector off the product before disconnecting power. • Turn on the projector first and then the signal sources. • Do not use lens cap when projector is in operation. • When the lamp reaches the end of its cooling cycle before cleaning. • Use a soft cloth moistened with mild...

User Manual
Page 11
...-Ray 3D supported • One-touch "3D" button on , the projector dynamically adjusts the power consumption of the image being projected. English 1 Introduction Product Features This product is a single-chip DLP® projector, including the following outstanding features: • DLP® technology • P1150/M306/PE-S45/F25S/AS329/PR120/MF-020/MS130/X1123H/D800D/EV- Dynamic Black: If turned on remote control allows...
...-Ray 3D supported • One-touch "3D" button on , the projector dynamically adjusts the power consumption of the image being projected. English 1 Introduction Product Features This product is a single-chip DLP® projector, including the following outstanding features: • DLP® technology • P1150/M306/PE-S45/F25S/AS329/PR120/MF-020/MS130/X1123H/D800D/EV- Dynamic Black: If turned on remote control allows...
User Manual
Page 13
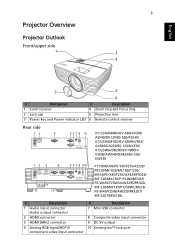
.../upper side 1 3 3 4 2 5 6 # Description # Description 1 Control panel 4 Zoom ring and Focus ring 2 Lens cap 5 Projection lens 3 Power key and Power indicator LED 6 Remote control receiver Rear side 12 4 5 6 7 8 10 X1123H/D800D/EV-S80H/.../MW130/P1350WL/M326/ PE-W45/F25W/AW329/PR320T/ MF-220T/MW130L # Description 1 Audio input connector Audio output connector 2 HDMI connector 3 HDMI (MHL) connector 4 Analog RGB signal/HDTV/ component video input connector # Description 7 Mini USB connector 8 Composite video input connector 9 DC 5V output 10 Kensington™ lock port
.../upper side 1 3 3 4 2 5 6 # Description # Description 1 Control panel 4 Zoom ring and Focus ring 2 Lens cap 5 Projection lens 3 Power key and Power indicator LED 6 Remote control receiver Rear side 12 4 5 6 7 8 10 X1123H/D800D/EV-S80H/.../MW130/P1350WL/M326/ PE-W45/F25W/AW329/PR320T/ MF-220T/MW130L # Description 1 Audio input connector Audio output connector 2 HDMI connector 3 HDMI (MHL) connector 4 Analog RGB signal/HDTV/ component video input connector # Description 7 Mini USB connector 8 Composite video input connector 9 DC 5V output 10 Kensington™ lock port

User Manual
Page 17
... the projector's volume. 7 English # Function Description 7 VGA To change source to HDMI™ (or MHL). (for adjusting 3D settings. 13 SOURCE Changes the active source. 14 MODE Chooses a display mode. 15 MENU Launches the Onscreen Display (OSD) menu or exits the OSD menu. 16 HIDE Press "HIDE" to hide screen image; OUT 19 VIDEO To change source to composite video. 20 LAN/WiFi (No function) 21 Keypad 0~9 Press "0~9" to input a password in or out. This connection supports analog...
... the projector's volume. 7 English # Function Description 7 VGA To change source to HDMI™ (or MHL). (for adjusting 3D settings. 13 SOURCE Changes the active source. 14 MODE Chooses a display mode. 15 MENU Launches the Onscreen Display (OSD) menu or exits the OSD menu. 16 HIDE Press "HIDE" to hide screen image; OUT 19 VIDEO To change source to composite video. 20 LAN/WiFi (No function) 21 Keypad 0~9 Press "0~9" to input a password in or out. This connection supports analog...
User Manual
Page 21
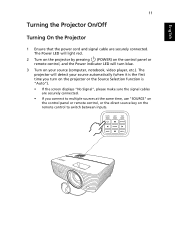
... turn blue. 3 Turn on the remote control to multiple sources at the same time, use "SOURCE" on the control panel or remote control, or the direct source key on your source (computer, notebook, video player, etc.). The Power LED will light red. 2 Turn on the projector by pressing (POWER) on the control panel or remote control, and the Power indicator LED will detect your source automatically (when it is "Auto"). • If the screen displays "No Signal", please make sure the signal cables are securely connected. English 11 Turning...
... turn blue. 3 Turn on the remote control to multiple sources at the same time, use "SOURCE" on the control panel or remote control, or the direct source key on your source (computer, notebook, video player, etc.). The Power LED will light red. 2 Turn on the projector by pressing (POWER) on the control panel or remote control, and the Power indicator LED will detect your source automatically (when it is "Auto"). • If the screen displays "No Signal", please make sure the signal cables are securely connected. English 11 Turning...
User Manual
Page 26
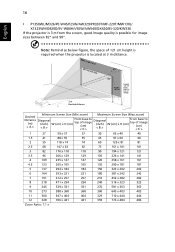
... Zoom Ratio: 1.1 x 16 • P1350WL/M326/PE-W45/F25W/AW329/PR320T/MF-220T/MW130L/ X1323WH/D820D/EV-W80H/V50W/AW540/DX420/BS-320/KW330 If the projector is 3 m from the screen, good image quality is located at 3 m distance. Max screen size Min screen size 90" 82" Height: 110 cm Height: 121 cm From base to top of image 3 m Desired distance Desired Distance (m) < A > Minimum Screen Size (Min zoom...
... Zoom Ratio: 1.1 x 16 • P1350WL/M326/PE-W45/F25W/AW329/PR320T/MF-220T/MW130L/ X1323WH/D820D/EV-W80H/V50W/AW540/DX420/BS-320/KW330 If the projector is 3 m from the screen, good image quality is located at 3 m distance. Max screen size Min screen size 90" 82" Height: 110 cm Height: 121 cm From base to top of image 3 m Desired distance Desired Distance (m) < A > Minimum Screen Size (Min zoom...

User Manual
Page 30
... to adjusting the calibration and alignment settings, such as screen size and distance, focus and more. Note: The OSD screenshot is displayed on the screen or when the projector searches for input signal. 1 Turn on the projector by pressing remote control. (POWER) on the control panel or 2 Press "MENU" on the control panel or remote control to the Acer welcome screen. The new settings will be saved automatically upon exiting the menu. 5 Press "MENU" anytime to exit the menu and...
... to adjusting the calibration and alignment settings, such as screen size and distance, focus and more. Note: The OSD screenshot is displayed on the screen or when the projector searches for input signal. 1 Turn on the projector by pressing remote control. (POWER) on the control panel or 2 Press "MENU" on the control panel or remote control to the Acer welcome screen. The new settings will be saved automatically upon exiting the menu. 5 Press "MENU" anytime to exit the menu and...
User Manual
Page 33
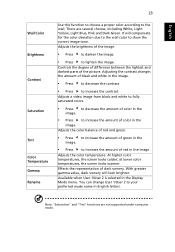
... color in the image. Controls the degree of difference between the lightest and darkest parts of dark scenery. English Wall Color Brightness Contrast Saturation Tint Color Temperature Gamma Rename 23 Use this function to choose a proper color according to show the correct image tone. Note: "Saturation" and "Tint" functions are several choices, including White, Light Yellow, Light Blue, Pink and Dark Green. It will look brighter. Adjusts a video image...
... color in the image. Controls the degree of difference between the lightest and darkest parts of dark scenery. English Wall Color Brightness Contrast Saturation Tint Color Temperature Gamma Rename 23 Use this function to choose a proper color according to show the correct image tone. Note: "Saturation" and "Tint" functions are several choices, including White, Light Yellow, Light Blue, Pink and Dark Green. It will look brighter. Adjusts a video image...

User Manual
Page 34
...; Full (for WXGA/1080p models): The image will be displayed making full use of image. • Desktop • Ceiling: Turns the image upside down for WXGA/1080p models): Keeps the original signal aspect ratio and zooms in by 1.333 times. mounted projection. 24 English Image Projection Mode Projection Location Aspect Ratio Auto Keystone • Front: The factory default setting. • Rear: Reverses the image so you can project from behind a translucent screen. • Auto: Automatically adjusts projection location of the horizontal and vertical...
...; Full (for WXGA/1080p models): The image will be displayed making full use of image. • Desktop • Ceiling: Turns the image upside down for WXGA/1080p models): Keeps the original signal aspect ratio and zooms in by 1.333 times. mounted projection. 24 English Image Projection Mode Projection Location Aspect Ratio Auto Keystone • Front: The factory default setting. • Rear: Reverses the image so you can project from behind a translucent screen. • Auto: Automatically adjusts projection location of the horizontal and vertical...

User Manual
Page 35
... available when the input signal is HDMI. Setting Startup Screen Use this function to prevent color display error. Position (Vertical Position) • Press • Press to move the image down. Note: "H. HDMI Color Range • Auto: Automatically adjusts the color range by information from the player. Adjusts the overscan ratio of the HDMI image data to correct it will take effect when you experience an unstable or flickering image, use this function...
... available when the input signal is HDMI. Setting Startup Screen Use this function to prevent color display error. Position (Vertical Position) • Press • Press to move the image down. Note: "H. HDMI Color Range • Auto: Automatically adjusts the color range by information from the player. Adjusts the overscan ratio of the HDMI image data to correct it will take effect when you experience an unstable or flickering image, use this function...

User Manual
Page 36
... the standby power consumption. Choose "Yes" to use as your customized startup screen. This function is only available when a composite video or SVideo input signal is selected and its native resolution. • Screen Capture • Select "Screen Capture" to press "SOURCE" on the control panel or remote control, or the direct source key on the remote control. • Auto: The projector will provide power output when MHL port(s) and USB A port are correctly connected to...
... the standby power consumption. Choose "Yes" to use as your customized startup screen. This function is only available when a composite video or SVideo input signal is selected and its native resolution. • Screen Capture • Select "Screen Capture" to press "SOURCE" on the control panel or remote control, or the direct source key on the remote control. • Auto: The projector will provide power output when MHL port(s) and USB A port are correctly connected to...

User Manual
Page 38
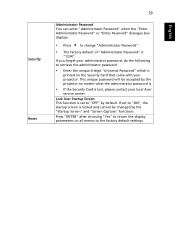
... or change "User Password". • Use the numerical keys on the remote control to set up , the projector will request you to enter the password again. • The factory default setting of "Timeout (Min.)" is "Off". • Once the security function is enabled, the projector will shut down automatically. • If you select "Always request password while projector turns on", you are requested to input the password every time the power cord...
... or change "User Password". • Use the numerical keys on the remote control to set up , the projector will request you to enter the password again. • The factory default setting of "Timeout (Min.)" is "Off". • Once the security function is enabled, the projector will shut down automatically. • If you select "Always request password while projector turns on", you are requested to input the password every time the power cord...
User Manual
Page 39
...", the startup screen is locked and cannot be accepted by the projector no matter what the administrator password is. • If the Security Card is "1234". English Lock User Startup Screen This function is set to the factory default settings. This unique password will be changed by default. If set to return the display parameters on the Security Card that came with your local Acer service center. Press...
...", the startup screen is locked and cannot be accepted by the projector no matter what the administrator password is. • If the Security Card is "1234". English Lock User Startup Screen This function is set to the factory default settings. This unique password will be changed by default. If set to return the display parameters on the Security Card that came with your local Acer service center. Press...
User Manual
Page 40
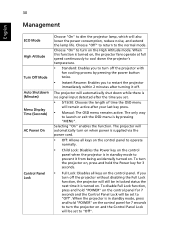
... is turned on, the projector fans operate at full speed continuously to cool down while there is no signal input detected after the time you turn the projector on and the Control Panel Lock will be set . • 5/15/30: Chooses the length of time the OSD menu will still be set to the normal mode. 30 Management English ECO Mode High Altitude Turn Off Mode Auto Shutdown (Minutes) Menu Display Time (Seconds) AC Power On Control Panel Lock...
... is turned on, the projector fans operate at full speed continuously to cool down while there is no signal input detected after the time you turn the projector on and the Control Panel Lock will be set . • 5/15/30: Chooses the length of time the OSD menu will still be set to the normal mode. 30 Management English ECO Mode High Altitude Turn Off Mode Auto Shutdown (Minutes) Menu Display Time (Seconds) AC Power On Control Panel Lock...
User Manual
Page 46
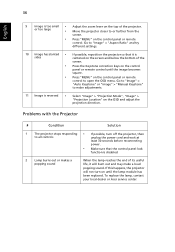
... popping sound. Problems with the Projector # Condition Solution 1 The projector stops responding • If possible, turn off the projector, then to open the OSD menu. To replace the lamp, contact your local dealer or Acer service center. If this happens, the projector will burn out and may make adjustments. 11 Image is reversed • Select "Image" > "Projection Mode", "Image" > "Projection Location" on until the image becomes square. • Press "MENU" on the control panel or remote control...
... popping sound. Problems with the Projector # Condition Solution 1 The projector stops responding • If possible, turn off the projector, then to open the OSD menu. To replace the lamp, contact your local dealer or Acer service center. If this happens, the projector will burn out and may make adjustments. 11 Image is reversed • Select "Image" > "Projection Mode", "Image" > "Projection Location" on until the image becomes square. • Press "MENU" on the control panel or remote control...

User Manual
Page 48
V -- V LAMP LED Red -- --- -- -- V --- V V Quick flashing --- Error (Lamp breakdown) -- Quick flashing V V Quick flashing -- -- Error (Color wheel -- failure) V V V Quick flashing TEMP LED Red -- --- -- -- 38 LED & Alarm Definition Listing LED Messages English Message Standby (Power cord plugged in) Power on Lamp retry Turning off (Cooling state) Turning off (Cooling completed) Firmware download Error (Thermal failure) Error (Fan lock failure) Power LED Red Blue V -- --- V -- --
V -- V LAMP LED Red -- --- -- -- V --- V V Quick flashing --- Error (Lamp breakdown) -- Quick flashing V V Quick flashing -- -- Error (Color wheel -- failure) V V V Quick flashing TEMP LED Red -- --- -- -- 38 LED & Alarm Definition Listing LED Messages English Message Standby (Power cord plugged in) Power on Lamp retry Turning off (Cooling state) Turning off (Cooling completed) Firmware download Error (Thermal failure) Error (Fan lock failure) Power LED Red Blue V -- --- V -- --


