

User Manual CastMaster
Page 2
... button LED indicator Status Descriptions Pairing Red The device is starting when power is supplied. Download software upgrade package from Guest. Put 2 files to your USB drive. (Format by Host and in USB port of your device before using CastMaster. 2. NOTE 3: For Android phone, it's required to Mobile 4. Tap "Build number" for pairing. Green The device is receiving request from acer official website. 2. Host White Red White Green flashing Green...
... button LED indicator Status Descriptions Pairing Red The device is starting when power is supplied. Download software upgrade package from Guest. Put 2 files to your USB drive. (Format by Host and in USB port of your device before using CastMaster. 2. NOTE 3: For Android phone, it's required to Mobile 4. Tap "Build number" for pairing. Green The device is receiving request from acer official website. 2. Host White Red White Green flashing Green...

User Manual Media
Page 1
... via the source USB Connection. split screen projection and enable high quality video streaming. • Powerful wireless display features ready for devices with RJ-45 port). • The projector can act as an access point (AP) or work in decoder and more. English 1 Acer Projector Gateway Introduction The Acer Projector Gateway (APG) is in AP mode). • Supports firmware upgrade via the built-in WiFi con-current mode when doing networking display. • Users can...
... via the source USB Connection. split screen projection and enable high quality video streaming. • Powerful wireless display features ready for devices with RJ-45 port). • The projector can act as an access point (AP) or work in decoder and more. English 1 Acer Projector Gateway Introduction The Acer Projector Gateway (APG) is in AP mode). • Supports firmware upgrade via the built-in WiFi con-current mode when doing networking display. • Users can...
User Manual Media
Page 2
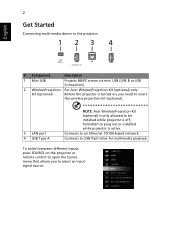
... projector is turned on the projector or remote control to open the Source menu that allows you need to insert the wireless projection-kit (optional). 3 LAN port 4 USB Type A NOTE: Acer WirelessProjection-Kit (optional) is only allowed to plug out or installed while projector is off; To switch between different inputs, press SOURCE on , you to the projector 1 23 4 # Component Description 1 Mini USB Projects NB/PC screen via mini USB (USB B or USB Connection). 2 WirelessProjection- English 2 Get Started Connecting...
... projector is turned on the projector or remote control to open the Source menu that allows you need to insert the wireless projection-kit (optional). 3 LAN port 4 USB Type A NOTE: Acer WirelessProjection-Kit (optional) is only allowed to plug out or installed while projector is off; To switch between different inputs, press SOURCE on , you to the projector 1 23 4 # Component Description 1 Mini USB Projects NB/PC screen via mini USB (USB B or USB Connection). 2 WirelessProjection- English 2 Get Started Connecting...

User Manual Media
Page 15
... USB power (recommend to use Y-cable) since USB power is not supported. NOTE 2: When upgrading the firmware, remove all cables and other USB devices. "Firmware Upgrade" Select "USB Drive" and press Enter to start. Via Network (1) Connect a Acer WirelessPrejection-Kit dongle (optional) or a RJ45 cable to the projector. (Make sure it connects to the internet.) (2) Press "MENU" to open the OSD menu. (3) Go to "Setting" > "Firmware Upgrade" Select "Network" and press Enter to do this: Via USB flash drive (1) Download new firmware...
... USB power (recommend to use Y-cable) since USB power is not supported. NOTE 2: When upgrading the firmware, remove all cables and other USB devices. "Firmware Upgrade" Select "USB Drive" and press Enter to start. Via Network (1) Connect a Acer WirelessPrejection-Kit dongle (optional) or a RJ45 cable to the projector. (Make sure it connects to the internet.) (2) Press "MENU" to open the OSD menu. (3) Go to "Setting" > "Firmware Upgrade" Select "Network" and press Enter to do this: Via USB flash drive (1) Download new firmware...

User Manual Media
Page 16
...). Before starting the app, open the WiFi settings on the splash screen and enjoy the display experience. Then enter the password shown on your device. - Installation and Connecting Instruction Step 1. Power on your NB/PC/ Smartphone/Tablet PC and find the projector name (Projector ID) which is AcerProjector_XXXXXXXX and connect to it. Step 4. Download and install the software/app on the projector and switch to the projector...
...). Before starting the app, open the WiFi settings on the splash screen and enjoy the display experience. Then enter the password shown on your device. - Installation and Connecting Instruction Step 1. Power on your NB/PC/ Smartphone/Tablet PC and find the projector name (Projector ID) which is AcerProjector_XXXXXXXX and connect to it. Step 4. Download and install the software/app on the projector and switch to the projector...

User Manual Media
Page 21
English 21 Network Setting Network Setting includes WiFi, WiFi Password Change, and Software Upgrade. (1) WiFi To set available network for your projector's access. (2) WiFi Password Change
English 21 Network Setting Network Setting includes WiFi, WiFi Password Change, and Software Upgrade. (1) WiFi To set available network for your projector's access. (2) WiFi Password Change
User Manual Media
Page 28
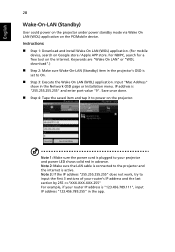
... your router IP address is set to On. Step 3: Execute the Wake On LAN (WOL) application. English 28 Wake-On-LAN (Standby) User could power on the projector under power standby mode via Wake On LAN (WOL) application on the projector. Note 2: Make sure the LAN cable is plugged to power on the PC/Mobile device. Note 1: Make sure the power cord is connected to input the first 3 sections...
... your router IP address is set to On. Step 3: Execute the Wake On LAN (WOL) application. English 28 Wake-On-LAN (Standby) User could power on the projector under power standby mode via Wake On LAN (WOL) application on the projector. Note 2: Make sure the LAN cable is plugged to power on the PC/Mobile device. Note 1: Make sure the power cord is connected to input the first 3 sections...
User Manual
Page 5
... spilled into the projector's lens when the lamp is on the projector first and then signal sources • Do not place the product in following the operating instructions Note: Adjust only those controls that is poorly ventilated or confined. At least 50cm clearance from walls • and free flow of air around the projector is necessary. • Locations where temperatures may become excessively high, such as...
... spilled into the projector's lens when the lamp is on the projector first and then signal sources • Do not place the product in following the operating instructions Note: Adjust only those controls that is poorly ventilated or confined. At least 50cm clearance from walls • and free flow of air around the projector is necessary. • Locations where temperatures may become excessively high, such as...

User Manual
Page 6
... showing warning message. • When changing the lamp, please allow unit to cool down, and follow all changing instructions. • Reset the "Lamp Hour Reset" function from the Onscreen display "Management > Lamp Settings" menu after replacing the lamp module. • Do not attempt to break on the remote control. • The lamp becomes extremely hot during operation. It may cause the projector to removing the lamp assembly for ceiling mount installation. Please be sure to change the lamp...
... showing warning message. • When changing the lamp, please allow unit to cool down, and follow all changing instructions. • Reset the "Lamp Hour Reset" function from the Onscreen display "Management > Lamp Settings" menu after replacing the lamp module. • Do not attempt to break on the remote control. • The lamp becomes extremely hot during operation. It may cause the projector to removing the lamp assembly for ceiling mount installation. Please be sure to change the lamp...
User Manual
Page 8
... things first Usage Notes Do: • Turn off the product before cleaning. • Use a soft cloth moistened with mild detergent to clean the display housing. • Disconnect the power plug from the Onscreen display "Management > Lamp Settings" menu after replacing the lamp module. • When switching the projector off, please ensure the projector completes its life, it shows warning messages. • Reset the "Lamp Hour Reset" function from AC outlet if the...
... things first Usage Notes Do: • Turn off the product before cleaning. • Use a soft cloth moistened with mild detergent to clean the display housing. • Disconnect the power plug from the Onscreen display "Management > Lamp Settings" menu after replacing the lamp module. • When switching the projector off, please ensure the projector completes its life, it shows warning messages. • Reset the "Lamp Hour Reset" function from AC outlet if the...
User Manual
Page 9
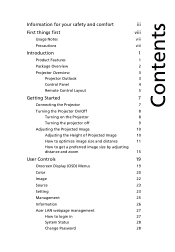
... Started 7 Connecting the Projector 7 Turning the Projector On/Off 8 Turning on the Projector 8 Turning the projector off 9 Adjusting the Projected Image 10 Adjusting the Height of Projected Image 10 How to optimize image size and distance 11 How to get a preferred image size by adjusting distance and zoom 15 User Controls 19 Onscreen Display (OSD) Menus 19 Color 20 Image 22 Source 23 Setting 23 Management 25 Information 26 Acer LAN webpage management 27 How to login in 27 System Status 28 Change Password 28
... Started 7 Connecting the Projector 7 Turning the Projector On/Off 8 Turning on the Projector 8 Turning the projector off 9 Adjusting the Projected Image 10 Adjusting the Height of Projected Image 10 How to optimize image size and distance 11 How to get a preferred image size by adjusting distance and zoom 15 User Controls 19 Onscreen Display (OSD) Menus 19 Color 20 Image 22 Source 23 Setting 23 Management 25 Information 26 Acer LAN webpage management 27 How to login in 27 System Status 28 Change Password 28

User Manual
Page 13
... 3 78 # Description 1 Control panel 2 Focus ring 3 Zoom ring 4 Remote control receiver 5 Projection lens 6 Quick-release lever Rear / Left side 24 5 76 # Description 7 Adjuster foot 8 Air outlet 9 Security bar 10 Lamp cover 11 Air inlet 2 3 4 5 6 7 89 1 10 11 12 13 # Description 1 Speaker 2 Mini USB connector 3 RS232 connector 4 PC analog signal/HDTV/component video input connector (VGA IN) 5 USB connector (WIRELESS KIT) 6 HDMI input connector 7 Audio input connector # Description 8 LAN (RJ45 Port for 10/100M Ethernet) 9 USB connector (5V...
... 3 78 # Description 1 Control panel 2 Focus ring 3 Zoom ring 4 Remote control receiver 5 Projection lens 6 Quick-release lever Rear / Left side 24 5 76 # Description 7 Adjuster foot 8 Air outlet 9 Security bar 10 Lamp cover 11 Air inlet 2 3 4 5 6 7 89 1 10 11 12 13 # Description 1 Speaker 2 Mini USB connector 3 RS232 connector 4 PC analog signal/HDTV/component video input connector (VGA IN) 5 USB connector (WIRELESS KIT) 6 HDMI input connector 7 Audio input connector # Description 8 LAN (RJ45 Port for 10/100M Ethernet) 9 USB connector (5V...
User Manual
Page 14
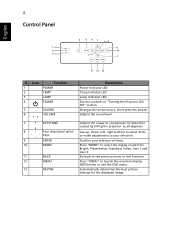
4 Control Panel English 4 567 8 1 6 2 10 3 9 7 11 12 13 # Icon Function 1 POWER 2 TEMP 3 LAMP 4 POWER 5 SOURCE 6 VOLUME 7 KEYSTONE 8 Four directional select keys 9 ENTER 10 MODE 11 BACK 12 MENU 13 RESYNC Description Power Indicator LED Temp Indicator LED Lamp Indicator LED See the contents in "Turning the Projector On/ Off" section. Adjusts the image to select the display mode from Bright, Presentation, Standard, Video, User 1 and User 2. Use up, down, left, right buttons to select items or make adjustments to your selection of...
4 Control Panel English 4 567 8 1 6 2 10 3 9 7 11 12 13 # Icon Function 1 POWER 2 TEMP 3 LAMP 4 POWER 5 SOURCE 6 VOLUME 7 KEYSTONE 8 Four directional select keys 9 ENTER 10 MODE 11 BACK 12 MENU 13 RESYNC Description Power Indicator LED Temp Indicator LED Lamp Indicator LED See the contents in "Turning the Projector On/ Off" section. Adjusts the image to select the display mode from Bright, Presentation, Standard, Video, User 1 and User 2. Use up, down, left, right buttons to select items or make adjustments to your selection of...
User Manual
Page 19
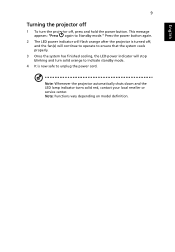
... power button. This message appears: "Press again to unplug the power cord. English 9 Turning the projector off 1 To turn the projector off , and the fan(s) will continue to operate to ensure that the system cools properly. 3 Once the system has finished cooling, the LED power indicator will stop blinking and turn solid orange to indicate standby mode. 4 It is now safe to Standby mode." Note: Whenever the projector automatically shuts down and the LED lamp indicator turns solid red...
... power button. This message appears: "Press again to unplug the power cord. English 9 Turning the projector off 1 To turn the projector off , and the fan(s) will continue to operate to ensure that the system cools properly. 3 Once the system has finished cooling, the LED power indicator will stop blinking and turn solid orange to indicate standby mode. 4 It is now safe to Standby mode." Note: Whenever the projector automatically shuts down and the LED lamp indicator turns solid red...
User Manual
Page 30
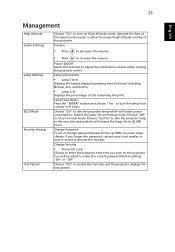
...; Off: Default setting. • Low / Medium / High: Select Low / Medium / High to reduce different exposure levels of ECO mode for 4 hours, the projector will extend the lamp life to 20,000 hours. • User 1/User 2: Memorize user's settings. • 3D: Only available for 3D input signal. : Once EcoPro is enabled, ECO Mode switches to EcoPro at the same time. : After the above setting is done, if user changes to other Dislay mode settings rather...
...; Off: Default setting. • Low / Medium / High: Select Low / Medium / High to reduce different exposure levels of ECO mode for 4 hours, the projector will extend the lamp life to 20,000 hours. • User 1/User 2: Memorize user's settings. • 3D: Only available for 3D input signal. : Once EcoPro is enabled, ECO Mode switches to EcoPro at the same time. : After the above setting is done, if user changes to other Dislay mode settings rather...
User Manual
Page 33
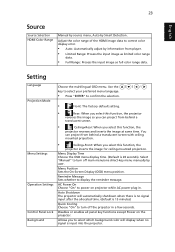
... HDMI image data to power on the projector. AC Power On Choose "On" to correct color display error. • Auto: Automatically adjust by information from player. • Limited Range: Prosess the input image as limited color range data. • Full Range: Prosess the input image as full color range data. 23 English Source Source Selection HDMI Color Range Manual by source menu, Auto by user. Select "Manual" to display the reminder message. Menu Display Time Choose the OSD menu display time. (Default is input into the projector. Reminder Message Sets whether to turn...
... HDMI image data to power on the projector. AC Power On Choose "On" to correct color display error. • Auto: Automatically adjust by information from player. • Limited Range: Prosess the input image as limited color range data. • Full Range: Prosess the input image as full color range data. 23 English Source Source Selection HDMI Color Range Manual by source menu, Auto by user. Select "Manual" to display the reminder message. Menu Display Time Choose the OSD menu display time. (Default is input into the projector. Reminder Message Sets whether to turn...

User Manual
Page 34
If you change the setting, the changes will take effect when you exit the OSD menu. Choose "On" to select your desired startup screen. Note: Functions vary depending on model definition. Default is "Off". Default is "Off". English 24 Startup Screen USB 5V (Standby) VGA OUT (Standby) Firmware Upgrade Use this function to enable VGA OUT connection. Choose "On" to upgrade firmware via USB drive or network. Choose to supply 5V/1.5A pwoer while in standby mode.
If you change the setting, the changes will take effect when you exit the OSD menu. Choose "On" to select your desired startup screen. Note: Functions vary depending on model definition. Default is "Off". Default is "Off". English 24 Startup Screen USB 5V (Standby) VGA OUT (Standby) Firmware Upgrade Use this function to enable VGA OUT connection. Choose "On" to upgrade firmware via USB drive or network. Choose to supply 5V/1.5A pwoer while in standby mode.
User Manual
Page 35
... turning the projector on -screen steps. Change Security • Power On Lock Choose to enter the password next time you forget the password, contact your local reseller or service center to decode the number. Choose "On" to increase the volume. Volume • Press to decrease the volume. • Press to enable the function and the projector displays the test pattern. Lamp Hour Reset Press the "ENTER" button...
... turning the projector on -screen steps. Change Security • Power On Lock Choose to enter the password next time you forget the password, contact your local reseller or service center to decode the number. Choose "On" to increase the volume. Volume • Press to decrease the volume. • Press to enable the function and the projector displays the test pattern. Lamp Hour Reset Press the "ENTER" button...

User Manual
Page 40
... the power button again. 2 Image problems • If the searching source is displayed: • Press SOURCE to select an active input source. • Be sure the external source is turned on and connected. • For a computer connection, ensure your notebook computer's external video port is blocking the remote control receiver on the front of the projector. • Use the remote control within the effective range. • Aim the remote control at the screen or...
... the power button again. 2 Image problems • If the searching source is displayed: • Press SOURCE to select an active input source. • Be sure the external source is turned on and connected. • For a computer connection, ensure your notebook computer's external video port is blocking the remote control receiver on the front of the projector. • Use the remote control within the effective range. • Aim the remote control at the screen or...
User Manual
Page 41
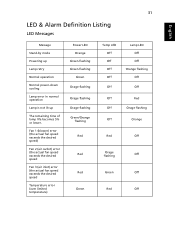
...speed Fan 3 (air inlet) error (the actual fan speed exceeds the desired speed Temperature error (over limited temperature) Power LED Orange Green flashing Green flashing Green Orage flashing Orage flashing Orage flashing Green/Orange flashing Red Red Red Green Temp LED Off Off Off Off Off Off Off Off Red Orage flashing Green Red 31 Lamp LED Off Off Orange flashing Off Off Red Orage flashing Orange Off Off Off Off English LED & Alarm Definition Listing LED Messages Message Stand-by mode Powering up Lamp retry Normal operation Normal power-down cooling Lamp error in normal operation Lamp is...
...speed Fan 3 (air inlet) error (the actual fan speed exceeds the desired speed Temperature error (over limited temperature) Power LED Orange Green flashing Green flashing Green Orage flashing Orage flashing Orage flashing Green/Orange flashing Red Red Red Green Temp LED Off Off Off Off Off Off Off Off Red Orage flashing Green Red 31 Lamp LED Off Off Orange flashing Off Off Red Orage flashing Orange Off Off Off Off English LED & Alarm Definition Listing LED Messages Message Stand-by mode Powering up Lamp retry Normal operation Normal power-down cooling Lamp error in normal operation Lamp is...


