

User Manual CastMaster
Page 2
.... The projector supports multiple CastMaster devices. Main button LED indicator Red flashing White Side button LED indicator Status Descriptions Guest Red Guest is an optional accessory and please consult with input source, and ready to cast. Go to "Settings" --> "About phone". 3. Red flashing => Red flashing Red flashing Red Software upgrading Software upgrade done NOTE 1: CastMaster is sending request to Host to cast after pressing side button. Red The device is supplied. Operation Red Red Green The...
.... The projector supports multiple CastMaster devices. Main button LED indicator Red flashing White Side button LED indicator Status Descriptions Guest Red Guest is an optional accessory and please consult with input source, and ready to cast. Go to "Settings" --> "About phone". 3. Red flashing => Red flashing Red flashing Red Software upgrading Software upgrade done NOTE 1: CastMaster is sending request to Host to cast after pressing side button. Red The device is supplied. Operation Red Red Green The...

User Manual Media
Page 1
... mode when doing networking display. • Users can easily launch the EZCastPro Management to do Full screen, L/R, 4- English 1 Acer Projector Gateway Introduction The Acer Projector Gateway (APG) is in AP mode). • Supports firmware upgrade via USB flash drive. The APG provides versatile source connectivity, the latest EZCastPro Management tools for networking display, supports for all media functions by the remote control. • You can enjoy media & documents playback via USB flash drive. • Supports high resolution...
... mode when doing networking display. • Users can easily launch the EZCastPro Management to do Full screen, L/R, 4- English 1 Acer Projector Gateway Introduction The Acer Projector Gateway (APG) is in AP mode). • Supports firmware upgrade via USB flash drive. The APG provides versatile source connectivity, the latest EZCastPro Management tools for networking display, supports for all media functions by the remote control. • You can enjoy media & documents playback via USB flash drive. • Supports high resolution...
User Manual Media
Page 2
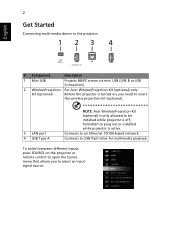
... remote control to open the Source menu that allows you need to insert the wireless projection-kit (optional). 3 LAN port 4 USB Type A NOTE: Acer WirelessProjection-Kit (optional) is only allowed to USB flash drive for multimedia playback. Connects to select an input signal source. To switch between different inputs, press SOURCE on , you to an Ethernet 10/100-based network. forbidden to the projector 1 23 4 # Component Description 1 Mini USB Projects NB/PC screen via mini USB (USB B or USB Connection...
... remote control to open the Source menu that allows you need to insert the wireless projection-kit (optional). 3 LAN port 4 USB Type A NOTE: Acer WirelessProjection-Kit (optional) is only allowed to USB flash drive for multimedia playback. Connects to select an input signal source. To switch between different inputs, press SOURCE on , you to an Ethernet 10/100-based network. forbidden to the projector 1 23 4 # Component Description 1 Mini USB Projects NB/PC screen via mini USB (USB B or USB Connection...

User Manual Media
Page 15
... 1: Do not turn off projector while the firmware upgrade is not supported. NOTE 4: The disk with partition is processing. English 15 Setting Menu Item Photo Display Ratio Interval time Video repeat mode Music repeat mode Options Original, Full Screen 3 sec, 5 sec, 10 sec Sequence, Single Sequence, Single Software Upgrade Instructions There are 2 ways to do this: Via USB flash drive (1) Download new firmware by one compressed file from acer global website...
... 1: Do not turn off projector while the firmware upgrade is not supported. NOTE 4: The disk with partition is processing. English 15 Setting Menu Item Photo Display Ratio Interval time Video repeat mode Music repeat mode Options Original, Full Screen 3 sec, 5 sec, 10 sec Sequence, Single Sequence, Single Software Upgrade Instructions There are 2 ways to do this: Via USB flash drive (1) Download new firmware by one compressed file from acer global website...

User Manual Media
Page 16
... projector. Download and install the software/app on the splash screen and enjoy the display experience. Display - Then enter the password shown on your NB/PC/ Smartphone/Tablet PC and find the projector name (Projector ID) which is AcerProjector_XXXXXXXX and connect to LAN/WiFi and display over network (either LAN or WiFi). Before starting the app, open the WiFi settings on the projector and switch to the source "LAN/WiFi". Step 2. Install Acer...
... projector. Download and install the software/app on the splash screen and enjoy the display experience. Display - Then enter the password shown on your NB/PC/ Smartphone/Tablet PC and find the projector name (Projector ID) which is AcerProjector_XXXXXXXX and connect to LAN/WiFi and display over network (either LAN or WiFi). Before starting the app, open the WiFi settings on the projector and switch to the source "LAN/WiFi". Step 2. Install Acer...

User Manual Media
Page 21
English 21 Network Setting Network Setting includes WiFi, WiFi Password Change, and Software Upgrade. (1) WiFi To set available network for your projector's access. (2) WiFi Password Change
English 21 Network Setting Network Setting includes WiFi, WiFi Password Change, and Software Upgrade. (1) WiFi To set available network for your projector's access. (2) WiFi Password Change
User Manual Media
Page 28
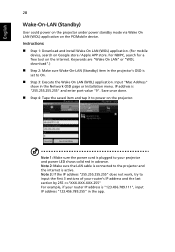
... a free tool on the PC/Mobile device. IP address is plugged to your router IP address is set to input the first 3 sections of your router's IP address and the last section by 255 =>"XXX.XXX.XXX.255" For example, if your projector and power LED shows solid red in the Network OSD page or Installation menu. Instructions: Step 1: Download and install Wake On LAN (WOL...
... a free tool on the PC/Mobile device. IP address is plugged to your router IP address is set to input the first 3 sections of your router's IP address and the last section by 255 =>"XXX.XXX.XXX.255" For example, if your projector and power LED shows solid red in the Network OSD page or Installation menu. Instructions: Step 1: Download and install Wake On LAN (WOL...
User Manual
Page 5
... free flow of air around the projector is something wrong with an ambient temperature above 40 oC/104 oF. • Locations where the altitudes are covered by the operating instructions, since improper adjustment of small children. In this product to normal condition. It can lead to fire. • When switching the projector off .. Your device and its cooling cycle before turning main power...
... free flow of air around the projector is something wrong with an ambient temperature above 40 oC/104 oF. • Locations where the altitudes are covered by the operating instructions, since improper adjustment of small children. In this product to normal condition. It can lead to fire. • When switching the projector off .. Your device and its cooling cycle before turning main power...

User Manual
Page 6
The only user serviceable part is the lamp which has its tilt angles should be sure to change the lamp when is showing warning message. • When changing the lamp, please allow unit to cool down, and follow all changing instructions. • Reset the "Lamp Hour Reset" function from the Onscreen display "Management > Lamp Settings" menu after replacing the lamp module. • Do not attempt to removing the lamp assembly for ceiling mount installation. It may cause the...
The only user serviceable part is the lamp which has its tilt angles should be sure to change the lamp when is showing warning message. • When changing the lamp, please allow unit to cool down, and follow all changing instructions. • Reset the "Lamp Hour Reset" function from the Onscreen display "Management > Lamp Settings" menu after replacing the lamp module. • Do not attempt to removing the lamp assembly for ceiling mount installation. It may cause the...
User Manual
Page 8
... mild detergent to clean the display housing. • Disconnect the power plug from the Onscreen display "Management > Lamp Settings" menu after replacing the lamp module. • When switching the projector off, please ensure the projector completes its cooling cycle before disconnecting power. • Turn on the projector first and then the signal sources. • Do not use lens cap when projector is in this user's guide to maximize the life of your eyes...
... mild detergent to clean the display housing. • Disconnect the power plug from the Onscreen display "Management > Lamp Settings" menu after replacing the lamp module. • When switching the projector off, please ensure the projector completes its cooling cycle before disconnecting power. • Turn on the projector first and then the signal sources. • Do not use lens cap when projector is in this user's guide to maximize the life of your eyes...
User Manual
Page 9
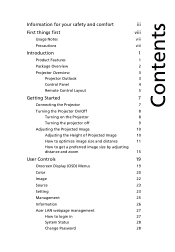
... Started 7 Connecting the Projector 7 Turning the Projector On/Off 8 Turning on the Projector 8 Turning the projector off 9 Adjusting the Projected Image 10 Adjusting the Height of Projected Image 10 How to optimize image size and distance 11 How to get a preferred image size by adjusting distance and zoom 15 User Controls 19 Onscreen Display (OSD) Menus 19 Color 20 Image 22 Source 23 Setting 23 Management 25 Information 26 Acer LAN webpage management 27 How to login in 27 System Status 28 Change Password 28
... Started 7 Connecting the Projector 7 Turning the Projector On/Off 8 Turning on the Projector 8 Turning the projector off 9 Adjusting the Projected Image 10 Adjusting the Height of Projected Image 10 How to optimize image size and distance 11 How to get a preferred image size by adjusting distance and zoom 15 User Controls 19 Onscreen Display (OSD) Menus 19 Color 20 Image 22 Source 23 Setting 23 Management 25 Information 26 Acer LAN webpage management 27 How to login in 27 System Status 28 Change Password 28

User Manual
Page 13
... 3 78 # Description 1 Control panel 2 Focus ring 3 Zoom ring 4 Remote control receiver 5 Projection lens 6 Quick-release lever Rear / Left side 24 5 76 # Description 7 Adjuster foot 8 Air outlet 9 Security bar 10 Lamp cover 11 Air inlet 2 3 4 5 6 7 89 1 10 11 12 13 # Description 1 Speaker 2 Mini USB connector 3 RS232 connector 4 PC analog signal/HDTV/component video input connector (VGA IN) 5 USB connector (WIRELESS KIT) 6 HDMI input connector 7 Audio input connector # Description 8 LAN (RJ45 Port for 10/100M Ethernet) 9 USB connector (5V...
... 3 78 # Description 1 Control panel 2 Focus ring 3 Zoom ring 4 Remote control receiver 5 Projection lens 6 Quick-release lever Rear / Left side 24 5 76 # Description 7 Adjuster foot 8 Air outlet 9 Security bar 10 Lamp cover 11 Air inlet 2 3 4 5 6 7 89 1 10 11 12 13 # Description 1 Speaker 2 Mini USB connector 3 RS232 connector 4 PC analog signal/HDTV/component video input connector (VGA IN) 5 USB connector (WIRELESS KIT) 6 HDMI input connector 7 Audio input connector # Description 8 LAN (RJ45 Port for 10/100M Ethernet) 9 USB connector (5V...
User Manual
Page 14
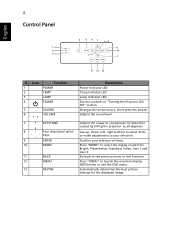
.... Adjusts the image to select the display mode from Bright, Presentation, Standard, Video, User 1 and User 2. Go back to launch the onscreen display (OSD) menu or exit the OSD menu. 4 Control Panel English 4 567 8 1 6 2 10 3 9 7 11 12 13 # Icon Function 1 POWER 2 TEMP 3 LAMP 4 POWER 5 SOURCE 6 VOLUME 7 KEYSTONE 8 Four directional select keys 9 ENTER 10 MODE 11 BACK 12 MENU 13 RESYNC Description Power Indicator LED Temp Indicator LED Lamp Indicator LED See the contents in "Turning the Projector On/ Off" section. Changes the...
.... Adjusts the image to select the display mode from Bright, Presentation, Standard, Video, User 1 and User 2. Go back to launch the onscreen display (OSD) menu or exit the OSD menu. 4 Control Panel English 4 567 8 1 6 2 10 3 9 7 11 12 13 # Icon Function 1 POWER 2 TEMP 3 LAMP 4 POWER 5 SOURCE 6 VOLUME 7 KEYSTONE 8 Four directional select keys 9 ENTER 10 MODE 11 BACK 12 MENU 13 RESYNC Description Power Indicator LED Temp Indicator LED Lamp Indicator LED See the contents in "Turning the Projector On/ Off" section. Changes the...
User Manual
Page 19
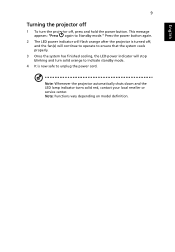
... message appears: "Press again to unplug the power cord. Note: Whenever the projector automatically shuts down and the LED lamp indicator turns solid red, contact your local reseller or service center. Press the power button again. 2 The LED power indicator will flash orange after the projector is turned off, and the fan(s) will continue to operate to ensure that the system cools properly. 3 Once the system has finished cooling, the LED power indicator will stop blinking...
... message appears: "Press again to unplug the power cord. Note: Whenever the projector automatically shuts down and the LED lamp indicator turns solid red, contact your local reseller or service center. Press the power button again. 2 The LED power indicator will flash orange after the projector is turned off, and the fan(s) will continue to operate to ensure that the system cools properly. 3 Once the system has finished cooling, the LED power indicator will stop blinking...
User Manual
Page 30
.... • EcoPro: Dims the projector lamp to the very low status which will extend the lamp life to 20,000 hours. • User 1/User 2: Memorize user's settings. • 3D: Only available for 3D input signal. : Once EcoPro is enabled, ECO Mode switches to EcoPro at the same time. : After the above setting is done, if user changes to other Dislay mode settings rather than EcoPro, ECO Mode switches to "Off". : When EcoPro...
.... • EcoPro: Dims the projector lamp to the very low status which will extend the lamp life to 20,000 hours. • User 1/User 2: Memorize user's settings. • 3D: Only available for 3D input signal. : Once EcoPro is enabled, ECO Mode switches to EcoPro at the same time. : After the above setting is done, if user changes to other Dislay mode settings rather than EcoPro, ECO Mode switches to "Off". : When EcoPro...
User Manual
Page 33
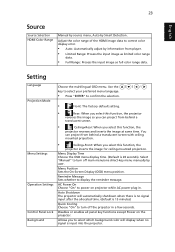
...no signal is 20 seconds). Setting Language Projection Mode Menu Settings Operation Settings Control Panel Lock Background Choose the multilingual OSD menu. You can project from behind a translucent screen with ceiling mounted projection. • Ceiling+Front: When you to correct color display error. • Auto: Automatically adjust by user. Menu Display Time Choose the OSD menu display time. (Default is input into the projector. Menu Position Sets the On-Screen Display (OSD) menu position. 23 English Source Source Selection HDMI Color Range Manual by source menu, Auto...
...no signal is 20 seconds). Setting Language Projection Mode Menu Settings Operation Settings Control Panel Lock Background Choose the multilingual OSD menu. You can project from behind a translucent screen with ceiling mounted projection. • Ceiling+Front: When you to correct color display error. • Auto: Automatically adjust by user. Menu Display Time Choose the OSD menu display time. (Default is input into the projector. Menu Position Sets the On-Screen Display (OSD) menu position. 23 English Source Source Selection HDMI Color Range Manual by source menu, Auto...

User Manual
Page 34
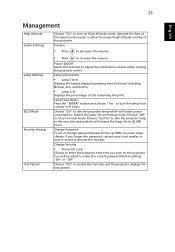
Choose to select your desired startup screen. English 24 Startup Screen USB 5V (Standby) VGA OUT (Standby) Firmware Upgrade Use this function to upgrade firmware via USB drive or network. Default is "Off". Choose "On" to supply 5V/1.5A pwoer while in standby mode. Default is "Off". If you change the setting, the changes will take effect when you exit the OSD menu. Note: Functions vary depending on model definition. Choose "On" to enable VGA OUT connection.
Choose to select your desired startup screen. English 24 Startup Screen USB 5V (Standby) VGA OUT (Standby) Firmware Upgrade Use this function to upgrade firmware via USB drive or network. Default is "Off". Choose "On" to supply 5V/1.5A pwoer while in standby mode. Default is "Off". If you change the setting, the changes will take effect when you exit the OSD menu. Note: Functions vary depending on model definition. Choose "On" to enable VGA OUT connection.
User Manual
Page 35
... 0 hours. Change Password To set or change password please follow up OSD on the projector. Lamp Information • Lamp Timer Displays the lamp's elapsed operating time (in hours) including Normal, Eco, and EcoPro. • Lamp Life Displays the percentage of the projector. Power On/Off Select this function to adjust the notification volume when turning the projector on High Altitude mode. Operate the fans at full speed continuously to allow for proper high altitude cooling of the remaining lamp life. Lamp Hour Reset...
... 0 hours. Change Password To set or change password please follow up OSD on the projector. Lamp Information • Lamp Timer Displays the lamp's elapsed operating time (in hours) including Normal, Eco, and EcoPro. • Lamp Life Displays the percentage of the projector. Power On/Off Select this function to adjust the notification volume when turning the projector on High Altitude mode. Operate the fans at full speed continuously to allow for proper high altitude cooling of the remaining lamp life. Lamp Hour Reset...

User Manual
Page 40
... a computer connection: • Press RESYNC. 3 Remote control problems • If the remote control does not operate: • Be sure nothing is blocking the remote control receiver on -screen menu, adjust the focus ring. (The image size should not change; English 30 Appendices Troubleshooting If you are adjusting the zoom, not the focus.) • Check the projection lens to the side. if it in and press the power button again. 2 Image problems • If the searching source is turned on...
... a computer connection: • Press RESYNC. 3 Remote control problems • If the remote control does not operate: • Be sure nothing is blocking the remote control receiver on -screen menu, adjust the focus ring. (The image size should not change; English 30 Appendices Troubleshooting If you are adjusting the zoom, not the focus.) • Check the projection lens to the side. if it in and press the power button again. 2 Image problems • If the searching source is turned on...
User Manual
Page 41
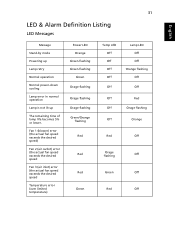
...speed Fan 3 (air inlet) error (the actual fan speed exceeds the desired speed Temperature error (over limited temperature) Power LED Orange Green flashing Green flashing Green Orage flashing Orage flashing Orage flashing Green/Orange flashing Red Red Red Green Temp LED Off Off Off Off Off Off Off Off Red Orage flashing Green Red 31 Lamp LED Off Off Orange flashing Off Off Red Orage flashing Orange Off Off Off Off English LED & Alarm Definition Listing LED Messages Message Stand-by mode Powering up Lamp retry Normal operation Normal power-down cooling Lamp error in normal operation Lamp is...
...speed Fan 3 (air inlet) error (the actual fan speed exceeds the desired speed Temperature error (over limited temperature) Power LED Orange Green flashing Green flashing Green Orage flashing Orage flashing Orage flashing Green/Orange flashing Red Red Red Green Temp LED Off Off Off Off Off Off Off Off Red Orage flashing Green Red 31 Lamp LED Off Off Orange flashing Off Off Red Orage flashing Orange Off Off Off Off English LED & Alarm Definition Listing LED Messages Message Stand-by mode Powering up Lamp retry Normal operation Normal power-down cooling Lamp error in normal operation Lamp is...


