

User Manual (3D)
Page 3
..., and an LED that indicates if the glasses are turned on and how to enhance battery life, they turn it off after a few minutes of the arms that you can view 3D content, you have bought has integrated DLP and NVIDIA 3D (Optional) technology. If you should turn off , otherwise the image may help you will be projected at full brightness...
..., and an LED that indicates if the glasses are turned on and how to enhance battery life, they turn it off after a few minutes of the arms that you can view 3D content, you have bought has integrated DLP and NVIDIA 3D (Optional) technology. If you should turn off , otherwise the image may help you will be projected at full brightness...
User Manual (3D)
Page 4
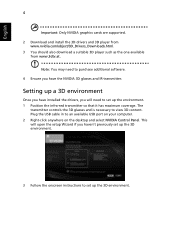
... open the setup Wizard if you have installed the drivers, you will need to purchase additional software. 4 Ensure you haven't previously set up the 3D environment. 3 Follow the onscreen instructions to set up the 3D environment. Note: You may need to set up a 3D environment Once you have the NVIDIA 3D glasses and IR-transmitter. Plug the USB cable in to view...
... open the setup Wizard if you have installed the drivers, you will need to purchase additional software. 4 Ensure you haven't previously set up the 3D environment. 3 Follow the onscreen instructions to set up the 3D environment. Note: You may need to set up a 3D environment Once you have the NVIDIA 3D glasses and IR-transmitter. Plug the USB cable in to view...

User Manual (3D)
Page 7
...supports 3D playback. Note: You need to your graphics card's documentation. 2 Download and install the latest drivers for your graphics card vendor's website for the latest driver version. 3 You should also download a suitable 3D player such as the one available from www.3dtv.at fullscreen resolution in the player. Using DLP... Open the stereoscopic player and set the viewing method by going to the NVIDIA 3DTV Play website: www.nvidia.com/3dtv. To download software and use an NVIDIA 3DTV Play ready projector with DLP glasses, refer to View > Viewing Method > NVIDIA 3D Vision. 2 Open ...
...supports 3D playback. Note: You need to your graphics card's documentation. 2 Download and install the latest drivers for your graphics card vendor's website for the latest driver version. 3 You should also download a suitable 3D player such as the one available from www.3dtv.at fullscreen resolution in the player. Using DLP... Open the stereoscopic player and set the viewing method by going to the NVIDIA 3DTV Play website: www.nvidia.com/3dtv. To download software and use an NVIDIA 3DTV Play ready projector with DLP glasses, refer to View > Viewing Method > NVIDIA 3D Vision. 2 Open ...

User Manual
Page 5
... spilled into the projector's lens when the lamp is on the projector first and then signal sources. • Do not place the product in performance, indicating a need for purchase options. v Product servicing Do not attempt to service this product from walls and free flow of air around the projector are necessary. • Locations where temperatures may become excessively high, such as opening or removing covers may expose you...
... spilled into the projector's lens when the lamp is on the projector first and then signal sources. • Do not place the product in performance, indicating a need for purchase options. v Product servicing Do not attempt to service this product from walls and free flow of air around the projector are necessary. • Locations where temperatures may become excessively high, such as opening or removing covers may expose you...

User Manual
Page 6
... capable of the lamp itself. Only use acer ceiling mount kit for changing the lamp, when lamp warning message displays. • Do not attempt to disassemble this product to become hot. • Clean the air filter frequently. To temporarily turn off the lamp, press HIDE on end vertically. It can lead to fall over, causing injury or damage. • This product is securely installed. There are clogged...
... capable of the lamp itself. Only use acer ceiling mount kit for changing the lamp, when lamp warning message displays. • Do not attempt to disassemble this product to become hot. • Clean the air filter frequently. To temporarily turn off the lamp, press HIDE on end vertically. It can lead to fall over, causing injury or damage. • This product is securely installed. There are clogged...

User Manual
Page 8
... sound. Precautions Follow all warnings, precautions and maintenance as this user's guide to maximize the life of the lamp itself. Warning: • Do not look into the projector's lens when the lamp is not being used for changing the lamp, when lamp warning message displays. • When switching the projector off the product before disconnecting power. • Turn on the projector first and then the signal sources. • Do not use lens cap when projector is in operation...
... sound. Precautions Follow all warnings, precautions and maintenance as this user's guide to maximize the life of the lamp itself. Warning: • Do not look into the projector's lens when the lamp is not being used for changing the lamp, when lamp warning message displays. • When switching the projector off the product before disconnecting power. • Turn on the projector first and then the signal sources. • Do not use lens cap when projector is in operation...

User Manual
Page 11
... of projectors via DLP Link Technology: Blu-Ray 3D supported • One-touch "3D" button on , the projector dynamically adjusts the power consumption of the image being projected. When projecting darker images the power consumption will be reduced and the contrast of the image will decrease the power consumption of the lamp by up to 70% when no input signal can be enhanced. - Dynamic Black: If turned on remote control...
... of projectors via DLP Link Technology: Blu-Ray 3D supported • One-touch "3D" button on , the projector dynamically adjusts the power consumption of the image being projected. When projecting darker images the power consumption will be reduced and the contrast of the image will decrease the power consumption of the lamp by up to 70% when no input signal can be enhanced. - Dynamic Black: If turned on remote control...

User Manual
Page 13
.../P1385WB # Description # Description 1 Control panel 4 HDMI (MHL) connector Micro USB cable 2 Power key and Power indicator LED 5 Projection lens 3 Zoom ring and Focus ring Focus ring 6 Remote control receiver 7 Lens cap Rear side 123 4 5 6 8 9 10 11 AUDIO IN S-VIDEO MIC IN AUDIO OUT VIDEO HDMI -1/ MHL USB MINI-B VGA IN -2 VGA IN -1 LAN USB -A 16 12 P5227/P5327W VGA-OUT RS232 DC 12V OUT 15 123 4 5 678 9 AUDIO IN S-VIDEO MIC IN AUDIO OUT VIDEO HDMI -1/ MHL USB MINI-B VGA IN -2 VGA IN -1 LAN USB -A 16 12 S1385WHne 10...
.../P1385WB # Description # Description 1 Control panel 4 HDMI (MHL) connector Micro USB cable 2 Power key and Power indicator LED 5 Projection lens 3 Zoom ring and Focus ring Focus ring 6 Remote control receiver 7 Lens cap Rear side 123 4 5 6 8 9 10 11 AUDIO IN S-VIDEO MIC IN AUDIO OUT VIDEO HDMI -1/ MHL USB MINI-B VGA IN -2 VGA IN -1 LAN USB -A 16 12 P5227/P5327W VGA-OUT RS232 DC 12V OUT 15 123 4 5 678 9 AUDIO IN S-VIDEO MIC IN AUDIO OUT VIDEO HDMI -1/ MHL USB MINI-B VGA IN -2 VGA IN -1 LAN USB -A 16 12 S1385WHne 10...

User Manual
Page 15
.... 9 S-VIDEO To change source to S-Video. 10 HDMI™/DVI To change source to VGA. Chooses a display mode. Adjusts image distortion caused by tilting projection. This connection supports analog RGB, YPbPr (480p/576p/720p/1080i/1080p), and YCbCr (480i/576i). 8 COMPONENT To change source to HDMI™ (or DVI). (for P1285i/P1285B/P1385Wi/ P1385WB/S1385WHBe) Zooms the projector display in the "Setting" > "Security" OSD. 7 VGA To change source to Component video. English Remote Control Layout S1385WHBe/S1385WHne 5 P5227/P5327W...
.... 9 S-VIDEO To change source to S-Video. 10 HDMI™/DVI To change source to VGA. Chooses a display mode. Adjusts image distortion caused by tilting projection. This connection supports analog RGB, YPbPr (480p/576p/720p/1080i/1080p), and YCbCr (480i/576i). 8 COMPONENT To change source to HDMI™ (or DVI). (for P1285i/P1285B/P1385Wi/ P1385WB/S1385WHBe) Zooms the projector display in the "Setting" > "Security" OSD. 7 VGA To change source to Component video. English Remote Control Layout S1385WHBe/S1385WHne 5 P5227/P5327W...

User Manual
Page 16
... display the image. 15 MENU Launches the Onscreen Display (OSD) menu, returns to open the 3D menu for adjusting 3D settings. 24 Laser Emits visible laser pointer light for the OSD menu operation or exits the OSD menu. 16 PgUp/PgDn For computer mode only. This function is not available for LAN/wireless compatible models) 20 Rewind (No function) Play/Pause Stop Fast-forward 21 SD/USB A To change source...
... display the image. 15 MENU Launches the Onscreen Display (OSD) menu, returns to open the 3D menu for adjusting 3D settings. 24 Laser Emits visible laser pointer light for the OSD menu operation or exits the OSD menu. 16 PgUp/PgDn For computer mode only. This function is not available for LAN/wireless compatible models) 20 Rewind (No function) Play/Pause Stop Fast-forward 21 SD/USB A To change source...

User Manual
Page 35
... contrast. Adjusts the brightness of the picture. Color Display Mode Wall Color Brightness Contrast Saturation 25 There are several choices, including White, Light Yellow, Light Blue, Pink and Dark Green. Adjusting the contrast changes the amount of images. • Bright: For brightness optimization. • Presentation: For meeting presentation with higher brightness. • Standard: For common environment. • Movie: For brighter and general movie/video/photo playing...
... contrast. Adjusts the brightness of the picture. Color Display Mode Wall Color Brightness Contrast Saturation 25 There are several choices, including White, Light Yellow, Light Blue, Pink and Dark Green. Adjusting the contrast changes the amount of images. • Bright: For brightness optimization. • Presentation: For meeting presentation with higher brightness. • Standard: For common environment. • Movie: For brighter and general movie/video/photo playing...
User Manual
Page 36
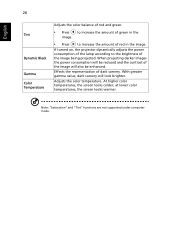
When projecting darker images the power consumption will be enhanced. Effects the representation of the image will look brighter. at lower color temperatures, the screen looks warmer. Adjusts the color temperature. English 26 Tint Dynamic Black Gamma Color Temperature Adjusts the color balance of red and green. • Press to increase the amount of the image being projected. If turned on, the projector dynamically adjusts the power consumption of the lamp according to the...
When projecting darker images the power consumption will be enhanced. Effects the representation of the image will look brighter. at lower color temperatures, the screen looks warmer. Adjusts the color temperature. English 26 Tint Dynamic Black Gamma Color Temperature Adjusts the color balance of red and green. • Press to increase the amount of the image being projected. If turned on, the projector dynamically adjusts the power consumption of the lamp according to the...
User Manual
Page 37
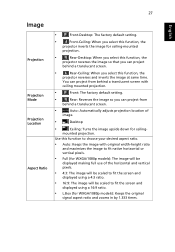
... and maximizes the image to fit the screen and displayed using a 16:9 ratio. • L.Box (for WXGA/1080p models): Keeps the original signal aspect ratio and zooms in by 1.333 times. 27 English Image Projection Projection Mode Projection Location Aspect Ratio • Front-Desktop: The factory default setting. • Front-Ceiling: When you select this function, the projector inverts the image for ceiling- mounted projection. You can project from behind a translucent screen. • Auto: Automatically adjusts projection location of the horizontal...
... and maximizes the image to fit the screen and displayed using a 16:9 ratio. • L.Box (for WXGA/1080p models): Keeps the original signal aspect ratio and zooms in by 1.333 times. 27 English Image Projection Projection Mode Projection Location Aspect Ratio • Front-Desktop: The factory default setting. • Front-Ceiling: When you select this function, the projector inverts the image for ceiling- mounted projection. You can project from behind a translucent screen. • Auto: Automatically adjusts projection location of the horizontal...

User Manual
Page 40
...; Change the "Startup Screen" from the default setting "Acer" to "User". • Select "Screen Capture" to customize the startup screen. • A dialog box appears to turn off the captioning feature. Choose "Yes" to press "SOURCE" on the control panel or remote control, or the direct source key on the remote control. When this function is shown. Choose "No" to cancel the screen capture and exist the Onscreen Display (OSD...
...; Change the "Startup Screen" from the default setting "Acer" to "User". • Select "Screen Capture" to customize the startup screen. • A dialog box appears to turn off the captioning feature. Choose "Yes" to press "SOURCE" on the control panel or remote control, or the direct source key on the remote control. When this function is shown. Choose "No" to cancel the screen capture and exist the Onscreen Display (OSD...
User Manual
Page 43
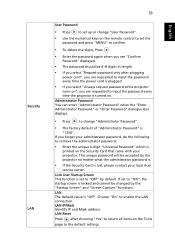
... LAN The default value is printed on the Tools page to return all items on the Security Card that came with your local Acer service center. Administrator Password You can enter "Administrator Password" when the "Enter Administrator Password" or "Enter Password" dialogue box displays. • Press to change "User Password". • Use the numerical keys on the remote control to set to input the password every time the projector is...
... LAN The default value is printed on the Tools page to return all items on the Security Card that came with your local Acer service center. Administrator Password You can enter "Administrator Password" when the "Enter Administrator Password" or "Enter Password" dialogue box displays. • Press to change "User Password". • Use the numerical keys on the remote control to set to input the password every time the projector is...

User Manual
Page 46
... charge takes 3-4 hours and will allow 30 hours non-stop use. Plug the PB dongle to blink. 5. AUDIO IN S-VIDEO MIC IN AUDIO OUT VIDEO HDMI -1/ MHL USB MINI-B VGA IN -2 VGA IN -1 VGA-OUT RS232 LAN USB -A Wireless Dongle DC 12V OUT 13 4. Enable the pen by selecting "On" in a shadow or it connected. Avoid standing too far from the screen. The closer you hold a remote control or a pen...
... charge takes 3-4 hours and will allow 30 hours non-stop use. Plug the PB dongle to blink. 5. AUDIO IN S-VIDEO MIC IN AUDIO OUT VIDEO HDMI -1/ MHL USB MINI-B VGA IN -2 VGA IN -1 VGA-OUT RS232 LAN USB -A Wireless Dongle DC 12V OUT 13 4. Enable the pen by selecting "On" in a shadow or it connected. Avoid standing too far from the screen. The closer you hold a remote control or a pen...
User Manual
Page 47
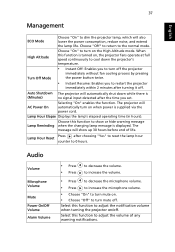
... turning the projector on . • Choose "Off" to turn off . When this function to show up 30 hours before end of any warning notifications. Lamp Hour Elapse Displays the lamp's elapsed operating time (in hours). Lamp Hour Reset Press after turning it off . English 37 Management ECO Mode High Altitude Turn Off Mode Choose "On" to dim the projector lamp, which will show or hide warning message Lamp Reminding when the changing lamp message is turned on the High Altitude mode...
... turning the projector on . • Choose "Off" to turn off . When this function to show up 30 hours before end of any warning notifications. Lamp Hour Elapse Displays the lamp's elapsed operating time (in hours). Lamp Hour Reset Press after turning it off . English 37 Management ECO Mode High Altitude Turn Off Mode Choose "On" to dim the projector lamp, which will show or hide warning message Lamp Reminding when the changing lamp message is turned on the High Altitude mode...

User Manual
Page 51
..." on the control panel or remote or incorrectly displayed image (For notebooks) control. • For an incorrectly displayed image: • Follow the steps for more information. • Change the display color setting on your computer. 6 Image has vertical • Use "Frequency" to make it compatible with the projector. 7 Image is out of focus • Adjust the focus ring on the projector lens. • Make sure the projection screen is unstable • Use "Tracking" to...
..." on the control panel or remote or incorrectly displayed image (For notebooks) control. • For an incorrectly displayed image: • Follow the steps for more information. • Change the display color setting on your computer. 6 Image has vertical • Use "Frequency" to make it compatible with the projector. 7 Image is out of focus • Adjust the focus ring on the projector lens. • Make sure the projection screen is unstable • Use "Tracking" to...

User Manual
Page 52
... reversed • Select "Image" > "Projection Mode", "Image" > "Projection Location" on the control panel or remote control. 42 English 8 Image is stretched When you play a 4:3 format DVD title, please change the format to 16:9 (wide) aspect ratio on your local dealer or Acer service center. Go to "Image" to or further from the screen. • Press "MENU" on the OSD and adjust the projection direction. Problems with the projector OSD. • If...
... reversed • Select "Image" > "Projection Mode", "Image" > "Projection Location" on the control panel or remote control. 42 English 8 Image is stretched When you play a 4:3 format DVD title, please change the format to 16:9 (wide) aspect ratio on your local dealer or Acer service center. Go to "Image" to or further from the screen. • Press "MENU" on the OSD and adjust the projection direction. Problems with the projector OSD. • If...
User Manual
Page 54
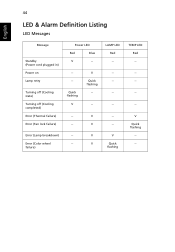
V LAMP LED Red -- ---- -- --- Error (Color wheel -- 44 LED & Alarm Definition Listing LED Messages English Message Standby (Power cord plugged in) Power on Lamp retry Turning off (Cooling state) Turning off (Cooling completed) Error (Thermal failure) Error (Fan lock failure) Power LED Red Blue V -- --- V Quick flashing --- Error (Lamp breakdown) -- V -- failure) V V V Quick flashing TEMP LED Red -- --- -- -- Quick flashing V V Quick flashing -- -- --
V LAMP LED Red -- ---- -- --- Error (Color wheel -- 44 LED & Alarm Definition Listing LED Messages English Message Standby (Power cord plugged in) Power on Lamp retry Turning off (Cooling state) Turning off (Cooling completed) Error (Thermal failure) Error (Fan lock failure) Power LED Red Blue V -- --- V Quick flashing --- Error (Lamp breakdown) -- V -- failure) V V V Quick flashing TEMP LED Red -- --- -- -- Quick flashing V V Quick flashing -- -- --


