

User Manual (3D)
Page 4
... content over an HDMI 1.4a or later connection, this will be set automatically. 2 Press the menu button on your graphics card supports 3D playback. To download software and use an NVIDIA 3DTV Play ready projector with DLP glasses, refer to purchase additional software. 4 Ensure you have installed the drivers, you are viewing Blu-ray 3D content over an HDMI 1.4a or later connection is not supported on the...
... content over an HDMI 1.4a or later connection, this will be set automatically. 2 Press the menu button on your graphics card supports 3D playback. To download software and use an NVIDIA 3DTV Play ready projector with DLP glasses, refer to purchase additional software. 4 Ensure you have installed the drivers, you are viewing Blu-ray 3D content over an HDMI 1.4a or later connection is not supported on the...
User Manual Multimedia
Page 1
...; Supports wireless network security (WPA-PSK, WPA2-PSK). • Acer Projector Gateway Web Management enables a web-based control of Acer projector for Windows NB/PC (only when the projector is a smart, integrated system that enhances presentations via your screen via the source USB Connection. English 1 Acer Projector Gateway Introduction The Acer Projector Gateway (APG) is in AP mode). • Supports firmware upgrade via USB flash drive. Networking APG features • With high-performance wireless projection via an acer USB WiFi adapter...
...; Supports wireless network security (WPA-PSK, WPA2-PSK). • Acer Projector Gateway Web Management enables a web-based control of Acer projector for Windows NB/PC (only when the projector is a smart, integrated system that enhances presentations via your screen via the source USB Connection. English 1 Acer Projector Gateway Introduction The Acer Projector Gateway (APG) is in AP mode). • Supports firmware upgrade via USB flash drive. Networking APG features • With high-performance wireless projection via an acer USB WiFi adapter...

User Manual Multimedia
Page 11
11 English Setting Menu Item Photo Display Ratio Slideshow Duration Software Upgrade Options Original, Full Screen 3 sec, 5 sec, 10 sec Network, USB Drive Software Upgrade Instruction There are 2 ways to do this: Via USB flash drive (1) Download new firmware by one compressed file from acer global website. (2) Copy the uncompressed file in USB flash drive and plug in projector.
11 English Setting Menu Item Photo Display Ratio Slideshow Duration Software Upgrade Options Original, Full Screen 3 sec, 5 sec, 10 sec Network, USB Drive Software Upgrade Instruction There are 2 ways to do this: Via USB flash drive (1) Download new firmware by one compressed file from acer global website. (2) Copy the uncompressed file in USB flash drive and plug in projector.
User Manual Multimedia
Page 12
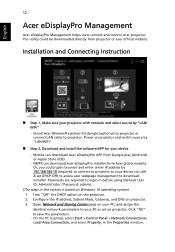
... Acer eDisplayPro Management helps users connect and control Acer projector. Power on Windows 10 operating system) 1. On the PC (Laptop), select Start > Control Panel > Network Connections> Local Area Connection, and select Property. Mobile can download Acer eDisplayPro installer form Acer global website. Passwords are required to save the parameters. - Turn "Off" the DHCP option on projector. 3. Click "OK" to login in before using (Default User ID: Administrator / Password: admin). (The steps in this section is based on projector and switch source...
... Acer eDisplayPro Management helps users connect and control Acer projector. Power on Windows 10 operating system) 1. On the PC (Laptop), select Start > Control Panel > Network Connections> Local Area Connection, and select Property. Mobile can download Acer eDisplayPro installer form Acer global website. Passwords are required to save the parameters. - Turn "Off" the DHCP option on projector. 3. Click "OK" to login in before using (Default User ID: Administrator / Password: admin). (The steps in this section is based on projector and switch source...

User Manual Multimedia
Page 18
Network Setting Network Setting includes WiFi, WiFi Password Change, and Software Upgrade. (1) WiFi To set available network for your LAN cable is connected to projector. English 18 Note: For LAN control function, please make sure your projector's access. (2) WiFi Password Change
Network Setting Network Setting includes WiFi, WiFi Password Change, and Software Upgrade. (1) WiFi To set available network for your LAN cable is connected to projector. English 18 Note: For LAN control function, please make sure your projector's access. (2) WiFi Password Change

User Manual
Page 5
... and free flow of air around the projector is necessary. • Locations where temperatures may become excessively high, such as inside of a car with all windows rolled up. • Locations where excessive humidity, dust, or cigarette smoke may result in damage and will often require extensive work by the operating instructions, since improper adjustment of other controls may contaminate optical components, shortening the life...
... and free flow of air around the projector is necessary. • Locations where temperatures may become excessively high, such as inside of a car with all windows rolled up. • Locations where excessive humidity, dust, or cigarette smoke may result in damage and will often require extensive work by the operating instructions, since improper adjustment of other controls may contaminate optical components, shortening the life...
User Manual
Page 6
..., and follow all changing instructions. • Reset the "Lamp Hour Reset" function from the Onscreen display "Management" menu after replacing the lamp module. • Do not attempt to disassemble this could cause it to removing the lamp assembly for ceiling mount installation. It may hurt your eyes. • Always open the lens shutter or remove the lens cap when the projector is operating. The only user serviceable part is the lamp which becomes hot. •...
..., and follow all changing instructions. • Reset the "Lamp Hour Reset" function from the Onscreen display "Management" menu after replacing the lamp module. • Do not attempt to disassemble this could cause it to removing the lamp assembly for ceiling mount installation. It may hurt your eyes. • Always open the lens shutter or remove the lens cap when the projector is operating. The only user serviceable part is the lamp which becomes hot. •...

User Manual
Page 8
...: • Turn off the product before cleaning. • Use a soft cloth moistened with mild detergent to clean the display housing. • Disconnect the power plug from the Onscreen display "Management" menu after replacing the lamp module. • When switching the projector off, please ensure the projector completes its life, it shows warning messages. • Reset the "Lamp Hour Reset" function from AC outlet if the product is in this user's guide to...
...: • Turn off the product before cleaning. • Use a soft cloth moistened with mild detergent to clean the display housing. • Disconnect the power plug from the Onscreen display "Management" menu after replacing the lamp module. • When switching the projector off, please ensure the projector completes its life, it shows warning messages. • Reset the "Lamp Hour Reset" function from AC outlet if the product is in this user's guide to...

User Manual
Page 15
... Functions vary depending on model definition. 5 Control Panel 1 2 3 English 4 7 8 5 9 6 10 # Icon Function 1 POWER POWER 2 LAMP LAMP 3 TEMP TEMP 4 POWER Description Power Indicator LED Lamp Indicator LED Temp Indicator LED See the contents in "Turning the Projector On/Off" section. 5 Four directional select Use to select items or make keys adjustments to your selection. 6 BACK BACK Returns to the previous operation. 7 SOURCE SOURCE Changes the active source. 8 ENTER ENTER Confirm your selection of items. 9 Keystone Adjusts the image to compensate for distortion...
... Functions vary depending on model definition. 5 Control Panel 1 2 3 English 4 7 8 5 9 6 10 # Icon Function 1 POWER POWER 2 LAMP LAMP 3 TEMP TEMP 4 POWER Description Power Indicator LED Lamp Indicator LED Temp Indicator LED See the contents in "Turning the Projector On/Off" section. 5 Four directional select Use to select items or make keys adjustments to your selection. 6 BACK BACK Returns to the previous operation. 7 SOURCE SOURCE Changes the active source. 8 ENTER ENTER Confirm your selection of items. 9 Keystone Adjusts the image to compensate for distortion...

User Manual
Page 16
... Use up, down, left, right buttons to select items or make adjustments to your selection. 7 3D Press "3D" to select 3D models. 8 SOURCE Changes the active source. 9 MODE Press "MODE" to select the display mode from Bright, Presentation, Standard, Video and User. 10 KEYSTONE Adjusts the image to compensate for distortion caused by tilting the projector. 11 BACK STOP Returns to stop playback. Press "VGA" to change source to the VGA...
... Use up, down, left, right buttons to select items or make adjustments to your selection. 7 3D Press "3D" to select 3D models. 8 SOURCE Changes the active source. 9 MODE Press "MODE" to select the display mode from Bright, Presentation, Standard, Video and User. 10 KEYSTONE Adjusts the image to compensate for distortion caused by tilting the projector. 11 BACK STOP Returns to stop playback. Press "VGA" to change source to the VGA...

User Manual
Page 17
... to display the image. 22 ZOOM IN Zooms the projector display in the "Security" OSD. • Press "MENU" to launch the Onscreen display (OSD) 19 MENU menu, back to the previous step for the OSD menu operation or exit the OSD menu. • Confirm your selection of media mode. 18 KeyPad 0~9 Press "0~9" to input a password in . 23 VIDEO To change source to activate the laser pointer. Use this button to HDMI/MHL...
... to display the image. 22 ZOOM IN Zooms the projector display in the "Security" OSD. • Press "MENU" to launch the Onscreen display (OSD) 19 MENU menu, back to the previous step for the OSD menu operation or exit the OSD menu. • Confirm your selection of media mode. 18 KeyPad 0~9 Press "0~9" to input a password in . 23 VIDEO To change source to activate the laser pointer. Use this button to HDMI/MHL...
User Manual
Page 22
... projector off projector within 1 minute after the projector is turned off , the projector will automatically shut down , and the LED temp indicator will stop blinking and turn solid red to indicate standby mode. 5 It is now safe to complete the shutdown process." Contact your local dealer or service center. • "Fan failed. Note 2: Functions vary depending on . This message appears: "Please press the power button again to unplug the power cord. The lamp...
... projector off projector within 1 minute after the projector is turned off , the projector will automatically shut down , and the LED temp indicator will stop blinking and turn solid red to indicate standby mode. 5 It is now safe to complete the shutdown process." Contact your local dealer or service center. • "Fan failed. Note 2: Functions vary depending on . This message appears: "Please press the power button again to unplug the power cord. The lamp...
User Manual
Page 32
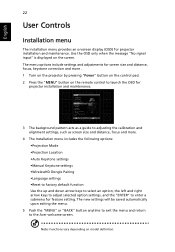
... the screen. English 22 User Controls Installation menu The installation menu provides an onscreen display (OSD) for projector installation and maintenance. Use the OSD only when the message "No signal input" is displayed on model definition. Keystone LAN IP/Mask WiFi IP/Mask MAC Address Wake on LAN (Standby) Language WirelessHD Dongle Pairing Reset Exit Select Off Off English Enter 3 The background pattern acts as a guide to adjusting the calibration and alignment settings, such as screen size and distance, focus...
... the screen. English 22 User Controls Installation menu The installation menu provides an onscreen display (OSD) for projector installation and maintenance. Use the OSD only when the message "No signal input" is displayed on model definition. Keystone LAN IP/Mask WiFi IP/Mask MAC Address Wake on LAN (Standby) Language WirelessHD Dongle Pairing Reset Exit Select Off Off English Enter 3 The background pattern acts as a guide to adjusting the calibration and alignment settings, such as screen size and distance, focus...

User Manual
Page 35
... green gain for color temperature optimization. B Gain Adjusts the blue gain for color temperature optimization. Effects the representation of red and green. Hue Adjusts the color balance of dark scenery. White Peaking Increases the brightness of whites that delivers enhanced color saturation for bright, true-to 24-frame True Film mode. Note 1: "Saturation" and "Tint" functions are near 100%. (video sources only) Film Mode Sets the image optimized to -life images. English Color Temperature...
... green gain for color temperature optimization. B Gain Adjusts the blue gain for color temperature optimization. Effects the representation of red and green. Hue Adjusts the color balance of dark scenery. White Peaking Increases the brightness of whites that delivers enhanced color saturation for bright, true-to 24-frame True Film mode. Note 1: "Saturation" and "Tint" functions are near 100%. (video sources only) Film Mode Sets the image optimized to -life images. English Color Temperature...
User Manual
Page 36
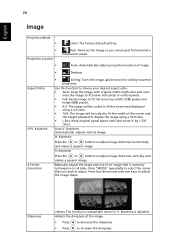
... increase the sharpness. Keystone Press the or button to adjust. Manually adjusts the shape and size of image. • Desktop Aspect Ratio H./V. Keystone 4 Corner Correction • Ceiling: Turns the image upside down for ceiling-mounted projection. Keystone is unevenly rectangular on all sides. Sharpness The function is unavailable when H./ V. English 26 Image Projection Mode • Front: The factory default setting. • Projection Location • Rear: Reverses the image so you wish to adjust image distortion vertically and...
... increase the sharpness. Keystone Press the or button to adjust. Manually adjusts the shape and size of image. • Desktop Aspect Ratio H./V. Keystone 4 Corner Correction • Ceiling: Turns the image upside down for ceiling-mounted projection. Keystone is unevenly rectangular on all sides. Sharpness The function is unavailable when H./ V. English 26 Image Projection Mode • Front: The factory default setting. • Projection Location • Rear: Reverses the image so you wish to adjust image distortion vertically and...
User Manual
Page 38
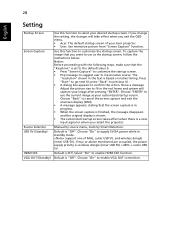
... projector. Show a message: Adjust the picture size to fit in standby mode. Manual by source menu, Auto by Smart Detection. press "Back" to previous UI . • A dialog box appears to go next UI; Default is Off, Select "On" to enable VGA OUT connection. Choose "ENTER" to use as your image after pressing "ENTER". Choose "On" to enable HDMI CEC function. Support one of your desired startup screen. 28 English Setting...
... projector. Show a message: Adjust the picture size to fit in standby mode. Manual by source menu, Auto by Smart Detection. press "Back" to previous UI . • A dialog box appears to go next UI; Default is Off, Select "On" to enable VGA OUT connection. Choose "ENTER" to use as your image after pressing "ENTER". Choose "On" to enable HDMI CEC function. Support one of your desired startup screen. 28 English Setting...

User Manual
Page 39
... power cord in the box). Security 29 Security This projector provides a useful security function for this security card and number, please contact with an Acer service center. The user has to enter a password to enable the security function. Both "User Password" and "Administrator Password" can turn on the remote control and press "ENTER" to confirm. • Press to setup or change the "Security" setting. Administrator Password The "Administrator Password" can set...
... power cord in the box). Security 29 Security This projector provides a useful security function for this security card and number, please contact with an Acer service center. The user has to enter a password to enable the security function. Both "User Password" and "Administrator Password" can turn on the remote control and press "ENTER" to confirm. • Press to setup or change the "Security" setting. Administrator Password The "Administrator Password" can set...

User Manual
Page 40
Wake on LAN (Standby) Set to "On" to enable wake-on-LAN function to power on model definition. Note: Functions vary depending on projector via mobile. English 30 Network Information Lock User Startup Screen Default Lock User Startup Screen is required to download WOL (wake-on-LAN; WOL) tool or app for PC/Mobile by users for Model Name, Input Source, Signal Type, Display Mode, Serial No., Software Version and QR code on all in LAN setting page. Scan QR...
Wake on LAN (Standby) Set to "On" to enable wake-on-LAN function to power on model definition. Note: Functions vary depending on projector via mobile. English 30 Network Information Lock User Startup Screen Default Lock User Startup Screen is required to download WOL (wake-on-LAN; WOL) tool or app for PC/Mobile by users for Model Name, Input Source, Signal Type, Display Mode, Serial No., Software Version and QR code on all in LAN setting page. Scan QR...
User Manual
Page 41
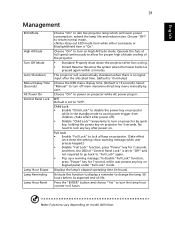
... menu display time. (Default is "On". The projector will lower power consumption, extend the lamp life and reduce noise. Choose "On" to dim the projector lamp which will automatically shutdown when there is no signal input after power off main menu/one direct-key menu manually by quick key, holding the power key on model definition. English 31 Management ECO Mode High Altitude Turn Off Mode Auto Shutdown Menu Display Time (Seconds) AC Power On Control Panel Lock Lamp Hour Elapse Lamp Reminding Lamp Hour Reset...
... menu display time. (Default is "On". The projector will lower power consumption, extend the lamp life and reduce noise. Choose "On" to dim the projector lamp which will automatically shutdown when there is no signal input after power off main menu/one direct-key menu manually by quick key, holding the power key on model definition. English 31 Management ECO Mode High Altitude Turn Off Mode Auto Shutdown Menu Display Time (Seconds) AC Power On Control Panel Lock Lamp Hour Elapse Lamp Reminding Lamp Hour Reset...

User Manual
Page 48
...", open the "Control Panel", and then double-click the "Display" icon. • Select the "Settings" tab. • Verify that the resolution setting is lower than or equal to the following troubleshooting guide. If the problem persists, please contact your Acer projector, refer to WUXGA-RB (1920 x 1200). • Click the "Change" button under the "Models" box. • Verify that the resolution setting of the connector pins are using...
...", open the "Control Panel", and then double-click the "Display" icon. • Select the "Settings" tab. • Verify that the resolution setting is lower than or equal to the following troubleshooting guide. If the problem persists, please contact your Acer projector, refer to WUXGA-RB (1920 x 1200). • Click the "Change" button under the "Models" box. • Verify that the resolution setting of the connector pins are using...


