

User Manual (3D)
Page 4
Plug the USB cable in to view 3D content. Note: You may need to set up the environment. 1 Position the infra-red transmitter so that it has maximum coverage. Setting up a 3D environment Once you haven't previously set up the 3D environment. 3 Follow the onscreen instructions to purchase additional software. 4 Ensure you have installed the drivers, you will open the setup Wizard if you...
Plug the USB cable in to view 3D content. Note: You may need to set up the environment. 1 Position the infra-red transmitter so that it has maximum coverage. Setting up a 3D environment Once you haven't previously set up the 3D environment. 3 Follow the onscreen instructions to purchase additional software. 4 Ensure you have installed the drivers, you will open the setup Wizard if you...

User Manual (3D)
Page 7
... supports 3D playback. English 7 1 Open the stereoscopic player and set the viewing method by going to your graphics card's documentation. 2 Download and install the latest drivers for the latest driver version. 3 You should also download a suitable 3D player such as the one available from www.3dtv.at fullscreen resolution in the player. Note: Please refer to View > Viewing Method > NVIDIA 3D Vision. 2 Open...
... supports 3D playback. English 7 1 Open the stereoscopic player and set the viewing method by going to your graphics card's documentation. 2 Download and install the latest drivers for the latest driver version. 3 You should also download a suitable 3D player such as the one available from www.3dtv.at fullscreen resolution in the player. Note: Please refer to View > Viewing Method > NVIDIA 3D Vision. 2 Open...
User Manual
Page 4
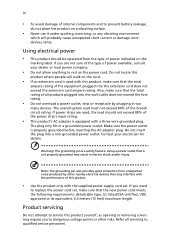
... to replace the power cord set . Product servicing Do not attempt to service this product yourself, as opening or removing covers may interfere with the performance of this product where people will probably cause unexpected short current or damage rotor devices, lamp. Note: The grounding pin also provides good protection from the type of power indicated on a vibrating surface. • Never use it...
... to replace the power cord set . Product servicing Do not attempt to service this product yourself, as opening or removing covers may interfere with the performance of this product where people will probably cause unexpected short current or damage rotor devices, lamp. Note: The grounding pin also provides good protection from the type of power indicated on a vibrating surface. • Never use it...
User Manual
Page 5
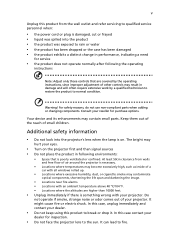
... and refer servicing to qualified service personnel when: • the power cord or plug is damaged, cut or frayed • liquid was spilled into the projector's lens when the lamp is on the projector first and then signal sources • Do not place the product in damage and will often require extensive work by the operating instructions, since improper adjustment of other controls may result...
... and refer servicing to qualified service personnel when: • the power cord or plug is damaged, cut or frayed • liquid was spilled into the projector's lens when the lamp is on the projector first and then signal sources • Do not place the product in damage and will often require extensive work by the operating instructions, since improper adjustment of other controls may result...

User Manual
Page 6
... when projector is showing warning message. • When changing the lamp, please allow unit to cool down, and follow all changing instructions. • Reset the "Lamp Hour Reset" function from the Onscreen display "Management" menu after replacing the lamp module. • Do not attempt to become heated and deformed or even cause a fire. The only user serviceable part is the lamp which may hurt your eyes. • Always open the lens...
... when projector is showing warning message. • When changing the lamp, please allow unit to cool down, and follow all changing instructions. • Reset the "Lamp Hour Reset" function from the Onscreen display "Management" menu after replacing the lamp module. • Do not attempt to become heated and deformed or even cause a fire. The only user serviceable part is the lamp which may hurt your eyes. • Always open the lens...
User Manual
Page 8
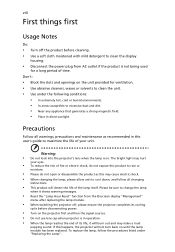
...; Turn off the product before cleaning. • Use a soft cloth moistened with mild detergent to clean the display housing. • Disconnect the power plug from the Onscreen display "Management" menu after replacing the lamp module. • When switching the projector off, please ensure the projector completes its life, it shows warning messages. • Reset the "Lamp Hour Reset" function from AC outlet if the product is on. Precautions Follow all changing instructions...
...; Turn off the product before cleaning. • Use a soft cloth moistened with mild detergent to clean the display housing. • Disconnect the power plug from the Onscreen display "Management" menu after replacing the lamp module. • When switching the projector off, please ensure the projector completes its life, it shows warning messages. • Reset the "Lamp Hour Reset" function from AC outlet if the product is on. Precautions Follow all changing instructions...

User Manual
Page 11
..., 1080p) supported • Lower power consumption and economy (ECO) mode extend lamp life • Acer EcoProjeciton Technology delivers Intelligent power management approach and physical efficiency improvement • Equipped with HDMI™ & MHL connection supporting HDCP • Support HDMI CEC function • Advanced digital keystone and 4-corner correction optimizes presentations • Smart detection delivers quick, intelligent source detection • Multi-language onscreen display (OSD) menus • Manual focus projection lens zooms up...
..., 1080p) supported • Lower power consumption and economy (ECO) mode extend lamp life • Acer EcoProjeciton Technology delivers Intelligent power management approach and physical efficiency improvement • Equipped with HDMI™ & MHL connection supporting HDCP • Support HDMI CEC function • Advanced digital keystone and 4-corner correction optimizes presentations • Smart detection delivers quick, intelligent source detection • Multi-language onscreen display (OSD) menus • Manual focus projection lens zooms up...
User Manual
Page 16
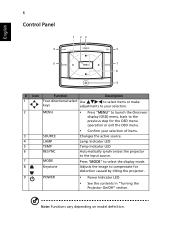
... the input source. Adjusts the image to compensate for the OSD menu operation or exit the OSD menu. 3 SOURCE 4 LAMP 5 TEMP 6 RESYNC 7 MODE 8 Keystone • Confirm your selection of items. Changes the active source. Note: Functions vary depending on model definition. Lamp Indicator LED Temp Indicator LED Automatically synchronizes the projector to select the display mode. English 6 Control Panel 1 23 4 LAMP SOURCE TEMP 5 6 RESYNC MENU MODE 7 8 9 # Icon Function Description 1 Four directional select Use to select items or make keys adjustments to...
... the input source. Adjusts the image to compensate for the OSD menu operation or exit the OSD menu. 3 SOURCE 4 LAMP 5 TEMP 6 RESYNC 7 MODE 8 Keystone • Confirm your selection of items. Changes the active source. Note: Functions vary depending on model definition. Lamp Indicator LED Temp Indicator LED Automatically synchronizes the projector to select the display mode. English 6 Control Panel 1 23 4 LAMP SOURCE TEMP 5 6 RESYNC MENU MODE 7 8 9 # Icon Function Description 1 Four directional select Use to select items or make keys adjustments to...

User Manual
Page 17
... image. 5 FREEZE Pause the screen image. 6 MEDIA_SETUP No function. 7 SOURCE Changes the active source. 8 3D Press "3D" to select 3D models. 9 ZOOM Zooms the projector display in Japanese market. 12 Enter No function. 13 Four directional Use up, down, left, right buttons to select items or make select keys adjustments to your selection. 14 KEYSTONE Adjusts the image to activate the laser pointer. Aim the remote at the viewing screen...
... image. 5 FREEZE Pause the screen image. 6 MEDIA_SETUP No function. 7 SOURCE Changes the active source. 8 3D Press "3D" to select 3D models. 9 ZOOM Zooms the projector display in Japanese market. 12 Enter No function. 13 Four directional Use up, down, left, right buttons to select items or make select keys adjustments to your selection. 14 KEYSTONE Adjusts the image to activate the laser pointer. Aim the remote at the viewing screen...

User Manual
Page 18
... (480i/576i). 26 VIDEO To change source to COMPOSITE VIDEO. 27 SD/USB A No function. 28 USB B For USB control and firmware upgrade. 29 HDMI™/DVI Press "HDMI™/DVI" to change source to HDMI™ (no DVI function). 30 LAN/WiFi Press "LAN/WiFi" to display the image which is only available when connected to a computer via the "Acer LAN webpage management" utility. 31 KeyPad 0~9 Press "0~9" to input a password in the "Security...
... (480i/576i). 26 VIDEO To change source to COMPOSITE VIDEO. 27 SD/USB A No function. 28 USB B For USB control and firmware upgrade. 29 HDMI™/DVI Press "HDMI™/DVI" to change source to HDMI™ (no DVI function). 30 LAN/WiFi Press "LAN/WiFi" to display the image which is only available when connected to a computer via the "Acer LAN webpage management" utility. 31 KeyPad 0~9 Press "0~9" to input a password in the "Security...

User Manual
Page 22
... screen displays "Lock" and "Source" icons, it means the projector is locked onto a specific source type and there is no such type of input signal detected. • If the screen displays "No Signal", please make sure the signal cables are securely connected. The Power indicator LED will flash red. 2 Turn on the projector by pressing "Power" button on the control panel or remote control, and the Power indicator LED will detect your source (computer, notebook, video player ,etc.). The projector will turn blue. 3 Turn on the remote control to switch between inputs...
... screen displays "Lock" and "Source" icons, it means the projector is locked onto a specific source type and there is no such type of input signal detected. • If the screen displays "No Signal", please make sure the signal cables are securely connected. The Power indicator LED will flash red. 2 Turn on the projector by pressing "Power" button on the control panel or remote control, and the Power indicator LED will detect your source (computer, notebook, video player ,etc.). The projector will turn blue. 3 Turn on the remote control to switch between inputs...

User Manual
Page 23
... LED temp indicator will automatically turn off soon." Attention! This onscreen message indicates that the projector has overheated. Lamp will continue to operate for about 2 minutes to ensure that the system cools properly. (only supported under "Instant Resume" mode) 4 Once the system has finished cooling, the LED power indicator will stop blinking and turn the projector off, press and hold the power button. English 13 Turning the projector off 1 To turn solid red to indicate standby mode...
... LED temp indicator will automatically turn off soon." Attention! This onscreen message indicates that the projector has overheated. Lamp will continue to operate for about 2 minutes to ensure that the system cools properly. (only supported under "Instant Resume" mode) 4 Once the system has finished cooling, the LED power indicator will stop blinking and turn the projector off, press and hold the power button. English 13 Turning the projector off 1 To turn solid red to indicate standby mode...
User Manual
Page 33
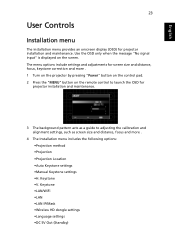
... Location •Auto Keystone settings •Manual Keystone settings •H. English 23 User Controls Installation menu The installation menu provides an onscreen display (OSD) for projector installation and maintenance. 3 The background pattern acts as screen size and distance, focus and more . 1 Turn on the projector by pressing "Power" button on the control pad. 2 Press the "MENU" button on the screen. Keystone •V. Use the OSD only when the message "No signal input" is displayed on the remote control to adjusting the calibration and alignment settings, such as a guide...
... Location •Auto Keystone settings •Manual Keystone settings •H. English 23 User Controls Installation menu The installation menu provides an onscreen display (OSD) for projector installation and maintenance. 3 The background pattern acts as screen size and distance, focus and more . 1 Turn on the projector by pressing "Power" button on the control pad. 2 Press the "MENU" button on the screen. Keystone •V. Use the OSD only when the message "No signal input" is displayed on the remote control to adjusting the calibration and alignment settings, such as a guide...

User Manual
Page 38
... this function, the projector reverses and inverts the image at same time. English 28 Image Projection Aspect Ratio H./V. Use this function to choose your desired aspect ratio. • Auto: Keep the image with ceiling mounted projection. • Front-Ceiling: When you wish to display the image using a 16:9 ratio. • L.Box: Keep original signal aspect ratio and zoom in by 1.333 times. Manually adjusts the shape and size of the screen and the height adjusted to adjust.
... this function, the projector reverses and inverts the image at same time. English 28 Image Projection Aspect Ratio H./V. Use this function to choose your desired aspect ratio. • Auto: Keep the image with ceiling mounted projection. • Front-Ceiling: When you wish to display the image using a 16:9 ratio. • L.Box: Keep original signal aspect ratio and zoom in by 1.333 times. Manually adjusts the shape and size of the screen and the height adjusted to adjust.
User Manual
Page 40
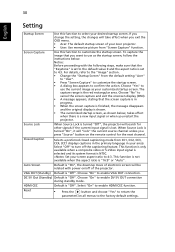
... VGA OUT connection. Reset • Press the button and choose "Yes" to turn off of your desired startup screen. Screen Capture Use this function to select your Acer projector. • User: Use memorize picture from the default setting "Acer" to "User". • Press "Screen Capture" to customize the startup screen. • A dialog box appears to the factory default settings. If you change the setting, the changes will "lock" the current source channel unless you press "Source" button on the remote control...
... VGA OUT connection. Reset • Press the button and choose "Yes" to turn off of your desired startup screen. Screen Capture Use this function to select your Acer projector. • User: Use memorize picture from the default setting "Acer" to "User". • Press "Screen Capture" to customize the startup screen. • A dialog box appears to the factory default settings. If you change the setting, the changes will "lock" the current source channel unless you press "Source" button on the remote control...
User Manual
Page 41
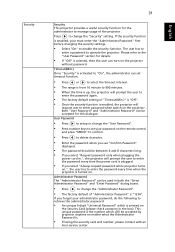
... projector will request user to enter the password every time the power cord is plugged. • If you select "Request password only when plugging the power cord in.", the projector will be used in the box). This unique password is the number which is turned on the Security Card (please check accessory in both the "Enter Administrator Password" and "Enter Password" dialog boxes. • Press to operate the projector...
... projector will request user to enter the password every time the power cord is plugged. • If you select "Request password only when plugging the power cord in.", the projector will be used in the box). This unique password is the number which is turned on the Security Card (please check accessory in both the "Enter Administrator Password" and "Enter Password" dialog boxes. • Press to operate the projector...

User Manual
Page 42
... power consumption, extend the lamp life and reduce noise. Displays the lamp's elapsed operating time (in . Choose "On" to power on High Altitude mode. English 32 LAN Lock to turn the lamp hour counter to enable HDBaseT IR Carrier function. Choose "On" to user startup screen Default Lock User Startup Screen is "On", users cannot change startup screen anymore and avoid other users change VGA OUT (Standby) from Off to unlock startup screen. Control Channel Default is "Off". LAN Default is "RS232/LAN". If lock user startup screen...
... power consumption, extend the lamp life and reduce noise. Displays the lamp's elapsed operating time (in . Choose "On" to power on High Altitude mode. English 32 LAN Lock to turn the lamp hour counter to enable HDBaseT IR Carrier function. Choose "On" to user startup screen Default Lock User Startup Screen is "On", users cannot change startup screen anymore and avoid other users change VGA OUT (Standby) from Off to unlock startup screen. Control Channel Default is "Off". LAN Default is "RS232/LAN". If lock user startup screen...

User Manual
Page 49
... problem persists, please contact your display resolution setting is lower than or equal to the "Replacing the Lamp" section. • Make sure you have removed the lens cap and the projector is lower than or equal to the following troubleshooting guide. or incorrectly displayed image • For an incorrectly displayed image: (for PC (Windows • Open "My Computer", open the "Control 2000/XP/Vista/ Panel", and then double-click the "Display" Windows 7/ Windows...
... problem persists, please contact your display resolution setting is lower than or equal to the "Replacing the Lamp" section. • Make sure you have removed the lens cap and the projector is lower than or equal to the following troubleshooting guide. or incorrectly displayed image • For an incorrectly displayed image: (for PC (Windows • Open "My Computer", open the "Control 2000/XP/Vista/ Panel", and then double-click the "Display" Windows 7/ Windows...

User Manual
Page 50
... information. • Change the display color depth settings on the projector lens. • Make sure the projection screen is within the required distance of 3.3 to 28.1 feet (1.0 to 8.6 meters) (XGA series) / 3.3 to 30.7 feet (1.0 to 9.4 meters) (1080p series) / 3.3 to 29.9 feet (1.0 to adjust the resolution of focus • Make sure the lens cap is in use. 40 English 3 Partial, scrolling • Press "RESYNC" on the control panel.
... information. • Change the display color depth settings on the projector lens. • Make sure the projection screen is within the required distance of 3.3 to 28.1 feet (1.0 to 8.6 meters) (XGA series) / 3.3 to 30.7 feet (1.0 to 9.4 meters) (1080p series) / 3.3 to 29.9 feet (1.0 to adjust the resolution of focus • Make sure the lens cap is in use. 40 English 3 Partial, scrolling • Press "RESYNC" on the control panel.

User Manual
Page 52
... projector, then to "Cleaning and replacing the dust filters" for details. • Replace the lamp - the projector has exceeded its recommended operating temperature and must be used. Prepare to cool down before reconnecting power. 2 Lamp burns out or makes a popping sound When the lamp reaches the end of its maximum lifetime. Please check the following message. the lamp is not working. • Projector Overheated - English 42 OSD Messages # Condition 1 Message Message Reminder • Fan...
... projector, then to "Cleaning and replacing the dust filters" for details. • Replace the lamp - the projector has exceeded its recommended operating temperature and must be used. Prepare to cool down before reconnecting power. 2 Lamp burns out or makes a popping sound When the lamp reaches the end of its maximum lifetime. Please check the following message. the lamp is not working. • Projector Overheated - English 42 OSD Messages # Condition 1 Message Message Reminder • Fan...


