

User Manual (3D)
Page 4
... Control Panel. Plug the USB cable in to view 3D content. Setting up a 3D environment Once you haven't previously set up the 3D environment. 3 Follow the onscreen instructions to set up the 3D environment. This will need to set up the environment. 1 Position the infra-red transmitter so that it has maximum coverage. English 4 Important: Only NVIDIA graphics cards are supported. 2 Download and install...
... Control Panel. Plug the USB cable in to view 3D content. Setting up a 3D environment Once you haven't previously set up the 3D environment. 3 Follow the onscreen instructions to set up the 3D environment. This will need to set up the environment. 1 Position the infra-red transmitter so that it has maximum coverage. English 4 Important: Only NVIDIA graphics cards are supported. 2 Download and install...

User Manual (3D)
Page 7
... your graphics card's documentation. 2 Download and install the latest drivers for the latest driver version. 3 You should also download a suitable 3D player such as the one available from www.3dtv.at fullscreen resolution in the player. To download software and use an NVIDIA 3DTV Play ready projector with DLP glasses, refer to View > Viewing Method > NVIDIA 3D Vision. 2 Open the 3D content in order...
... your graphics card's documentation. 2 Download and install the latest drivers for the latest driver version. 3 You should also download a suitable 3D player such as the one available from www.3dtv.at fullscreen resolution in the player. To download software and use an NVIDIA 3DTV Play ready projector with DLP glasses, refer to View > Viewing Method > NVIDIA 3D Vision. 2 Open the 3D content in order...
User Manual
Page 4
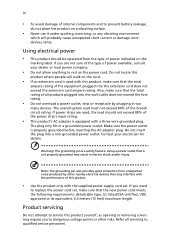
... exceed 80% of power indicated on the cord. • If an extension cord is used , the load should be operated from unexpected noise produced by other risks. Product servicing Do not attempt to qualified service personnel. Using electrical power • This product should not exceed 80% of internal components and to replace the power cord set . Also, make sure that the new power cord meets the following...
... exceed 80% of power indicated on the cord. • If an extension cord is used , the load should be operated from unexpected noise produced by other risks. Product servicing Do not attempt to qualified service personnel. Using electrical power • This product should not exceed 80% of internal components and to replace the power cord set . Also, make sure that the new power cord meets the following...
User Manual
Page 5
... then signal sources • Do not place the product in following the operating instructions Note: Adjust only those controls that is poorly ventilated or confined. At least 50cm clearance from the wall outlet and refer servicing to qualified service personnel when: • the power cord or plug is damaged, cut or frayed • liquid was spilled into the projector's lens when the lamp...
... then signal sources • Do not place the product in following the operating instructions Note: Adjust only those controls that is poorly ventilated or confined. At least 50cm clearance from the wall outlet and refer servicing to qualified service personnel when: • the power cord or plug is damaged, cut or frayed • liquid was spilled into the projector's lens when the lamp...

User Manual
Page 6
... changing instructions. • Reset the "Lamp Hour Reset" function from the Onscreen display "Management" menu after replacing the lamp module. • Do not attempt to disassemble this could cause it would cause dramatical decrease of lamp life or severe safety concern of the lamp itself. Only use acer ceiling mount kit for ceiling mount installation. vi • When switching the projector off, suggest to ensure the projector completes its cooling cycle before turning main power...
... changing instructions. • Reset the "Lamp Hour Reset" function from the Onscreen display "Management" menu after replacing the lamp module. • Do not attempt to disassemble this could cause it would cause dramatical decrease of lamp life or severe safety concern of the lamp itself. Only use acer ceiling mount kit for ceiling mount installation. vi • When switching the projector off, suggest to ensure the projector completes its cooling cycle before turning main power...
User Manual
Page 8
... shows warning messages. • Reset the "Lamp Hour Reset" function from AC outlet if the product is not being used for ventilation. • Use abrasive cleaners, waxes or solvents to clean the unit. • Use under "Replacing the Lamp". Please be sure to change the lamp when it will detect the life of time. viii First things first Usage Notes Do: • Turn off , please ensure the projector...
... shows warning messages. • Reset the "Lamp Hour Reset" function from AC outlet if the product is not being used for ventilation. • Use abrasive cleaners, waxes or solvents to clean the unit. • Use under "Replacing the Lamp". Please be sure to change the lamp when it will detect the life of time. viii First things first Usage Notes Do: • Turn off , please ensure the projector...

User Manual
Page 11
..., 1080p) supported • Lower power consumption and economy (ECO) mode extend lamp life • Acer EcoProjeciton Technology delivers Intelligent power management approach and physical efficiency improvement • Equipped with HDMI™ & MHL connection supporting HDCP • Support HDMI CEC function • Advanced digital keystone and 4-corner correction optimizes presentations • Smart detection delivers quick, intelligent source detection • Multi-language onscreen display (OSD) menus • Manual focus projection lens zooms up...
..., 1080p) supported • Lower power consumption and economy (ECO) mode extend lamp life • Acer EcoProjeciton Technology delivers Intelligent power management approach and physical efficiency improvement • Equipped with HDMI™ & MHL connection supporting HDCP • Support HDMI CEC function • Advanced digital keystone and 4-corner correction optimizes presentations • Smart detection delivers quick, intelligent source detection • Multi-language onscreen display (OSD) menus • Manual focus projection lens zooms up...
User Manual
Page 16
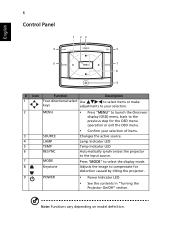
... image to compensate for the OSD menu operation or exit the OSD menu. 3 SOURCE 4 LAMP 5 TEMP 6 RESYNC 7 MODE 8 Keystone • Confirm your selection. 2 MENU • Press "MENU" to launch the Onscreen display (OSD) menu, back to the previous step for distortion caused by tilting the projector. 9 POWER • Power Indicator LED • See the contents in "Turning the Projector On/Off" section. Note: Functions vary depending on model definition. English 6 Control Panel 1 23 4 LAMP SOURCE TEMP...
... image to compensate for the OSD menu operation or exit the OSD menu. 3 SOURCE 4 LAMP 5 TEMP 6 RESYNC 7 MODE 8 Keystone • Confirm your selection. 2 MENU • Press "MENU" to launch the Onscreen display (OSD) menu, back to the previous step for distortion caused by tilting the projector. 9 POWER • Power Indicator LED • See the contents in "Turning the Projector On/Off" section. Note: Functions vary depending on model definition. English 6 Control Panel 1 23 4 LAMP SOURCE TEMP...

User Manual
Page 17
.... 7 SOURCE Changes the active source. 8 3D Press "3D" to select 3D models. 9 ZOOM Zooms the projector display in Japanese market. 12 Enter No function. 13 Four directional Use up, down, left, right buttons to select items or make select keys adjustments to your selection. 14 KEYSTONE Adjusts the image to go back one menu step. 11 Laser button Aim the remote at the viewing screen. Aim the remote at the viewing screen...
.... 7 SOURCE Changes the active source. 8 3D Press "3D" to select 3D models. 9 ZOOM Zooms the projector display in Japanese market. 12 Enter No function. 13 Four directional Use up, down, left, right buttons to select items or make select keys adjustments to your selection. 14 KEYSTONE Adjusts the image to go back one menu step. 11 Laser button Aim the remote at the viewing screen. Aim the remote at the viewing screen...

User Manual
Page 18
... change source to COMPOSITE VIDEO. 27 SD/USB A No function. 28 USB B For USB control and firmware upgrade. 29 HDMI™/DVI Press "HDMI™/DVI" to change source to the projector via a USB cable. 21 Prev No function. the center button works as a multidirectional 17 MOUSE_Four pointer stick. Increases/decreases the volume. 20 PAGE For computer mode only. To enable this button to display the image which is only available when connected...
... change source to COMPOSITE VIDEO. 27 SD/USB A No function. 28 USB B For USB control and firmware upgrade. 29 HDMI™/DVI Press "HDMI™/DVI" to change source to the projector via a USB cable. 21 Prev No function. the center button works as a multidirectional 17 MOUSE_Four pointer stick. Increases/decreases the volume. 20 PAGE For computer mode only. To enable this button to display the image which is only available when connected...

User Manual
Page 22
... at the same time, use the "Source" button on either control panel or the remote control or direct source key on the remote control to switch between inputs. Power button RESYNC LAMP MENU SOURCE MODE TEMP LENS SHIFT FOCUS ZOOM The projector will turn blue. 3 Turn on the control panel or remote control, and the Power indicator LED will detect your source (computer, notebook, video player ,etc.). The Power indicator LED will flash red. 2 Turn on the projector by pressing "Power" button on your source automatically. • If the screen displays "Lock" and "Source" icons, it means...
... at the same time, use the "Source" button on either control panel or the remote control or direct source key on the remote control to switch between inputs. Power button RESYNC LAMP MENU SOURCE MODE TEMP LENS SHIFT FOCUS ZOOM The projector will turn blue. 3 Turn on the control panel or remote control, and the Power indicator LED will detect your source (computer, notebook, video player ,etc.). The Power indicator LED will flash red. 2 Turn on the projector by pressing "Power" button on your source automatically. • If the screen displays "Lock" and "Source" icons, it means...

User Manual
Page 23
... the power button again to ensure continued optimal lamp operation. The lamp with automatically turn off , the projector will turn RED and blink rapidly after the projector is now safe to indicate standby mode. 5 It is turned off soon." Note: Whenever the projector automatically shuts down , and the LED temp indicator will turn solid red. Contact your local reseller or service center. Warning indicators: • "Projector Overheated. Contact your local dealer or service center. • "Fan failed. This onscreen message indicates...
... the power button again to ensure continued optimal lamp operation. The lamp with automatically turn off , the projector will turn RED and blink rapidly after the projector is now safe to indicate standby mode. 5 It is turned off soon." Note: Whenever the projector automatically shuts down , and the LED temp indicator will turn solid red. Contact your local reseller or service center. Warning indicators: • "Projector Overheated. Contact your local dealer or service center. • "Fan failed. This onscreen message indicates...
User Manual
Page 33
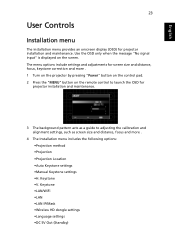
... a guide to adjusting the calibration and alignment settings, such as screen size and distance, focus and more . 1 Turn on the projector by pressing "Power" button on the control pad. 2 Press the "MENU" button on the screen. Keystone •LAN/WiFi •LAN •LAN IP/Mask •Wireless HD dongle settings •Language settings •DC 5V Out (Standby) Use the OSD only when the message "No signal input" is displayed on the remote control to launch the OSD for projector installation...
... a guide to adjusting the calibration and alignment settings, such as screen size and distance, focus and more . 1 Turn on the projector by pressing "Power" button on the control pad. 2 Press the "MENU" button on the screen. Keystone •LAN/WiFi •LAN •LAN IP/Mask •Wireless HD dongle settings •Language settings •DC 5V Out (Standby) Use the OSD only when the message "No signal input" is displayed on the remote control to launch the OSD for projector installation...

User Manual
Page 38
... full screen by 1.333 times. Adjusts the sharpness of the image. • Press to decrease the sharpness. • Press to adjust image distortion horizontally and makes a squarer image. H. Keystone Press the or button to increase the sharpness. Sharpness The function is adjusted. Manually adjusts the shape and size of the screen and the height adjusted to display the image using a 16:9 ratio. • L.Box: Keep original signal aspect ratio and zoom...
... full screen by 1.333 times. Adjusts the sharpness of the image. • Press to decrease the sharpness. • Press to adjust image distortion horizontally and makes a squarer image. H. Keystone Press the or button to increase the sharpness. Sharpness The function is adjusted. Manually adjusts the shape and size of the screen and the height adjusted to display the image using a 16:9 ratio. • L.Box: Keep original signal aspect ratio and zoom...
User Manual
Page 40
...". Reset • Press the button and choose "Yes" to return the parameters on the remote control for other signals if the current input signal is "On", the down/up move of your screen aspect ratio to 4:3. Notice: Before proceeding with power on/off the captioning feature. Set your Acer projector. • User: Use memorize picture from "Screen Capture" function. Choose "On" to the "Image" section. • Change the...
...". Reset • Press the button and choose "Yes" to return the parameters on the remote control for other signals if the current input signal is "On", the down/up move of your screen aspect ratio to 4:3. Notice: Before proceeding with power on/off the captioning feature. Set your Acer projector. • User: Use memorize picture from "Screen Capture" function. Choose "On" to the "Image" section. • Change the...
User Manual
Page 41
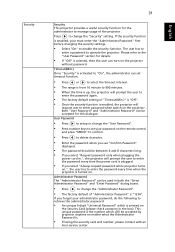
... time is up, the projector will prompt the user to enter the password again. • The factory default setting of "Timeout(Min.)" is "Off". • Once the security function is enabled, the projector will request user to enter password when switch on the remote control and press "MENU" to confirm. • Press to delete character. • Enter the password when you see "Confirm Password" displayed. • The password...
... time is up, the projector will prompt the user to enter the password again. • The factory default setting of "Timeout(Min.)" is "Off". • Once the security function is enabled, the projector will request user to enter password when switch on the remote control and press "MENU" to confirm. • Press to delete character. • Enter the password when you see "Confirm Password" displayed. • The password...

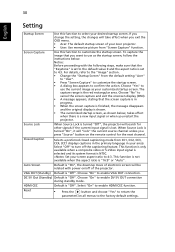
User Manual
Page 42
... Mode High Altitude Turn Off Mode Auto Shutdown AC Power On Lamp Hour Elapse Lamp Reminding Lamp Hour Reset Choose "On" to dim the projector lamp which will automatically shutdown when there is no signal input after the allocated time. (default is 120 minutes) Choose "On" to power on High Altitude mode. Displays the lamp's elapsed operating time (in . English 32 LAN Lock to user startup screen Default Lock User Startup Screen is "Off". Press the button and choose "Yes" to do LAN control under standby mode, change the lamp...
... Mode High Altitude Turn Off Mode Auto Shutdown AC Power On Lamp Hour Elapse Lamp Reminding Lamp Hour Reset Choose "On" to dim the projector lamp which will automatically shutdown when there is no signal input after the allocated time. (default is 120 minutes) Choose "On" to power on High Altitude mode. Displays the lamp's elapsed operating time (in . English 32 LAN Lock to user startup screen Default Lock User Startup Screen is "Off". Press the button and choose "Yes" to do LAN control under standby mode, change the lamp...

User Manual
Page 49
... the following troubleshooting guide. If the problem still appears, change the monitor display you are using and follow the steps below: • Verify that the resolution setting of the connector pins are bent or broken. • Check if the projector lamp has been securely installed. Next, select "Standard monitor types" under the SP box, and choose the resolution mode you need under the "Models" box...
... the following troubleshooting guide. If the problem still appears, change the monitor display you are using and follow the steps below: • Verify that the resolution setting of the connector pins are bent or broken. • Check if the projector lamp has been securely installed. Next, select "Standard monitor types" under the SP box, and choose the resolution mode you need under the "Models" box...

User Manual
Page 50
... the projector lens. • Make sure the projection screen is in use. Refer to the or flickering "Image" section for more information. • Change the display color depth settings on the control panel. Refer to the "How to adjust the resolution of the notebook computer is not displaying your presentation • If you are using an Apple® Mac® OS based notebook: In System Preferences, open Display and select Video...
... the projector lens. • Make sure the projection screen is in use. Refer to the or flickering "Image" section for more information. • Change the display color depth settings on the control panel. Refer to the "How to adjust the resolution of the notebook computer is not displaying your presentation • If you are using an Apple® Mac® OS based notebook: In System Preferences, open Display and select Video...

User Manual
Page 52
... system fan is about to "Cleaning and replacing the dust filters" for details. • Replace the lamp - Please check the following message. Please refer to reach its useful life, it may make a loud popping sound. Please also check the dust filters if they are installed. Problems with dust, please clean it soon. the projector has exceeded its recommended operating temperature and must be used. the lamp is not working. • Projector Overheated - To replace the lamp...
... system fan is about to "Cleaning and replacing the dust filters" for details. • Replace the lamp - Please check the following message. Please refer to reach its useful life, it may make a loud popping sound. Please also check the dust filters if they are installed. Problems with dust, please clean it soon. the projector has exceeded its recommended operating temperature and must be used. the lamp is not working. • Projector Overheated - To replace the lamp...


