
PD116P Quick Start Guide
Page 1
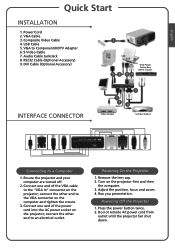
...projector fan shut down. connect the other end to an electrical outlet. Powering On the Projector Powering On the Projector 1. Remove the lens cap. 2. Powering Off the Projector 1. Audio Cable Jack/Jack 8. S-Video Cable 7. Ensure the projector and your computer are turned off. 2. connect the other end to the "VGA In" connector on the projector first and then the computer. 3. Power Cord 2. Adjust the position, focus and zoom. 4. Run you presentation. English Quick Start INSTALLATION 1. VGA Cable 3. USB Cable 5. RS232 Cable (Optional Accessory) 9. Connect...
...projector fan shut down. connect the other end to an electrical outlet. Powering On the Projector Powering On the Projector 1. Remove the lens cap. 2. Powering Off the Projector 1. Audio Cable Jack/Jack 8. S-Video Cable 7. Ensure the projector and your computer are turned off. 2. connect the other end to the "VGA In" connector on the projector first and then the computer. 3. Power Cord 2. Adjust the position, focus and zoom. 4. Run you presentation. English Quick Start INSTALLATION 1. VGA Cable 3. USB Cable 5. RS232 Cable (Optional Accessory) 9. Connect...
PD116P Service Guide
Page 11
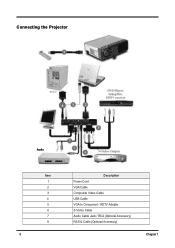
Connecting the Projector 8 Audio Item Description 1 Power Cord 2 VGA Cable 3 Composite Video Cable 4 USB Cable 5 VGA to Component / HDTV Adapter 6 S-Video Cable 7 Audio Cable Jack / RCA (Optional Accessory) 8 RS232 Cable (Optional Accessory) 5 Chapter 1
Connecting the Projector 8 Audio Item Description 1 Power Cord 2 VGA Cable 3 Composite Video Cable 4 USB Cable 5 VGA to Component / HDTV Adapter 6 S-Video Cable 7 Audio Cable Jack / RCA (Optional Accessory) 8 RS232 Cable (Optional Accessory) 5 Chapter 1

PD116P Service Guide
Page 51
... screen. - Check the Main board. - UniformityOK? - Ensure the Signal cable works as well. - Adjust the Tracking selection in the service mode of OSD Menu. (*Note) - Check the Main board. - Is Color OK? - Use the Air gun for the Optical engine clean. - Ensure the Signal cable and Source is clean. - Ensure the Signal cable and Source work as well. - C. Ensure the Projection screen without dirty. - Check the DMD board. Have Noise? - Press the Menu button to check that can OSD Menu...
... screen. - Check the Main board. - UniformityOK? - Ensure the Signal cable works as well. - Adjust the Tracking selection in the service mode of OSD Menu. (*Note) - Check the Main board. - Is Color OK? - Use the Air gun for the Optical engine clean. - Ensure the Signal cable and Source is clean. - Ensure the Signal cable and Source work as well. - C. Ensure the Projection screen without dirty. - Check the DMD board. Have Noise? - Press the Menu button to check that can OSD Menu...

PD116P Service Guide
Page 53
... under default) - the signal will be reduce when the signal cable is work as well. - Do the “Factory Reset” of the engineering mode. - Ensure the signal cable is longer than 5m) - Check the “Degamma”, ”Saturation”, ”Tint” and “Sharpness” setting of OSD menu. (Check the main board if the setting of cable; Is Color OK? - Check that can OSD menu display...
... under default) - the signal will be reduce when the signal cable is work as well. - Do the “Factory Reset” of the engineering mode. - Ensure the signal cable is longer than 5m) - Check the “Degamma”, ”Saturation”, ”Tint” and “Sharpness” setting of OSD menu. (Check the main board if the setting of cable; Is Color OK? - Check that can OSD menu display...

PD116P Service Guide
Page 54
Use the Remote control for the OSD function Adjustment test. (Check the Keypad board and Keypad cable if the Remote control works as well) - Function Cannot Be Adjust. - Audio Troubleshooting A. Ensure the Signal cable and Source are work fine. - Check the Speaker wire that has broken issue or not. - B. Use Keypad to test again. (Replace the Keypad board if the Unit works fine with the Unit.) - Check the Main board. Sound Output With...
Use the Remote control for the OSD function Adjustment test. (Check the Keypad board and Keypad cable if the Remote control works as well) - Function Cannot Be Adjust. - Audio Troubleshooting A. Ensure the Signal cable and Source are work fine. - Check the Speaker wire that has broken issue or not. - B. Use Keypad to test again. (Replace the Keypad board if the Unit works fine with the Unit.) - Check the Main board. Sound Output With...

PD116P Service Guide
Page 62
... well. - Item Keypad Function 1 (Including Remote Control) 2 Factory Reset 3 R, G, B and white color contrast 4 Screen Uniformity 5 Dead Pixel (Bright pixel) 6 Dead Pixel (Dark pixel) Description - Please check and ensure the control function of "Service Mode", then ensure the reset function is under the spec. (Cannot accept any bright pixel) - If not, please return the unit to repair area. Test Signal : 1024 x 768 @ 75Hz Test Pattern : 64...
... well. - Item Keypad Function 1 (Including Remote Control) 2 Factory Reset 3 R, G, B and white color contrast 4 Screen Uniformity 5 Dead Pixel (Bright pixel) 6 Dead Pixel (Dark pixel) Description - Please check and ensure the control function of "Service Mode", then ensure the reset function is under the spec. (Cannot accept any bright pixel) - If not, please return the unit to repair area. Test Signal : 1024 x 768 @ 75Hz Test Pattern : 64...

PD116P Service Guide
Page 63
... @ 75Hz Test Pattern : Full white and Blue 60 patterns - If not, please return the unit to repair area. Please select and enter "Factory Reset" function of "Service Mode" to ensure the function is work as well. If not, please return the unit to repair area. Please check and ensure the unit can display the HDTV signal without color abnormal or image abnormal issue. - After...
... @ 75Hz Test Pattern : Full white and Blue 60 patterns - If not, please return the unit to repair area. Please select and enter "Factory Reset" function of "Service Mode" to ensure the function is work as well. If not, please return the unit to repair area. Please check and ensure the unit can display the HDTV signal without color abnormal or image abnormal issue. - After...
PD116P User's Guide
Page 1
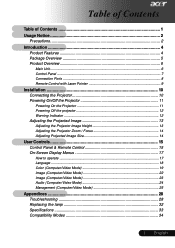
...Ports ...8 Remote Control with Laser Pointer 9 Installation 10 Connecting the Projector 10 Powering On/Off the Projector 11 Powering On the Projector 11 Powering Off the projector 12 Warning Indicator ...12 Adjusting the Projected Image 13 Adjusting the Projector Image Height 13 Adjusting the Projector Zoom / Focus 14 Adjusting Projected Image Size 14 User Controls 15 Control Panel & Remote Control 15 On-Screen Display Menus 17 How to operate ...17 Language ...18 Color (Computer/Video Mode 19 Image (Computer/Video Mode 22 Image (Computer/Video Mode 23 Audio (Computer/Video Mode...
...Ports ...8 Remote Control with Laser Pointer 9 Installation 10 Connecting the Projector 10 Powering On/Off the Projector 11 Powering On the Projector 11 Powering Off the projector 12 Warning Indicator ...12 Adjusting the Projected Image 13 Adjusting the Projector Image Height 13 Adjusting the Projector Zoom / Focus 14 Adjusting Projected Image Size 14 User Controls 15 Control Panel & Remote Control 15 On-Screen Display Menus 17 How to operate ...17 Language ...18 Color (Computer/Video Mode 19 Image (Computer/Video Mode 22 Image (Computer/Video Mode 23 Audio (Computer/Video Mode...

PD116P User's Guide
Page 2
... popping sound. If this user's guide to change the lamp when it will not turn back on until the lamp module has been replaced. Warning- Warning- Usage Notice Precautions Follow all changing instructions. When switching the projector off, please ensure the projector completes its life, it shows warning messages. Turn on . Warning- Reset the "Lamp Hour Reset" function from the On Screen Display "Management" menu after replacing the lamp module (refer to rain or moisture. Warning- Warning- Warning- Do not use lens cap when projector...
... popping sound. If this user's guide to change the lamp when it will not turn back on until the lamp module has been replaced. Warning- Warning- Usage Notice Precautions Follow all changing instructions. When switching the projector off, please ensure the projector completes its life, it shows warning messages. Turn on . Warning- Reset the "Lamp Hour Reset" function from the On Screen Display "Management" menu after replacing the lamp module (refer to rain or moisture. Warning- Warning- Warning- Do not use lens cap when projector...
PD116P User's Guide
Page 12
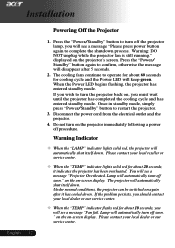
... flashing, the projector has entered standby mode. Please contact your local reseller or service center. ™ When the "TEMP" indicator lights solid red for cooling cycle and the Power LED will keep green. Warning: DO NOT unplug while the projector fan is still running." Disconnect the power cord from the electrical outlet and the projector. 4. Do not turn the projector back on -screen display. Lamp will automatically turn off procedure. displayed on -screen display. Once in standby mode, simply press "Power/Standby" button...
... flashing, the projector has entered standby mode. Please contact your local reseller or service center. ™ When the "TEMP" indicator lights solid red for cooling cycle and the Power LED will keep green. Warning: DO NOT unplug while the projector fan is still running." Disconnect the power cord from the electrical outlet and the projector. 4. Do not turn the projector back on -screen display. Lamp will automatically turn off procedure. displayed on -screen display. Once in standby mode, simply press "Power/Standby" button...

PD116P User's Guide
Page 16
... Projector" section on screen display menu. Source 4 Press "Source" to pause the screen image. Freeze 4 Press "Freeze" to choose RGB, Component-p, Component-i, S-Video, Composite Video, DVI-D (Optional) and HDTV sources. to select items or make adjustments to Laser Button 4 Aim the remote at the viewing screen, press and hold this button to page down. User Controls English ... 16 Using the Remote Control Power 4 Refer to activate the laser pointer. Hide 4 Momentarily turns off the video...
... Projector" section on screen display menu. Source 4 Press "Source" to pause the screen image. Freeze 4 Press "Freeze" to choose RGB, Component-p, Component-i, S-Video, Composite Video, DVI-D (Optional) and HDTV sources. to select items or make adjustments to Laser Button 4 Aim the remote at the viewing screen, press and hold this button to page down. User Controls English ... 16 Using the Remote Control Power 4 Refer to activate the laser pointer. Hide 4 Momentarily turns off the video...

PD116P User's Guide
Page 19
... the to increase the contrast. at lower temperature, the screen looks warmer. 19 ... to darken image. English User Controls Color (Computer / Video Mode) Display Mode There are many factory presets optimized for various types of black and white in a dark room. 4 User : Memorize user's settings. Brightness Adjust the brightness of the picture. At higher temperature, the screen looks colder; The contrast controls the degree of difference between the lightest and...
... the to increase the contrast. at lower temperature, the screen looks warmer. 19 ... to darken image. English User Controls Color (Computer / Video Mode) Display Mode There are many factory presets optimized for various types of black and white in a dark room. 4 User : Memorize user's settings. Brightness Adjust the brightness of the picture. At higher temperature, the screen looks colder; The contrast controls the degree of difference between the lightest and...
PD116P User's Guide
Page 20
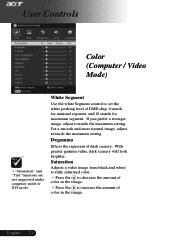
... look brighter. White Segment Use the white Segment control to set the white peaking level of color in the image. 4Press the to decrease the amount of color in the image. Degamma Effects the represent of dark scenery. English ... 20 User Controls Color (Computer / Video Mode) ™"Saturation" and "Tint" functions are not supported under computer mode or DVI mode. For a smooth and more natural image, adjust towards the maximum...
... look brighter. White Segment Use the white Segment control to set the white peaking level of color in the image. 4Press the to decrease the amount of color in the image. Degamma Effects the represent of dark scenery. English ... 20 User Controls Color (Computer / Video Mode) ™"Saturation" and "Tint" functions are not supported under computer mode or DVI mode. For a smooth and more natural image, adjust towards the maximum...
PD116P User's Guide
Page 25
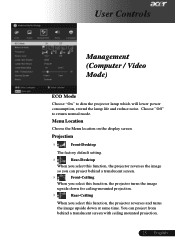
... projector lamp which will lower power consumption, extend the lamp life and reduce noise. Menu Location Choose the Menu location on the display screen. User Controls Management (Computer / Video Mode) ECO Mode Choose "On" to return normal mode. Projection 4 Front-Desktop The factory default setting. 4 Rear-Desktop When you select this function, the projector reverses the image so you can project from behind a translucent screen. 4 Front-Ceiling When you select this function, the projector turns the image upside down for ceiling-mounted projection...
... projector lamp which will lower power consumption, extend the lamp life and reduce noise. Menu Location Choose the Menu location on the display screen. User Controls Management (Computer / Video Mode) ECO Mode Choose "On" to return normal mode. Projection 4 Front-Desktop The factory default setting. 4 Rear-Desktop When you select this function, the projector reverses the image so you can project from behind a translucent screen. 4 Front-Ceiling When you select this function, the projector turns the image upside down for ceiling-mounted projection...
PD116P User's Guide
Page 26
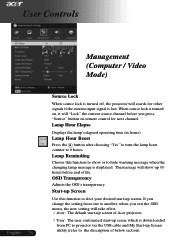
...). User Controls English ... 26 Management (Computer / Video Mode) Source Lock When source lock is turned off, the projector will show or to hide warning message when the changing lamp message is displayed. OSD Transparency Adjusts the OSD's transparency. When source lock is turned on, it will "Lock" the current source channel before end of Acer projector. 4User : The user customized start -up screen. Start-up scren, which is lost. If you change the setting from PC to projector via the USB cable and...
...). User Controls English ... 26 Management (Computer / Video Mode) Source Lock When source lock is turned off, the projector will show or to hide warning message when the changing lamp message is displayed. OSD Transparency Adjusts the OSD's transparency. When source lock is turned on, it will "Lock" the current source channel before end of Acer projector. 4User : The user customized start -up screen. Start-up scren, which is lost. If you change the setting from PC to projector via the USB cable and...

PD116P User's Guide
Page 27
... USB cable has been plugged and connected to the factory default settings. 27 ... Reset Press the button after choosing "Yes" to return the display parameters on again, release both buttons, projector enters download mode. 6. Make sure all menus to your PC to turn on all the fan of the projector was shut down and the "Power" LED is a PC utility for user to change the default start-up screen of Acer projector to enter "Download Mode". 1. You can install...
... USB cable has been plugged and connected to the factory default settings. 27 ... Reset Press the button after choosing "Yes" to return the display parameters on again, release both buttons, projector enters download mode. 6. Make sure all menus to your PC to turn on all the fan of the projector was shut down and the "Power" LED is a PC utility for user to change the default start-up screen of Acer projector to enter "Download Mode". 1. You can install...
PD116P User's Guide
Page 28
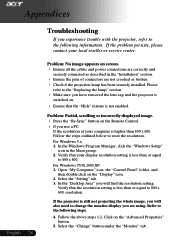
... "Replacing the lamp" section. 4 Make sure you use a PC: If the resolution of connectors are using. Problem: Partial, scrolling or incorrectly displayed image. 4 Press the "Re-Sync" button on the Remote Control. 4 If you have removed the lens cap and the projector is switched on screen. 4 Ensure all the cables and power connections are correctly and securely connected as described in the Main group. 2. Problem: No image appears on . 4 Ensure that the resolution setting is...
... "Replacing the lamp" section. 4 Make sure you use a PC: If the resolution of connectors are using. Problem: Partial, scrolling or incorrectly displayed image. 4 Press the "Re-Sync" button on the Remote Control. 4 If you have removed the lens cap and the projector is switched on screen. 4 Ensure all the cables and power connections are correctly and securely connected as described in the Main group. 2. Problem: No image appears on . 4 Ensure that the resolution setting is...

PD116P User's Guide
Page 30
... LED lighting message Message Power LED Green Standby State (Input power cord) Flashing Lamp lighting Power on until the lamp module has been replaced. The projector automatically detects 16:9 DVD and adjusts the aspect ratio by referring to full screen with 4:3 default setting. Problem: Image is outstretched when displaying 16:9 DVD. Problem: Lamp burns out or makes a popping sound 4 When the lamp reaches its end of life, it will not turn on Power off (Cooling) Error (Lamp fail) Error (Thermal fail) Error (Fan lock fail) Error (Over Temp.) Error (Lamp Breakdown) Temp LED...
... LED lighting message Message Power LED Green Standby State (Input power cord) Flashing Lamp lighting Power on until the lamp module has been replaced. The projector automatically detects 16:9 DVD and adjusts the aspect ratio by referring to full screen with 4:3 default setting. Problem: Image is outstretched when displaying 16:9 DVD. Problem: Lamp burns out or makes a popping sound 4 When the lamp reaches its end of life, it will not turn on Power off (Cooling) Error (Lamp fail) Error (Thermal fail) Error (Fan lock fail) Error (Over Temp.) Error (Lamp Breakdown) Temp LED...

PD116P User's Guide
Page 31
Lamp will automatically turn off soon." Lamp will automatically turn off soon." English will be shown when the system temperature is going to deplete. 4 "Projector Overheated. will be shown about 10 seconds when lamp life is over heat. 4 "Fan fail. will be shown when the fan is approaching the end of order. 31 ... Replacement Suggested!" Appendices Problem: Message Reminders 4 "Lamp is out of its useful life in full power operation.
Lamp will automatically turn off soon." Lamp will automatically turn off soon." English will be shown when the system temperature is going to deplete. 4 "Projector Overheated. will be shown about 10 seconds when lamp life is over heat. 4 "Fan fail. will be shown when the fan is approaching the end of order. 31 ... Replacement Suggested!" Appendices Problem: Message Reminders 4 "Lamp is out of its useful life in full power operation.
PD116P User's Guide
Page 33
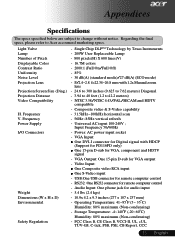
... control - RS232: One RS232 connector for VGA output - English NTSC 3.58/NTSC 4.43/PAL/SECAM and HDTV compatible - Video Input: ƒ One Composite video RCA input ƒ One S-Video input - Light Valve Lamp Number of Pixels Displayable Color Contrast Ratio Uniformity Noise Level Projection Lens Projection Screen Size (Diag.) Projection Distance Video Compatibility H. Frequency V. F/2.4~2.8 f=22.34~26.8 mm with HDCP (Support for PD116PD only) ƒ One 15-pin D-sub for Digital signal with 1.2x Manual zoom lens...
... control - RS232: One RS232 connector for VGA output - English NTSC 3.58/NTSC 4.43/PAL/SECAM and HDTV compatible - Video Input: ƒ One Composite video RCA input ƒ One S-Video input - Light Valve Lamp Number of Pixels Displayable Color Contrast Ratio Uniformity Noise Level Projection Lens Projection Screen Size (Diag.) Projection Distance Video Compatibility H. Frequency V. F/2.4~2.8 f=22.34~26.8 mm with HDCP (Support for PD116PD only) ƒ One 15-pin D-sub for Digital signal with 1.2x Manual zoom lens...


