

PD311 Service Guide
Page 11
Connecting the Projector Item 1 2 3 4 5 6 7 8 9 Description Power Cord VGA Cable Audio Cable Jack/Jack (Optional Accessory) USB Cable Audio Cable Jack/RCA (Optional Accessory) S-Video Cable (Optional Accessory) Composite Video Cable VGA to Component/HDTV Adapter (Optional Accessory) 3 RCA Component Cable (Optional Accessory) 5 Chapter 1
Connecting the Projector Item 1 2 3 4 5 6 7 8 9 Description Power Cord VGA Cable Audio Cable Jack/Jack (Optional Accessory) USB Cable Audio Cable Jack/RCA (Optional Accessory) S-Video Cable (Optional Accessory) Composite Video Cable VGA to Component/HDTV Adapter (Optional Accessory) 3 RCA Component Cable (Optional Accessory) 5 Chapter 1

PD311 Service Guide
Page 13
Firmware (PD311 & PD323) Hardware : Item Photo Item Projector (PD311 or PD323) USB Cable Chapter 2 Photo Power Cord PC or Laptop 7 Chapter 2 Firmware Upgrade Equipment Needed Software : (DDP 3020- USB) - DLP Composer Lite (6.0) -
Firmware (PD311 & PD323) Hardware : Item Photo Item Projector (PD311 or PD323) USB Cable Chapter 2 Photo Power Cord PC or Laptop 7 Chapter 2 Firmware Upgrade Equipment Needed Software : (DDP 3020- USB) - DLP Composer Lite (6.0) -

PD311 Service Guide
Page 16
... Upgrade Procedure No Step 1 Set-up , plug in Power Cord while holding on "Menu". 2. Hold on "Menu" button and plug in USB Cable into the Projector. (Note: The system fan will not function as well.) 2 Execute Program Execute the C:\Program files\DLP Composer 6.0\usbupdata.cmd (Note: The "DLP Composer" program...
... Upgrade Procedure No Step 1 Set-up , plug in Power Cord while holding on "Menu". 2. Hold on "Menu" button and plug in USB Cable into the Projector. (Note: The system fan will not function as well.) 2 Execute Program Execute the C:\Program files\DLP Composer 6.0\usbupdata.cmd (Note: The "DLP Composer" program...

PD311 Service Guide
Page 18
Once Power, Lamp, Temp LED lights up, plug in USB Cable into the Projector. (Note: The system fan will not function as well.) 2 Set-up 1. The library path in Power Cord while holding on "Menu". 2. The light will not ... Files\DLP Composer Lite 6.0 If not, press "Browse" to select the right path. 1. Firmware Upgrade Procedure No Step Procedure 1 Set-up Link PC USB and projector 3 Execute the "DLP Compose(TM) Lite 6.0". 4 Click "Edit" and "Prefer- Wait for about 5 secs. 3. Click "Library". 2.
Once Power, Lamp, Temp LED lights up, plug in USB Cable into the Projector. (Note: The system fan will not function as well.) 2 Set-up 1. The library path in Power Cord while holding on "Menu". 2. The light will not ... Files\DLP Composer Lite 6.0 If not, press "Browse" to select the right path. 1. Firmware Upgrade Procedure No Step Procedure 1 Set-up Link PC USB and projector 3 Execute the "DLP Compose(TM) Lite 6.0". 4 Click "Edit" and "Prefer- Wait for about 5 secs. 3. Click "Library". 2.

PD311 Service Guide
Page 19
...: If the error message "cannot open USB driver - Click "Reset Bus" to search the firmware 1 file. (PD311 / PD323) 3. Finally, re-do 4. Click "Yes" to process the firmware upgrade. 2. No projectors found" appears, please unplug the USB Cable and replug, then check Driver. If the firmware is ready, click...
...: If the error message "cannot open USB driver - Click "Reset Bus" to search the firmware 1 file. (PD311 / PD323) 3. Finally, re-do 4. Click "Yes" to process the firmware upgrade. 2. No projectors found" appears, please unplug the USB Cable and replug, then check Driver. If the firmware is ready, click...

PD311 Service Guide
Page 22
... COM 1 in 2 3 the Port selection. 2. Chapter2 16 Fixture P1 to Fixture JP1 All Ports 2. Fixture P2 to ex- Click on "EDID" to Projector Analog Port Photo Adapter JP1 P1 P2 2 Power On Power on Fixture Fixture RS-232 Cable To Analog Port EDID Key-In Procedure No Step...the Port that you use . EDID ecute EDID Program. Program. 2 Choose 1. Ex: If you choose. Power Adapter to PC COM1 Port 3. Item Projector (PD311 or PD323) Photo Item One additional monitor (for checking the program execution) Photo Setup Procedure No Step Procedure 1 C o n n e c t 1.
... COM 1 in 2 3 the Port selection. 2. Chapter2 16 Fixture P1 to Fixture JP1 All Ports 2. Fixture P2 to ex- Click on "EDID" to Projector Analog Port Photo Adapter JP1 P1 P2 2 Power On Power on Fixture Fixture RS-232 Cable To Analog Port EDID Key-In Procedure No Step...the Port that you use . EDID ecute EDID Program. Program. 2 Choose 1. Ex: If you choose. Power Adapter to PC COM1 Port 3. Item Projector (PD311 or PD323) Photo Item One additional monitor (for checking the program execution) Photo Setup Procedure No Step Procedure 1 C o n n e c t 1.

PD311 Service Guide
Page 25
Chapter 3 Mechanical Disassembly & Reassembly This section provides disassembly & Reassembly procedures for PD311 & PD323 DMD Projector. Before you begin any of the system and all power and signal cables from the electrical outlet. then disconnect the power cable from...Screw : 5mm Side Cutter Pliers Tweezers Hexagon Keys General Information Before You Begin Before proceeding with the disassembly procedure, make sure that you disassemble the projector, be sure to their category. Anti-static wrist strap. 19 Chapter 3 Unplug the AC adapter and all the peripherals. 2. Moreover, when ...
Chapter 3 Mechanical Disassembly & Reassembly This section provides disassembly & Reassembly procedures for PD311 & PD323 DMD Projector. Before you begin any of the system and all power and signal cables from the electrical outlet. then disconnect the power cable from...Screw : 5mm Side Cutter Pliers Tweezers Hexagon Keys General Information Before You Begin Before proceeding with the disassembly procedure, make sure that you disassemble the projector, be sure to their category. Anti-static wrist strap. 19 Chapter 3 Unplug the AC adapter and all the peripherals. 2. Moreover, when ...

PD311 Service Guide
Page 47
... Distance : 1.5m~3m for functional inspection - Symptom Burn-in (Refer to the table below . Screen Size : 60 inches diagonal (wide) - After repairing each PD311 / PD323, the unit should be burn-in Time Normal Repair 2 Hours NFF 4 Hours Auto Shutdown 6 Hours Guide to Entering Service Mode No Item Steps 1 Service...Time Factory Reset EDID M/B v v v v v v FW v v v Color Wheel v Lamp Module v Test Condition - HDTV Tuner or Source (480P, 720P, 1080i) - Turn on the projector. 2. DVD player with XGA resolution (Color Video Signal & Pattern Generator) -
... Distance : 1.5m~3m for functional inspection - Symptom Burn-in (Refer to the table below . Screen Size : 60 inches diagonal (wide) - After repairing each PD311 / PD323, the unit should be burn-in Time Normal Repair 2 Hours NFF 4 Hours Auto Shutdown 6 Hours Guide to Entering Service Mode No Item Steps 1 Service...Time Factory Reset EDID M/B v v v v v v FW v v v Color Wheel v Lamp Module v Test Condition - HDTV Tuner or Source (480P, 720P, 1080i) - Turn on the projector. 2. DVD player with XGA resolution (Color Video Signal & Pattern Generator) -

PD311 User's Guide EN
Page 3
... Ports ...8 Remote Control with Laser Pointer 9 Installation 10 Connecting the Projector 10 Powering On/Off the Projector 11 Powering On the Projector 11 Powering Off the projector 12 Warning Indicator ...12 Adjusting the Projected Image 13 Adjusting the Projector Image Height 13 Adjusting the Projector Zoom / Focus 14 Adjusting Projected Image Size 14 User Controls 15...
... Ports ...8 Remote Control with Laser Pointer 9 Installation 10 Connecting the Projector 10 Powering On/Off the Projector 11 Powering On the Projector 11 Powering Off the projector 12 Warning Indicator ...12 Adjusting the Projected Image 13 Adjusting the Projector Image Height 13 Adjusting the Projector Zoom / Focus 14 Adjusting Projected Image Size 14 User Controls 15...

PD311 User's Guide EN
Page 4
... risk of your eyes. Turn on until the lamp module has been replaced. If this product to page 26) When switching the projector off, please ensure the projector completes its life, it shows warning messages. English ... 2 Please be sure to maximize the life of fire or electric shock...function from the On Screen Display "Management" menu after replacing the lamp module (refer to rain or moisture. Do not use lens cap when projector is on. When the lamp reaches the end of the lamp itself. WarningWarningWarning- When changing the lamp, please allow unit to cool down, ...
... risk of your eyes. Turn on until the lamp module has been replaced. If this product to page 26) When switching the projector off, please ensure the projector completes its life, it shows warning messages. English ... 2 Please be sure to maximize the life of fire or electric shock...function from the On Screen Display "Management" menu after replacing the lamp module (refer to rain or moisture. Do not use lens cap when projector is on. When the lamp reaches the end of the lamp itself. WarningWarningWarning- When changing the lamp, please allow unit to cool down, ...

PD311 User's Guide EN
Page 6
ible (480i/p, 576i/p, 720p, 1080i) User friendly and powerful Acer Empowering key in- cluding: Acer eView Management, Acer eTimer Management and Acer eOpening Management. Full function remote control with laser pointer Advanced digital keystone correction and high quality...and VGA, SVGA re-sizing Mac compatible English ... 4 Introduction Product Features This product is an XGA(PD323)/SVGA(PD311) single chip 0.55" DLPTM projector. Outstanding features include: True XGA, 1024 x 768 addressable pixels (PD323) True SVGA, 800 x 600 addressable pixels...
ible (480i/p, 576i/p, 720p, 1080i) User friendly and powerful Acer Empowering key in- cluding: Acer eView Management, Acer eTimer Management and Acer eOpening Management. Full function remote control with laser pointer Advanced digital keystone correction and high quality...and VGA, SVGA re-sizing Mac compatible English ... 4 Introduction Product Features This product is an XGA(PD323)/SVGA(PD311) single chip 0.55" DLPTM projector. Outstanding features include: True XGA, 1024 x 768 addressable pixels (PD323) True SVGA, 800 x 600 addressable pixels...
PD311 User's Guide EN
Page 7
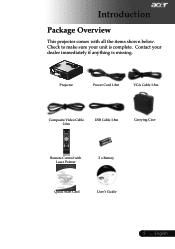
Projector Power Cord 1.8m VGA Cable 1.8m Composite Video Cable 2.0m USB Cable 1.8m Carrying Case Remote Control with all the items shown below. English Introduction Package Overview This projector comes with Laser Pointer 2 x Battery Quick Start Card User's Guide 5 ... Contact your unit is missing. Check to make sure your dealer immediately if anything is complete.
Projector Power Cord 1.8m VGA Cable 1.8m Composite Video Cable 2.0m USB Cable 1.8m Carrying Case Remote Control with all the items shown below. English Introduction Package Overview This projector comes with Laser Pointer 2 x Battery Quick Start Card User's Guide 5 ... Contact your unit is missing. Check to make sure your dealer immediately if anything is complete.

PD311 User's Guide EN
Page 12
... well with your computer, please make sure the timing of the display mode is compatible with the projector. English ... 10 Installation Connecting the Projector 1 PC USB DVD Player, RGB 3 Settop Box, 4 2 HDTV receiver S-Video Output 8 9 7 5 6 Video Output 1...Power Cord 2...VGA Cable 3 Audio Cable Jack/Jack (Optional Accessory) 4...USB Cable 5 ...
... well with your computer, please make sure the timing of the display mode is compatible with the projector. English ... 10 Installation Connecting the Projector 1 PC USB DVD Player, RGB 3 Settop Box, 4 2 HDTV receiver S-Video Output 8 9 7 5 6 Video Output 1...Power Cord 2...VGA Cable 3 Audio Cable Jack/Jack (Optional Accessory) 4...USB Cable 5 ...

PD311 User's Guide EN
Page 13
... is no such type of input signal found. If the screen displays "No Signal", please make sure the signal cables are securely connected. The projector will detect your source (computer, notebook, video player ,etc.). Open the lens cap. 2. Turn on your source automatically. If the ...screen displays "Lock" & "Source" icons, it means the projector locks on the control panel. And the Power LED will flash red. 3. The Power LED will turn on the...
... is no such type of input signal found. If the screen displays "No Signal", please make sure the signal cables are securely connected. The projector will detect your source (computer, notebook, video player ,etc.). Open the lens cap. 2. Turn on your source automatically. If the ...screen displays "Lock" & "Source" icons, it means the projector locks on the control panel. And the Power LED will flash red. 3. The Power LED will turn on the...

PD311 User's Guide EN
Page 14
...the cooling cycle and has entered standby mode. displayed on again after 5 seconds. 2. Installation Powering Off the Projector English ... 12 1. Press the "Power" button again to restart the projector. 3. Once in standby mode, simply press "Power" button to confirm, otherwise the message will see a ...message "Fan fail. Close the lens cap to prevent dust if you will see a message "Projector Overheated. Lamp will be switched on the projector's screen. Lamp will see a message "Please press power button again to turn on , you should contact your local...
...the cooling cycle and has entered standby mode. displayed on again after 5 seconds. 2. Installation Powering Off the Projector English ... 12 1. Press the "Power" button again to restart the projector. 3. Once in standby mode, simply press "Power" button to confirm, otherwise the message will see a ...message "Fan fail. Close the lens cap to prevent dust if you will see a message "Projector Overheated. Lamp will be switched on the projector's screen. Lamp will see a message "Please press power button again to turn on , you should contact your local...

PD311 User's Guide EN
Page 15
Installation Adjusting the Projected Image Adjusting the Projector Image Height The projector is equipped with an elevator foot for adjusting the image height. Lower the image, then release the button to the desired height angle , then ...
Installation Adjusting the Projected Image Adjusting the Projector Image Height The projector is equipped with an elevator foot for adjusting the image height. Lower the image, then release the button to the desired height angle , then ...

PD311 User's Guide EN
Page 16
... feet (1.2 to zoom in or out. To focus the image, rotate the focus ring until the image is for user's reference only. Installation Adjusting the Projector Zoom / Focus You may turn the zoom ring to 12.0 meters). Min. 2.74" (7.0cm) 2.50" (6.9cm) 6.85" (17.4cm) 6.24" 15.9cm) 11.42" (29...
... feet (1.2 to zoom in or out. To focus the image, rotate the focus ring until the image is for user's reference only. Installation Adjusting the Projector Zoom / Focus You may turn the zoom ring to 12.0 meters). Min. 2.74" (7.0cm) 2.50" (6.9cm) 6.85" (17.4cm) 6.24" 15.9cm) 11.42" (29...

PD311 User's Guide EN
Page 17
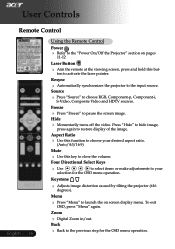
... Composite, Video and HDTV sources. User Controls Control Panel & Remote Control There are "Acer eView Management", "Acer eTimer Management" and "Acer eOpening Management" respectively. to select items or make adjustments to your selection of items. ...Source Press "Source" to modify its function. Control Panel Using the Control Panel Power Refer to the input source. Resync Automatically synchronizes the projector to the "Power On/Off the Projector...
... Composite, Video and HDTV sources. User Controls Control Panel & Remote Control There are "Acer eView Management", "Acer eTimer Management" and "Acer eOpening Management" respectively. to select items or make adjustments to your selection of items. ...Source Press "Source" to modify its function. Control Panel Using the Control Panel Power Refer to the input source. Resync Automatically synchronizes the projector to the "Power On/Off the Projector...
PD311 User's Guide EN
Page 18
press and hold this function (Auto/4:3/16:9) to choose your Keystone Adjusts image degrees). Resync Automatically synchronizes the projector to launch the press "Menu" again. Hide Momentarily turns off the video. To exit Zoom Digital Zoom ...in/out. to hide image, Aspect Ratio Use this but- distortion caused by tilting the projector (±16 Menu Press OSD, "Menu" to the input source. on pages Laser Button Aim the remote at ton ...
press and hold this function (Auto/4:3/16:9) to choose your Keystone Adjusts image degrees). Resync Automatically synchronizes the projector to launch the press "Menu" again. Hide Momentarily turns off the video. To exit Zoom Digital Zoom ...in/out. to hide image, Aspect Ratio Use this but- distortion caused by tilting the projector (±16 Menu Press OSD, "Menu" to the input source. on pages Laser Button Aim the remote at ton ...

PD311 User's Guide EN
Page 19
...screen display main menu to page up. This function is only available when the projector is connected to On Screen Display Menus section for more detail. "Acer eTimer Management" provides the reminding function for more detail. Acer eTimer Management Press "e" to a computer via an USB cable. ...This function is only available when the projector is for details. Acer eView Management Press "e" to a computer via an USB cable. 17 ... Page Up (Computer mode only) Use this ...
...screen display main menu to page up. This function is only available when the projector is connected to On Screen Display Menus section for more detail. "Acer eTimer Management" provides the reminding function for more detail. Acer eTimer Management Press "e" to a computer via an USB cable. ...This function is only available when the projector is for details. Acer eView Management Press "e" to a computer via an USB cable. 17 ... Page Up (Computer mode only) Use this ...


