User Manual
Page 3
... LCD screen, an afterimage of the previous screen may remain after switching the image, when the same image is attached to its base before connecting the power cord to the AC power outlet. • Make sure both the LCD monitor and the computer are normal with the LCD monitor and do not indicate a problem. • Due to the nature of the fluorescent light, the screen may find slightly uneven brightness...
... LCD screen, an afterimage of the previous screen may remain after switching the image, when the same image is attached to its base before connecting the power cord to the AC power outlet. • Make sure both the LCD monitor and the computer are normal with the LCD monitor and do not indicate a problem. • Due to the nature of the fluorescent light, the screen may find slightly uneven brightness...
User Manual
Page 4
... When you . These openings must not be blocked by placing the product on the marking label. Using electrical power • This product should never be blocked or covered. If you plug the power cord into is provided. &#...touch dangerous voltage points or short-out parts that the power outlet you are provided for ventilation to ensure reliable operation of time listening to music at high volume. • Avoid turning up the volume to unplug the power cord from overheating. Safe listening To protect your hearing, follow these instructions. • Gradually increase the volume...
... When you . These openings must not be blocked by placing the product on the marking label. Using electrical power • This product should never be blocked or covered. If you plug the power cord into is provided. &#...touch dangerous voltage points or short-out parts that the power outlet you are provided for ventilation to ensure reliable operation of time listening to music at high volume. • Avoid turning up the volume to unplug the power cord from overheating. Safe listening To protect your hearing, follow these instructions. • Gradually increase the volume...
User Manual
Page 5
... The plug only fits in too many devices. Using a power outlet that may expose you need to qualified service personnel. v • Do not allow anything to rest on the cord. • If an extension cord is used , the load should not exceed 80% of the power strip's input rating. • This product's power cord is equipped with the supplied power supply cord set , make sure that the new power cord meets...
... The plug only fits in too many devices. Using a power outlet that may expose you need to qualified service personnel. v • Do not allow anything to rest on the cord. • If an extension cord is used , the load should not exceed 80% of the power strip's input rating. • This product's power cord is equipped with the supplied power supply cord set , make sure that the new power cord meets...

User Manual
Page 6
... enhancements may result in damage and will often require extensive work by the operating instructions, since improper adjustment of other controls may contain small parts. Potentially explosive atmospheres include areas where you would normally be advised to turn off your vehicle engine. or where blasting operations are covered by a qualified technician to restore the product to this...
... enhancements may result in damage and will often require extensive work by the operating instructions, since improper adjustment of other controls may contain small parts. Potentially explosive atmospheres include areas where you would normally be advised to turn off your vehicle engine. or where blasting operations are covered by a qualified technician to restore the product to this...
User Manual
Page 7
... instructions This symbol on the product or on the recorded image and does not constitute a malfunction. The separate collection and recycling of your other household waste. This product has been shipped enabled for power management: • Activate display's Sleep mode within 5 minutes of disposal will help to... the environment. https://www.acer-group.com/sustainability/en/our-products-environment.html LCD pixel statement The LCD unit is produced with your waste equipment at the time of user inactivity. • Wake the monitor when it is recycled in Active Off mode, move the mouse or ...
... instructions This symbol on the product or on the recorded image and does not constitute a malfunction. The separate collection and recycling of your other household waste. This product has been shipped enabled for power management: • Activate display's Sleep mode within 5 minutes of disposal will help to... the environment. https://www.acer-group.com/sustainability/en/our-products-environment.html LCD pixel statement The LCD unit is produced with your waste equipment at the time of user inactivity. • Wake the monitor when it is recycled in Active Off mode, move the mouse or ...
User Manual
Page 9
... as often as open windows, for enhanced text readability and graphics clarity. • Eliminate glare and reflections by: • placing your eyes regular breaks by using drapes, shades or blinds • using a task light • changing the display's viewing angle • using a glare-reduction filter • using a display visor, such as a piece of the display. • Adjust the display brightness and/or contrast to reduce eyestrain...
... as often as open windows, for enhanced text readability and graphics clarity. • Eliminate glare and reflections by: • placing your eyes regular breaks by using drapes, shades or blinds • using a task light • changing the display's viewing angle • using a glare-reduction filter • using a display visor, such as a piece of the display. • Adjust the display brightness and/or contrast to reduce eyestrain...
User Manual
Page 10
TABLE OF CONTENTS UNPACKING...1 ATTACHING/REMOVING THE BASE 2 SCREEN POSITION ADJUSTMENT 4 CONNECTING THE POWER CORD 5 SAFETY PRECAUTION 6 CLEANING YOUR MONITOR 6 POWER SAVING...7 DISPLAY DATA CHANNEL (DDC 7 CONNECTOR PIN ASSIGNMENT 8 STANDARD TIMING TABLE 10 INSTALLATION...11 USER CONTROLS 12 TROUBLESHOOTING 25
TABLE OF CONTENTS UNPACKING...1 ATTACHING/REMOVING THE BASE 2 SCREEN POSITION ADJUSTMENT 4 CONNECTING THE POWER CORD 5 SAFETY PRECAUTION 6 CLEANING YOUR MONITOR 6 POWER SAVING...7 DISPLAY DATA CHANNEL (DDC 7 CONNECTOR PIN ASSIGNMENT 8 STANDARD TIMING TABLE 10 INSTALLATION...11 USER CONTROLS 12 TROUBLESHOOTING 25

User Manual
Page 11
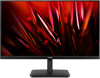
The actual product may be different. • LCD Monitor • Quick Start Guide • AC Power Cord (Optional) • Power adapter (Optional) • D-Sub Cable (Optional) • HDMI Cable (Optional) • DP cable (Optional) • Audio Cable (Optional) • USB Cable (Optional) • USB Type C Cable (Optional) 1 UNPACKING Please check the following items are present when you unpack the box, and save the packing materials in case you will need to ship or transport the monitor in future. *Below items shown here is indicative only.
The actual product may be different. • LCD Monitor • Quick Start Guide • AC Power Cord (Optional) • Power adapter (Optional) • D-Sub Cable (Optional) • HDMI Cable (Optional) • DP cable (Optional) • Audio Cable (Optional) • USB Cable (Optional) • USB Type C Cable (Optional) 1 UNPACKING Please check the following items are present when you unpack the box, and save the packing materials in case you will need to ship or transport the monitor in future. *Below items shown here is indicative only.
User Manual
Page 14
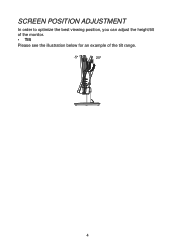
SCREEN POSITION ADJUSTMENT In order to optimize the best viewing position, you can adjust the height/tilt of the monitor. • Tilt Please see the illustration below for an example of the tilt range. -5° 20° 4
SCREEN POSITION ADJUSTMENT In order to optimize the best viewing position, you can adjust the height/tilt of the monitor. • Tilt Please see the illustration below for an example of the tilt range. -5° 20° 4
User Manual
Page 15
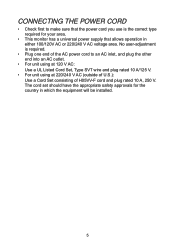
...; For unit using at 220/240 V AC (outside of U.S.): Use a Cord Set consisting of H05VV-F cord and plug rated 10 A, 250 V. The cord set should have the appropriate safety approvals for your area. • This monitor has a universal power supply that the power cord you use is required. • Plug one end of the AC power cord to make sure that allows operation in which the equipment will be installed. 5
...; For unit using at 220/240 V AC (outside of U.S.): Use a Cord Set consisting of H05VV-F cord and plug rated 10 A, 250 V. The cord set should have the appropriate safety approvals for your area. • This monitor has a universal power supply that the power cord you use is required. • Plug one end of the AC power cord to make sure that allows operation in which the equipment will be installed. 5
User Manual
Page 17
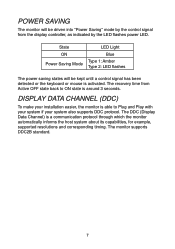
... time from the display controller, as indicated by the LED flashes power LED. POWER SAVING The monitor will be driven into "Power Saving" mode by the control signal from Active OFF state back to ON state is able to Plug and Play with your system if your installation easier, the monitor is around 3 seconds. State ON Power Saving Mode LED Light Blue Type 1: Amber Type 2: LED flashes The power saving states will be kept until a control signal has been...
... time from the display controller, as indicated by the LED flashes power LED. POWER SAVING The monitor will be driven into "Power Saving" mode by the control signal from Active OFF state back to ON state is able to Plug and Play with your system if your installation easier, the monitor is around 3 seconds. State ON Power Saving Mode LED Light Blue Type 1: Amber Type 2: LED flashes The power saving states will be kept until a control signal has been...

User Manual
Page 19
... SSTXp2 A12 GND * only for certain models Threading 9. 10. 11. 12. 13. 14. 15. 15-pin color display signal cable Threading 1. 2. 3. 4. 5. 6. 7. 8. Explanations +5 V Logic ground Monitor ground DDC-continuous data Line sync signal Field sync signal DDC-continuous clock 24-pin USB Type C cable PIN No. Explanations Red Green Blue Monitor ground DDC return Red-ground Green-ground Blue-ground * only for certain models PIN No. B12 B11 B10 B9 B8...
... SSTXp2 A12 GND * only for certain models Threading 9. 10. 11. 12. 13. 14. 15. 15-pin color display signal cable Threading 1. 2. 3. 4. 5. 6. 7. 8. Explanations +5 V Logic ground Monitor ground DDC-continuous data Line sync signal Field sync signal DDC-continuous clock 24-pin USB Type C cable PIN No. Explanations Red Green Blue Monitor ground DDC return Red-ground Green-ground Blue-ground * only for certain models PIN No. B12 B11 B10 B9 B8...
User Manual
Page 21
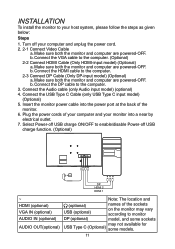
... unplug the power cord. 2. 2-1 Connect Video Cable a. Connect the USB Type C Cable (only USB Type C input model) (Optional) 5. b. Select Power-off USB charge function. (Optional) DP HDMI 2 HDMI 1 ~ HDMI (optional) VGA IN (optional) AUDIO IN (optional) AUDIO OUT(optional) Note: The location and (optional) USB (optional) names of your computer and your monitor into the power port at the back of the monitor. 6. Connect the HDMI cable to the computer. (Optional) 2-2 Connect HDMI Cable (Only HDMI-input model) (Optional) a. Connect the Audio cable (only Audio input model) (optional...
... unplug the power cord. 2. 2-1 Connect Video Cable a. Connect the USB Type C Cable (only USB Type C input model) (Optional) 5. b. Select Power-off USB charge function. (Optional) DP HDMI 2 HDMI 1 ~ HDMI (optional) VGA IN (optional) AUDIO IN (optional) AUDIO OUT(optional) Note: The location and (optional) USB (optional) names of your computer and your monitor into the power port at the back of the monitor. 6. Connect the HDMI cable to the computer. (Optional) 2-2 Connect HDMI Cable (Only HDMI-input model) (Optional) a. Connect the Audio cable (only Audio input model) (optional...
User Manual
Page 22
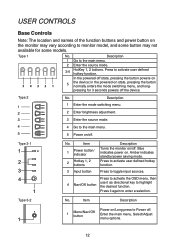
... 3 seconds powers off . 1 Menu/Navi/OK button Enter the main menu, Select/Adjust menu options. 12 Item 1 Power button/ indicator 2 Hotkey 1, 2 buttons Description Turns the monitor on/off state, pressing the button powers on 5 the device; Item Description Power on /off. pressing for some button may vary according to monitor model, and some models. Amber indicates standby/power saving mode. Description 1 Enter the mode switching menu. 2 Enter brightness adjustment. 3 Enter the source mode. 4 Go to the main menu. 5 Power on...
... 3 seconds powers off . 1 Menu/Navi/OK button Enter the main menu, Select/Adjust menu options. 12 Item 1 Power button/ indicator 2 Hotkey 1, 2 buttons Description Turns the monitor on/off state, pressing the button powers on 5 the device; Item Description Power on /off. pressing for some button may vary according to monitor model, and some models. Amber indicates standby/power saving mode. Description 1 Enter the mode switching menu. 2 Enter brightness adjustment. 3 Enter the source mode. 4 Go to the main menu. 5 Power on...

User Manual
Page 23
... not support. The button of your LCD Monitor. The OSD (on-screen display) can be grayed if the model can use (please see the OSD section for more information). 13 Using the Shortcut Menu Note: The following page: The button and the actual functions depend on detail model. Main Page Turn Modes on or off Note: Please select the button function operation according to use the OSD to open the Modes control...
... not support. The button of your LCD Monitor. The OSD (on-screen display) can be grayed if the model can use (please see the OSD section for more information). 13 Using the Shortcut Menu Note: The following page: The button and the actual functions depend on detail model. Main Page Turn Modes on or off Note: Please select the button function operation according to use the OSD to open the Modes control...
User Manual
Page 26
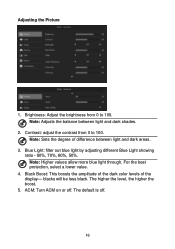
... black. Brightness: Adjust the brightness from 0 to 100. ACM: Turn ACM on or off . 16 Black Boost: This boosts the amplitude of the dark color levels of difference between light and dark shades. 2. The higher the level, the higher the boost. 5. Note: Adjusts the balance between light and dark areas. 3. For the best protection, select a lower value. 4. The default is off . Adjusting the Picture 1. Contrast: adjust...
... black. Brightness: Adjust the brightness from 0 to 100. ACM: Turn ACM on or off . 16 Black Boost: This boosts the amplitude of the dark color levels of difference between light and dark shades. 2. The higher the level, the higher the boost. 5. Note: Adjusts the balance between light and dark areas. 3. For the best protection, select a lower value. 4. The default is off . Adjusting the Picture 1. Contrast: adjust...
User Manual
Page 31
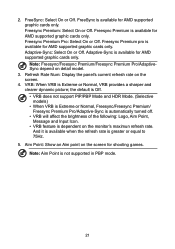
... the refresh rate is Extreme or Normal, VRB provides a sharper and clearer dynamic picture; Note: Freesync/Freesync Premium/Freesync Premium Pro/AdaptiveSync depend on the screen. 4. the default is Off. • VRB does not support PIP/PBP Mode and HDR Mode. (Selective models) • When VRB is Extreme or Normal, Freesync/Freesync Premium/ Freesync Premium Pro/Adaptive-Sync is automatically turned off...
... the refresh rate is Extreme or Normal, VRB provides a sharper and clearer dynamic picture; Note: Freesync/Freesync Premium/Freesync Premium Pro/AdaptiveSync depend on the screen. 4. the default is Off. • VRB does not support PIP/PBP Mode and HDR Mode. (Selective models) • When VRB is Extreme or Normal, Freesync/Freesync Premium/ Freesync Premium Pro/Adaptive-Sync is automatically turned off...
User Manual
Page 33
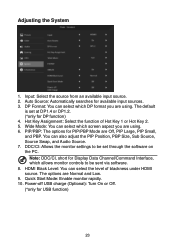
... software. 8. HDMI Black Level: You can also adjust the PIP Position, PBP Size, Sub Source, Source Swap, and Audio Source. 7. The options are Off, PIP Large, PIP Small, and PBP. Quick Start Mode: Enable monitor rapidly. 10. The default is set through the software on the PC. DDC/CI: Allows the monitor settings to be set at DP1.4 or DP1.2. (*only for Display Data Channel/Command Interface, which screen aspect you are using...
... software. 8. HDMI Black Level: You can also adjust the PIP Position, PBP Size, Sub Source, Source Swap, and Audio Source. 7. The options are Off, PIP Large, PIP Small, and PBP. Quick Start Mode: Enable monitor rapidly. 10. The default is set through the software on the PC. DDC/CI: Allows the monitor settings to be set at DP1.4 or DP1.2. (*only for Display Data Channel/Command Interface, which screen aspect you are using...
User Manual
Page 35
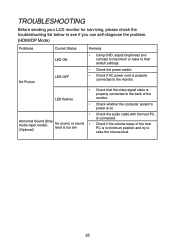
... you can self-diagnose the problem. (HDMI/DP Mode) Problems No Picture Current Status LED ON LED OFF Remedy • Using OSD, adjust brightness and contrast to maximum or reset to their default settings. • Check the power switch. • Check if AC power cord is properly connected to the monitor. • LED flashes • • Abnormal Sound (Only Audio-Input model) (Optional) No sound, or sound level is too low • Check that the video signal cable is connected. Check the audio cable with the host PC is...
... you can self-diagnose the problem. (HDMI/DP Mode) Problems No Picture Current Status LED ON LED OFF Remedy • Using OSD, adjust brightness and contrast to maximum or reset to their default settings. • Check the power switch. • Check if AC power cord is properly connected to the monitor. • LED flashes • • Abnormal Sound (Only Audio-Input model) (Optional) No sound, or sound level is too low • Check that the video signal cable is connected. Check the audio cable with the host PC is...
User Manual
Page 36
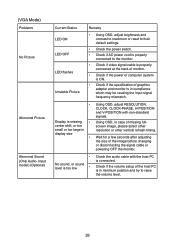
... LED OFF LED flashes Unstable Picture Remedy • Using OSD, adjust brightness and contrast to maximum or reset to their default settings. • Check the power switch. • Check if AC power cord is properly connected to raise the volume level. 26 Using OSD, in case of graphics adapter and monitor is in compliance which may be causing the input signal frequency mismatch. • Display is missing, • center shift, or too small or too large in minimum position...
... LED OFF LED flashes Unstable Picture Remedy • Using OSD, adjust brightness and contrast to maximum or reset to their default settings. • Check the power switch. • Check if AC power cord is properly connected to raise the volume level. 26 Using OSD, in case of graphics adapter and monitor is in compliance which may be causing the input signal frequency mismatch. • Display is missing, • center shift, or too small or too large in minimum position...

