
User Guide
Page 1
...Image 13 Adjusting the Projector Image Height 13 Adjusting the Projector Zoom / Focus 14 Adjusting Projected Image Size 14 User Controls...15 Control Panel & Remote Control 15 On-Screen Display Menus 17 How to operate ...17 Language ...18 Color (Computer/Video Mode 19 Image (...Computer Mode 21 Image (Video Mode 22 Audio (Computer/Video Mode 23 Management (Computer/Video...
...Image 13 Adjusting the Projector Image Height 13 Adjusting the Projector Zoom / Focus 14 Adjusting Projected Image Size 14 User Controls...15 Control Panel & Remote Control 15 On-Screen Display Menus 17 How to operate ...17 Language ...18 Color (Computer/Video Mode 19 Image (...Computer Mode 21 Image (Video Mode 22 Audio (Computer/Video Mode 23 Management (Computer/Video...

User Guide
Page 5
Check to Component / HDTV Composite Video Cable USB Cable VGA Cable S-Video Cable Audio Cable Remote Control 2 x Battery User's Guide Carrying Case Quick Start Card 5 ... English Contact your unit is missing. Projector with all the items shown below. Introduction Package Overview This projector comes with lens cap Power Cord VGA to make sure your dealer immediately if anything is complete.
Check to Component / HDTV Composite Video Cable USB Cable VGA Cable S-Video Cable Audio Cable Remote Control 2 x Battery User's Guide Carrying Case Quick Start Card 5 ... English Contact your unit is missing. Projector with all the items shown below. Introduction Package Overview This projector comes with lens cap Power Cord VGA to make sure your dealer immediately if anything is complete.
User Guide
Page 10
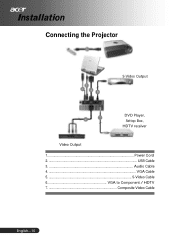
Installation Connecting the Projector USB RGB S-Video Output DVD Player, Settop Box, HDTV receiver Video Output 1 Power Cord 2...USB Cable 3 Audio Cable 4...VGA Cable 5 S-Video Cable 6 VGA to Component / HDTV 7 Composite Video Cable English...10
Installation Connecting the Projector USB RGB S-Video Output DVD Player, Settop Box, HDTV receiver Video Output 1 Power Cord 2...USB Cable 3 Audio Cable 4...VGA Cable 5 S-Video Cable 6 VGA to Component / HDTV 7 Composite Video Cable English...10

User Guide
Page 11
...connected. If you connect multiple sources at the same time, using the "Source" button on the projector first and then the signal sources. Installation Powering On/Off the Projector Powering On the Projector 1. The Power LED will turn steady blue. 4. English Ensure that the power cord and signal...cable are securely connected. NOTE Turn on the remote control or control panel to switch. Remove the lens cap. 2. The projector will detect your source (computer, notebook, video player ,etc.). Power 11 ... Turn on the control panel. 1 And the Power LED will flash blue. 3.
...connected. If you connect multiple sources at the same time, using the "Source" button on the projector first and then the signal sources. Installation Powering On/Off the Projector Powering On the Projector 1. The Power LED will turn steady blue. 4. English Ensure that the power cord and signal...cable are securely connected. NOTE Turn on the remote control or control panel to switch. Remove the lens cap. 2. The projector will detect your source (computer, notebook, video player ,etc.). Power 11 ... Turn on the control panel. 1 And the Power LED will flash blue. 3.

User Guide
Page 15
Four Directional Select Keys Use to select items or make adjustments to control the functions: Remote Control and Control Panel. To exit OSD, press "Menu" again. User Controls Control Panel & Remote Control There are two ways for you to your selection. 15 ... Control Panel Remote Control Using the Control Panel Refer to the "Power On/Off the Projector" section on screen display (OSD) menu. Source Press "Source" to launch the on pages 11-12. Menu Press "Menu" to choose RGB, Component-p, Component-i, S-Video, Composite Video and HDTV sources. English
Four Directional Select Keys Use to select items or make adjustments to control the functions: Remote Control and Control Panel. To exit OSD, press "Menu" again. User Controls Control Panel & Remote Control There are two ways for you to your selection. 15 ... Control Panel Remote Control Using the Control Panel Refer to the "Power On/Off the Projector" section on screen display (OSD) menu. Source Press "Source" to launch the on pages 11-12. Menu Press "Menu" to choose RGB, Component-p, Component-i, S-Video, Composite Video and HDTV sources. English

User Guide
Page 16
... image distortion caused by tilting the projector ( 15 degrees). This function is only available when the projector is connected to a computer via an USB cable. Re-Sync Automatically synchronizes the projector to pause the screen image. Mute Momentarily turns off the video. Press "Hide" to hide image... Press "Freeze" to the input source. User Controls English...16 Using the Remote Control Power Refer to the "Power On/Off the Projector" section on screen display menu. Empowering Key Display the "Display Mode" submenu of the image. Menu Press "Menu" to launch the...
... image distortion caused by tilting the projector ( 15 degrees). This function is only available when the projector is connected to a computer via an USB cable. Re-Sync Automatically synchronizes the projector to pause the screen image. Mute Momentarily turns off the video. Press "Hide" to hide image... Press "Freeze" to the input source. User Controls English...16 Using the Remote Control Power Refer to the "Power On/Off the Projector" section on screen display menu. Empowering Key Display the "Display Mode" submenu of the image. Menu Press "Menu" to launch the...

User Guide
Page 24
...translucent screen with ceiling mounted projection. Front-Ceiling When you select this function, the projector reverses and turns the image upside down for ceiling-mounted projection. User Controls Management (Computer / Video Mode) Menu Location Choose the Menu location on the display screen. Rear-Desktop ...When you select this function, the projector turns the image upside down at same time. English...24 Rear-Ceiling...
...translucent screen with ceiling mounted projection. Front-Ceiling When you select this function, the projector reverses and turns the image upside down for ceiling-mounted projection. User Controls Management (Computer / Video Mode) Menu Location Choose the Menu location on the display screen. Rear-Desktop ...When you select this function, the projector turns the image upside down at same time. English...24 Rear-Ceiling...
User Guide
Page 25
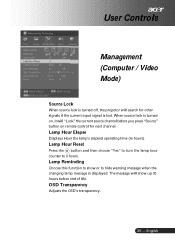
... other signals if the current input signal is lost. OSD Transparency Adjusts the OSD's transparency. 25 ... User Controls Management (Computer / Video Mode) Source Lock When source lock is turned off, the projector will search for next channel. Lamp Hour Elapse Displays Hour the lamp's elapsed operating time (in hours). Lamp Reminding Choose...
... other signals if the current input signal is lost. OSD Transparency Adjusts the OSD's transparency. 25 ... User Controls Management (Computer / Video Mode) Source Lock When source lock is turned off, the projector will search for next channel. Lamp Hour Elapse Displays Hour the lamp's elapsed operating time (in hours). Lamp Reminding Choose...
User Guide
Page 26
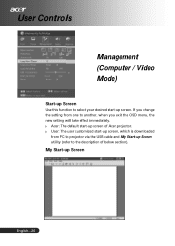
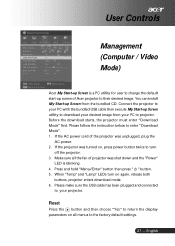
User: The user customized start-up screen, which is downloaded from one to the description of Acer projector. My Start-up screen. If you change the setting from PC to projector via the USB cable and My Start-up screen of below section). User Controls Management (Computer / Video Mode) Start-up Screen Use this function to select your desired start-up Screen English...26 Acer: The default start-up Screen utility (refer to another, when you exit the OSD menu, the new setting will take effect immediately.
User: The user customized start-up screen, which is downloaded from one to the description of Acer projector. My Start-up screen. If you change the setting from PC to projector via the USB cable and My Start-up screen of below section). User Controls Management (Computer / Video Mode) Start-up Screen Use this function to select your desired start-up Screen English...26 Acer: The default start-up Screen utility (refer to another, when you exit the OSD menu, the new setting will take effect immediately.
User Guide
Page 27
...a PC utility for user to return the display parameters on again, release both buttons, projector enters download mode. 6. When "Temp" and "Lamp" LEDs turn off the projector. 3. Connect the projector to the factory default settings. 27 ... Make sure all menus to your PC with ...up Screen from your projector. Before the download starts, the projector must enter "Download Mode" first. If the AC power cord of Acer projector to enter "Download Mode". 1. Press and hold "Menu/Enter" button then press " " button. 5. User Controls Management (Computer / Video Mode) Acer My Start-up Screen...
...a PC utility for user to return the display parameters on again, release both buttons, projector enters download mode. 6. When "Temp" and "Lamp" LEDs turn off the projector. 3. Connect the projector to the factory default settings. 27 ... Make sure all menus to your PC with ...up Screen from your projector. Before the download starts, the projector must enter "Download Mode" first. If the AC power cord of Acer projector to enter "Download Mode". 1. Press and hold "Menu/Enter" button then press " " button. 5. User Controls Management (Computer / Video Mode) Acer My Start-up Screen...

User Guide
Page 29
...: In Control Panels, open the PowerBook Display to 12.0 meters) from your computer's documentation for information on "Show all the equipment and the projector. If you are using a Notebook PC: Some Notebook PCs may deactivate their screens when a second display device is unstable or flickering. Change the... Follow the above steps of resolution setting of the monitor display is between the required distance 3.94 to 39.4 feet (1.2 to select Video Mirroring "On". Click on the projector lens. Refer to reactivate the monitor display. You are using a Notebook PC: 1.
...: In Control Panels, open the PowerBook Display to 12.0 meters) from your computer's documentation for information on "Show all the equipment and the projector. If you are using a Notebook PC: Some Notebook PCs may deactivate their screens when a second display device is unstable or flickering. Change the... Follow the above steps of resolution setting of the monitor display is between the required distance 3.94 to 39.4 feet (1.2 to select Video Mirroring "On". Click on the projector lens. Refer to reactivate the monitor display. You are using a Notebook PC: 1.


