

User Manual
Page 5
... opening or removing covers may expose you to dangerous voltage points or other controls may result in damage and will often require extensive work by the operating instructions, since improper adjustment of a car with an ambient temperature above 40 ºC/104 ºF. Additional safety information • Do not look into the projector's lens when the light source is on the projector first and then signal sources...
... opening or removing covers may expose you to dangerous voltage points or other controls may result in damage and will often require extensive work by the operating instructions, since improper adjustment of a car with an ambient temperature above 40 ºC/104 ºF. Additional safety information • Do not look into the projector's lens when the light source is on the projector first and then signal sources...

User Manual
Page 6
... the projector on the remote control. • Do not attempt to disassemble this could cause the object to become hot. • Clean the air filter frequently. In this case, unplug immediately and contact your dealer. • Do not keep using this case contact your eyes. • Always open the lens shutter or remove the lens cap when the projector is to wait for ceiling mount installation...
... the projector on the remote control. • Do not attempt to disassemble this could cause the object to become hot. • Clean the air filter frequently. In this case, unplug immediately and contact your dealer. • Do not keep using this case contact your eyes. • Always open the lens shutter or remove the lens cap when the projector is to wait for ceiling mount installation...

User Manual
Page 7
Above laser cautions are located on the Waste from the projector. • Notice is given to use of the global environment, please recycle. For more information on the bottom of this electronic device into the projector beam at high volumes for starting the projector while in front of the projection lens. • Notice is given to the user to CLASS I laser...
Above laser cautions are located on the Waste from the projector. • Notice is given to use of the global environment, please recycle. For more information on the bottom of this electronic device into the projector beam at high volumes for starting the projector while in front of the projection lens. • Notice is given to the user to CLASS I laser...

User Manual
Page 9
... Outlook 3 Control Panel 4 Remote Control Layout 5 Getting Started 7 Connecting the Projector 7 Connecting Multiple Sources through HDBaseT Module (Optional) 8 Turning the Projector On/Off 10 Turning On the Projector 10 Turning Off the Projector 11 Adjusting the Projected Image 12 Adjusting the Height of the Projected Image 12 How to Get a Preferred Image Size by Adjusting Distance and Zoom 13 How to Get a Preferred Image Position by Adjusting Lens Shift 15 User Controls 16 Installation Menu 16 Onscreen Display (OSD) Menus 17 Color 18 Image 21 Setting 24...
... Outlook 3 Control Panel 4 Remote Control Layout 5 Getting Started 7 Connecting the Projector 7 Connecting Multiple Sources through HDBaseT Module (Optional) 8 Turning the Projector On/Off 10 Turning On the Projector 10 Turning Off the Projector 11 Adjusting the Projected Image 12 Adjusting the Height of the Projected Image 12 How to Get a Preferred Image Size by Adjusting Distance and Zoom 13 How to Get a Preferred Image Position by Adjusting Lens Shift 15 User Controls 16 Installation Menu 16 Onscreen Display (OSD) Menus 17 Color 18 Image 21 Setting 24...

User Manual
Page 11
... is a single-chip DLP® projector, including the following outstanding features: • DLP® technology • Enables projecting 3D content via DLP Link Technology: Blu-Ray 3D supported • One-touch "3D" button on remote control allows quick and easy access to the 3D functions • Acer ColorBoost technology delivers vivid, life-like images • High brightness and contrast ratio • Versatile display modes enable optimum...
... is a single-chip DLP® projector, including the following outstanding features: • DLP® technology • Enables projecting 3D content via DLP Link Technology: Blu-Ray 3D supported • One-touch "3D" button on remote control allows quick and easy access to the 3D functions • Acer ColorBoost technology delivers vivid, life-like images • High brightness and contrast ratio • Versatile display modes enable optimum...

User Manual
Page 13
... 2 Remote control receiver 3 Zoom ring and Focus ring 4 Tilt adjusting wheel 5 Projection lens 6 7 8 9 # Description 6 Vents 7 Security slot 8 Indicator LED 9 Control panel Rear side 1 2 3 4 5 6 7 8 9 10 1112 13 14 16 15 15 Note: Connector interface is subject to model's specifications. # Description # Description 1 HDMI connectors 2 DC 5V output (service) 9 Monitor loop-through output connector 3 HDBaseT connector 10 RS232 connector 4 Wired remote control connector 11 LAN (RJ45 port for 10/100M Ethernet) 5 Composite video input connector...
... 2 Remote control receiver 3 Zoom ring and Focus ring 4 Tilt adjusting wheel 5 Projection lens 6 7 8 9 # Description 6 Vents 7 Security slot 8 Indicator LED 9 Control panel Rear side 1 2 3 4 5 6 7 8 9 10 1112 13 14 16 15 15 Note: Connector interface is subject to model's specifications. # Description # Description 1 HDMI connectors 2 DC 5V output (service) 9 Monitor loop-through output connector 3 HDBaseT connector 10 RS232 connector 4 Wired remote control connector 11 LAN (RJ45 port for 10/100M Ethernet) 5 Composite video input connector...

User Manual
Page 14
Temperature indicator LED. Changes the active source. Launches the Onscreen Display (OSD) menu, returns to the "Turning the Projector On/Off" section. Selects items or makes adjustments to your selection, or goes back to previous page. Refer to the previous step for the OSD menu operation or exits the OSD menu. 4 Bottom side 304 Unit: mm English 151 151 304 Control Panel 1 2 7 3 4 8 5 # Function 1 POWER 2 LAMP 3 Keystone 4 Power key 5 ENTER 6 BACK...
Temperature indicator LED. Changes the active source. Launches the Onscreen Display (OSD) menu, returns to the "Turning the Projector On/Off" section. Selects items or makes adjustments to your selection, or goes back to previous page. Refer to the previous step for the OSD menu operation or exits the OSD menu. 4 Bottom side 304 Unit: mm English 151 151 304 Control Panel 1 2 7 3 4 8 5 # Function 1 POWER 2 LAMP 3 Keystone 4 Power key 5 ENTER 6 BACK...

User Manual
Page 16
... video. 20 LAN/WiFi To change source to LAN/WiFi. (for adjusting 3D settings. 13 SOURCE Changes the active source. 14 MODE Chooses a display mode. 15 MENU Launches the Onscreen Display (OSD) menu or exits the OSD menu. 16 HIDE Press "HIDE" to hide screen image; This function is only available when connected to a computer via a mini USB cable. 9 COMPONENT (No function) 10 MEDIA Opens MEDIA SETUP page. (for LAN/wireless compatible models) 11 Infrared transmitter Sends signals...
... video. 20 LAN/WiFi To change source to LAN/WiFi. (for adjusting 3D settings. 13 SOURCE Changes the active source. 14 MODE Chooses a display mode. 15 MENU Launches the Onscreen Display (OSD) menu or exits the OSD menu. 16 HIDE Press "HIDE" to hide screen image; This function is only available when connected to a computer via a mini USB cable. 9 COMPONENT (No function) 10 MEDIA Opens MEDIA SETUP page. (for LAN/wireless compatible models) 11 Infrared transmitter Sends signals...

User Manual
Page 21
... the Projector 1 To turn solid red to indicate standby mode. 3 It is now safe to unplug the power cord. This message appears: "Please press power button again to complete the shutdown process" Press the power button again. 2 The LED Power indicator will automatically turn off , the projector will automatically shut down, and the LED Temp indicator will automatically turn solid red. Warning indicators: • "Projector Overheated. Note: Whenever the projector automatically shuts down , and the LED Temp indicator will turn off soon." The lamp will blink.
... the Projector 1 To turn solid red to indicate standby mode. 3 It is now safe to unplug the power cord. This message appears: "Please press power button again to complete the shutdown process" Press the power button again. 2 The LED Power indicator will automatically turn off , the projector will automatically shut down, and the LED Temp indicator will automatically turn solid red. Warning indicators: • "Projector Overheated. Note: Whenever the projector automatically shuts down , and the LED Temp indicator will turn off soon." The lamp will blink.

User Manual
Page 26
Use the OSD only when the message "No signal" is for projector installation and maintenance. Note: The OSD screenshot is displayed on the screen or when the projector searches for input signal. 1 Turn on the projector by pressing remote control. (POWER) on the control panel or 2 Press "MENU" on the control panel or remote control to launch the OSD for projector installation and maintenance. 3 The background pattern acts as screen size and distance, focus and more. English 16 User Controls Installation Menu The...
Use the OSD only when the message "No signal" is for projector installation and maintenance. Note: The OSD screenshot is displayed on the screen or when the projector searches for input signal. 1 Turn on the projector by pressing remote control. (POWER) on the control panel or 2 Press "MENU" on the control panel or remote control to launch the OSD for projector installation and maintenance. 3 The background pattern acts as screen size and distance, focus and more. English 16 User Controls Installation Menu The...

User Manual
Page 29
... image. Adjusts a video image from black and white to fully saturated colors. • Press to decrease the amount of color in the image. • Press to increase the contrast. Effects the representation of the picture. With greater gamma value, dark scenery will look brighter. Controls the degree of difference between the lightest and darkest parts of dark scenery. At higher color temperatures, the screen...
... image. Adjusts a video image from black and white to fully saturated colors. • Press to decrease the amount of color in the image. • Press to increase the contrast. Effects the representation of the picture. With greater gamma value, dark scenery will look brighter. Controls the degree of difference between the lightest and darkest parts of dark scenery. At higher color temperatures, the screen...

User Manual
Page 31
...; Full (for WXGA/1080p models): The image will be displayed making full use of image. • Desktop • Ceiling: Turns the image upside down for WXGA/1080p models): Keeps the original signal aspect ratio and zooms in by 1.333 times. Keystone Manually adjusts image distortion caused by tilting projection (±30 degrees). Keystone Manually adjusts image distortion caused by tilting projection (±30 degrees). H/V Keystone H. English 21 Image Projection Mode Projection Location Aspect Ratio • Front: The factory default setting. • Rear: Reverses...
...; Full (for WXGA/1080p models): The image will be displayed making full use of image. • Desktop • Ceiling: Turns the image upside down for WXGA/1080p models): Keeps the original signal aspect ratio and zooms in by 1.333 times. Keystone Manually adjusts image distortion caused by tilting projection (±30 degrees). Keystone Manually adjusts image distortion caused by tilting projection (±30 degrees). H/V Keystone H. English 21 Image Projection Mode Projection Location Aspect Ratio • Front: The factory default setting. • Rear: Reverses...

User Manual
Page 34
... transfer the picture. • Source Selection Manual: When switching input signals, you need to select your area). VGA OUT (Standby) Selecting "On" enables the function. USB 5V (Standby) Enabling this function to press "SOURCE" on the control panel or remote control, or the direct source key on the remote control. • Auto: The projector will be related with power on or in your desired startup screen. See "Acer Splash Downloader" for the HDMI/MHL port. Auto Screen Default is...
... transfer the picture. • Source Selection Manual: When switching input signals, you need to select your area). VGA OUT (Standby) Selecting "On" enables the function. USB 5V (Standby) Enabling this function to press "SOURCE" on the control panel or remote control, or the direct source key on the remote control. • Auto: The projector will be related with power on or in your desired startup screen. See "Acer Splash Downloader" for the HDMI/MHL port. Auto Screen Default is...

User Manual
Page 36
... to input the password every time the projector is "1234". If set to "ON", the startup screen is set to "OFF" by default. English 26 Security User Password • Press to set up or change "Administrator Password". • The factory default of "Administrator Password" is turned on. Lock User Startup Screen This function is locked and cannot be accepted by the "Startup Screen" and "Screen Capture" functions. If you fail to change "User Password". • Use the...
... to input the password every time the projector is "1234". If set to "ON", the startup screen is set to "OFF" by default. English 26 Security User Password • Press to set up or change "Administrator Password". • The factory default of "Administrator Password" is turned on. Lock User Startup Screen This function is locked and cannot be accepted by the "Startup Screen" and "Screen Capture" functions. If you fail to change "User Password". • Use the...

User Manual
Page 39
... exit the OSD menu is no signal input detected after the time you to the normal mode. 29 Management English ECO Mode Light Source Power High Altitude Auto Shutdown (Minutes) Menu Display Time (Seconds) Auto Power On Choose "ECO" to dim the projector lamp, which will automatically shut down the projector's temperature. VGA Power On Selecting "On" enables the function. You can adjust the light source power to extend the light source life and decreases the fan noise. The projector will also...
... exit the OSD menu is no signal input detected after the time you to the normal mode. 29 Management English ECO Mode Light Source Power High Altitude Auto Shutdown (Minutes) Menu Display Time (Seconds) Auto Power On Choose "ECO" to dim the projector lamp, which will automatically shut down the projector's temperature. VGA Power On Selecting "On" enables the function. You can adjust the light source power to extend the light source life and decreases the fan noise. The projector will also...

User Manual
Page 40
... projector is in standby mode to adjust the notification volume when turning the projector on/off . Displays current status of any warning notifications. Audio Volume Mute Power On/Off Volume Alarm Volume • Press to decrease the volume. • Press to increase the volume. • Choose "On" to turn mute on. • Choose "Off" to turn the projector on and the Control Panel Lock will be set to operate...
... projector is in standby mode to adjust the notification volume when turning the projector on/off . Displays current status of any warning notifications. Audio Volume Mute Power On/Off Volume Alarm Volume • Press to decrease the volume. • Press to increase the volume. • Choose "On" to turn mute on. • Choose "Off" to turn the projector on and the Control Panel Lock will be set to operate...
User Manual
Page 45
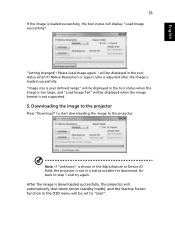
... OSD menu will be set to "User". After the image is downloaded successfully, the projector will display "Load Image successfully". Downloading the image to the projector Press "Download" to start downloading the image to step 1 and try again. Please load image again." English 35 If the image is loaded successfully, the tool status will automatically shut down (enter standby mode), and the Startup Screen function in a status suitable for download. Go back to the projector.
... OSD menu will be set to "User". After the image is downloaded successfully, the projector will display "Load Image successfully". Downloading the image to the projector Press "Download" to start downloading the image to step 1 and try again. Please load image again." English 35 If the image is loaded successfully, the tool status will automatically shut down (enter standby mode), and the Startup Screen function in a status suitable for download. Go back to the projector.

User Manual
Page 48
... the Projector # Condition Solution 1 The projector stops responding • If possible, turn on the OSD and adjust the projection direction. If this happens, the projector will burn out and may make adjustments. 11 Image is reversed • Select "Image" > "Projection Mode", "Image" > "Projection Location" on until the image becomes square. • Press "MENU" on the control panel or remote control to open the OSD menu. To replace the lamp, contact your local dealer or Acer service...
... the Projector # Condition Solution 1 The projector stops responding • If possible, turn on the OSD and adjust the projection direction. If this happens, the projector will burn out and may make adjustments. 11 Image is reversed • Select "Image" > "Projection Mode", "Image" > "Projection Location" on until the image becomes square. • Press "MENU" on the control panel or remote control to open the OSD menu. To replace the lamp, contact your local dealer or Acer service...
User Manual
Page 50
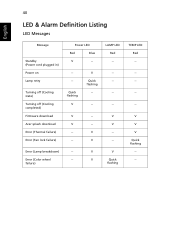
V LAMP LED Red -- --- -- -- V V V Quick flashing --- V V --- failure) V V V Quick flashing TEMP LED Red -- --- -- -- V -- Error (Color wheel -- 40 LED & Alarm Definition Listing LED Messages English Message Standby (Power cord plugged in) Power on Lamp retry Turning off (Cooling state) Turning off (Cooling completed) Firmware download Acer splash download Error (Thermal failure) Error (Fan lock failure) Power LED Red Blue V -- --- V -- V -- -- Error (Lamp breakdown) -- Quick flashing V V Quick flashing -- --
V LAMP LED Red -- --- -- -- V V V Quick flashing --- V V --- failure) V V V Quick flashing TEMP LED Red -- --- -- -- V -- Error (Color wheel -- 40 LED & Alarm Definition Listing LED Messages English Message Standby (Power cord plugged in) Power on Lamp retry Turning off (Cooling state) Turning off (Cooling completed) Firmware download Acer splash download Error (Thermal failure) Error (Fan lock failure) Power LED Red Blue V -- --- V -- V -- -- Error (Lamp breakdown) -- Quick flashing V V Quick flashing -- --

User Manual
Page 52
42 English Specifications The specifications below are subject to Acer's marketing documentation. For final specs, please refer to change without notice. Projection system Computer compatibility Video compatibility Displayable colors Digital zoom Weight Dimensions (W x D x H) Power supply Operating temperature Standard package contents Accessory (optional) DLP™ Refer to 104ºF • AC power cord x 1 • Remote control x 1 • Battery x 2 (for more information. NTSC/NTSC4.43/PAL (M/N)/ SECAM/ PAL60/ NTSC (480i)/ 480p/ PAL (576i...
42 English Specifications The specifications below are subject to Acer's marketing documentation. For final specs, please refer to change without notice. Projection system Computer compatibility Video compatibility Displayable colors Digital zoom Weight Dimensions (W x D x H) Power supply Operating temperature Standard package contents Accessory (optional) DLP™ Refer to 104ºF • AC power cord x 1 • Remote control x 1 • Battery x 2 (for more information. NTSC/NTSC4.43/PAL (M/N)/ SECAM/ PAL60/ NTSC (480i)/ 480p/ PAL (576i...


