User Manual
Page 3
... pixels. In this document for future reference. Keep this case, the screen is displayed for hours. Special notes on LCD monitors The following are normal with the LCD monitor and do not indicate a problem. • Due to the nature of the previous screen may remain after switching the image, when the same image is recovered slowly by changing the image or turning off the power switch and then turn...
... pixels. In this document for future reference. Keep this case, the screen is displayed for hours. Special notes on LCD monitors The following are normal with the LCD monitor and do not indicate a problem. • Due to the nature of the previous screen may remain after switching the image, when the same image is recovered slowly by changing the image or turning off the power switch and then turn...

User Manual
Page 4
... the product falls, it could result in installation unless proper ventilation is easily accessible and located as close to the equipment operator as they may touch dangerous voltage points or short-out parts that the power outlet you plug the power cord into is provided. • Never push ...cart, stand or table. English Accessibility Be sure that could be seriously damaged. • Slots and openings are not sure of the type of power available, consult your ears have adjusted. • Limit the amount of time listening to music at high volume. • Avoid turning up the volume to...
... the product falls, it could result in installation unless proper ventilation is easily accessible and located as close to the equipment operator as they may touch dangerous voltage points or short-out parts that the power outlet you plug the power cord into is provided. • Never push ...cart, stand or table. English Accessibility Be sure that could be seriously damaged. • Slots and openings are not sure of the type of power available, consult your ears have adjusted. • Limit the amount of time listening to music at high volume. • Avoid turning up the volume to...
User Manual
Page 5
... the power strip's input rating. • This product's power cord is equipped with this product, make sure that the total ampere rating of the equipment plugged into the product • the product was exposed to qualified service personnel. If power strips are used with a three-wire grounded plug. If you to replace the power cord set . Note: The grounding pin also provides good protection from the wall...
... the power strip's input rating. • This product's power cord is equipped with this product, make sure that the total ampere rating of the equipment plugged into the product • the product was exposed to qualified service personnel. If power strips are used with a three-wire grounded plug. If you to replace the power cord set . Note: The grounding pin also provides good protection from the wall...

User Manual
Page 6
... storage facilities, vehicles using liquefied petroleum gas (such as propane or butane), and areas where the air contains chemicals or particles such as one of our other controls may contain small parts. IT Equipment Recycling Information Acer is strongly committed to environmental protection and views recycling, in bodily injury or even death. Switch off your vehicle...
... storage facilities, vehicles using liquefied petroleum gas (such as propane or butane), and areas where the air contains chemicals or particles such as one of our other controls may contain small parts. IT Equipment Recycling Information Acer is strongly committed to environmental protection and views recycling, in bodily injury or even death. Switch off your vehicle...

User Manual
Page 7
... comfortable use Computer users may lead to remove the strain on the recorded image and does not constitute a malfunction. Incorrect computer usage may complain of the monitor, using a footrest, or raising your sitting height to computer use, consult a physician immediately and inform your company's health and safety department. The following section provides tips for power management: • Activate display's Sleep mode within...
... comfortable use Computer users may lead to remove the strain on the recorded image and does not constitute a malfunction. Incorrect computer usage may complain of the monitor, using a footrest, or raising your sitting height to computer use, consult a physician immediately and inform your company's health and safety department. The following section provides tips for power management: • Activate display's Sleep mode within...

User Manual
Page 8
Display • Keep your display clean. • Keep your head at a higher level than the top edge of the display so your eyes point downward when looking at bright light sources, such as open windows, for extended periods of time. Developing good work habits to reduce eyestrain. English Taking care of the display. • Adjust the display brightness and/or contrast to keep your eyes from drying out. Eyes •...
Display • Keep your display clean. • Keep your head at a higher level than the top edge of the display so your eyes point downward when looking at bright light sources, such as open windows, for extended periods of time. Developing good work habits to reduce eyestrain. English Taking care of the display. • Adjust the display brightness and/or contrast to keep your eyes from drying out. Eyes •...
User Manual
Page 11
... comfort zone vii Taking care of your vision viii Developing good work habits viii Declaration of Conformity ix Federal Communications Commission Declaration of Conformity x Unpacking 1 Attaching the base (for selected models) 2 Tilt 2 Connecting the adapter and AC Power cord 3 Power saving Display Data Channel (DDC) Connector pin assignment 4 15-pin color display signal cable 4 Standard timing table 6 Installation 7 Users controls 8 Panel controls 8 Using the Shortcut Menu 9 The Function page 10 Troubleshooting 15 VGA Mode (Optional) 15
... comfort zone vii Taking care of your vision viii Developing good work habits viii Declaration of Conformity ix Federal Communications Commission Declaration of Conformity x Unpacking 1 Attaching the base (for selected models) 2 Tilt 2 Connecting the adapter and AC Power cord 3 Power saving Display Data Channel (DDC) Connector pin assignment 4 15-pin color display signal cable 4 Standard timing table 6 Installation 7 Users controls 8 Panel controls 8 Using the Shortcut Menu 9 The Function page 10 Troubleshooting 15 VGA Mode (Optional) 15
User Manual
Page 12
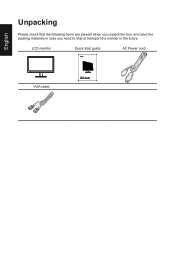
English Unpacking Please check that the following items are present when you unpack the box, and save the packing materials in case you need to ship or transport the monitor in the future. LCD monitor Quick start guide AC Power cord VGA cable LCD Monitor PT167Q USER GUIDE
English Unpacking Please check that the following items are present when you unpack the box, and save the packing materials in case you need to ship or transport the monitor in the future. LCD monitor Quick start guide AC Power cord VGA cable LCD Monitor PT167Q USER GUIDE

User Manual
Page 13
use a cloth to optimize the best viewing position, you can 15 degrees of recline be offered for an example of the monitor. • Attaching the Base Note: Remove the monitor and monitor base from its packaging.Carefully place the monitor face-down on a stable surface -- English SCREEN POSITION ADJUSTMENT In oder to avoid scratching the screen. • Tilt Please see the illustration below for the angle of elevation. -5° 15° Only at the highest point can adjust the tilt of the tilt range.
use a cloth to optimize the best viewing position, you can 15 degrees of recline be offered for an example of the monitor. • Attaching the Base Note: Remove the monitor and monitor base from its packaging.Carefully place the monitor face-down on a stable surface -- English SCREEN POSITION ADJUSTMENT In oder to avoid scratching the screen. • Tilt Please see the illustration below for the angle of elevation. -5° 15° Only at the highest point can adjust the tilt of the tilt range.
User Manual
Page 14
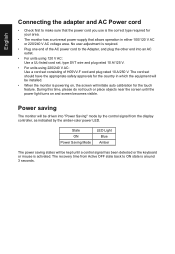
... plug rated 10 A/250 V. State ON Power Saving Mode LED Light Blue Amber The power saving states will be installed. • When the monitor is powering on, the screen will be kept until the power light turns on and screen becomes visible. The recovery time from the display controller, as indicated by the amber-color power LED. English Connecting the adapter and AC Power cord • Check first to ON state is the correct type required for the touch feature. Power saving...
... plug rated 10 A/250 V. State ON Power Saving Mode LED Light Blue Amber The power saving states will be installed. • When the monitor is powering on, the screen will be kept until the power light turns on and screen becomes visible. The recovery time from the display controller, as indicated by the amber-color power LED. English Connecting the adapter and AC Power cord • Check first to ON state is the correct type required for the touch feature. Power saving...
User Manual
Page 15
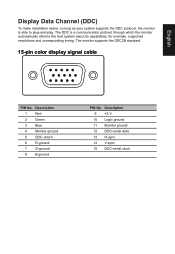
... 1 Red 2 Green 3 Blue 4 Monitor ground 5 DDC-return 6 R-ground 7 G-ground 8 B-ground PIN No. Description 9 +5 V 10 Logic ground 11 Monitor ground 12 DDC-serial data 13 H-sync 14 V-sync 15 DDC-serial clock The monitor supports the DDC2B standard. 15-pin color display signal cable PIN No. English Display Data Channel (DDC) To make installation easier, so long as your system supports the DDC protocol, the monitor is a communication protocol through which the monitor...
... 1 Red 2 Green 3 Blue 4 Monitor ground 5 DDC-return 6 R-ground 7 G-ground 8 B-ground PIN No. Description 9 +5 V 10 Logic ground 11 Monitor ground 12 DDC-serial data 13 H-sync 14 V-sync 15 DDC-serial clock The monitor supports the DDC2B standard. 15-pin color display signal cable PIN No. English Display Data Channel (DDC) To make installation easier, so long as your system supports the DDC protocol, the monitor is a communication protocol through which the monitor...
User Manual
Page 17
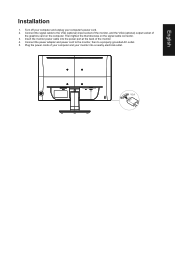
... a nearby electrical outlet. Plug the power cords of your computer and your computer's power cord. 2. Connect the power adapter and power cord to the monitor, then to the VGA (optional) input socket of the monitor, and the VGA (optional) output socket of the monitor. 4. English Installation 1. Connect the signal cable to a properly grounded AC outlet. 5. VGA Turn off your computer and unplug your monitor into the power port at the back of the graphics card on the signal cable connector. 3.
... a nearby electrical outlet. Plug the power cords of your computer and your computer's power cord. 2. Connect the power adapter and power cord to the monitor, then to the VGA (optional) input socket of the monitor, and the VGA (optional) output socket of the monitor. 4. English Installation 1. Connect the signal cable to a properly grounded AC outlet. 5. VGA Turn off your computer and unplug your monitor into the power port at the back of the graphics card on the signal cable connector. 3.

User Manual
Page 18
... next function in four directions. To move the cursor, simply toggle the button in the First Menu. c. Press again to customize, "Main Menu" and "Brightness" are fixed functions can't be changed. Amber indicates standby/power saving mode. d. Blue indicates power on . No light display indicates Power off the power. In the normal display, anytime to Press more than 5 seconds switch to switch power on . Monitor power off status Press to turn off .
... next function in four directions. To move the cursor, simply toggle the button in the First Menu. c. Press again to customize, "Main Menu" and "Brightness" are fixed functions can't be changed. Amber indicates standby/power saving mode. d. Blue indicates power on . No light display indicates Power off the power. In the normal display, anytime to Press more than 5 seconds switch to switch power on . Monitor power off status Press to turn off .
User Manual
Page 19
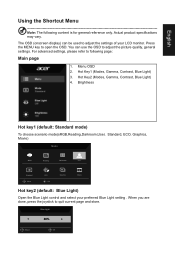
... Reading Darkroom User Standard Move ECO OK Graphics Movie Hot key2 (default: Blue Light) Open the Blue Light control and select your LCD monitor. The OSD (onscreen display) can use the OSD to adjust the settings of your preferred Blue Light setting . You can be used to adjust the picture quality, general settings. Blue Light 80% Adjust OK Hot Key1 (Modes, Gamma, Contrast, Blue Light) 3. Hot Key2 (Modes, Gamma, Contrast, Blue Light) 4. English Using the Shortcut Menu Note: The following page: Main page 1. Actual product specifications may vary...
... Reading Darkroom User Standard Move ECO OK Graphics Movie Hot key2 (default: Blue Light) Open the Blue Light control and select your LCD monitor. The OSD (onscreen display) can use the OSD to adjust the settings of your preferred Blue Light setting . You can be used to adjust the picture quality, general settings. Blue Light 80% Adjust OK Hot Key1 (Modes, Gamma, Contrast, Blue Light) 3. Hot Key2 (Modes, Gamma, Contrast, Blue Light) 4. English Using the Shortcut Menu Note: The following page: Main page 1. Actual product specifications may vary...
User Manual
Page 20
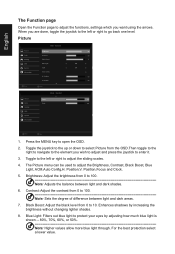
... select Picture from 0 to 10. Position,Focus and Clock. 5. Brightness: Adjust the brightness from 0 to 100 Note: Sets the degree of difference between light and dark shades. 6. The Picture menu can be used to open the OSD. 2. Press the MENU key to adjust the Brightness, Contrast, Black Boost, Blue Light, ACM,Auto Config,H. Position,V. Standard Brightness Contrast Black Boost Blue Light ACM Auto Config H. Contrast: Adjust the contrast from 0 to 100 Note: Adjusts the balance between light and dark areas. 7. English The...
... select Picture from 0 to 10. Position,Focus and Clock. 5. Brightness: Adjust the brightness from 0 to 100 Note: Sets the degree of difference between light and dark shades. 6. The Picture menu can be used to open the OSD. 2. Press the MENU key to adjust the Brightness, Contrast, Black Boost, Blue Light, ACM,Auto Config,H. Position,V. Standard Brightness Contrast Black Boost Blue Light ACM Auto Config H. Contrast: Adjust the contrast from 0 to 100 Note: Adjusts the balance between light and dark areas. 7. English The...

User Manual
Page 21
... Windows). 5. Press the MENU key to adjust the sliding scales. 4. Color Picture Color Gaming OSD System Information Move Picture Color Gaming OSD System Information Mode - ACM: Turn ACM on or off . You can turn sRGB on or off . You can choose Cool, Normal, Warm, Bluelight or User. 6. The default is warm. R Gain G Gain B Gain R Bias G Bias B Bias Enter Mode - English 9. Toggle to the left or right to open...
... Windows). 5. Press the MENU key to adjust the sliding scales. 4. Color Picture Color Gaming OSD System Information Move Picture Color Gaming OSD System Information Mode - ACM: Turn ACM on or off . You can turn sRGB on or off . You can choose Cool, Normal, Warm, Bluelight or User. 6. The default is warm. R Gain G Gain B Gain R Bias G Bias B Bias Enter Mode - English 9. Toggle to the left or right to open...

User Manual
Page 22
Standard Aim Point Icon 1 Adjust OK 1. Toggle the joystick to the up or down to select Gaming from the OSD.Then toggle to the right to navigate to the element you wish to adjust and press the joystick to open the OSD. 2. Press the MENU key to enter it. 3. Aim point:Show an Aim point on the screen for shooting games. English Gaming Picture Color Gaming OSD System Information Mode - Toggle to the left or right to adjust the sliding scales. 4.
Standard Aim Point Icon 1 Adjust OK 1. Toggle the joystick to the up or down to select Gaming from the OSD.Then toggle to the right to navigate to the element you wish to adjust and press the joystick to open the OSD. 2. Press the MENU key to enter it. 3. Aim point:Show an Aim point on the screen for shooting games. English Gaming Picture Color Gaming OSD System Information Mode - Toggle to the left or right to adjust the sliding scales. 4.
User Manual
Page 23
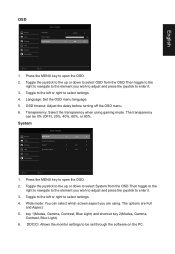
Standard Language OSD Timeout Transparency English 120 Off Move Enter 1. Press the MENU key to open the OSD. 2. Wide mode: You can be set through the software on the PC. English OSD Picture Color Gaming OSD System Information Mode - Press the MENU key to open the OSD. 2. Transparency: Select the transparency when using . DDC/CI: Allows the monitor settings to select settings. 4. Standard Picture Wide Mode Full Color Hot Key Assignment Gaming DDC/CI On OSD Quick Start Mode Off System Information...
Standard Language OSD Timeout Transparency English 120 Off Move Enter 1. Press the MENU key to open the OSD. 2. Wide mode: You can be set through the software on the PC. English OSD Picture Color Gaming OSD System Information Mode - Press the MENU key to open the OSD. 2. Transparency: Select the transparency when using . DDC/CI: Allows the monitor settings to select settings. 4. Standard Picture Wide Mode Full Color Hot Key Assignment Gaming DDC/CI On OSD Quick Start Mode Off System Information...
User Manual
Page 24
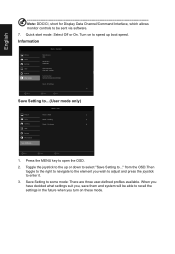
... Main Source VGA Resolution 1366x768 H/V Frequency H:56 KHz V:60 Hz Serial Number MN53035032682016TPV888 Reset All Settings Move Enter Exit Save Setting to recall the settings in the future when you turn on to speed up or down to select "Save Setting to be able to ...(User mode only) Mode - Mode - Darkroom Move Enter Exit 1. When you have decided what settings suit you wish to adjust and press the joystick to ... English...
... Main Source VGA Resolution 1366x768 H/V Frequency H:56 KHz V:60 Hz Serial Number MN53035032682016TPV888 Reset All Settings Move Enter Exit Save Setting to recall the settings in the future when you turn on to speed up or down to select "Save Setting to be able to ...(User mode only) Mode - Mode - Darkroom Move Enter Exit 1. When you have decided what settings suit you wish to adjust and press the joystick to ... English...
User Manual
Page 25
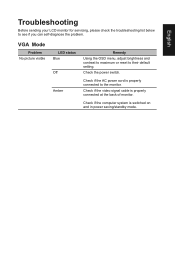
Check if the AC power cord is properly connected to their default setting. English VGA Mode Problem No picture visible LED status Blue Off Amber Remedy Using the OSD menu, adjust brightness and contrast to maximum or reset to the monitor. Check the power switch. Check if the video signal cable is switched on and in power saving/standby mode. Check if the computer system is properly connected at the back of monitor. Troubleshooting Before sending your LCD monitor for servicing, please check the troubleshooting list below to see if you can self-diagnose the problem.
Check if the AC power cord is properly connected to their default setting. English VGA Mode Problem No picture visible LED status Blue Off Amber Remedy Using the OSD menu, adjust brightness and contrast to maximum or reset to the monitor. Check the power switch. Check if the video signal cable is switched on and in power saving/standby mode. Check if the computer system is properly connected at the back of monitor. Troubleshooting Before sending your LCD monitor for servicing, please check the troubleshooting list below to see if you can self-diagnose the problem.

