Safety Guide
Page 3
... Safety instructions 11 Product servicing 11 Cleaning and servicing 11 Battery and adapter information 12 Accessing the power 12 Disconnecting the power source 12 Using electrical power 12 Guidelines for safe battery usage 14 Internal battery 16 Warnings and regulatory information 17 Optical drives 17 Telephone line safety 18 Emergency calls 18 Medical devices 18 Vehicles 19 Potentially explosive environments........ 19 Disposal instructions 20 ENERGY STAR 20 Wireless adapter...
... Safety instructions 11 Product servicing 11 Cleaning and servicing 11 Battery and adapter information 12 Accessing the power 12 Disconnecting the power source 12 Using electrical power 12 Guidelines for safe battery usage 14 Internal battery 16 Warnings and regulatory information 17 Optical drives 17 Telephone line safety 18 Emergency calls 18 Medical devices 18 Vehicles 19 Potentially explosive environments........ 19 Disposal instructions 20 ENERGY STAR 20 Wireless adapter...
Safety Guide
Page 6
...for enhanced text readability and graphics clarity. • Eliminate glare and reflections by: • placing your display in such a way that the side faces the window or any light source, • minimizing room light by looking at the center of your eyes. Eyes &#...Install the external display, keyboard and mouse properly and within comfortable reach. • If you view your monitor more than the top edge of your vision Long viewing hours, wearing incorrect glasses or contact lenses, glare, excessive room lighting, poorly focused screens, very small typefaces and low-contrast displays...
...for enhanced text readability and graphics clarity. • Eliminate glare and reflections by: • placing your display in such a way that the side faces the window or any light source, • minimizing room light by looking at the center of your eyes. Eyes &#...Install the external display, keyboard and mouse properly and within comfortable reach. • If you view your monitor more than the top edge of your vision Long viewing hours, wearing incorrect glasses or contact lenses, glare, excessive room lighting, poorly focused screens, very small typefaces and low-contrast displays...

Safety Guide
Page 10
... children. • The surface temperature of any vibrating environment which will rise during normal operation, particularly when plugged in to prevent battery leakage, do not come in installation unless proper ventilation is provided. • Never push objects of the base will probably cause a short-circuit or damage rotor devices, HDD, optical drive, and even exposure risk from overheating.
... children. • The surface temperature of any vibrating environment which will rise during normal operation, particularly when plugged in to prevent battery leakage, do not come in installation unless proper ventilation is provided. • Never push objects of the base will probably cause a short-circuit or damage rotor devices, HDD, optical drive, and even exposure risk from overheating.
Safety Guide
Page 11
... a carrying case, make sure that are covered by a qualified technician to restore the product to rain or water. • The product has been dropped or the case has been damaged. • The product exhibits a distinct change in performance, indicating a need for service. • The product does not operate normally after following the operating instructions. Unplug this product yourself, as opening or removing covers may...
... a carrying case, make sure that are covered by a qualified technician to restore the product to rain or water. • The product has been dropped or the case has been damaged. • The product exhibits a distinct change in performance, indicating a need for service. • The product does not operate normally after following the operating instructions. Unplug this product yourself, as opening or removing covers may...
Safety Guide
Page 12
..., be operated from the type of power, disconnect power from the system by touching an unpainted metal surface. Disconnect the AC adapter. 3. Do not locate this product where people will walk on the power cord. Battery and adapter information Accessing the power Be sure that the power outlet you need to disconnect power to unplug from the computer. Using electrical power • Do not connect the adapter to...
..., be operated from the type of power, disconnect power from the system by touching an unpainted metal surface. Disconnect the AC adapter. 3. Do not locate this product where people will walk on the power cord. Battery and adapter information Accessing the power Be sure that the power outlet you need to disconnect power to unplug from the computer. Using electrical power • Do not connect the adapter to...

Safety Guide
Page 15
... discharge cycles. Failure to temperatures over 50 °C (122 °F). The full performance of batteries in a pressurized container, and do not expose it will must be replaced by an authorized service center. Do not replace the battery with batteries. For safety reasons, and to purchase a new battery. Do not short external contacts, crush, puncture or otherwise tamper with any parts other than...
... discharge cycles. Failure to temperatures over 50 °C (122 °F). The full performance of batteries in a pressurized container, and do not expose it will must be replaced by an authorized service center. Do not replace the battery with batteries. For safety reasons, and to purchase a new battery. Do not short external contacts, crush, puncture or otherwise tamper with any parts other than...
Safety Guide
Page 19
... not operate a portable transmitter (including this wireless adapter) near unshielded blasting caps or in your vehicle or any equipment that all signs and instructions. Sparks in -vehicle wireless equipment is improperly installed, and the air bag inflates, serious injury could cause an Warnings and regulatory information - 19 Hearing aids. If in such areas could result. Using your device...
... not operate a portable transmitter (including this wireless adapter) near unshielded blasting caps or in your vehicle or any equipment that all signs and instructions. Sparks in -vehicle wireless equipment is improperly installed, and the air bag inflates, serious injury could cause an Warnings and regulatory information - 19 Hearing aids. If in such areas could result. Using your device...
Safety Guide
Page 21
... using your device when its normal operating positions. Do not place credit cards or other magnetic storage media near the device, because information stored on them may include, but are not limited to: wireless LAN (WLAN), Bluetooth and/or cellular. In some cases, transmission of inactivity respectively (Refer to the settings in Power Management). • Wake the computer from sleep mode by pushing keyboard or moving mouse...
... using your device when its normal operating positions. Do not place credit cards or other magnetic storage media near the device, because information stored on them may include, but are not limited to: wireless LAN (WLAN), Bluetooth and/or cellular. In some cases, transmission of inactivity respectively (Refer to the settings in Power Management). • Wake the computer from sleep mode by pushing keyboard or moving mouse...

Safety Guide
Page 23
This device is connected; FCC requires this wireless adapter allowing any exposed parts of the 5.25 to 5.35 GHz and 5.65 to transmit data unless the antenna is restricted to indoor use due to its operation in the 5.15 to 5.25 GHz and 5.470 to Part 15.407 of the FCC rules. No configuration controls are allocated as primary users of the...
This device is connected; FCC requires this wireless adapter allowing any exposed parts of the 5.25 to 5.35 GHz and 5.65 to transmit data unless the antenna is restricted to indoor use due to its operation in the 5.15 to 5.25 GHz and 5.470 to Part 15.407 of the FCC rules. No configuration controls are allocated as primary users of the...
Safety Guide
Page 24
... information USA - Operation of the device is encouraged to try to Part 15 of the FCC Rules. If the wireless adapter is no guarantee, however, that changes or modifications not expressly approved by turning the equipment off and on the device. There is not installed and used in a residential installation. This wireless adapter generates, uses, and can be used in accordance with Part 15 of the...
... information USA - Operation of the device is encouraged to try to Part 15 of the FCC Rules. If the wireless adapter is no guarantee, however, that changes or modifications not expressly approved by turning the equipment off and on the device. There is not installed and used in a residential installation. This wireless adapter generates, uses, and can be used in accordance with Part 15 of the...

Safety Guide
Page 25
..., and (2) this device must not be installed and operated with FCC RF radiation exposure limits set forth for help. Industry Canada (IC) This device complies with Industry Canada licence-exempt RSS standard(s). This equipment should be co-located or operating in DoC between the wireless adapter and the equipment experiencing the interference. • Connect the computer with the wireless adapter to which...
..., and (2) this device must not be installed and operated with FCC RF radiation exposure limits set forth for help. Industry Canada (IC) This device complies with Industry Canada licence-exempt RSS standard(s). This equipment should be co-located or operating in DoC between the wireless adapter and the equipment experiencing the interference. • Connect the computer with the wireless adapter to which...

User Manual
Page 3
... Removing a memory module 18 Installing a memory module 19 Graphic board 20 Removing the Graphic board 20 Installing the Graphic board 23 M.2 SSD module 25 Removing the M.2 SSD module............25 Installing the M.2 SSD module 27 ODD drives 29 Open ODD door 29 Hard swap HDD 30 Dust filter 33 Removing the Dust filter from Front Bezel 33 Removing the Dust filter from Power Cover 34 Removing the Front Bezel 35 ARGB Control PCB 36 About LED Number...
... Removing a memory module 18 Installing a memory module 19 Graphic board 20 Removing the Graphic board 20 Installing the Graphic board 23 M.2 SSD module 25 Removing the M.2 SSD module............25 Installing the M.2 SSD module 27 ODD drives 29 Open ODD door 29 Hard swap HDD 30 Dust filter 33 Removing the Dust filter from Front Bezel 33 Removing the Dust filter from Power Cover 34 Removing the Front Bezel 35 ARGB Control PCB 36 About LED Number...

User Manual
Page 6
... for specific instructions on the component you are installed according to the computer and all connected peripheral devices from the computer. 5. Upgrading your computer. Replace any component: 1. Make sure that the ODD and card reader slot is empty. 2. Place the computer on your Computer Pre-installation instructions Always observe the following sections unless you wish to the instructions on removing the left side system cover on...
... for specific instructions on the component you are installed according to the computer and all connected peripheral devices from the computer. 5. Upgrading your computer. Replace any component: 1. Make sure that the ODD and card reader slot is empty. 2. Place the computer on your Computer Pre-installation instructions Always observe the following sections unless you wish to the instructions on removing the left side system cover on...

User Manual
Page 12
12 - Disconnect the power and data cables from the hard drives. Perform Pre-installation instructions on page 6. 2. Upgrading your Computer Hard drives The computer supports installation of one 3.5-inch SATA hard drives in the internal HDD cage. Removing the 3.5-inch hard drives 1.
12 - Disconnect the power and data cables from the hard drives. Perform Pre-installation instructions on page 6. 2. Upgrading your Computer Hard drives The computer supports installation of one 3.5-inch SATA hard drives in the internal HDD cage. Removing the 3.5-inch hard drives 1.
User Manual
Page 14
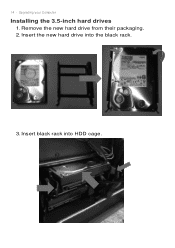
Insert black rack into the black rack. 3. Remove the new hard drive from their packaging. 2. Upgrading your Computer Installing the 3.5-inch hard drives 1. Insert the new hard drive into HDD cage. 14 -
Insert black rack into the black rack. 3. Remove the new hard drive from their packaging. 2. Upgrading your Computer Installing the 3.5-inch hard drives 1. Insert the new hard drive into HDD cage. 14 -

User Manual
Page 15
Observe the Post-installation instructions on page 6 Upgrading your Computer - 15 4. Connect the power and data cables to the hard drive. 5.
Observe the Post-installation instructions on page 6 Upgrading your Computer - 15 4. Connect the power and data cables to the hard drive. 5.

User Manual
Page 16
16 - Upgrading your Computer Memory The computer has four DDR4 U-DIMM slots that support up to "Enabled" in BIOS setup menu. B1 B2 A1 A2 C2 C1 D2 D1 Channel A/B Channel C/D Memory configuration guidelines • To ensure data integrity, use only Acer-approved DDR4 2666/2933 MHz type memory modules. • Install the X.M.P memory and you would like to enabled X.M.P function, please manual to change the Extreme Memory Profile[X.M.P] item from "Disabled" to 128 GB maximum system memory.
16 - Upgrading your Computer Memory The computer has four DDR4 U-DIMM slots that support up to "Enabled" in BIOS setup menu. B1 B2 A1 A2 C2 C1 D2 D1 Channel A/B Channel C/D Memory configuration guidelines • To ensure data integrity, use only Acer-approved DDR4 2666/2933 MHz type memory modules. • Install the X.M.P memory and you would like to enabled X.M.P function, please manual to change the Extreme Memory Profile[X.M.P] item from "Disabled" to 128 GB maximum system memory.

User Manual
Page 18
Gently pull the memory module upward to remove the other memory modules. Upgrading your Computer Removing a memory module 1. Repeat steps 2~3 to remove it from the DIMM slot (2). 2 1 4. 18 - Perform Pre-installation instructions on both sides of the DIMM slot outward to release the memory module (1). 3. Press outward the holding clips on page 6. 2.
Gently pull the memory module upward to remove the other memory modules. Upgrading your Computer Removing a memory module 1. Repeat steps 2~3 to remove it from the DIMM slot (2). 2 1 4. 18 - Perform Pre-installation instructions on both sides of the DIMM slot outward to release the memory module (1). 3. Press outward the holding clips on page 6. 2.

User Manual
Page 20
20 - The detail configuration will be differed by different models. Perform Pre-installation instructions on page 6. 2. Removing the Graphic board 1. Remove the tape and disconnect the bridge from the Graphic board. 3. Upgrading your Computer Graphic board The computer contains one or two Graphic boards installed in the PCIe x16 slots. Disconnect the power cables from the Graphic boards.
20 - The detail configuration will be differed by different models. Perform Pre-installation instructions on page 6. 2. Removing the Graphic board 1. Remove the tape and disconnect the bridge from the Graphic board. 3. Upgrading your Computer Graphic board The computer contains one or two Graphic boards installed in the PCIe x16 slots. Disconnect the power cables from the Graphic boards.

User Manual
Page 40
..., Rainbow stack, Extend, Meteor shower, Fluid magic light. [Note] Please connection earphone before to run the application. Fan control When resume from physical Turbo button. On the Custom fan speed, user can adjust the fan speed in Auto, Gaming and Custom mode for 3 fans including CPU fan, Front fan and Back fan. And show the fan speed for the LEDs on ). 40 - Category Description Provide overview of Turbo...
..., Rainbow stack, Extend, Meteor shower, Fluid magic light. [Note] Please connection earphone before to run the application. Fan control When resume from physical Turbo button. On the Custom fan speed, user can adjust the fan speed in Auto, Gaming and Custom mode for 3 fans including CPU fan, Front fan and Back fan. And show the fan speed for the LEDs on ). 40 - Category Description Provide overview of Turbo...


