

User Manual
Page 5
... change in performance, indicating a need for purchase options. v Product servicing Do not attempt to service this product from walls and free flow of air around the projector are necessary. • Locations where temperatures may become excessively high, such as opening or removing covers may expose you to dangerous voltage points or other controls may result in damage and will often require extensive work by the operating instructions...
... change in performance, indicating a need for purchase options. v Product servicing Do not attempt to service this product from walls and free flow of air around the projector are necessary. • Locations where temperatures may become excessively high, such as opening or removing covers may expose you to dangerous voltage points or other controls may result in damage and will often require extensive work by the operating instructions...

User Manual
Page 6
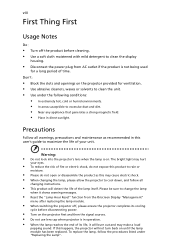
... into the air outlet grille when projector is unplugged. • The product will detect the life of displaying inverted images for replacement. • Do not operate lamps beyond the rated lamp life. Please be sure to change the lamp when warning messages display. • When changing the lamp, please allow the projector to cool down, and follow all changing instructions. • Reset the "Lamp Hour Reset" function from the Onscreen Display "Management" menu after replacing the lamp module. •...
... into the air outlet grille when projector is unplugged. • The product will detect the life of displaying inverted images for replacement. • Do not operate lamps beyond the rated lamp life. Please be sure to change the lamp when warning messages display. • When changing the lamp, please allow the projector to cool down, and follow all changing instructions. • Reset the "Lamp Hour Reset" function from the Onscreen Display "Management" menu after replacing the lamp module. •...
User Manual
Page 8
... from the Onscreen Display "Management" menu after replacing the lamp module. • When switching the projector off the product before disconnecting power. • Turn on . To replace the lamp, follow all warnings, precautions and maintenance as this happens, the projector will detect the life of time. Don't: • Block the slots and openings on until the lamp module has been replaced. Precautions Follow all changing instructions. • This product...
... from the Onscreen Display "Management" menu after replacing the lamp module. • When switching the projector off the product before disconnecting power. • Turn on . To replace the lamp, follow all warnings, precautions and maintenance as this happens, the projector will detect the life of time. Don't: • Block the slots and openings on until the lamp module has been replaced. Precautions Follow all changing instructions. • This product...

User Manual
Page 9
...Overview 3 Projector Outlook 3 Control Panel 4 Remote Control Layout 5 Getting Started 7 Connecting the Projector 7 Turning the Projector On/Off 9 Turning On the Projector 9 Turning Off the Projector 10 Adjusting the Projected Image 11 Adjusting the Height of the Projected Image 11 How to Optimize Image Size and Distance 12 How to Get a Preferred Image Size by Adjusting Distance and Zoom 15 User Controls 18 Installation Menu 18 Acer Empowering Technology 19 Onscreen Display (OSD) Menus 20 Color 21 Image 23 Setting 25 Management 34 Audio 35 Timer 36...
...Overview 3 Projector Outlook 3 Control Panel 4 Remote Control Layout 5 Getting Started 7 Connecting the Projector 7 Turning the Projector On/Off 9 Turning On the Projector 9 Turning Off the Projector 10 Adjusting the Projected Image 11 Adjusting the Height of the Projected Image 11 How to Optimize Image Size and Distance 12 How to Get a Preferred Image Size by Adjusting Distance and Zoom 15 User Controls 18 Installation Menu 18 Acer Empowering Technology 19 Onscreen Display (OSD) Menus 20 Color 21 Image 23 Setting 25 Management 34 Audio 35 Timer 36...

User Manual
Page 11
... (ECO) mode extends lamp life • Acer EcoProjeciton Technology delivers Intelligent power management approach and physical efficiency improvement • Empowering Key reveals Acer Empowering Technology functions (Acer eView, eTimer, eOpening, ePower Management) for easy adjustment of settings • Advanced keystone correction delivers optimum presentations • Multi-language Onscreen Display (OSD) menus • Full-function remote control • P5403/N243/PN-SX12: Manual focus projection lens zooms up to...
... (ECO) mode extends lamp life • Acer EcoProjeciton Technology delivers Intelligent power management approach and physical efficiency improvement • Empowering Key reveals Acer Empowering Technology functions (Acer eView, eTimer, eOpening, ePower Management) for easy adjustment of settings • Advanced keystone correction delivers optimum presentations • Multi-language Onscreen Display (OSD) menus • Full-function remote control • P5403/N243/PN-SX12: Manual focus projection lens zooms up to...

User Manual
Page 13
... Power indicator LED 2 Projection lens 3 Elevator button 4 Lens cap Rear side (S5201M/T111B/PS-X11M/S5301WM/ T121B/PS-W11M) 1 23 4 5 6 7 8 9 10 # Description 5 Control panel 6 Zoom ring 7 Focus ring 8 Remote control receiver (P5403/N243/PN-SX12) 1 3 6 2 7 4 8 9 16 10 DC OUT 1213 11 14 12 15 # Description # Description 1 Remote control receiver 9 S-Video input connector/ 2 USB connector (Type B) Composite video input connector 3 LAN (RJ45 port for 10/100M 10 Audio input connector/ Ethernet) Audio output connector 4 HDMI connector 11 Microphone input...
... Power indicator LED 2 Projection lens 3 Elevator button 4 Lens cap Rear side (S5201M/T111B/PS-X11M/S5301WM/ T121B/PS-W11M) 1 23 4 5 6 7 8 9 10 # Description 5 Control panel 6 Zoom ring 7 Focus ring 8 Remote control receiver (P5403/N243/PN-SX12) 1 3 6 2 7 4 8 9 16 10 DC OUT 1213 11 14 12 15 # Description # Description 1 Remote control receiver 9 S-Video input connector/ 2 USB connector (Type B) Composite video input connector 3 LAN (RJ45 port for 10/100M 10 Audio input connector/ Ethernet) Audio output connector 4 HDMI connector 11 Microphone input...

User Manual
Page 16
... via a USB cable. To change source to HDMI™/DVI (for the projectors sold in the Japanese market. To change source to Composite video. This connector supports analog RGB, YPbPr (480p/576p/720p/1080i/1080p), and YCbCr (480i/576i). Press "HIDE" to display the image. To change source to the previous step for photo/audio/video files. Launches the Onscreen Display (OSD) menu, returns to S-Video. Use the button to input a password in...
... via a USB cable. To change source to HDMI™/DVI (for the projectors sold in the Japanese market. To change source to Composite video. This connector supports analog RGB, YPbPr (480p/576p/720p/1080i/1080p), and YCbCr (480i/576i). Press "HIDE" to display the image. To change source to the previous step for photo/audio/video files. Launches the Onscreen Display (OSD) menu, returns to S-Video. Use the button to input a password in...

User Manual
Page 28
... signal input" is displayed on the screen. 1 Turn on the projector by pressing remote control. (POWER) on the control panel or 2 Press "MENU" on the control panel or remote control to launch the OSD for projector installation and maintenance. 3 The background pattern acts as a guide to adjust the calibration and alignment settings, such as screen size and distance, focus and more. 4 The Installation menu includes the following options: • Projection method • Menu location • Keystone settings • Language settings • Reset to factory default functions Use...
... signal input" is displayed on the screen. 1 Turn on the projector by pressing remote control. (POWER) on the control panel or 2 Press "MENU" on the control panel or remote control to launch the OSD for projector installation and maintenance. 3 The background pattern acts as a guide to adjust the calibration and alignment settings, such as screen size and distance, focus and more. 4 The Installation menu includes the following options: • Projection method • Menu location • Keystone settings • Language settings • Reset to factory default functions Use...

User Manual
Page 31
... with higher brightness. • Standard: For common environment. • Video: For playing video in the image. • Press to decrease the contrast. • Press to lighten the image. 21 Color English Display Mode Wall Color Brightness Contrast Color Temperature Degamma There are several choices, including white, light yellow, light blue, pink, dark green. at lower color temperatures, the screen looks warmer. With greater gamma value, dark scenery will compensate...
... with higher brightness. • Standard: For common environment. • Video: For playing video in the image. • Press to decrease the contrast. • Press to lighten the image. 21 Color English Display Mode Wall Color Brightness Contrast Color Temperature Degamma There are several choices, including white, light yellow, light blue, pink, dark green. at lower color temperatures, the screen looks warmer. With greater gamma value, dark scenery will compensate...

User Manual
Page 33
... ceiling-mounted projection. • Rear-Desktop: When you select this function, the projector reverses the image so that you can project from behind a translucent screen. • Rear-Ceiling: When you select this function, the projector inverts the image for S5301WM/T121B/PS-W11M): Keeps the original signal aspect ratio and zooms in by tilting projection (±40 degrees). Manually adjusts image distortion caused by 1.333 times. You can project behind a translucent screen...
... ceiling-mounted projection. • Rear-Desktop: When you select this function, the projector reverses the image so that you can project from behind a translucent screen. • Rear-Ceiling: When you select this function, the projector inverts the image for S5301WM/T121B/PS-W11M): Keeps the original signal aspect ratio and zooms in by tilting projection (±40 degrees). Manually adjusts image distortion caused by 1.333 times. You can project behind a translucent screen...

User Manual
Page 36
...: This screen capture function is a new input signal or when you want to get best quality for your Acer projector. • User: Use the memorized picture from the default setting "Acer" to "User". • Press "Screen Capture" to customize the startup screen. • A dialog box appears to customize the startup screen. Notice: Before proceeding with the following steps, make sure that the "Keystone" is set to the default value...
...: This screen capture function is a new input signal or when you want to get best quality for your Acer projector. • User: Use the memorized picture from the default setting "Acer" to "User". • Press "Screen Capture" to customize the startup screen. • A dialog box appears to customize the startup screen. Notice: Before proceeding with the following steps, make sure that the "Keystone" is set to the default value...

User Manual
Page 37
... input signal is selected and its system format is "16:9" or 16:9 format detected under "Auto mode". Press to turn off the captioning feature. Please refer to "User Password" section for this dialogue. Select "Off" to change the "Security" setting. Both "User Password" and "Administrator Password" can switch on the projector without password. The function is not available when the aspect ratio is NTSC. The factory default...
... input signal is selected and its system format is "16:9" or 16:9 format detected under "Auto mode". Press to turn off the captioning feature. Please refer to "User Password" section for this dialogue. Select "Off" to change the "Security" setting. Both "User Password" and "Administrator Password" can switch on the projector without password. The function is not available when the aspect ratio is NTSC. The factory default...

User Manual
Page 38
... plugging power cord", you are requested to input the password every time the power cord is plugged. • If you select "Always request password while projector turns on", you are correctly connected to the devices. Enabling this function slightly increases the standby power consumption. English 28 VGA OUT User Password • Press to set up or change "User Password". • Use the numerical keys on the remote control to set the password and press "MENU" to...
... plugging power cord", you are requested to input the password every time the power cord is plugged. • If you select "Always request password while projector turns on", you are correctly connected to the devices. Enabling this function slightly increases the standby power consumption. English 28 VGA OUT User Password • Press to set up or change "User Password". • Use the numerical keys on the remote control to set the password and press "MENU" to...

User Manual
Page 40
... remote network operation page is displayed. You can control the projector by using this page. If your are not in this table. LAN Reset (for Subnet Mask, Default Gateway, DNS server. 5 Press to the RJ45 port. 2 Enter the LAN Setting menu. For details, see the notes following this menu and press to the default settings. The "Enter Administrator Password" dialogue box is "1234". English 30 To connect your projector to...
... remote network operation page is displayed. You can control the projector by using this page. If your are not in this table. LAN Reset (for Subnet Mask, Default Gateway, DNS server. 5 Press to the RJ45 port. 2 Enter the LAN Setting menu. For details, see the notes following this menu and press to the default settings. The "Enter Administrator Password" dialogue box is "1234". English 30 To connect your projector to...
User Manual
Page 43
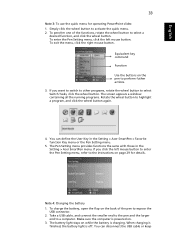
... disconnect the USB cable or keep The battery light stays on . 3. To exit the menu, click the right mouse button. You can define the User Key in the Setting > Acer SmartPen menu. The screen appears a window containing all the running programs. Rotate the wheel button to a computer. If you click the left mouse button. To charge the battery, open the flap on page 29 for operating PowerPoint slides...
... disconnect the USB cable or keep The battery light stays on . 3. To exit the menu, click the right mouse button. You can define the User Key in the Setting > Acer SmartPen menu. The screen appears a window containing all the running programs. Rotate the wheel button to a computer. If you click the left mouse button. To charge the battery, open the flap on page 29 for operating PowerPoint slides...

User Manual
Page 44
... show or hide warning message Lamp Reminding when the changing lamp message is turned on the High Altitude mode. The closer you hold a remote control or a pen. 3. Lamp Hour Elapse Displays the lamp's elapsed operating time (in a shadow or it connected. Choose "Off" to return to the screen, the better performance the pen has. 2. Auto Shutdown The projector will also lower the power consumption, reduce noise, and extend the lamp life. Avoid standing too...
... show or hide warning message Lamp Reminding when the changing lamp message is turned on the High Altitude mode. The closer you hold a remote control or a pen. 3. Lamp Hour Elapse Displays the lamp's elapsed operating time (in a shadow or it connected. Choose "Off" to return to the screen, the better performance the pen has. 2. Auto Shutdown The projector will also lower the power consumption, reduce noise, and extend the lamp life. Avoid standing too...

User Manual
Page 47
... resolution mode you are bent or broken. • Check if the projection lamp has been securely installed. If the problem persists, please contact your display resolution setting is lower than or equal to UXGA (1600 x 1200). • Click the "Advanced Properties" button. For an incorrectly displayed image: 95/98/2000/XP)) • Open "My Computer > Control Panel," and then double-click the "Display" icon. • Select the "Settings...
... resolution mode you are bent or broken. • Check if the projection lamp has been securely installed. If the problem persists, please contact your display resolution setting is lower than or equal to UXGA (1600 x 1200). • Click the "Advanced Properties" button. For an incorrectly displayed image: 95/98/2000/XP)) • Open "My Computer > Control Panel," and then double-click the "Display" icon. • Select the "Settings...

User Manual
Page 48
... projector. 4 The screen of your computer. • Press the toggle output settings. 38 English 3 Partial, scrolling • Press "RESYNC" on the control panel or remote or incorrectly displayed image (For notebooks) control. • For an incorrectly displayed image: • Follow the steps for item 2 (above) to adjust the resolution of the notebook computer is not displaying your presentation • If you are using a Microsoft® Windows...
... projector. 4 The screen of your computer. • Press the toggle output settings. 38 English 3 Partial, scrolling • Press "RESYNC" on the control panel or remote or incorrectly displayed image (For notebooks) control. • For an incorrectly displayed image: • Follow the steps for item 2 (above) to adjust the resolution of the notebook computer is not displaying your presentation • If you are using a Microsoft® Windows...

User Manual
Page 49
... screen. • Press the Keystone correction keys on the control panel or remote control until the image becomes square. • Press "MENU" on until the lamp module has been replaced. Go to "Image > Auto Keystone" or "Image > Manual Keystone" to 16:9 (wide) aspect ratio on your DVD player. 9 Image is reversed • Select "Image > Projection" on the control panel or remote control. Set up the display format to make a loud popping sound. If this happens, the projector...
... screen. • Press the Keystone correction keys on the control panel or remote control until the image becomes square. • Press "MENU" on until the lamp module has been replaced. Go to "Image > Auto Keystone" or "Image > Manual Keystone" to 16:9 (wide) aspect ratio on your DVD player. 9 Image is reversed • Select "Image > Projection" on the control panel or remote control. Set up the display format to make a loud popping sound. If this happens, the projector...
User Manual
Page 51
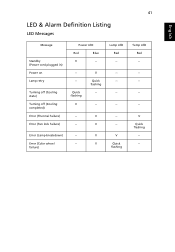
Error (Lamp breakdown) -- English V -- Quick flashing V V Quick flashing -- -- -- Error (Color wheel -- LED & Alarm Definition Listing LED Messages Message Standby (Power cord plugged in) Power on Lamp retry Turning off (Cooling state) Turning off (Cooling completed) Error (Thermal failure) Error (Fan lock failure) Power LED Red Blue V -- --- V Lamp LED Red -- ---- -- --- failure) V V V Quick flashing 41 Temp LED Red -----V Quick flashing ---
Error (Lamp breakdown) -- English V -- Quick flashing V V Quick flashing -- -- -- Error (Color wheel -- LED & Alarm Definition Listing LED Messages Message Standby (Power cord plugged in) Power on Lamp retry Turning off (Cooling state) Turning off (Cooling completed) Error (Thermal failure) Error (Fan lock failure) Power LED Red Blue V -- --- V Lamp LED Red -- ---- -- --- failure) V V V Quick flashing 41 Temp LED Red -----V Quick flashing ---


