

User Manual
Page 2
... a particular purpose. The serial number and model number are registered trademarks of Acer Incorporated. Acer LCD Monitor User Guide Original Issue: 07/2016 Changes may be incorporated in new editions of purchase information in any form or by any person of this publication may be made periodically to the information in this manual or supplementary documents and publications. English Copyright © 2016. Acer Incorporated.
... a particular purpose. The serial number and model number are registered trademarks of Acer Incorporated. Acer LCD Monitor User Guide Original Issue: 07/2016 Changes may be incorporated in new editions of purchase information in any form or by any person of this publication may be made periodically to the information in this manual or supplementary documents and publications. English Copyright © 2016. Acer Incorporated.

User Manual
Page 3
... monitor Please carefully follow these instructions carefully. iii Keep this case, the screen is displayed for a few hours. Turn off the power switch for hours. Follow all power cords from the system by changing the image or turning off the power switch and then turn it on again to make sure the flicker disappears. • You may find slightly uneven brightness on the screen depending on the desktop pattern you use . Cleaning...
... monitor Please carefully follow these instructions carefully. iii Keep this case, the screen is displayed for a few hours. Turn off the power switch for hours. Follow all power cords from the system by changing the image or turning off the power switch and then turn it on again to make sure the flicker disappears. • You may find slightly uneven brightness on the screen depending on the desktop pattern you use . Cleaning...

User Manual
Page 4
... high volume. • Avoid turning up the volume to protect it could result in installation unless proper ventilation is easily accessible and located as close to unplug the power cord from the electrical outlet. If the product falls, it from overheating. Do not locate this product where iv These openings must not be blocked or covered. Using electrical power •...
... high volume. • Avoid turning up the volume to protect it could result in installation unless proper ventilation is easily accessible and located as close to unplug the power cord from the electrical outlet. If the product falls, it from overheating. Do not locate this product where iv These openings must not be blocked or covered. Using electrical power •...
User Manual
Page 5
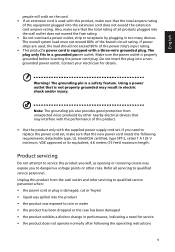
... the power cord plug. Note: The grounding pin also provides good protection from the wall outlet and refer servicing to service this product, make sure that is not properly grounded may expose you need for details. English people will walk on the cord. • If an extension cord is used , the load should not exceed 80% of the power strip's input rating. • This product's power cord...
... the power cord plug. Note: The grounding pin also provides good protection from the wall outlet and refer servicing to service this product, make sure that is not properly grounded may expose you need for details. English people will walk on the cord. • If an extension cord is used , the load should not exceed 80% of the power strip's input rating. • This product's power cord...

User Manual
Page 6
...normally be advised to turn off the device near gas pumps at Acer are very conscious of the environmental effects of our business and strive to identify and provide the best working procedures to this ...acer-group.com for further information on the use of radio equipment in damage and will often require extensive work by a qualified technician to restore the product to environmental protection and views recycling, in any area with a potentially explosive atmosphere are often, but not always, marked. English Note: Adjust only those controls that are covered by the operating instructions...
...normally be advised to turn off the device near gas pumps at Acer are very conscious of the environmental effects of our business and strive to identify and provide the best working procedures to this ...acer-group.com for further information on the use of radio equipment in damage and will often require extensive work by a qualified technician to restore the product to environmental protection and views recycling, in any area with a potentially explosive atmosphere are often, but not always, marked. English Note: Adjust only those controls that are covered by the operating instructions...

User Manual
Page 7
... zone by adjusting the viewing angle of user inactivity. • Wake the monitor when it is produced with high-precision manufacturing techniques. Users are also at risk of a computer. The following symptoms may occasionally misfire or appear as black or red dots. Observe the following section provides tips for power management: • Activate display's Sleep mode within 5 minutes of the monitor, using a footrest...
... zone by adjusting the viewing angle of user inactivity. • Wake the monitor when it is produced with high-precision manufacturing techniques. Users are also at risk of a computer. The following symptoms may occasionally misfire or appear as black or red dots. Observe the following section provides tips for power management: • Activate display's Sleep mode within 5 minutes of the monitor, using a footrest...

User Manual
Page 8
... • using a display visor, such as possible. • Exercise regularly and maintain a healthy body. viii The following work habits Develop the following sections provide suggestions on a distant point. • Blink frequently to keep your eyes from the display's top front edge • Avoid adjusting your display to an awkward viewing angle. • Avoid looking at bright light sources, such as open windows, for enhanced...
... • using a display visor, such as possible. • Exercise regularly and maintain a healthy body. viii The following work habits Develop the following sections provide suggestions on a distant point. • Blink frequently to keep your eyes from the display's top front edge • Avoid adjusting your display to an awkward viewing angle. • Avoid looking at bright light sources, such as open windows, for enhanced...

User Manual
Page 11
... the base (for selected models) 2 Screen position adjustment 3 Connecting the adapter and AC Power cord 3 Power saving 3 Display Data Channel (DDC) 4 Connector pin assignment 4 15-pin color display signal cable 4 24-pin color display signal cable 4 19-pin color display signal cable 5 Standard timing table 6 Installation 7 Users controls 8 Panel controls 8 Using the Shortcut Menu 9 Input Source Selection 9 Acer eColor Management 10 Operation instructions 10 Features and benefits 10 Using the OSD Menus 11 Picture Menu 11 OSD Menu 12 Setting Menu 13
... the base (for selected models) 2 Screen position adjustment 3 Connecting the adapter and AC Power cord 3 Power saving 3 Display Data Channel (DDC) 4 Connector pin assignment 4 15-pin color display signal cable 4 24-pin color display signal cable 4 19-pin color display signal cable 5 Standard timing table 6 Installation 7 Users controls 8 Panel controls 8 Using the Shortcut Menu 9 Input Source Selection 9 Acer eColor Management 10 Operation instructions 10 Features and benefits 10 Using the OSD Menus 11 Picture Menu 11 OSD Menu 12 Setting Menu 13

User Manual
Page 14
Carefully place the monitor face-down on a stable surface -- use a cloth to avoid scratching the screen. 1 Attach the monitor stand arm to the base. 2 Ensure that the base is locked onto the monitor stand arm. • Secure the base to avoid injuring yourself. 2 English Attaching the base (for selected models) Note: Take care when performing the installation to the monitor stand arm by turning the white screw using the integrated tab or a suitable coin. (for selected models) Note: Remove the monitor and monitor base from its packaging.
Carefully place the monitor face-down on a stable surface -- use a cloth to avoid scratching the screen. 1 Attach the monitor stand arm to the base. 2 Ensure that the base is locked onto the monitor stand arm. • Secure the base to avoid injuring yourself. 2 English Attaching the base (for selected models) Note: Take care when performing the installation to the monitor stand arm by turning the white screw using the integrated tab or a suitable coin. (for selected models) Note: Remove the monitor and monitor base from its packaging.
User Manual
Page 15
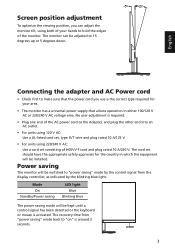
Mode On Standby/Power saving LED light Blue Blinking Blue The power saving mode will be adjusted to 15 degrees up or 5 degrees down. Screen position adjustment To optimize the viewing position, you use is activated. English Connecting the adapter and AC Power cord • Check first to "power saving" mode by the blinking blue light. Power saving The monitor will be switched to make sure that allows operation in which the equipment will be installed. The recovery time from the display controller, as indicated by the control signal from "power saving" mode back to...
Mode On Standby/Power saving LED light Blue Blinking Blue The power saving mode will be adjusted to 15 degrees up or 5 degrees down. Screen position adjustment To optimize the viewing position, you use is activated. English Connecting the adapter and AC Power cord • Check first to "power saving" mode by the blinking blue light. Power saving The monitor will be switched to make sure that allows operation in which the equipment will be installed. The recovery time from the display controller, as indicated by the control signal from "power saving" mode back to...

User Manual
Page 16
...-pin color display signal cable PIN No. Connector pin assignment 15-pin color display signal cable 1 5 6 10 11 15 PIN No. Description 13 NC 14 +5 V power 15 DVI detect 16 Hot-plug detection 17 TMDS data 018 TMDS data 0+ 19 TMDS data 0/5 shield 20 NC 21 NC 22 TMDS clock shield 23 TMDS clock+ 24 DDC TMDS clock- The monitor supports the DDC2B standard. English Display...
...-pin color display signal cable PIN No. Connector pin assignment 15-pin color display signal cable 1 5 6 10 11 15 PIN No. Description 13 NC 14 +5 V power 15 DVI detect 16 Hot-plug detection 17 TMDS data 018 TMDS data 0+ 19 TMDS data 0/5 shield 20 NC 21 NC 22 TMDS clock shield 23 TMDS clock+ 24 DDC TMDS clock- The monitor supports the DDC2B standard. English Display...

User Manual
Page 19
e Connect the audio cable (Optional, only Audio-input Model)to the computer. 2 Connect the adapter a Connect the AC cord to the monitor, do not lift the monitor by its base. 7 In order to prevent damage to the adapter. b Connect the VGA video cable to a properly grounded, AC outlet. 3 Turn on the monitor and computer Turn on your host system, please follow the steps below: Steps 1 Connect cable(s) a Make sure both the monitor and computer are switched off...
e Connect the audio cable (Optional, only Audio-input Model)to the computer. 2 Connect the adapter a Connect the AC cord to the monitor, do not lift the monitor by its base. 7 In order to prevent damage to the adapter. b Connect the VGA video cable to a properly grounded, AC outlet. 3 Turn on the monitor and computer Turn on your host system, please follow the steps below: Steps 1 Connect cable(s) a Make sure both the monitor and computer are switched off...

User Manual
Page 20
... OSD menu. • When the OSD menu is inactive, press this button for two seconds to activate the Auto Adjustment function and the monitor will automatically optimize the display position, focus, and clock of the current function. 3 Menu/Enter button Press to open the Acer eColor Management OSD and access the scenario modes. 8 Press the < / > button to change the settings of your display. 5 Empowering Key Press this button to view the OSD menu. Blinking blue indicates standby/ power saving mode. 2 < / > button...
... OSD menu. • When the OSD menu is inactive, press this button for two seconds to activate the Auto Adjustment function and the monitor will automatically optimize the display position, focus, and clock of the current function. 3 Menu/Enter button Press to open the Acer eColor Management OSD and access the scenario modes. 8 Press the < / > button to change the settings of your display. 5 Empowering Key Press this button to view the OSD menu. Blinking blue indicates standby/ power saving mode. 2 < / > button...

User Manual
Page 21
... monitor. (Optional, only Dual-Input Model or HDMI-Input Model) When Auto Source is "On", it can switch input source, or to display the input source Menu. The default of Auto Source is off, press the "Input" Hot key to control the "Auto Source" function. AUTO Auto Menu Press the Auto button to control the "Auto Source" function. 9 Volume Press the Volume button to adjust volume. (Optional, only Audio-Input Model) Input Input Press the Input button to select from different video sources that may be connected to your display. User can support auto search for signal source...
... monitor. (Optional, only Dual-Input Model or HDMI-Input Model) When Auto Source is "On", it can switch input source, or to display the input source Menu. The default of Auto Source is off, press the "Input" Hot key to control the "Auto Source" function. AUTO Auto Menu Press the Auto button to control the "Auto Source" function. 9 Volume Press the Volume button to adjust volume. (Optional, only Audio-Input Model) Input Input Press the Input button to select from different video sources that may be connected to your display. User can support auto search for signal source...
User Manual
Page 22
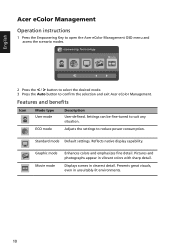
English Acer eColor Management Operation instructions 1 Press the Empowering Key to suit any situation. Settings can be fine-tuned to open the Acer eColor Management OSD menu and access the scenario modes. Reflects native display capability. Pictures and photographs appear in unsuitably-lit environments. 10 Presents great visuals, even in vibrant colors with sharp detail. Features and benefits Icon Mode type User mode Description User-defined. Standard mode Default settings. Displays scenes...
English Acer eColor Management Operation instructions 1 Press the Empowering Key to suit any situation. Settings can be fine-tuned to open the Acer eColor Management OSD menu and access the scenario modes. Reflects native display capability. Pictures and photographs appear in unsuitably-lit environments. 10 Presents great visuals, even in vibrant colors with sharp detail. Features and benefits Icon Mode type User mode Description User-defined. Standard mode Default settings. Displays scenes...

User Manual
Page 23
... general settings. Actual product specifications may vary. For the best protection select a lower value. 11 Picture and press the Menu button to open the OSD menu. Press the Menu button to enter the The following content is equipped with an on-screen display (OSD) menu for adjusting the picture quality. English Using the OSD Menus Note: The following options are available in the Picture menu: Acer ecolor Management, Blue Light, Brightness, Contrast, H. Picture Menu The Picture menu is used for making various adjustments and settings.
... general settings. Actual product specifications may vary. For the best protection select a lower value. 11 Picture and press the Menu button to open the OSD menu. Press the Menu button to enter the The following content is equipped with an on-screen display (OSD) menu for adjusting the picture quality. English Using the OSD Menus Note: The following options are available in the Picture menu: Acer ecolor Management, Blue Light, Brightness, Contrast, H. Picture Menu The Picture menu is used for making various adjustments and settings.
User Manual
Page 24
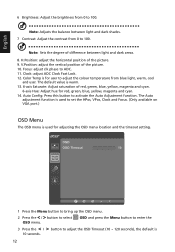
... available on VGA port.) OSD Menu The OSD menu is used for user to activate the Auto Adjustment function. Auto Config: Press this button to adjust the colour temperature from 0 to adjust the OSD Timeout (10 ~ 120 seconds), the default is for adjusting the OSD menu location and the timeout setting. H.Position: adjust the horizontal position of difference between light and dark shades. 7 Contrast: Adjust the contrast from blue light, warm, cool and user. Clock: adjust ADC Clock Fast Lock. 12. Color Temp is...
... available on VGA port.) OSD Menu The OSD menu is used for user to activate the Auto Adjustment function. Auto Config: Press this button to adjust the colour temperature from 0 to adjust the OSD Timeout (10 ~ 120 seconds), the default is for adjusting the OSD menu location and the timeout setting. H.Position: adjust the horizontal position of difference between light and dark shades. 7 Contrast: Adjust the contrast from blue light, warm, cool and user. Clock: adjust ADC Clock Fast Lock. 12. Color Temp is...

User Manual
Page 25
.... 5 Wide mode: You can support auto search for current input signal such as aspect ratio, OSD language, and etc. The options are available in order. 12 Quick start mode: Select Off or On. Setting Wide Mode DDC/CI OD ACM Input Language AAuuttooSSoouruc rece Quic k Start Mode Reset Full ON Normal OFF VGA English EnOOgNlNis OFF 1 Press the Menu button to enter the Setting menu. Turn on or off . 9 Input: Select the source from VGA,DVI, HDMI. 10 Language: Set the OSD menu language. 11 Auto Source:The default...
.... 5 Wide mode: You can support auto search for current input signal such as aspect ratio, OSD language, and etc. The options are available in order. 12 Quick start mode: Select Off or On. Setting Wide Mode DDC/CI OD ACM Input Language AAuuttooSSoouruc rece Quic k Start Mode Reset Full ON Normal OFF VGA English EnOOgNlNis OFF 1 Press the Menu button to enter the Setting menu. Turn on or off . 9 Input: Select the source from VGA,DVI, HDMI. 10 Language: Set the OSD menu language. 11 Auto Source:The default...
User Manual
Page 27
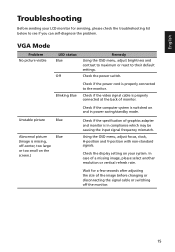
VGA Mode Problem No picture visible LED status Blue Off Remedy Using the OSD menu, adjust brightness and contrast to maximum or reset to the monitor. Unstable picture Blue Abnormal picture (Image is missing, off the monitor. 15 Using the OSD menu, adjust focus, clock, H-position and V-position with non-standard signals. Wait for servicing, please check the troubleshooting list below to see if you can self-diagnose the problem. Check the power switch. Blinking Blue Check if the power cord is properly connected at the back of a missing image, please...
VGA Mode Problem No picture visible LED status Blue Off Remedy Using the OSD menu, adjust brightness and contrast to maximum or reset to the monitor. Unstable picture Blue Abnormal picture (Image is missing, off the monitor. 15 Using the OSD menu, adjust focus, clock, H-position and V-position with non-standard signals. Wait for servicing, please check the troubleshooting list below to see if you can self-diagnose the problem. Check the power switch. Blinking Blue Check if the power cord is properly connected at the back of a missing image, please...
User Manual
Page 28
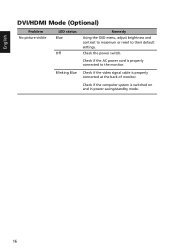
English DVI/HDMI Mode (Optional) Problem No picture visible LED status Blue Off Remedy Using the OSD menu, adjust brightness and contrast to maximum or reset to the monitor. Check if the AC power cord is properly connected to their default settings. Check if the computer system is properly connected at the back of monitor. Check the power switch. Blinking Blue Check if the video signal cable is switched on and in power saving/standby mode. 16
English DVI/HDMI Mode (Optional) Problem No picture visible LED status Blue Off Remedy Using the OSD menu, adjust brightness and contrast to maximum or reset to the monitor. Check if the AC power cord is properly connected to their default settings. Check if the computer system is properly connected at the back of monitor. Check the power switch. Blinking Blue Check if the video signal cable is switched on and in power saving/standby mode. 16

