
Pre-Install Intel® AHCI Driver for Windows XP® Operating System
Page 1
... the root directory: 2. Connect the USB floppy drive and then boot up from the Microsoft® Windows XP® Professional/Home Edition Setup Disc to a blank 1.44MB floppy diskette. Pre-Install Intel® AHCI Driver for Windows XP® Operating System Pre-Installation Using the F6 Method Notes: Before you start to install Microsoft® Windows XP® operating system, you will need an optical drive, a USB floppy disk drive, a blank 1.44MB...
... the root directory: 2. Connect the USB floppy drive and then boot up from the Microsoft® Windows XP® Professional/Home Edition Setup Disc to a blank 1.44MB floppy diskette. Pre-Install Intel® AHCI Driver for Windows XP® Operating System Pre-Installation Using the F6 Method Notes: Before you start to install Microsoft® Windows XP® operating system, you will need an optical drive, a USB floppy disk drive, a blank 1.44MB...

Quick Start Guide
Page 5
... help you use Adobe Reader, access the Help and Support menu. Note: Viewing the file requires Adobe Reader. If Adobe Reader is available in the text with setting up your choice for certain models". For instructions on AcerSystem User Guide will occasionally refer to all models in the model you for making an Acer notebook your computer. It covers basic topics such as system utilities, data recovery, expansion options and troubleshooting. For...
... help you use Adobe Reader, access the Help and Support menu. Note: Viewing the file requires Adobe Reader. If Adobe Reader is available in the text with setting up your choice for certain models". For instructions on AcerSystem User Guide will occasionally refer to all models in the model you for making an Acer notebook your computer. It covers basic topics such as system utilities, data recovery, expansion options and troubleshooting. For...
Quick Start Guide
Page 7
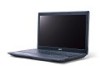
... mouse buttons. 10 Palmrest Comfortable support area for your hands when you use the computer. Hotkeys The computer employs hotkeys or key combinations to save power. Turns the touchpad on and off to access most of the computer's controls like (left and right) the left and right buttons function like screen brightness and volume output. HDD indicator Indicates when the hard disk drive is active. 5 Power switch Turns the computer on and off Touchpad toggle Switches display output between the display screen, external monitor...
... mouse buttons. 10 Palmrest Comfortable support area for your hands when you use the computer. Hotkeys The computer employs hotkeys or key combinations to save power. Turns the touchpad on and off to access most of the computer's controls like (left and right) the left and right buttons function like screen brightness and volume output. HDD indicator Indicates when the hard disk drive is active. 5 Power switch Turns the computer on and off Touchpad toggle Switches display output between the display screen, external monitor...
Quick Start Guide
Page 8
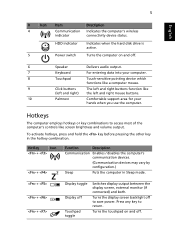
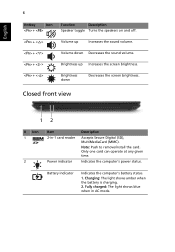
...to remove/install the card. Battery indicator Indicates the computer's battery status. 1. Fully charged: The light shows blue when in -1 card reader Power indicator Description Accepts Secure Digital (SD), MultiMediaCard (MMC). Charging: The light shows amber when the battery is charging. 2. English 6 Hotkey Icon + Function Description Speaker toggle Turns the speakers on and off. + < > Volume up Increases the sound volume. + < > Volume down Decreases the sound volume. + < > Brightness up Increases the screen brightness. + < > Brightness down Decreases the screen...
...to remove/install the card. Battery indicator Indicates the computer's battery status. 1. Fully charged: The light shows blue when in -1 card reader Power indicator Description Accepts Secure Digital (SD), MultiMediaCard (MMC). Charging: The light shows amber when the battery is charging. 2. English 6 Hotkey Icon + Function Description Speaker toggle Turns the speakers on and off. + < > Volume up Increases the sound volume. + < > Volume down Decreases the sound volume. + < > Brightness up Increases the screen brightness. + < > Brightness down Decreases the screen...

Quick Start Guide
Page 9
... 10/100/1000based network. Ethernet (RJ-45) port Connects to be used while unplugged. Accepts inputs from external microphones. Headphone/ speaker/line-out jack Connects to stay cool, even after prolonged use. Ventilation slots External display (VGA) port Enable the computer to audio line-out devices (e.g., speakers, headphones). HDMI port USB 2.0 port Microphone-in jack Description Connects to an AC adapter. Connects to a display device (e.g., external monitor, LCD projector). Connects to USB 2.0 devices (e.g., USB mouse, USB camera). Left view 1 2 3 4567...
... 10/100/1000based network. Ethernet (RJ-45) port Connects to be used while unplugged. Accepts inputs from external microphones. Headphone/ speaker/line-out jack Connects to stay cool, even after prolonged use. Ventilation slots External display (VGA) port Enable the computer to audio line-out devices (e.g., speakers, headphones). HDMI port USB 2.0 port Microphone-in jack Description Connects to an AC adapter. Connects to a display device (e.g., external monitor, LCD projector). Connects to USB 2.0 devices (e.g., USB mouse, USB camera). Left view 1 2 3 4567...

User Manual
Page 8
... of fire or explosion. Wireless devices may cause the battery to keep the battery between 15°C and 25°C (59°F and 77°F). Replacing the battery pack The notebook uses lithium batteries. Warning! Batteries may also explode if damaged. Do not disassemble or dispose of them away from the battery, which came bundled with a hot or cold battery may present a risk of...
... of fire or explosion. Wireless devices may cause the battery to keep the battery between 15°C and 25°C (59°F and 77°F). Replacing the battery pack The notebook uses lithium batteries. Warning! Batteries may also explode if damaged. Do not disassemble or dispose of them away from the battery, which came bundled with a hot or cold battery may present a risk of...

User Manual
Page 15
... helps you get started with language such as the AcerSystem User Guide mentioned below the LCD screen beside the easy-launch buttons. For instructions on how your computer can help you use Adobe Reader, access the Help and Support menu. The printed Quick Guide introduces you to be more on how to use your notebook. It is not installed on AcerSystem User Guide will run the Adobe Reader setup program first...
... helps you get started with language such as the AcerSystem User Guide mentioned below the LCD screen beside the easy-launch buttons. For instructions on how your computer can help you use Adobe Reader, access the Help and Support menu. The printed Quick Guide introduces you to be more on how to use your notebook. It is not installed on AcerSystem User Guide will run the Adobe Reader setup program first...

User Manual
Page 19
... battery pack xv Cleaning and servicing xv Touchpad 1 Touchpad basics (with fingerprint reader) 1 Touchpad basics (with two-click buttons) 2 Using the keyboard 3 Lock keys and embedded numeric keypad* 3 Windows keys 4 Audio 5 Acer PureZone (only for certain models) 5 Video 5 16:9 display (only for certain models) 5 Using the system utilities 6 Acer Bio-Protection (only for certain models) 6 Acer Backup Manager 7 Power management 8 Acer eRecovery Management 9 Burn backup discs 10 Restore 11 Restore Windows from backup discs 12 Battery pack 14 Battery...
... battery pack xv Cleaning and servicing xv Touchpad 1 Touchpad basics (with fingerprint reader) 1 Touchpad basics (with two-click buttons) 2 Using the keyboard 3 Lock keys and embedded numeric keypad* 3 Windows keys 4 Audio 5 Acer PureZone (only for certain models) 5 Video 5 16:9 display (only for certain models) 5 Using the system utilities 6 Acer Bio-Protection (only for certain models) 6 Acer Backup Manager 7 Power management 8 Acer eRecovery Management 9 Burn backup discs 10 Restore 11 Restore Windows from backup discs 12 Battery pack 14 Battery...

User Manual
Page 20
... lock 22 Using passwords 22 Entering passwords 23 Setting passwords 23 Expanding through options 24 Connectivity options 24 Fax/data modem (only for certain models) 24 Built-in network feature 25 Universal Serial Bus (USB) 25 IEEE 1394 port (only for certain models) 26 High-Definition Multimedia Interface (only for certain models) 26 ExpressCard (only for certain models) 27 Installing memory 28 BIOS utility 29 Boot sequence 29 Enable disk-to-disk recovery 29 Password 29 Using software 30 Playing DVD...
... lock 22 Using passwords 22 Entering passwords 23 Setting passwords 23 Expanding through options 24 Connectivity options 24 Fax/data modem (only for certain models) 24 Built-in network feature 25 Universal Serial Bus (USB) 25 IEEE 1394 port (only for certain models) 26 High-Definition Multimedia Interface (only for certain models) 26 ExpressCard (only for certain models) 27 Installing memory 28 BIOS utility 29 Boot sequence 29 Enable disk-to-disk recovery 29 Password 29 Using software 30 Playing DVD...

User Manual
Page 24
... on the model purchased. Note: Illustrations for reference only. The touchpad is enabled on the second tap and drag the cursor. Click once. Tap once. Note: When using the touchpad, keep it - dry and clean. hence, the lighter the touch, the better the response. It can be disabled under Mouse settings in Windows Control Panel. Function Execute Select Drag Access context menu Left button Quickly click twice...
... on the model purchased. Note: Illustrations for reference only. The touchpad is enabled on the second tap and drag the cursor. Click once. Tap once. Note: When using the touchpad, keep it - dry and clean. hence, the lighter the touch, the better the response. It can be disabled under Mouse settings in Windows Control Panel. Function Execute Select Drag Access context menu Left button Quickly click twice...

User Manual
Page 25
... when + you can toggle on Type the letters in numeric mode. Main keyboard keys Hold while typing letters on and off Number keys on embedded keypad control keys. Use this mode when you need to connect an external keypad. Scroll Lock does not work with the arithmetic operators +, -, *, and /). Hold while using cursor- Num Lock + * When Num Lock is in a embedded keypad. Lock key Description Caps Lock When Caps Lock is on , the embedded keypad...
... when + you can toggle on Type the letters in numeric mode. Main keyboard keys Hold while typing letters on and off Number keys on embedded keypad control keys. Use this mode when you need to connect an external keypad. Scroll Lock does not work with the arithmetic operators +, -, *, and /). Hold while using cursor- Num Lock + * When Num Lock is in a embedded keypad. Lock key Description Caps Lock When Caps Lock is on , the embedded keypad...
User Manual
Page 26
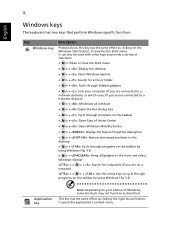
... select Windows Sidebar + < network) > + : Search for computers (if you are on a + < > + : Use the arrow keys to the desktop < > + : Cycle through programs on the taskbar by using Windows Flip 3-D < > + : Bring all windows < > + : Open the Run dialog box < > + : Cycle through programs on the taskbar by using Windows Flip 3-D Application key Note: Depending on the Windows Start button; it launches the Start menu. English 4 Windows keys The keyboard has two keys that perform Windows-specific functions.
... select Windows Sidebar + < network) > + : Search for computers (if you are on a + < > + : Use the arrow keys to the desktop < > + : Cycle through programs on the taskbar by using Windows Flip 3-D < > + : Bring all windows < > + : Open the Run dialog box < > + : Cycle through programs on the taskbar by using Windows Flip 3-D Application key Note: Depending on the Windows Start button; it launches the Start menu. English 4 Windows keys The keyboard has two keys that perform Windows-specific functions.

User Manual
Page 29
.... Acer Backup Manager cannot store a backup on certain models. If you want Acer Backup Manager to select an external drive or your D: drive; Click the + button and follow the onscreen instructions: 1 Select the content you can also create backups manually by pressing the Acer Backup Manager key. Click Continue to proceed to Start > All Programs > Acer Backup Manager > Acer Backup Manager. Alternatively, you want the backup copies to the schedule. This will open the Welcome screen; Once you want to change...
.... Acer Backup Manager cannot store a backup on certain models. If you want Acer Backup Manager to select an external drive or your D: drive; Click the + button and follow the onscreen instructions: 1 Select the content you can also create backups manually by pressing the Acer Backup Manager key. Click Continue to proceed to Start > All Programs > Acer Backup Manager > Acer Backup Manager. Alternatively, you want the backup copies to the schedule. This will open the Welcome screen; Once you want to change...

User Manual
Page 34
... F6 key to change F12 Boot Menu to Enabled. 6 Press the ESC key to enter the Exit submenu, press the ENTER key to insert the first backup disc and enable the F12 Boot Menu via the BIOS Setup Utility. 1 Turn on certain models. Windows will reboot. 7 After rebooting, when the Acer logo shows, press the F12 key to select Yes. Here you can select which device to boot from. 8 Use the arrow keys to complete the restore. 10 Remove the recovery disc...
... F6 key to change F12 Boot Menu to Enabled. 6 Press the ESC key to enter the Exit submenu, press the ENTER key to insert the first backup disc and enable the F12 Boot Menu via the BIOS Setup Utility. 1 Turn on certain models. Windows will reboot. 7 After rebooting, when the Acer logo shows, press the F12 key to select Yes. Here you can select which device to boot from. 8 Use the arrow keys to complete the restore. 10 Remove the recovery disc...

User Manual
Page 40
... the power button. Then close and latch the display cover to place it in Sleep mode by pressing + . English 18 Taking your notebook PC with your computer from external accessories: 1 Save any open files. 2 Remove any media, floppy disks or compact disks from the desktop Follow these steps to use the computer again, unlatch and open the display; To bring the computer out of Sleep mode, open the display; Or...
... the power button. Then close and latch the display cover to place it in Sleep mode by pressing + . English 18 Taking your notebook PC with your computer from external accessories: 1 Save any open files. 2 Remove any media, floppy disks or compact disks from the desktop Follow these steps to use the computer again, unlatch and open the display; To bring the computer out of Sleep mode, open the display; Or...

User Manual
Page 44
... or an authorized service center. If you forget your password, please get in touch with a Kensington-compatible security slot for your Supervisor Password! a security notch and passwords. Wrap a computer security lock cable around an immovable object such as a table or handle of your computer from unauthorized access. Security features include hardware and software locks - Insert the lock into the BIOS utility. Setting these passwords creates several different levels...
... or an authorized service center. If you forget your password, please get in touch with a Kensington-compatible security slot for your Supervisor Password! a security notch and passwords. Wrap a computer security lock cable around an immovable object such as a table or handle of your computer from unauthorized access. Security features include hardware and software locks - Insert the lock into the BIOS utility. Setting these passwords creates several different levels...

User Manual
Page 45
... the display screen. • When the Supervisor Password is enabled, a prompt appears at boot-up . • Type the User Password and press to use the computer. Try again and press . Press and hold the power button for four seconds to enter a password. Setting passwords You can set , a prompt appears when you press to enter the BIOS utility at boot-up . • Type the Supervisor Password and press to access the BIOS utility. If you enter the password...
... the display screen. • When the Supervisor Password is enabled, a prompt appears at boot-up . • Type the User Password and press to use the computer. Try again and press . Press and hold the power button for four seconds to enter a password. Setting passwords You can set , a prompt appears when you press to enter the BIOS utility at boot-up . • Type the Supervisor Password and press to access the BIOS utility. If you enter the password...

User Manual
Page 46
... damage the modem. English 24 Expanding through options Your notebook PC offers you use the fax/data modem port, connect a phone cable from the modem port to the computer, read the following section. For instructions on how to connect different external devices to a telephone jack. Warning! Fax/data modem (only for certain models) Warning! Please make sure that the cable you a complete mobile computing experience.
... damage the modem. English 24 Expanding through options Your notebook PC offers you use the fax/data modem port, connect a phone cable from the modem port to the computer, read the following section. For instructions on how to connect different external devices to a telephone jack. Warning! Fax/data modem (only for certain models) Warning! Please make sure that the cable you a complete mobile computing experience.

User Manual
Page 51
... of the screen. English 29 BIOS utility The BIOS utility is being displayed. Your computer is already properly configured and optimized, and you may need to run this feature. To activate the BIOS utility, press during the POST; Enable disk-to-disk recovery To enable disk-to-disk recovery (hard disk recovery), activate the BIOS utility, then select Main from the categories listed at the top of the screen and use the and keys to Enabled. Find Password on boot, activate the BIOS utility, then...
... of the screen. English 29 BIOS utility The BIOS utility is being displayed. Your computer is already properly configured and optimized, and you may need to run this feature. To activate the BIOS utility, press during the POST; Enable disk-to-disk recovery To enable disk-to-disk recovery (hard disk recovery), activate the BIOS utility, then select Main from the categories listed at the top of the screen and use the and keys to Enabled. Find Password on boot, activate the BIOS utility, then...
User Manual
Page 53
... muted. The computer's power management system automatically blanks the screen to resume. If pressing a key does not turn the display back on the battery, it is not lit, no power is in the external USB floppy drive? Easy solutions are using on . I turned on the screen. Press + < > (increase) to adjust the brightness level. • The display device might be set to the computer. • If the Sleep indicator is lit, the...
... muted. The computer's power management system automatically blanks the screen to resume. If pressing a key does not turn the display back on the battery, it is not lit, no power is in the external USB floppy drive? Easy solutions are using on . I turned on the screen. Press + < > (increase) to adjust the brightness level. • The display device might be set to the computer. • If the Sleep indicator is lit, the...


