

User Guide
Page 6
... or purse. Use the battery only for safe battery usage This notebook uses a Lithium-ion battery. Accidental short-circuiting can be susceptible to www.acer.com for this device. Always try to leak acid, become hot, explode or ignite and cause injury and/or damage. Batteries may damage the battery or the connecting object. Wireless devices may cause the battery to keep the battery between 15°...
... or purse. Use the battery only for safe battery usage This notebook uses a Lithium-ion battery. Accidental short-circuiting can be susceptible to www.acer.com for this device. Always try to leak acid, become hot, explode or ignite and cause injury and/or damage. Batteries may damage the battery or the connecting object. Wireless devices may cause the battery to keep the battery between 15°...

User Guide
Page 14
... the power button. For instructions on how your computer on and off To turn the power off , the setup poster helps you get started with language such as system utilities, data recovery, expansion options and troubleshooting. The TravelMate Generic User Guide contains useful information applying to use your computer. Note: Viewing the file requires Adobe Reader. Please refer to functions or features which are marked in Portable Document Format (PDF...
... the power button. For instructions on how your computer on and off To turn the power off , the setup poster helps you get started with language such as system utilities, data recovery, expansion options and troubleshooting. The TravelMate Generic User Guide contains useful information applying to use your computer. Note: Viewing the file requires Adobe Reader. Please refer to functions or features which are marked in Portable Document Format (PDF...

User Guide
Page 17
...your AC adapter xv Taking care of your battery pack xvi Cleaning and servicing xvi Touchpad 1 Touchpad basics (with two buttons) 1 Using the keyboard 3 Lock keys and embedded numeric keypad* 3 Hotkeys 4 Windows keys 5 Acer ProShield (only for certain model) 7 Overview 7 Setting up ProShield 7 Personal Secure Disk 8 BIOS Settings 9 Credential Manager 9 Data Protection 10 Data Removal 10 Remote Manageability 11 Acer eRecovery Management 12 Creating a recovery backup (Optical drive) 13 Creating a recovery backup (USB flash drive) 15 Recovering your system...
...your AC adapter xv Taking care of your battery pack xvi Cleaning and servicing xvi Touchpad 1 Touchpad basics (with two buttons) 1 Using the keyboard 3 Lock keys and embedded numeric keypad* 3 Hotkeys 4 Windows keys 5 Acer ProShield (only for certain model) 7 Overview 7 Setting up ProShield 7 Personal Secure Disk 8 BIOS Settings 9 Credential Manager 9 Data Protection 10 Data Removal 10 Remote Manageability 11 Acer eRecovery Management 12 Creating a recovery backup (Optical drive) 13 Creating a recovery backup (USB flash drive) 15 Recovering your system...

User Guide
Page 18
Recovering your system (USB flash drive) 21 To recover your system 21 Types of recovery 21 Recovering pre-installed software and drivers 21 Returning to a previous system condition 22 Returning your system to its factory condition 23 Acer Backup Manager 25 Power management 26 Acer PowerSmart key 26 Battery pack 27 Battery pack characteristics 27 Maximizing the battery's life 27 Installing and removing the battery pack 28 Charging the battery 29 Checking the battery level 29 Optimizing battery life 29...
Recovering your system (USB flash drive) 21 To recover your system 21 Types of recovery 21 Recovering pre-installed software and drivers 21 Returning to a previous system condition 22 Returning your system to its factory condition 23 Acer Backup Manager 25 Power management 26 Acer PowerSmart key 26 Battery pack 27 Battery pack characteristics 27 Maximizing the battery's life 27 Installing and removing the battery pack 28 Charging the battery 29 Checking the battery level 29 Optimizing battery life 29...

User Guide
Page 19
... ExpressCard 40 Installing memory 41 BIOS utility 43 Boot sequence 43 Enable disk-to RF fields (RSS-102) 55 LCD panel ergonomic specifications 56 Low-power license-exempt radio communication devices (RSS-210) 55 Exposure of humans to -disk recovery 43 Password 43 Using software 44 Playing DVD content 44 Frequently asked questions 45 Requesting service 47 International Travelers Warranty (ITW) 47 Before you call 47 Troubleshooting 48 Troubleshooting tips 48 Error messages...
... ExpressCard 40 Installing memory 41 BIOS utility 43 Boot sequence 43 Enable disk-to RF fields (RSS-102) 55 LCD panel ergonomic specifications 56 Low-power license-exempt radio communication devices (RSS-210) 55 Exposure of humans to -disk recovery 43 Password 43 Using software 44 Playing DVD content 44 Frequently asked questions 45 Requesting service 47 International Travelers Warranty (ITW) 47 Before you call 47 Troubleshooting 48 Troubleshooting tips 48 Error messages...

User Guide
Page 23
... Lock is indicated by small characters located on and off Hold while using cursor-control keys. Scroll Lock does not work with the arithmetic operators +, -, *, and /). Use this mode when you press the up or down when you need to connect an external keypad. The keys function as a calculator (complete with some applications. Scroll Lock + When Scroll Lock is on Type numbers in a normal manner. * only for certain models To simplify the keyboard legend, cursor-control key...
... Lock is indicated by small characters located on and off Hold while using cursor-control keys. Scroll Lock does not work with the arithmetic operators +, -, *, and /). Use this mode when you press the up or down when you need to connect an external keypad. The keys function as a calculator (complete with some applications. Scroll Lock + When Scroll Lock is on Type numbers in a normal manner. * only for certain models To simplify the keyboard legend, cursor-control key...
User Guide
Page 24
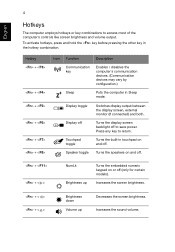
... certain models). Hotkey + + + + + + Icon Function Description Communication key Enables / disables the computer's communication devices. (Communication devices may vary by configuration.) Sleep Puts the computer in the hotkey combination. Press any key to access most of the computer's controls like screen brightness and volume output. Speaker toggle Turns the speakers on and off to save power. English 4 Hotkeys The computer employs hotkeys or key combinations to return. Display toggle Switches display output between the display screen, external monitor (if...
... certain models). Hotkey + + + + + + Icon Function Description Communication key Enables / disables the computer's communication devices. (Communication devices may vary by configuration.) Sleep Puts the computer in the hotkey combination. Press any key to access most of the computer's controls like screen brightness and volume output. Speaker toggle Turns the speakers on and off to save power. English 4 Hotkeys The computer employs hotkeys or key combinations to return. Display toggle Switches display output between the display screen, external monitor (if...
User Guide
Page 25
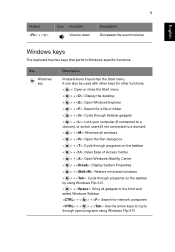
... programs on the taskbar < > + : Open Ease of Access Center < > + : Open Windows Mobility Center < > + : Display System Properties < > + : Restore minimized windows < > + : Cycle through programs on the taskbar by using Windows Flip 3-D < > + : Bring all gadgets to the front and select Windows Sidebar + < > + : Search for network computers + < > + : Use the arrow keys to cycle through open programs using Windows Flip 3-D Key Windows key Description Pressed alone it launches the Start menu. 5 Hotkey + < > Icon Function Volume down Description Decreases the sound volume.
... programs on the taskbar < > + : Open Ease of Access Center < > + : Open Windows Mobility Center < > + : Display System Properties < > + : Restore minimized windows < > + : Cycle through programs on the taskbar by using Windows Flip 3-D < > + : Bring all gadgets to the front and select Windows Sidebar + < > + : Search for network computers + < > + : Use the arrow keys to cycle through open programs using Windows Flip 3-D Key Windows key Description Pressed alone it launches the Start menu. 5 Hotkey + < > Icon Function Volume down Description Decreases the sound volume.

User Guide
Page 29
You can change your credentials, including Pre-boot authentication. English 9 BIOS Settings Here you can set and manage your ProShield and Windows passwords, manage online account information, and back up or restore credential information. You can also set the BIOS Supervisor and User passwords, enable or disable password checking at bootup, and add an Asset Tag for the device. Credential Manager Here you can set the boot device order, enable or disable ports and built-in devices, and import or export BIOS settings.
You can change your credentials, including Pre-boot authentication. English 9 BIOS Settings Here you can set and manage your ProShield and Windows passwords, manage online account information, and back up or restore credential information. You can also set the BIOS Supervisor and User passwords, enable or disable password checking at bootup, and add an Asset Tag for the device. Credential Manager Here you can set the boot device order, enable or disable ports and built-in devices, and import or export BIOS settings.

User Guide
Page 37
... its factory condition. If only one or two items of recovery Recovering pre-installed software and drivers As a troubleshooting step, you may need to a previous state when everything was working correctly, the problem may be solved by reinstalling the software or the device drivers. You can recover using either your hard drive or the recovery discs you have stopped working correctly. If reinstalling software or drivers does not help fix your problem, you need to recover device drivers...
... its factory condition. If only one or two items of recovery Recovering pre-installed software and drivers As a troubleshooting step, you may need to a previous state when everything was working correctly, the problem may be solved by reinstalling the software or the device drivers. You can recover using either your hard drive or the recovery discs you have stopped working correctly. If reinstalling software or drivers does not help fix your problem, you need to recover device drivers...

User Guide
Page 39
... Restore Operating System to restart your system. Click Yes, then Start. Click OK. This process may take several minutes, and may restart your hard drive, then reinstalls Windows and all pre-installed software and drivers: Click Start > All Programs > Acer, then click Acer eRecovery Management. When the recovery has finished, a dialog box will erase all files on your computer. Your system is still working, see "Recovering...
... Restore Operating System to restart your system. Click Yes, then Start. Click OK. This process may take several minutes, and may restart your hard drive, then reinstalls Windows and all pre-installed software and drivers: Click Start > All Programs > Acer, then click Acer eRecovery Management. When the recovery has finished, a dialog box will erase all files on your computer. Your system is still working, see "Recovering...

User Guide
Page 40
... hard drive or an optical disc. 3 Use your hard drive. The boot menu allows you must enable the F12 Boot Menu: Press when starting your hard drive. 3 Click Next. Warning: Continuing the process will erase all files on your arrow keys to select the line CDROM/DVD (this setting to start with 'IDE 1...'), then press . Windows will restart. 2 During startup, press to confirm. Select OK to open Acer eRecovery Management. 2 Click Restore Operating System to Factory Defaults...
... hard drive or an optical disc. 3 Use your hard drive. The boot menu allows you must enable the F12 Boot Menu: Press when starting your hard drive. 3 Click Next. Warning: Continuing the process will erase all files on your arrow keys to select the line CDROM/DVD (this setting to start with 'IDE 1...'), then press . Windows will restart. 2 During startup, press to confirm. Select OK to open Acer eRecovery Management. 2 Click Restore Operating System to Factory Defaults...

User Guide
Page 41
... items of recovery Recovering pre-installed software and drivers As a troubleshooting step, you may need to recover device drivers that came pre-installed on your computer, follow that software's installation instructions. • New device drivers: If you need to reinstall the software and device drivers that did not come pre-installed on page 23. Types of software or hardware have created. • New software: If you have stopped working correctly. You can use the Acer eRecovery Management program. To recover software and drivers that product...
... items of recovery Recovering pre-installed software and drivers As a troubleshooting step, you may need to recover device drivers that came pre-installed on your computer, follow that software's installation instructions. • New device drivers: If you need to reinstall the software and device drivers that did not come pre-installed on page 23. Types of software or hardware have created. • New software: If you have stopped working correctly. You can use the Acer eRecovery Management program. To recover software and drivers that product...

User Guide
Page 43
... restored using either your hard drive or the recovery backup you to reinstall everything on your hard drive, then reinstalls Windows and all software and drivers that were pre-installed on your hard drive. If you specified. Recovering from the hard drive during startup" on page 23. Click the Restore tab, then Restore Operating System to Factory Defaults to your hard drive. A dialog box will erase all pre-installed software and drivers: Click Start > All Programs > Acer, then click Acer eRecovery Management...
... restored using either your hard drive or the recovery backup you to reinstall everything on your hard drive, then reinstalls Windows and all software and drivers that were pre-installed on your hard drive. If you specified. Recovering from the hard drive during startup" on page 23. Click the Restore tab, then Restore Operating System to Factory Defaults to your hard drive. A dialog box will erase all pre-installed software and drivers: Click Start > All Programs > Acer, then click Acer eRecovery Management...

User Guide
Page 44
... device to start from, such as a flash drive. 3 Use your arrow keys to select the line USB HDD, then press . The boot menu allows you must enable the F12 Boot Menu: Press when starting your computer. English 24 Recovering from the hard drive during startup to open the boot menu. Recovering from the recovery backup on your hard drive. Use the left or right arrow keys to select the Main menu. Windows will erase all pre-installed software and drivers: 1 Plug in the USB flash drive...
... device to start from, such as a flash drive. 3 Use your arrow keys to select the line USB HDD, then press . The boot menu allows you must enable the F12 Boot Menu: Press when starting your computer. English 24 Recovering from the hard drive during startup to open the boot menu. Recovering from the recovery backup on your hard drive. Use the left or right arrow keys to select the Main menu. Windows will erase all pre-installed software and drivers: 1 Plug in the USB flash drive...

User Guide
Page 46
... monitors system activity. Windows handles all of the following devices: keyboard, mouse, hard disk, peripherals connected to your computer. PCI and WLAN switch to a lower speed; When you press the Acer PowerSmart key, the screen brightness is only available on certain models. System activity refers to any activity involving one or more of these devices in power management unit that supports the advanced configuration and power interface (ACPI), which allows for your previous settings. Acer...
... monitors system activity. Windows handles all of the following devices: keyboard, mouse, hard disk, peripherals connected to your computer. PCI and WLAN switch to a lower speed; When you press the Acer PowerSmart key, the screen brightness is only available on certain models. System activity refers to any activity involving one or more of these devices in power management unit that supports the advanced configuration and power interface (ACPI), which allows for your previous settings. Acer...
User Guide
Page 51
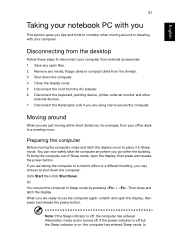
... Sleep mode, open files. 2 Remove any media, floppy disks or compact disks from the drive(s). 3 Shut down the computer. 4 Close the display cover. 5 Disconnect the cord from the desktop Follow these steps to place it in Sleep mode by pressing + . Then close and latch the display cover to disconnect your computer. then press and release the power button. Disconnecting from the AC adapter. 6 Disconnect the keyboard, pointing device, printer, external monitor...
... Sleep mode, open files. 2 Remove any media, floppy disks or compact disks from the drive(s). 3 Shut down the computer. 4 Close the display cover. 5 Disconnect the cord from the desktop Follow these steps to place it in Sleep mode by pressing + . Then close and latch the display cover to disconnect your computer. then press and release the power button. Disconnecting from the AC adapter. 6 Disconnect the keyboard, pointing device, printer, external monitor...

User Guide
Page 63
... the notebook PC logo is a hardware configuration program built into your computer's BIOS. Password To set a password on boot: and use the and keys to -disk recovery (hard disk recovery), activate the BIOS utility, then select Main from the categories listed at the top of the screen. However, if you encounter configuration problems, you do not need to Enabled. English 43 BIOS utility The BIOS utility is being displayed. Enable disk-to-disk recovery To enable disk-to set the boot sequence in the BIOS utility, activate the BIOS utility, then select Boot...
... the notebook PC logo is a hardware configuration program built into your computer's BIOS. Password To set a password on boot: and use the and keys to -disk recovery (hard disk recovery), activate the BIOS utility, then select Main from the categories listed at the top of the screen. However, if you encounter configuration problems, you do not need to Enabled. English 43 BIOS utility The BIOS utility is being displayed. Enable disk-to-disk recovery To enable disk-to set the boot sequence in the BIOS utility, activate the BIOS utility, then select Boot...

User Guide
Page 65
... not start or boot up. Press + < > (increase) to adjust the brightness level. • The display device might be too low. English 45 Frequently asked questions The following is being supplied to the computer. Press any key to resume. Look at the power indicator: • If it is lit, check the following: • Is a non-bootable (non-system) disk in Sleep mode. Remove or replace...
... not start or boot up. Press + < > (increase) to adjust the brightness level. • The display device might be too low. English 45 Frequently asked questions The following is being supplied to the computer. Press any key to resume. Look at the power indicator: • If it is lit, check the following: • Is a non-bootable (non-system) disk in Sleep mode. Remove or replace...
User Guide
Page 66
... it works, contact your notebook. This recovery process helps you purchased your dealer or an authorized service center as the internal keyboard cable may be loose. Before performing a restore operation, please check the BIOS settings. 1 Check to see if Acer disk-to-disk recovery is enabled or not. 2 Make sure the D2D Recovery setting in Main is connected securely to a USB port and the corresponding port on the printer. Note: If your C: drive. (Your C: drive...
... it works, contact your notebook. This recovery process helps you purchased your dealer or an authorized service center as the internal keyboard cable may be loose. Before performing a restore operation, please check the BIOS settings. 1 Check to see if Acer disk-to-disk recovery is enabled or not. 2 Make sure the D2D Recovery setting in Main is connected securely to a USB port and the corresponding port on the printer. Note: If your C: drive. (Your C: drive...


