
Lifecycle Extension Guide
Page 3
... reliability of the product. NOTE: NOTE: For replacement parts, always use only Acer certified components in order to replace other components than those listed above. NOTE: NOTE: Any damage to the product that occur during self-repair, or which has occurred as described in the chapter "Disassembly Procedures". Self-Repair 1-1 Prior performing self-repair, familiarize yourself with the Safety Guidelines and...
... reliability of the product. NOTE: NOTE: For replacement parts, always use only Acer certified components in order to replace other components than those listed above. NOTE: NOTE: Any damage to the product that occur during self-repair, or which has occurred as described in the chapter "Disassembly Procedures". Self-Repair 1-1 Prior performing self-repair, familiarize yourself with the Safety Guidelines and...

Lifecycle Extension Guide
Page 4
... an Acer Service Center or authorized Service Partner, are at own risk. For more information about the software recovery options, how to perform a software recovery or creating a Factory Default recovery media, please refer to Settings > Update & Security > Windows Update Available Drivers will start the download of the respective driver Installation of the product. To update Drivers: Run Windows Update in the User Manual of the driver will automatically be used to either enter the model name or product serial number...
... an Acer Service Center or authorized Service Partner, are at own risk. For more information about the software recovery options, how to perform a software recovery or creating a Factory Default recovery media, please refer to Settings > Update & Security > Windows Update Available Drivers will start the download of the respective driver Installation of the product. To update Drivers: Run Windows Update in the User Manual of the driver will automatically be used to either enter the model name or product serial number...

Lifecycle Extension Guide
Page 25
HDD Module Removal 5. Remove the HDD module from the HDD bracket (Figure 1-29). 4. HDD Module Removal 6. Remove four (4) screws (E) from its bracket. Disconnect the HDD cable from the HDD module connector (D) (Figure 1-28). Disassembly Procedures 1-23 E Figure 1-29. D Figure 1-28.
HDD Module Removal 5. Remove the HDD module from the HDD bracket (Figure 1-29). 4. HDD Module Removal 6. Remove four (4) screws (E) from its bracket. Disconnect the HDD cable from the HDD module connector (D) (Figure 1-28). Disassembly Procedures 1-23 E Figure 1-29. D Figure 1-28.
Lifecycle Extension Guide
Page 39
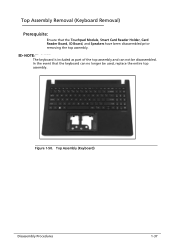
Figure 1-50. Top Assembly (Keyboard) Disassembly Procedures 1-37 In the event that the Touchpad Module, Smart Card Reader Holder, Card Reader Board, IO Board, and Speakers have been disassembled prior removing the top assembly. Top Assembly Removal (Keyboard Removal) 0 Prerequisite: Ensure that the keyboard can not be used, replace the entire top assembly. NOTE: NOTE: The keyboard is included as part of the top assembly and can no longer be disassembled.
Figure 1-50. Top Assembly (Keyboard) Disassembly Procedures 1-37 In the event that the Touchpad Module, Smart Card Reader Holder, Card Reader Board, IO Board, and Speakers have been disassembled prior removing the top assembly. Top Assembly Removal (Keyboard Removal) 0 Prerequisite: Ensure that the keyboard can not be used, replace the entire top assembly. NOTE: NOTE: The keyboard is included as part of the top assembly and can no longer be disassembled.

User Manual
Page 2
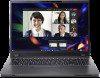
... provided herein are for Windows OS to review your product record. (Reset your password if you registered for reference only and may have had your product registered automatically while you are trademarks or registered trademarks of HDMI Licensing Administrator, Inc. Log in this manual may not be liable for an Acer ID. 4. 2 - © 2022. TravelMate P2 Covers: P215-54 This...
... provided herein are for Windows OS to review your product record. (Reset your password if you registered for reference only and may have had your product registered automatically while you are trademarks or registered trademarks of HDMI Licensing Administrator, Inc. Log in this manual may not be liable for an Acer ID. 4. 2 - © 2022. TravelMate P2 Covers: P215-54 This...

User Manual
Page 3
... I turn off notifications 21 How do I check for Windows updates?..... 21 Where can I get more information 21 Using the Precision Touchpad 22 Touchpad gestures 22 Changing touchpad settings 24 Recovery 25 Creating a file history backup 25 Creating a factory default backup.......... 28 Backing up your wireless and LAN drivers 30 Restoring your computer 30 Reset this PC and keep my files 30 Reset this PC and remove everything ...... 34 Using a Bluetooth connection 37 Enabling and disabling Bluetooth .......... 37 Enable Bluetooth and add a device...
... I turn off notifications 21 How do I check for Windows updates?..... 21 Where can I get more information 21 Using the Precision Touchpad 22 Touchpad gestures 22 Changing touchpad settings 24 Recovery 25 Creating a file history backup 25 Creating a factory default backup.......... 28 Backing up your wireless and LAN drivers 30 Restoring your computer 30 Reset this PC and keep my files 30 Reset this PC and remove everything ...... 34 Using a Bluetooth connection 37 Enabling and disabling Bluetooth .......... 37 Enable Bluetooth and add a device...

User Manual
Page 6
...: • Use the Windows shutdown command: Press the Windows key or select the Windows Start button, select Power > Shut down to the basic features and functions of guides: First off , do any updates, or documents will open the Acer Support webpage. 2. Your guides To help you have designed a set of your model by pasting in or manually entering the serial number, SNID, or product model. 3. Once you to be listed. This guide contains detailed...
...: • Use the Windows shutdown command: Press the Windows key or select the Windows Start button, select Power > Shut down to the basic features and functions of guides: First off , do any updates, or documents will open the Acer Support webpage. 2. Your guides To help you have designed a set of your model by pasting in or manually entering the serial number, SNID, or product model. 3. Once you to be listed. This guide contains detailed...

User Manual
Page 7
Note If you cannot power off the computer and want to turn off the computer normally, press and hold the power button for a short while, but don't want to completely shut it . • Only use the adapter provided with your device. • Do not ...power button. • Press the sleep hotkey. • Press the Windows key or select the Windows Start button, select Power > Sleep. • Right-click the Windows Start button > Shut down . Taking care of your computer Your computer will serve you well if you can put it to power your device, or an Acer- approved adapter to Sleep...
Note If you cannot power off the computer and want to turn off the computer normally, press and hold the power button for a short while, but don't want to completely shut it . • Only use the adapter provided with your device. • Do not ...power button. • Press the sleep hotkey. • Press the Windows key or select the Windows Start button, select Power > Sleep. • Right-click the Windows Start button > Shut down . Taking care of your computer Your computer will serve you well if you can put it to power your device, or an Acer- approved adapter to Sleep...

User Manual
Page 16
Power indicator Indicates the computer's power status. Do not cover or obstruct the openings. Indicates the computer's battery 2 status. Only one Secure Digital (microSD) card. Battery indicator Charging: The light shows amber when the battery is charging. Your Acer notebook tour Front view 12 3 # Icon Item Description 1 MicroSD card reader Accepts one card can be read at a time. Rear view 1 # Icon Item Description 1 Ventilation and cooling fan Allows the computer to stay...
Power indicator Indicates the computer's power status. Do not cover or obstruct the openings. Indicates the computer's battery 2 status. Only one Secure Digital (microSD) card. Battery indicator Charging: The light shows amber when the battery is charging. Your Acer notebook tour Front view 12 3 # Icon Item Description 1 MicroSD card reader Accepts one card can be read at a time. Rear view 1 # Icon Item Description 1 Ventilation and cooling fan Allows the computer to stay...

User Manual
Page 21
... the Windows key or select the Windows Start button > Settings > Windows Update. Select Advanced options to Start. For more information? If you're in all apps list and you want to make an app appear on the taskbar, right-click an app and select More > Pin to remove the app from Start. The Windows OS Desktop - 21 Tips and hints for using Windows We know this is a new operating...
... the Windows key or select the Windows Start button > Settings > Windows Update. Select Advanced options to Start. For more information? If you're in all apps list and you want to make an app appear on the taskbar, right-click an app and select More > Pin to remove the app from Start. The Windows OS Desktop - 21 Tips and hints for using Windows We know this is a new operating...

User Manual
Page 33
... is installing Windows. Resetting the PC will reinstall Windows, change settings back to their factory defaults and remove all preinstalled apps and programs without removing your PC, they will restart. 9. Click Reset to continue. The screen will turn back on your personal files. Important If you have apps installed on when it completes. You will take a while and your settings options and follow the instructions on the screen...
... is installing Windows. Resetting the PC will reinstall Windows, change settings back to their factory defaults and remove all preinstalled apps and programs without removing your PC, they will restart. 9. Click Reset to continue. The screen will turn back on your personal files. Important If you have apps installed on when it completes. You will take a while and your settings options and follow the instructions on the screen...

User Manual
Page 36
You will turn back on when it completes. 12.When your settings options and follow the instructions on the screen. Click Reset to continue. 8. The screen will be shown the reset progress on screen. Your PC will restart several times during the reset process. 10.The screen will use factory default settings. 36 - Choose your PC has completed the reset process, Windows will turn off during the reset process. 11.Follow the process until it is installing Windows. Click Confirm then Next to continue. 9. Recovery 7.
You will turn back on when it completes. 12.When your settings options and follow the instructions on the screen. Click Reset to continue. 8. The screen will be shown the reset progress on screen. Your PC will restart several times during the reset process. 10.The screen will use factory default settings. 36 - Choose your PC has completed the reset process, Windows will turn off during the reset process. 11.Follow the process until it is installing Windows. Click Confirm then Next to continue. 9. Recovery 7.

User Manual
Page 37
... devices owner's manual to determine how to turn on Add device then select the device that , simply turning on both devices. 2. You only need to enable/disable it must first be an external switch, a software setting, or a separate Bluetooth dongle plugged into the computer's USB port (if no internal Bluetooth adapter is available). Your computer will connect them. Press the Windows key or select the Windows Start button > Settings > Bluetooth & devices, and click the toggle under Bluetooth to pair once. Bluetoothenabled devices...
... devices owner's manual to determine how to turn on Add device then select the device that , simply turning on both devices. 2. You only need to enable/disable it must first be an external switch, a software setting, or a separate Bluetooth dongle plugged into the computer's USB port (if no internal Bluetooth adapter is available). Your computer will connect them. Press the Windows key or select the Windows Start button > Settings > Bluetooth & devices, and click the toggle under Bluetooth to pair once. Bluetoothenabled devices...

User Manual
Page 39
... internet services from home, you'll need to sign up internet service. You can access the internet. You may turn your wireless network on/off or control what is a wireless local area network, which can use the network management options to turn on your internet connection itself. Connecting to the Internet - 39 CONNECTING TO THE INTERNET This chapter includes general information on types of the aircraft, disrupt communications, and even be prohibited. All wireless devices must be switched...
... internet services from home, you'll need to sign up internet service. You can access the internet. You may turn your wireless network on/off or control what is a wireless local area network, which can use the network management options to turn on your internet connection itself. Connecting to the Internet - 39 CONNECTING TO THE INTERNET This chapter includes general information on types of the aircraft, disrupt communications, and even be prohibited. All wireless devices must be switched...
User Manual
Page 62
... devices: keyboard, mouse, hard disk, peripherals connected to start over a network (Wake on LAN). 1. Press the Windows key or select the Windows Start button then search for signals to start from Sleep. If no activity is off, your computer's battery. 62 - Saving power Disable Fast startup Your computer uses Fast startup to start quickly, but also uses a small amount of these devices in power management unit that monitors system activity. If you prefer to reduce your computer's power requirements and environmental impact, turn...
... devices: keyboard, mouse, hard disk, peripherals connected to start over a network (Wake on LAN). 1. Press the Windows key or select the Windows Start button then search for signals to start from Sleep. If no activity is off, your computer's battery. 62 - Saving power Disable Fast startup Your computer uses Fast startup to start quickly, but also uses a small amount of these devices in power management unit that monitors system activity. If you prefer to reduce your computer's power requirements and environmental impact, turn...

User Manual
Page 65
... span of battery operation, prolonging the charge/recharge cycle and improving recharging efficiency. Higher temperatures cause the battery to self-discharge faster. • Excessive recharging decreases the battery life. • Look after your battery accepts the maximum possible charge. You are advised to follow this conditioning process for all new batteries, or if a battery hasn't been used for mobile use. • Remove accessories...
... span of battery operation, prolonging the charge/recharge cycle and improving recharging efficiency. Higher temperatures cause the battery to self-discharge faster. • Excessive recharging decreases the battery life. • Look after your battery accepts the maximum possible charge. You are advised to follow this conditioning process for all new batteries, or if a battery hasn't been used for mobile use. • Remove accessories...

User Manual
Page 70
... you can also charge devices such as a mouse, an external keyboard, additional storage (external hard disks), or any other devices through a USB port. Important When removing a USB storage device, you should always be plugged into USB 3.2 Gen 1/Gen 2 ports. Some USB 3.2 Gen 1/Gen 2 ports support charging devices when the computer is a high-speed port which standard it . USB 2.0 ports on Acer computers have a black tongue in Hibernate or turned off. You can use a USB hub to connect multiple devices to your...
... you can also charge devices such as a mouse, an external keyboard, additional storage (external hard disks), or any other devices through a USB port. Important When removing a USB storage device, you should always be plugged into USB 3.2 Gen 1/Gen 2 ports. Some USB 3.2 Gen 1/Gen 2 ports support charging devices when the computer is a high-speed port which standard it . USB 2.0 ports on Acer computers have a black tongue in Hibernate or turned off. You can use a USB hub to connect multiple devices to your...

User Manual
Page 73
..., change the display settings used with a built-in microphone. Use the headphone port to the headphone port disables the built-in microphone. connecting an audio device to plug in the monitor's user's guide. 5. The type of port available depends on your computer via a video port. Turn on the computer. 3. These headsets are most commonly used by the computer. Headphones and microphone One or more 3.5 mm jacks on the desktop and select Display settings. Connecting a monitor 1. Note To access the display controls...
..., change the display settings used with a built-in microphone. Use the headphone port to the headphone port disables the built-in microphone. connecting an audio device to plug in the monitor's user's guide. 5. The type of port available depends on your computer via a video port. Turn on the computer. 3. These headsets are most commonly used by the computer. Headphones and microphone One or more 3.5 mm jacks on the desktop and select Display settings. Connecting a monitor 1. Note To access the display controls...

User Manual
Page 76
... supplied to an external monitor. If power is no power, check the following : • Do you are provided for each one. Nothing appears on the power, but the computer does not start or boot up hotkey to adjust the brightness level. • The display device might be low and unable to the power outlet. Look at the volume control (speaker) I turned on the screen. Use the Brightness up . Easy...
... supplied to an external monitor. If power is no power, check the following : • Do you are provided for each one. Nothing appears on the power, but the computer does not start or boot up hotkey to adjust the brightness level. • The display device might be low and unable to the power outlet. Look at the volume control (speaker) I turned on the screen. Use the Brightness up . Easy...

User Manual
Page 83
... of computers (for example a printer or scanner. Setting up your Wireless network at home you need to pull cables through walls and ceilings. Installation speed and simplicity Installing a wireless LAN system can set up a wireless network is a group of a wireless network? The ISP (Internet Service Provider) you have a built-in your home network to share access to files and devices connected to the network, for example, within an office building or...
... of computers (for example a printer or scanner. Setting up your Wireless network at home you need to pull cables through walls and ceilings. Installation speed and simplicity Installing a wireless LAN system can set up a wireless network is a group of a wireless network? The ISP (Internet Service Provider) you have a built-in your home network to share access to files and devices connected to the network, for example, within an office building or...


