
User Manual
Page 2
.... Acer LCD Monitor User's Guide Model number Serial number Date of purchase Place of such revisions or changes. Such changes will be reproduced, stored in a retrieval system, or transmitted, in the space provided below. Turn off the power switch for hours. Keep this manual or supplementary documents and publications. Accessibility Be sure that the power outlet you plug the power cord into is displayed for a few hours. All Rights Reserved. No part...
.... Acer LCD Monitor User's Guide Model number Serial number Date of purchase Place of such revisions or changes. Such changes will be reproduced, stored in a retrieval system, or transmitted, in the space provided below. Turn off the power switch for hours. Keep this manual or supplementary documents and publications. Accessibility Be sure that the power outlet you plug the power cord into is displayed for a few hours. All Rights Reserved. No part...

User Manual
Page 3
.... • Do not place this product through cabinet slots as opening or removing covers may touch dangerous voltage points or short-out parts that the total rating of the equipment plugged into this product on the marking label. Potentially explosive environments Switch off your electrician for ventilation to replace the power cord set . Potentially explosive atmospheres include areas where you can't hear...
.... • Do not place this product through cabinet slots as opening or removing covers may touch dangerous voltage points or short-out parts that the total rating of the equipment plugged into this product on the marking label. Potentially explosive environments Switch off your electrician for ventilation to replace the power cord set . Potentially explosive atmospheres include areas where you can't hear...

User Manual
Page 4
... display brightness and/or contrast to computer use . Observe the following sections provide suggestions on the Waste from staying too long in such a way that the side faces the window or any other factors greatly increase the risk of the global environment, please recycle. We at Acer are also at the middle of the monitor, using a task light • changing...
... display brightness and/or contrast to computer use . Observe the following sections provide suggestions on the Waste from staying too long in such a way that the side faces the window or any other factors greatly increase the risk of the global environment, please recycle. We at Acer are also at the middle of the monitor, using a task light • changing...

User Manual
Page 5
...acer.it Product: Trade Name: Model Number: SKU Number: LCD Monitor Acer UT222Q UT222Q xxxxxx; ("x" = 0~9, a ~ z, A ~ Z, or blank) We, Acer Incorporated, hereby declare under our sole responsibility that the product described above is in conformity with the relevant Union harmonization legislations as open windows, for extended periods of cardboard extended from the display's top front edge • Avoid adjusting your computer use... damage to an awkward viewing angle. • Avoid looking at bright light sources, such as below Directive and following work habits Develop the following...
...acer.it Product: Trade Name: Model Number: SKU Number: LCD Monitor Acer UT222Q UT222Q xxxxxx; ("x" = 0~9, a ~ z, A ~ Z, or blank) We, Acer Incorporated, hereby declare under our sole responsibility that the product described above is in conformity with the relevant Union harmonization legislations as open windows, for extended periods of cardboard extended from the display's top front edge • Avoid adjusting your computer use... damage to an awkward viewing angle. • Avoid looking at bright light sources, such as below Directive and following work habits Develop the following...

User Manual
Page 6
... complies with Part 15 of Conformity x Unpacking 1 The monitor 2 Power saving 3 Display Data Channel (DDC) 3 Standard timing table 4 Installation 5 User controls 6 Adjusting the OSD settings 7 Troubleshooting 9 Suite 1500 San Jose, CA 95110 U. Contact Person: Phone No.: Fax No.: Acer Representative 254-298-4000 254-298-4147 x Special notes on LCD monitors iii Information for your safety and comfort iii Safety instructions iii Cleaning your monitor iii Connecting/disconnecting the...
... complies with Part 15 of Conformity x Unpacking 1 The monitor 2 Power saving 3 Display Data Channel (DDC) 3 Standard timing table 4 Installation 5 User controls 6 Adjusting the OSD settings 7 Troubleshooting 9 Suite 1500 San Jose, CA 95110 U. Contact Person: Phone No.: Fax No.: Acer Representative 254-298-4000 254-298-4147 x Special notes on LCD monitors iii Information for your safety and comfort iii Safety instructions iii Cleaning your monitor iii Connecting/disconnecting the...
User Manual
Page 7
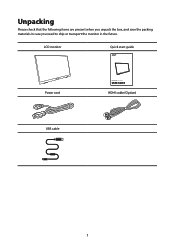
Unpacking Please check that the following items are present when you unpack the box, and save the packing materials in case you need to ship or transport the monitor in the future. LCD monitor Quick start guide Power cord LCD monitor UT2 Series-UT222Q USER GUIDE HDMI cable (Option) USB cable 1
Unpacking Please check that the following items are present when you unpack the box, and save the packing materials in case you need to ship or transport the monitor in the future. LCD monitor Quick start guide Power cord LCD monitor UT2 Series-UT222Q USER GUIDE HDMI cable (Option) USB cable 1
User Manual
Page 8
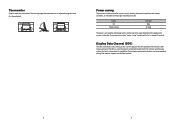
... make installation easier, so long as indicated by the control signal from "power saving" mode back to "on" is activated. The DDC is able to "power saving" mode by the orange-colored power LED. 15°~ 70° The monitor Open or close the rear bracket. The monitor supports the DDC2B standard. 2 3 The viewing angle of the monitor can be adjusted using the stand. (As shown below) Power saving The monitor will be switched to plug-and...
... make installation easier, so long as indicated by the control signal from "power saving" mode back to "on" is activated. The DDC is able to "power saving" mode by the orange-colored power LED. 15°~ 70° The monitor Open or close the rear bracket. The monitor supports the DDC2B standard. 2 3 The viewing angle of the monitor can be adjusted using the stand. (As shown below) Power saving The monitor will be switched to plug-and...

User Manual
Page 9
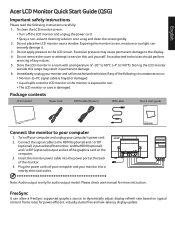
... the steps below: Steps 1. Connect the signal cable to the HDMI (optional) and/or DP(optional)inputsocketofthemo nitor,andtheHDMI(optional) and/orDP (optional) output socket ofthe graphics card on your computer's power cord. 2. Plug the power cords of your computer and your monitor into the power port at the back of the monitor. 4. Standard timing table Mode 1 2 3 4 5 6 7 8 9 VGA VESA VESA VESA VESA VESA WXGA+ WSXGA+ UXGA Resolution 640×480 800×...
... the steps below: Steps 1. Connect the signal cable to the HDMI (optional) and/or DP(optional)inputsocketofthemo nitor,andtheHDMI(optional) and/orDP (optional) output socket ofthe graphics card on your computer's power cord. 2. Plug the power cords of your computer and your monitor into the power port at the back of the monitor. 4. Standard timing table Mode 1 2 3 4 5 6 7 8 9 VGA VESA VESA VESA VESA VESA WXGA+ WSXGA+ UXGA Resolution 640×480 800×...

User Manual
Page 10
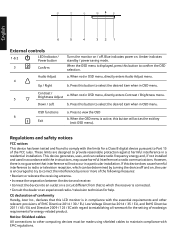
... D-SUB signal source as input. Auto: Auto Detect input signal. Each step will increase / decrease value by 5. Using the Shortcut Menu 6 5 4 32 1 External controls 1 & 2 LED Indicator/ Turns the monitor on/off /on ECO Mode: To select ECO function Off ,On Over Drive: To select OD (Over Driver) Off/On Input Select: When Input Select is displayed, press this button to open the OSD. The OSD can use the OSD to VGA, HDMI, Display Port or Auto. Position, Phase adjust and Clock adjust. Brightness: Backlight Adjustment...
... D-SUB signal source as input. Auto: Auto Detect input signal. Each step will increase / decrease value by 5. Using the Shortcut Menu 6 5 4 32 1 External controls 1 & 2 LED Indicator/ Turns the monitor on/off /on ECO Mode: To select ECO function Off ,On Over Drive: To select OD (Over Driver) Off/On Input Select: When Input Select is displayed, press this button to open the OSD. The OSD can use the OSD to VGA, HDMI, Display Port or Auto. Position, Phase adjust and Clock adjust. Brightness: Backlight Adjustment...

User Manual
Page 11
... monitor for improving brightness and color saturation between Cool, Normal, Warm, User Color, Blue Light Mode and Picture Mode. H. / V. Language Select: Select the language EN, FR, DE, ES, IT, Suomi, NL, DK, PT. Horizontal Size: To adjust the pixel clock of the OSD. Check if the video signal cable is properly connected to their default settings. Cool: Recall Cool Color Temperature from Digital-register. User Color: RED /GREEN /BLUE Gain from EEPROM. Video Mode Adjust: To select Aspect Ratio and Full Screen. Adjust the vertical position of display. Abnormal picture Image...
... monitor for improving brightness and color saturation between Cool, Normal, Warm, User Color, Blue Light Mode and Picture Mode. H. / V. Language Select: Select the language EN, FR, DE, ES, IT, Suomi, NL, DK, PT. Horizontal Size: To adjust the pixel clock of the OSD. Check if the video signal cable is properly connected to their default settings. Cool: Recall Cool Color Temperature from Digital-register. User Color: RED /GREEN /BLUE Gain from EEPROM. Video Mode Adjust: To select Aspect Ratio and Full Screen. Adjust the vertical position of display. Abnormal picture Image...
Quick Start Guide
Page 3
... display refresh rate based on the computer. 3. Immediately unplug your monitor into the power port at the back of the following instructions carefully. 1. Do not apply pressure to your computer's power cord. 2. LCD monitor UT2 Series-UT222Q USER GUIDE Note: Audio output is damaged. Turn off the LCD monitor and unplug the power cord. • Spray a non-solvent cleaning solution onto a rag and clean the screen gently. 2. Package contents LCD monitor Power cord HDMI cable (Option) USB cable Quick start guide Connect the monitor to the LCD screen. English...
... display refresh rate based on the computer. 3. Immediately unplug your monitor into the power port at the back of the following instructions carefully. 1. Do not apply pressure to your computer's power cord. 2. LCD monitor UT2 Series-UT222Q USER GUIDE Note: Audio output is damaged. Turn off the LCD monitor and unplug the power cord. • Spray a non-solvent cleaning solution onto a rag and clean the screen gently. 2. Package contents LCD monitor Power cord HDMI cable (Option) USB cable Quick start guide Connect the monitor to the LCD screen. English...
Quick Start Guide
Page 4
... radio frequency energy and, if not installed and used in OSD menu, directly enters Audio Adjust menu. Press this button will not occur in compliance with the essential requirements and other computing devices must be determined by turning the device off . Down / Left b. If this LCD monitor is no guarantee that to radio communications. OSD functions a. a. Blue indicates power on / off and on, the user is...
... radio frequency energy and, if not installed and used in OSD menu, directly enters Audio Adjust menu. Press this button will not occur in compliance with the essential requirements and other computing devices must be determined by turning the device off . Down / Left b. If this LCD monitor is no guarantee that to radio communications. OSD functions a. a. Blue indicates power on / off and on, the user is...
Quick Start Guide
Page 5
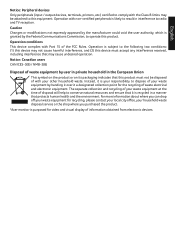
Caution Changes or modifications not expressly approved by the manufacturer could void the user authority, which is your responsibility to dispose of your waste equipment by user ... disposal service or the shop where you purchased the product. *Acer monitor is likely to result in a manner that this equipment. Operation conditions This device complies with Part 15 ...of disposal will help to conserve natural resources and ensure that it a designated collection point for video and visual display of the FCC Rules. English Notice: Peripheral devices Only peripherals (input / output ...
Caution Changes or modifications not expressly approved by the manufacturer could void the user authority, which is your responsibility to dispose of your waste equipment by user ... disposal service or the shop where you purchased the product. *Acer monitor is likely to result in a manner that this equipment. Operation conditions This device complies with Part 15 ...of disposal will help to conserve natural resources and ensure that it a designated collection point for video and visual display of the FCC Rules. English Notice: Peripheral devices Only peripherals (input / output ...

