
User Manual
Page 3
... by changing the image or turning off the power switch and then turn it on again to make sure the flicker disappears. • You may flicker during initial use . • The LCD screen has 99.99% or more effective pixels. Information for future reference. Follow all warnings and instructions marked on the desktop pattern you use . Keep this case, the screen is displayed for a few hours. Turn off the power switch...
... by changing the image or turning off the power switch and then turn it on again to make sure the flicker disappears. • You may flicker during initial use . • The LCD screen has 99.99% or more effective pixels. Information for future reference. Follow all warnings and instructions marked on the desktop pattern you use . Keep this case, the screen is displayed for a few hours. Turn off the power switch...

User Manual
Page 4
... music at high volume. • Avoid turning up the volume to protect it under sporting, exercising, or any kind into this product through cabinet slots as they may touch dangerous voltage points or short-out parts that could result in installation unless proper ventilation is used with this product, make sure that the power outlet you plug the power cord into is...
... music at high volume. • Avoid turning up the volume to protect it under sporting, exercising, or any kind into this product through cabinet slots as they may touch dangerous voltage points or short-out parts that could result in installation unless proper ventilation is used with this product, make sure that the power outlet you plug the power cord into is...

User Manual
Page 5
... grounded plug. v ampere rating of the branch circuit rating. If power strips are used, the load should not exceed 80% of the power strip's input rating. • This product's power cord is equipped with the supplied power supply cord set , make sure that the total rating of all servicing to dangerous voltage points or other nearby electrical devices that the new power cord meets the following the operating instructions Make sure the power...
... grounded plug. v ampere rating of the branch circuit rating. If power strips are used, the load should not exceed 80% of the power strip's input rating. • This product's power cord is equipped with the supplied power supply cord set , make sure that the total rating of all servicing to dangerous voltage points or other nearby electrical devices that the new power cord meets the following the operating instructions Make sure the power...

User Manual
Page 6
... the use of radio equipment in damage and will often require extensive work by the operating instructions, since improper adjustment of our products. Keep them out of the reach of our other controls may contain small parts. For more information and help when ...Adjust only those controls that are covered by a qualified technician to restore the product to normal condition. Switch off your device in the form of salvaging and disposal of used equipment, as grain, dust or metal powders. Potentially explosive atmospheres include areas where you would normally be advised to turn...
... the use of radio equipment in damage and will often require extensive work by the operating instructions, since improper adjustment of our products. Keep them out of the reach of our other controls may contain small parts. For more information and help when ...Adjust only those controls that are covered by a qualified technician to restore the product to normal condition. Switch off your device in the form of salvaging and disposal of used equipment, as grain, dust or metal powders. Potentially explosive atmospheres include areas where you would normally be advised to turn...

User Manual
Page 7
...used to power home electronics is consumed while the products are turned off position use up to local, state or federal laws. More information vii Disposal instructions ...LCD/CRT monitor or display: lamp(s) inside this electronic device into the trash when discarding. In the average home, 75% of the global environment, please recycle. For more information on the recorded image and does not constitute a malfunction. Nevertheless, some pixels may occasionally misfire or appear as black or red dots. For lamp-specific disposal information, check www.lamprecycle.org. LCD pixel...
...used to power home electronics is consumed while the products are turned off position use up to local, state or federal laws. More information vii Disposal instructions ...LCD/CRT monitor or display: lamp(s) inside this electronic device into the trash when discarding. In the average home, 75% of the global environment, please recycle. For more information on the recorded image and does not constitute a malfunction. Nevertheless, some pixels may occasionally misfire or appear as black or red dots. For lamp-specific disposal information, check www.lamprecycle.org. LCD pixel...

User Manual
Page 8
... the power button. As an ENERGY STAR partner, Acer Inc. viii refers to Acer LCD monitor with an ENERGY STAR logo. The following section provides tips for energy efficiency. Finding your comfort zone Find your sitting height to remove the strain on your company's health and safety department. Users are also at risk of physical injury after prolonged use . Long work...
... the power button. As an ENERGY STAR partner, Acer Inc. viii refers to Acer LCD monitor with an ENERGY STAR logo. The following section provides tips for energy efficiency. Finding your comfort zone Find your sitting height to remove the strain on your company's health and safety department. Users are also at risk of physical injury after prolonged use . Long work...

User Manual
Page 9
... window or any light source • minimizing room light by using drapes, shades or blinds • using a task light • changing the display's viewing angle • using a glare-reduction filter • using a display visor, such as a piece of cardboard extended from the display's top front edge • Avoid adjusting your display to an awkward viewing angle. • Avoid looking away from the monitor and focusing on how to make...
... window or any light source • minimizing room light by using drapes, shades or blinds • using a task light • changing the display's viewing angle • using a glare-reduction filter • using a display visor, such as a piece of cardboard extended from the display's top front edge • Avoid adjusting your display to an awkward viewing angle. • Avoid looking away from the monitor and focusing on how to make...

User Manual
Page 13
... Accessibility Safe listening Warnings Using electrical power Product servicing Additional safety information IT equipment recycling information Disposal instructions LCD pixel statement Tips and information for comfortable use Federal Communications Commission Declaration of Conformity Unpacking Attaching/removing the base Screen position adjustment Connecting the power cord Power saving Display Data Channel (DDC) Connector pin assignment Standard timing table Installation User controls How to adjust a setting Acer eColor Management User Troubleshooting VGA mode DVI mode 1 iii iii iii iii...
... Accessibility Safe listening Warnings Using electrical power Product servicing Additional safety information IT equipment recycling information Disposal instructions LCD pixel statement Tips and information for comfortable use Federal Communications Commission Declaration of Conformity Unpacking Attaching/removing the base Screen position adjustment Connecting the power cord Power saving Display Data Channel (DDC) Connector pin assignment Standard timing table Installation User controls How to adjust a setting Acer eColor Management User Troubleshooting VGA mode DVI mode 1 iii iii iii iii...

User Manual
Page 16
Screen position adjustment To optimize the viewing position, you can be adjusted to remove the base. Removing: Press the release button as shown below. The monitor can adjust the monitor tilt by using both of your hands to hold the edges of the monitor as indicated, then pull in the direction of the base. English 2 Attaching/removing the base Attaching: Align the release button on the bottom of the monitor with the corresponding slots on the bottom of the arrow to 15 degrees up or 5 degrees down.
Screen position adjustment To optimize the viewing position, you can be adjusted to remove the base. Removing: Press the release button as shown below. The monitor can adjust the monitor tilt by using both of your hands to hold the edges of the monitor as indicated, then pull in the direction of the base. English 2 Attaching/removing the base Attaching: Align the release button on the bottom of the monitor with the corresponding slots on the bottom of the arrow to 15 degrees up or 5 degrees down.

User Manual
Page 17
... monitor supports the DDC2B standard. 3 English Connecting the power cord • Check first to make installation easier, so long as indicated by the control signal from "power saving" mode back to "on" is required. • Plug one end of H05VV-F cord and plug rated 10 A/250 V. The DDC is a communication protocol through which the equipment will be switched to "power saving" mode by the amber-colored power LED. No user-adjustment is around 3 seconds. Mode On Power saving LED light Blue Amber The power saving mode...
... monitor supports the DDC2B standard. 3 English Connecting the power cord • Check first to make installation easier, so long as indicated by the control signal from "power saving" mode back to "on" is required. • Plug one end of H05VV-F cord and plug rated 10 A/250 V. The DDC is a communication protocol through which the equipment will be switched to "power saving" mode by the amber-colored power LED. No user-adjustment is around 3 seconds. Mode On Power saving LED light Blue Amber The power saving mode...

User Manual
Page 19
Description 13 NC 14 +5 V power 15 GND (return for +5 V hsync.vsync) 16 Hot-plug detection 17 TMDS data 0- 18 TMDS data 0+ 19 TMDS data 0/5 shield 20 NC 21 NC 22 TMDS clock shield 23 TMDS clock+ 24 DDC TMDS clock- 5 English 24-pin color display signal cable PIN No. Description 1 TMDS data 2- 2 TMDS data 2+ 3 TMDS data 2/4 shield 4 NC 5 NC 6 DDC clock 7 DDC data 8 NC 9 TMDS data 1- 10 TMDS data 1+ 11 TMDS data 1/3 shield 12 NC PIN No.
Description 13 NC 14 +5 V power 15 GND (return for +5 V hsync.vsync) 16 Hot-plug detection 17 TMDS data 0- 18 TMDS data 0+ 19 TMDS data 0/5 shield 20 NC 21 NC 22 TMDS clock shield 23 TMDS clock+ 24 DDC TMDS clock- 5 English 24-pin color display signal cable PIN No. Description 1 TMDS data 2- 2 TMDS data 2+ 3 TMDS data 2/4 shield 4 NC 5 NC 6 DDC clock 7 DDC data 8 NC 9 TMDS data 1- 10 TMDS data 1+ 11 TMDS data 1/3 shield 12 NC PIN No.

User Manual
Page 20
... to store as given in the user mode. 6 English Standard timing table To reduce adjustments for vertical frequency, or the sync signal polarities are different from the default modes. When none of storing up to perform Auto Setup under Windows "Full Screen" pattern or use the pattern on the disc provided. Mode 1 2 3 4 5 6 7 8 9 10 11 12 13 14 15 16 17 18 VGA VGA MAC VESA VESA VESA VESA VESA VESA MAC VESA VESA VESA VESA VESA VESA VESA Resolution 720 x 400 70 Hz 620...
... to store as given in the user mode. 6 English Standard timing table To reduce adjustments for vertical frequency, or the sync signal polarities are different from the default modes. When none of storing up to perform Auto Setup under Windows "Full Screen" pattern or use the pattern on the disc provided. Mode 1 2 3 4 5 6 7 8 9 10 11 12 13 14 15 16 17 18 VGA VGA MAC VESA VESA VESA VESA VESA VESA MAC VESA VESA VESA VESA VESA VESA VESA Resolution 720 x 400 70 Hz 620...

User Manual
Page 21
...-pin DVI cable to the back of the monitor and the other end to the computer's port. 2 Connect the power cord Connect the power cord to the monitor, then to a properly grounded AC outlet. 3 Turn on the monitor and computer Turn on your host system, please follow the steps below: Steps 1 Connect the video cable a Make sure both the monitor and computer are switched off . English 7 Installation To install the monitor on the monitor first...
...-pin DVI cable to the back of the monitor and the other end to the computer's port. 2 Connect the power cord Connect the power cord to the monitor, then to a properly grounded AC outlet. 3 Turn on the monitor and computer Turn on your host system, please follow the steps below: Steps 1 Connect the video cable a Make sure both the monitor and computer are switched off . English 7 Installation To install the monitor on the monitor first...
User Manual
Page 22
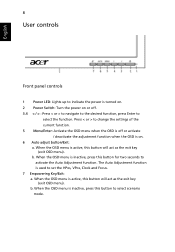
... activate the Auto Adjustment function. English 8 User controls Front panel controls 1 Power LED: Lights up to indicate the power is turned on. 2 Power Switch: Turn the power on or off or activate / deactivate the adjustment function when the OSD is on. 6 Auto adjust button/Exit: a. When the OSD menu is inactive, press this button will act as the exit key (exit OSD menu). When the OSD menu is active, this button to select scenario mode. Press < or > to change the settings of...
... activate the Auto Adjustment function. English 8 User controls Front panel controls 1 Power LED: Lights up to indicate the power is turned on. 2 Power Switch: Turn the power on or off or activate / deactivate the adjustment function when the OSD is on. 6 Auto adjust button/Exit: a. When the OSD menu is inactive, press this button will act as the exit key (exit OSD menu). When the OSD menu is active, this button to select scenario mode. Press < or > to change the settings of...

User Manual
Page 23
... change the settings of the current function. 5 To exit and save, select the exit function. A. I. Only analog-input mode II. Only digital-input mode B. User: If "User" is selected, the Acer eColor Management OSD will appear. Acer eColor Management: If "Acer eColor Management" is selected, the standard OSD will appear. English 9 How to adjust a setting 1 Press the Menu button to activate the OSD window. 2 Press < or > to select the desired function. 3 Press the Menu button...
... change the settings of the current function. 5 To exit and save, select the exit function. A. I. Only analog-input mode II. Only digital-input mode B. User: If "User" is selected, the Acer eColor Management OSD will appear. Acer eColor Management: If "Acer eColor Management" is selected, the standard OSD will appear. English 9 How to adjust a setting 1 Press the Menu button to activate the OSD window. 2 Press < or > to select the desired function. 3 Press the Menu button...

User Manual
Page 24
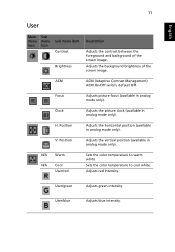
... confirm the mode and run Auto Adjust. • Features and benefits Main menu icon Sub menu item User mode Text mode Standard mode Graphic mode Movie mode Description User-defined. Enhances colors and emphasizes fine detail. English 10 Acer eColor Management • Operation instructions 1 Press the Empowering Key to open the Acer eColor Management OSD and access the scenario modes. 2 Press "" to select the mode. 3 Press the Auto-adjust button to suit any situation. Default settings.
... confirm the mode and run Auto Adjust. • Features and benefits Main menu icon Sub menu item User mode Text mode Standard mode Graphic mode Movie mode Description User-defined. Enhances colors and emphasizes fine detail. English 10 Acer eColor Management • Operation instructions 1 Press the Empowering Key to open the Acer eColor Management OSD and access the scenario modes. 2 Press "" to select the mode. 3 Press the Auto-adjust button to suit any situation. Default settings.
User Manual
Page 25
...in analog mode only). Position Adjusts the horizontal position (available in analog mode only). User/blue Adjusts blue intensity. Adjusts the background brightness of the screen image. Sets the color temperature to warm white. Position Adjusts the vertical position (available in analog mode only). V. Adjusts red intensity. ACM ACM (Adaptive Contrast Management) ACM On/Off switch, default Off. Clock Adjusts the picture clock (available in analog mode only). User/green Adjusts green intensity. English 11 User Main Sub menu menu icon icon Sub menu item...
...in analog mode only). Position Adjusts the horizontal position (available in analog mode only). User/blue Adjusts blue intensity. Adjusts the background brightness of the screen image. Sets the color temperature to warm white. Position Adjusts the vertical position (available in analog mode only). V. Adjusts red intensity. ACM ACM (Adaptive Contrast Management) ACM On/Off switch, default Off. Clock Adjusts the picture clock (available in analog mode only). User/green Adjusts green intensity. English 11 User Main Sub menu menu icon icon Sub menu item...

User Manual
Page 26
.... Selects input signal from analog (D-sub). English 12 Main menu icon Sub menu icon N/A N/A Sub menu item English Deutsch Français Español Italiano Suomi Nederlands H. N/A Digital (only dual- N/A DDC/CI Turns on/off DDC/CI support N/A Information Shows the resolution, H/V frequency, input port and serial number for current input. EMEA version OSD only. Position Adjusts the vertical position of the OSD. N/A Analog Selects input signal from digital (DVI) input models) (only dual-input models). N/A Reset Clears Auto-configuration changes and sets the color...
.... Selects input signal from analog (D-sub). English 12 Main menu icon Sub menu icon N/A N/A Sub menu item English Deutsch Français Español Italiano Suomi Nederlands H. N/A Digital (only dual- N/A DDC/CI Turns on/off DDC/CI support N/A Information Shows the resolution, H/V frequency, input port and serial number for current input. EMEA version OSD only. Position Adjusts the vertical position of the OSD. N/A Analog Selects input signal from digital (DVI) input models) (only dual-input models). N/A Reset Clears Auto-configuration changes and sets the color...

User Manual
Page 27
.... Check the display setting on your LCD monitor for a few seconds after adjusting the size of graphics adapter and monitor is switched on the screen. VGA mode Problem No picture visible LED status Blue Off Remedy Using the OSD, adjust brightness and contrast to maximum or reset to the monitor. Amber Check if the power cord is properly connected to their default settings. Unstable picture Abnormal picture Check if the computer system is in power saving/ standby mode. 13 English Troubleshooting Before sending your system. Check if the video signal cable is...
.... Check the display setting on your LCD monitor for a few seconds after adjusting the size of graphics adapter and monitor is switched on the screen. VGA mode Problem No picture visible LED status Blue Off Remedy Using the OSD, adjust brightness and contrast to maximum or reset to the monitor. Amber Check if the power cord is properly connected to their default settings. Unstable picture Abnormal picture Check if the computer system is in power saving/ standby mode. 13 English Troubleshooting Before sending your system. Check if the video signal cable is...

User Manual
Page 28
Check if the video signal cable is switched on and in power saving/ standby mode. Check that the computer system is properly connected at the back of monitor. English 14 DVI mode Problem No picture visible LED status Blue Off Remedy Using the OSD, adjust brightness and contrast to maximum or reset to the monitor. Amber Check if the AC power cord is properly connected to their default settings. Check the power switch.
Check if the video signal cable is switched on and in power saving/ standby mode. Check that the computer system is properly connected at the back of monitor. English 14 DVI mode Problem No picture visible LED status Blue Off Remedy Using the OSD, adjust brightness and contrast to maximum or reset to the monitor. Amber Check if the AC power cord is properly connected to their default settings. Check the power switch.

