
User Manual
Page 2
... the prior written permission of Acer Incorporated. The serial number and model number are used herein for a particular purpose. Such changes will be incorporated in the space provided below. This company makes no representations or warranties, either expressed or implied, with respect to your unit should include the serial number, model number and purchase information. Copyright © 2012. Acer LCD Monitor User's Guide Original Issue: 12/2012...
... the prior written permission of Acer Incorporated. The serial number and model number are used herein for a particular purpose. Such changes will be incorporated in the space provided below. This company makes no representations or warranties, either expressed or implied, with respect to your unit should include the serial number, model number and purchase information. Copyright © 2012. Acer LCD Monitor User's Guide Original Issue: 12/2012...

User Manual
Page 3
... power cords from the system by changing the image or turning off the power switch and then turn it on again to make sure the flicker disappears. • You may flicker during initial use . • The LCD screen has 99.99% or more effective pixels. Information for a few hours. Cleaning your safety and comfort Safety instructions Read these guidelines when cleaning the monitor: • Always unplug the monitor before connecting any cable...
... power cords from the system by changing the image or turning off the power switch and then turn it on again to make sure the flicker disappears. • You may flicker during initial use . • The LCD screen has 99.99% or more effective pixels. Information for a few hours. Cleaning your safety and comfort Safety instructions Read these guidelines when cleaning the monitor: • Always unplug the monitor before connecting any cable...

User Manual
Page 4
... these instructions. • Gradually increase the volume until you can 't hear people speaking near you. Warnings • Do not use it from overheating. iv Accessibility Be sure that the power outlet you plug the power cord into is easily accessible and located as close to the equipment operator as they may touch dangerous voltage points or short-out parts...
... these instructions. • Gradually increase the volume until you can 't hear people speaking near you. Warnings • Do not use it from overheating. iv Accessibility Be sure that the power outlet you plug the power cord into is easily accessible and located as close to the equipment operator as they may touch dangerous voltage points or short-out parts...
User Manual
Page 5
... not insert the plug into the wall outlet does not exceed the fuse rating. • Do not overload a power outlet, strip or receptacle by other risks. Using a power outlet that the new power cord meets the following the operating instructions Product servicing Do not attempt to replace the power cord set . If you to qualified service personnel. v ampere rating of the equipment plugged into the product •...
... not insert the plug into the wall outlet does not exceed the fuse rating. • Do not overload a power outlet, strip or receptacle by other risks. Using a power outlet that the new power cord meets the following the operating instructions Product servicing Do not attempt to replace the power cord set . If you to qualified service personnel. v ampere rating of the equipment plugged into the product •...

User Manual
Page 6
...of salvaging and disposal of used equipment, as grain, dust or metal powders. Switch off the device near gas pumps at Acer are covered by the operating instructions, since improper adjustment of other products. Observe ...instructions. IT Equipment Recycling Information Acer is strongly committed to environmental protection and views recycling, in damage and will often require extensive work by a qualified technician to restore the product to normal condition. We at service stations. Potentially explosive atmospheres include areas where you would normally be advised to turn...
...of salvaging and disposal of used equipment, as grain, dust or metal powders. Switch off the device near gas pumps at Acer are covered by the operating instructions, since improper adjustment of other products. Observe ...instructions. IT Equipment Recycling Information Acer is strongly committed to environmental protection and views recycling, in damage and will often require extensive work by a qualified technician to restore the product to normal condition. We at service stations. Potentially explosive atmospheres include areas where you would normally be advised to turn...
User Manual
Page 8
... regularly to remove the strain on your sitting height to computer use, consult a physician immediately and inform your comfort zone by pushing the power button. Users are also at risk of physical injury. Finding your comfort zone Find your company's health and safety department. Observe the following tips: • refrain from Sleep mode by adjusting the viewing angle of user inactivity...
... regularly to remove the strain on your sitting height to computer use, consult a physician immediately and inform your comfort zone by pushing the power button. Users are also at risk of physical injury. Finding your comfort zone Find your company's health and safety department. Observe the following tips: • refrain from Sleep mode by adjusting the viewing angle of user inactivity...
User Manual
Page 9
... display's top front edge • Avoid adjusting your display to an awkward viewing angle. • Avoid looking at bright light sources, such as possible. • Exercise regularly and maintain a healthy body. The following work habits to a comfortable level for extended periods of time. Display • Keep your display clean. • Keep your head at the middle of the display. • Adjust the display brightness and/or contrast to make...
... display's top front edge • Avoid adjusting your display to an awkward viewing angle. • Avoid looking at bright light sources, such as possible. • Exercise regularly and maintain a healthy body. The following work habits to a comfortable level for extended periods of time. Display • Keep your display clean. • Keep your head at the middle of the display. • Adjust the display brightness and/or contrast to make...

User Manual
Page 10
... use less energy and prevent greenhouse gas emissions by meeting strict energy efficiency guidelines set by "Factory Reset" function in Active Off mode, move the mouse or press any keyboard key. Products that could exceed the ENERGY STAR specified limit The more energy we reduce greenhouse gases and the risks of climate change. Acer is in the OSD menu...
... use less energy and prevent greenhouse gas emissions by meeting strict energy efficiency guidelines set by "Factory Reset" function in Active Off mode, move the mouse or press any keyboard key. Products that could exceed the ENERGY STAR specified limit The more energy we reduce greenhouse gases and the risks of climate change. Acer is in the OSD menu...

User Manual
Page 13
... servicing v Additional safety information vi IT equipment recycling information vi Disposal instructions vii LCD pixel statement vii Tips and information for comfortable use viii Federal Communications Commission Declaration of Conformity xi Unpacking 1 Attaching/removing the base 2 Screen position adjustment 2 Connecting the power cord 3 Power saving 3 Display Data Channel (DDC) 3 Connector pin assignment 4 Standard timing table 6 Installation 7 User controls 8 Acer eColor Management 9 Adjusting the OSD settings 10 Troubleshooting 14 VGA mode 15 DVI...
... servicing v Additional safety information vi IT equipment recycling information vi Disposal instructions vii LCD pixel statement vii Tips and information for comfortable use viii Federal Communications Commission Declaration of Conformity xi Unpacking 1 Attaching/removing the base 2 Screen position adjustment 2 Connecting the power cord 3 Power saving 3 Display Data Channel (DDC) 3 Connector pin assignment 4 Standard timing table 6 Installation 7 User controls 8 Acer eColor Management 9 Adjusting the OSD settings 10 Troubleshooting 14 VGA mode 15 DVI...

User Manual
Page 14
Unpacking Please check that the following items are present when you unpack the box, and save the packing materials in case you need to ship or transport the monitor in the future. LCD monitor Quick start guide *DP cable (Option) *D-sub cable (Option) *DVI cable (Option) *AC power cord *Audio Cable (Option) *HDMI Cable (Option) *Also the Replaceable parts required by the TCO Certified EN-1
Unpacking Please check that the following items are present when you unpack the box, and save the packing materials in case you need to ship or transport the monitor in the future. LCD monitor Quick start guide *DP cable (Option) *D-sub cable (Option) *DVI cable (Option) *AC power cord *Audio Cable (Option) *HDMI Cable (Option) *Also the Replaceable parts required by the TCO Certified EN-1
User Manual
Page 15
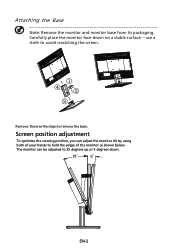
Screen position adjustment To optimize the viewing position, you can be adjusted to 25 degrees up or 5 degrees down on a stable surface -- The monitor can adjust the monitor tilt by using both of the monitor as shown below. use a cloth to avoid scratching the screen. ① ④② ③ Remove: Reverse the steps to hold the edges of your hands to remove the base. Carefully place the monitor face-down . 25 EN-2 Attaching the Base Note: Remove the monitor and monitor base from its packaging.
Screen position adjustment To optimize the viewing position, you can be adjusted to 25 degrees up or 5 degrees down on a stable surface -- The monitor can adjust the monitor tilt by using both of the monitor as shown below. use a cloth to avoid scratching the screen. ① ④② ③ Remove: Reverse the steps to hold the edges of your hands to remove the base. Carefully place the monitor face-down . 25 EN-2 Attaching the Base Note: Remove the monitor and monitor base from its packaging.

User Manual
Page 16
... H05VV-F cord and plug rated 10 A/250 V. for your system supports the DDC protocol, the monitor is able to plug-and-play. EN-3 No user-adjustment is required. • Plug one end of the power cord to "on" is a communication protocol through which the equipment will be installed. Display Data Channel (DDC) To make sure that the power cord you use is activated. Mode On Power saving LED light Blue Amber The power saving mode will...
... H05VV-F cord and plug rated 10 A/250 V. for your system supports the DDC protocol, the monitor is able to plug-and-play. EN-3 No user-adjustment is required. • Plug one end of the power cord to "on" is a communication protocol through which the equipment will be installed. Display Data Channel (DDC) To make sure that the power cord you use is activated. Mode On Power saving LED light Blue Amber The power saving mode will...

User Manual
Page 17
... 17. 9. Connector pin assignment 1 5 6 10 11 15 15-pin color display signal cable PIN No. TMDS Data1 Shield 14. 6. Description 1 Red 2 Green 3 Blue 4 Monitor ground 5 DDC-return 6 R-ground 7 G-ground 8 B-ground PIN No. TMDS Data2+ 10. 2. CEC Reserved (N.C. on device) SCL SDA DDC/CEC Ground +5V Power Hot Plug Detect TMDS Data0+ 16. 8. TMDS Data0- 18. 19. * only for certain models EN-4 Meaning...
... 17. 9. Connector pin assignment 1 5 6 10 11 15 15-pin color display signal cable PIN No. TMDS Data1 Shield 14. 6. Description 1 Red 2 Green 3 Blue 4 Monitor ground 5 DDC-return 6 R-ground 7 G-ground 8 B-ground PIN No. TMDS Data2+ 10. 2. CEC Reserved (N.C. on device) SCL SDA DDC/CEC Ground +5V Power Hot Plug Detect TMDS Data0+ 16. 8. TMDS Data0- 18. 19. * only for certain models EN-4 Meaning...
User Manual
Page 20
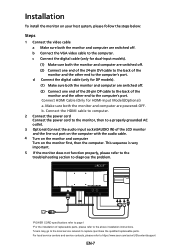
... troubleshooting section to diagnose the problem. *POWER CORD specifications refer to page1 *For the installation of the monitor and the other end to the computer's port. c Connect the digital cable (only for dual-input models). (1) Make sure both the monitor and computer are switched off. (2) Connect one end of the 20-pin DP cable to the back of replaceable parts, please refer to the above installation instructions. *Users may go to the local service...
... troubleshooting section to diagnose the problem. *POWER CORD specifications refer to page1 *For the installation of the monitor and the other end to the computer's port. c Connect the digital cable (only for dual-input models). (1) Make sure both the monitor and computer are switched off. (2) Connect one end of the 20-pin DP cable to the back of replaceable parts, please refer to the above installation instructions. *Users may go to the local service...

User Manual
Page 21
... button to activate the Auto Adjustment function. MENU OSD functions Press this button to open the Acer eColor Management OSD and access the scenario modes. Lights up to your monitor. (a) VGA input (b) DVI input (c) DP input (d) HDMI input As you cycle through the sources you quickly select the most commonly accessed settings. It may be connected to indicate the power is selected ,but the VGA and DVI cables are not con- USER CONTROLS Power Switch / Power LED: To turn the monitor ON or OFF. The Auto Adjustment...
... button to activate the Auto Adjustment function. MENU OSD functions Press this button to open the Acer eColor Management OSD and access the scenario modes. Lights up to your monitor. (a) VGA input (b) DVI input (c) DP input (d) HDMI input As you cycle through the sources you quickly select the most commonly accessed settings. It may be connected to indicate the power is selected ,but the VGA and DVI cables are not con- USER CONTROLS Power Switch / Power LED: To turn the monitor ON or OFF. The Auto Adjustment...

User Manual
Page 22
... Sub Menu icon Sub Menu item Description N/A User mode User defined. N/A Standard D efau lt Settin g . EN-9 Acer eColor Management Operation instructions Step 1: Press " " Key to open the Acer eColor Management OSD and access the scenario modes Step 2: Press " " or " " to select the mode Step 3: Press " AUTO " Key to reduce power consumption. Presents great visuals, even in clearest detail. N/A Movie mode Displays scenes in unsuitably-lit environments. Pictures...
... Sub Menu icon Sub Menu item Description N/A User mode User defined. N/A Standard D efau lt Settin g . EN-9 Acer eColor Management Operation instructions Step 1: Press " " Key to open the Acer eColor Management OSD and access the scenario modes Step 2: Press " " or " " to select the mode Step 3: Press " AUTO " Key to reduce power consumption. Presents great visuals, even in clearest detail. N/A Movie mode Displays scenes in unsuitably-lit environments. Pictures...
User Manual
Page 23
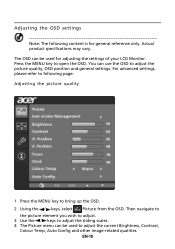
... be used to adjust the current Brightness, Contrast, Colour Temp, Auto Config and other image-related qualities. The OSD can be used for general reference only. Then navigate to the picture element you wish to adjust. 3 Use the / keys to adjust the sliding scales. 4 The Picture menu can use the OSD to adjust the picture quality, OSD position and general settings. EN-10 Press the MENU key to open the OSD. For advanced settings, please...
... be used to adjust the current Brightness, Contrast, Colour Temp, Auto Config and other image-related qualities. The OSD can be used for general reference only. Then navigate to the picture element you wish to adjust. 3 Use the / keys to adjust the sliding scales. 4 The Picture menu can use the OSD to adjust the picture quality, OSD position and general settings. EN-10 Press the MENU key to open the OSD. For advanced settings, please...

User Manual
Page 25
EN-12 Then navigate to the feature you wish to adjust. 3 The Setting menu can be used to bring up the OSD. 2 Using the / keys, select Setting from the OSD. Adjusting the setting 1 Press the MENU key to adjust the screen Menu Language and other important settings.
EN-12 Then navigate to the feature you wish to adjust. 3 The Setting menu can be used to bring up the OSD. 2 Using the / keys, select Setting from the OSD. Adjusting the setting 1 Press the MENU key to adjust the screen Menu Language and other important settings.

User Manual
Page 27
... signal cable or switching off the monitor. EN-14 Check the power switch. Unstable picture Abnormal picture Check if the computer system is properly connected at the back of monitor. VGA mode Problem No picture visible LED status Blue Off Remedy Using the OSD, adjust brightness and contrast to maximum or reset to the monitor. Check if the video signal cable is switched on and in compliance which may be causing the input signal frequency mismatch. Image is in power saving/ standby mode. Check if the specification of graphics adapter...
... signal cable or switching off the monitor. EN-14 Check the power switch. Unstable picture Abnormal picture Check if the computer system is properly connected at the back of monitor. VGA mode Problem No picture visible LED status Blue Off Remedy Using the OSD, adjust brightness and contrast to maximum or reset to the monitor. Check if the video signal cable is switched on and in compliance which may be causing the input signal frequency mismatch. Image is in power saving/ standby mode. Check if the specification of graphics adapter...

User Manual
Page 28
Check if the video signal cable is switched on and in power saving/ standby mode. Check that the computer system is properly connected at the back of monitor. EN-15 English DVI/DP/HDMI mode Problem No picture visible LED status Blue Off Remedy Using the OSD, adjust brightness and contrast to maximum or reset to the monitor. Amber Check if the AC power cord is properly connected to their default settings. Check the power switch.
Check if the video signal cable is switched on and in power saving/ standby mode. Check that the computer system is properly connected at the back of monitor. EN-15 English DVI/DP/HDMI mode Problem No picture visible LED status Blue Off Remedy Using the OSD, adjust brightness and contrast to maximum or reset to the monitor. Amber Check if the AC power cord is properly connected to their default settings. Check the power switch.

