

User Guide
Page 3
... accessible and located as disconnecting device Observe the following guidelines when connecting and disconnecting power to the external power supply unit: • Install the power supply unit before connecting the power cord to protect it from the projector. • If the system has multiple sources of any kind into the product. Keep this product from the wall outlet before removing the power supply unit from overheating. iii Information...
... accessible and located as disconnecting device Observe the following guidelines when connecting and disconnecting power to the external power supply unit: • Install the power supply unit before connecting the power cord to protect it from the projector. • If the system has multiple sources of any kind into the product. Keep this product from the wall outlet before removing the power supply unit from overheating. iii Information...

User Guide
Page 5
... the life span and darken the image. • Locations near fire alarms. • Locations with an ambient temperature above 40 ºC/104 ºF. At least 50cm clearance from the wall outlet and refer servicing to qualified service personnel. v Product servicing Do not attempt to service this product from walls and free flow of air around the projector are covered by the operating instructions, since improper adjustment...
... the life span and darken the image. • Locations near fire alarms. • Locations with an ambient temperature above 40 ºC/104 ºF. At least 50cm clearance from the wall outlet and refer servicing to qualified service personnel. v Product servicing Do not attempt to service this product from walls and free flow of air around the projector are covered by the operating instructions, since improper adjustment...

User Guide
Page 6
... your dealer for ceiling mount installation. vi • Locations where the altitudes are clogged with your projector. Do not operate if smoke, strange noise or odor comes out of displaying inverted images for inspection. • Do not face the projector lens to become hot. • Clean the air filter frequently. It might cause fire or electric shock. Only use acer ceiling mount kit for mounting the projector and ensure it...
... your dealer for ceiling mount installation. vi • Locations where the altitudes are clogged with your projector. Do not operate if smoke, strange noise or odor comes out of displaying inverted images for inspection. • Do not face the projector lens to become hot. • Clean the air filter frequently. It might cause fire or electric shock. Only use acer ceiling mount kit for mounting the projector and ensure it...
User Guide
Page 8
... signal sources. • Do not use lens cap when projector is not being used for a long period of your unit. The bright light may make a loud popping sound. Don't: • Block the slots and openings on . Warning: • Do not look into the projector's lens when the lamp is on the projector provided for changing the lamp, when lamp warning message displays. • When switching the projector off the product before disconnecting power...
... signal sources. • Do not use lens cap when projector is not being used for a long period of your unit. The bright light may make a loud popping sound. Don't: • Block the slots and openings on . Warning: • Do not look into the projector's lens when the lamp is on the projector provided for changing the lamp, when lamp warning message displays. • When switching the projector off the product before disconnecting power...

User Guide
Page 9
... 3 Control Panel 5 Remote Control Layout 6 Getting Started 8 Connecting the Projector 8 Turning On the Projector 9 Turning Off the Projector 10 Adjusting the Projected Image 11 Adjusting the Height of the Projected Image 11 How to Optimize Image Size and Distance 12 How to Get a Preferred Image Size by Adjusting Distance and Zoom 13 How to get a preferred image position by adjusting lens shift 14 User Controls 15 Onscreen Display (OSD) Menus 15 Color 16 Image 19 Setting 21 Management 23 Language 23 Appendices 24 Troubleshooting 24 LED...
... 3 Control Panel 5 Remote Control Layout 6 Getting Started 8 Connecting the Projector 8 Turning On the Projector 9 Turning Off the Projector 10 Adjusting the Projected Image 11 Adjusting the Height of the Projected Image 11 How to Optimize Image Size and Distance 12 How to Get a Preferred Image Size by Adjusting Distance and Zoom 13 How to get a preferred image position by adjusting lens shift 14 User Controls 15 Onscreen Display (OSD) Menus 15 Color 16 Image 19 Setting 21 Management 23 Language 23 Appendices 24 Troubleshooting 24 LED...

User Guide
Page 11
...; Manual focus/zoom projection lens • Microsoft® Windows® 2000, XP, 7, 8, 8.1,10, Vista®, Macintosh OS, Chrome OS compliant • LAN settings enable remote management of projectors via a web browser • Crestron compliant • CEC (Consumer Electronics Control) function supported • PIP / PBP functions allows you to display two signal sources at the same time • BT2020 / HDR content supported • ISFccc compliant • HDCP2.2 supported via HDMI...
...; Manual focus/zoom projection lens • Microsoft® Windows® 2000, XP, 7, 8, 8.1,10, Vista®, Macintosh OS, Chrome OS compliant • LAN settings enable remote management of projectors via a web browser • Crestron compliant • CEC (Consumer Electronics Control) function supported • PIP / PBP functions allows you to display two signal sources at the same time • BT2020 / HDR content supported • ISFccc compliant • HDCP2.2 supported via HDMI...
User Guide
Page 13
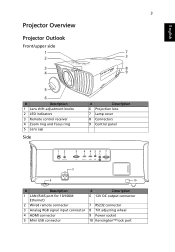
... Projector Outlook Front/upper side 1 2 3 4 3 7 3 8 9 5 6 # Description 1 Lens shift adjustment knobs 2 LED indicators 3 Remote control receiver 4 Zoom ring and Focus ring 5 Lens cap Side # Description 6 Projection lens 7 Lamp cover 8 Connectors 9 Control panel 12 3 4 456 7 9 8 10 # Description 1 LAN (RJ45 port for 10/100M Ethernet) 2 Wired remote connector 3 Analog RGB signal input connector 4 HDMI connector 5 Mini USB connector # Description 6 12V DC output connector 7 RS232 connector 8 Tilt adjusting wheel 9 Power socket 10 Kensington™ lock port
... Projector Outlook Front/upper side 1 2 3 4 3 7 3 8 9 5 6 # Description 1 Lens shift adjustment knobs 2 LED indicators 3 Remote control receiver 4 Zoom ring and Focus ring 5 Lens cap Side # Description 6 Projection lens 7 Lamp cover 8 Connectors 9 Control panel 12 3 4 456 7 9 8 10 # Description 1 LAN (RJ45 port for 10/100M Ethernet) 2 Wired remote connector 3 Analog RGB signal input connector 4 HDMI connector 5 Mini USB connector # Description 6 12V DC output connector 7 RS232 connector 8 Tilt adjusting wheel 9 Power socket 10 Kensington™ lock port

User Guide
Page 16
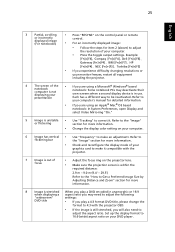
... 1 POWER Refer to the "Turning the Projector On/Off" section. 2 LIGHT Turns on the upper right corner. 4 FREEZE To pause the screen image. 5 HIDE Press "HIDE" to the previous step for adjusting sharpness settings. 14 SOURCE Changes the active source. press again to display the image. 6 HDMI 1 To change source to HDMI 1. 7 MENU Launches the Onscreen Display (OSD) menu, returns to hide screen image; directional selection keys 11 BRIGHT Press to open the brightness menu...
... 1 POWER Refer to the "Turning the Projector On/Off" section. 2 LIGHT Turns on the upper right corner. 4 FREEZE To pause the screen image. 5 HIDE Press "HIDE" to the previous step for adjusting sharpness settings. 14 SOURCE Changes the active source. press again to display the image. 6 HDMI 1 To change source to HDMI 1. 7 MENU Launches the Onscreen Display (OSD) menu, returns to hide screen image; directional selection keys 11 BRIGHT Press to open the brightness menu...
User Guide
Page 19
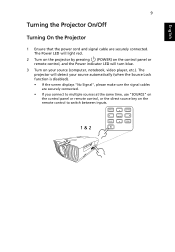
... sources at the same time, use "SOURCE" on the control panel or remote control, or the direct source key on your source automatically (when the Source Lock function is disabled). • If the screen displays "No Signal", please make sure the signal cables are securely connected. The projector will turn blue. 3 Turn on the remote control to switch between inputs. 1 & 2 The Power LED will light red. 2 Turn on the projector by pressing (POWER) on the control panel or remote control, and the Power indicator LED will detect your source (computer, notebook, video...
... sources at the same time, use "SOURCE" on the control panel or remote control, or the direct source key on your source automatically (when the Source Lock function is disabled). • If the screen displays "No Signal", please make sure the signal cables are securely connected. The projector will turn blue. 3 Turn on the remote control to switch between inputs. 1 & 2 The Power LED will light red. 2 Turn on the projector by pressing (POWER) on the control panel or remote control, and the Power indicator LED will detect your source (computer, notebook, video...

User Guide
Page 26
... when ISF is enabled. • User 1/2/3: Memorize user's settings. Controls the degree of difference between the lightest and darkest parts of the image. • Press to darken the image. • Press to the wall. Use this function to choose a proper color according to lighten the image. English 16 Color Display Mode Wall Color Brightness Contrast Saturation There are several choices, including White, Light Yellow, Light Blue, Pink and Dark Green.
... when ISF is enabled. • User 1/2/3: Memorize user's settings. Controls the degree of difference between the lightest and darkest parts of the image. • Press to darken the image. • Press to the wall. Use this function to choose a proper color according to lighten the image. English 16 Color Display Mode Wall Color Brightness Contrast Saturation There are several choices, including White, Light Yellow, Light Blue, Pink and Dark Green.

User Guide
Page 28
... "Yes" to return the display parameters on -screen color spectrum that helps to eliminate unwanted noise in the picture. • Black/White Level Adjustment: Analyzes the current input image and calculates an offset value which is then added to the analog to obtain optimal picture quality ISF certified display devices. Color Management: Adjusts the red, green, blue, cyan, yellow and magenta colors. • - English 18 Advanced Reset • Ind.
... "Yes" to return the display parameters on -screen color spectrum that helps to eliminate unwanted noise in the picture. • Black/White Level Adjustment: Analyzes the current input image and calculates an offset value which is then added to the analog to obtain optimal picture quality ISF certified display devices. Color Management: Adjusts the red, green, blue, cyan, yellow and magenta colors. • - English 18 Advanced Reset • Ind.
User Guide
Page 29
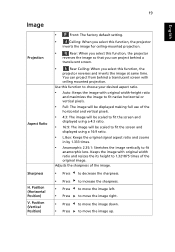
... image. Position (Horizontal Position) V. Keeps the image with original width-height ratio and maximizes the image to fit native horizontal or vertical pixels. • Full: The image will be scaled to fit the screen and displayed using a 16:9 ratio. • L.Box: Keeps the original signal aspect ratio and zooms in by 1.333 times. • Anamorphic 2.35:1: Stretches the image vertically to fit anamorphic lens...
... image. Position (Horizontal Position) V. Keeps the image with original width-height ratio and maximizes the image to fit native horizontal or vertical pixels. • Full: The image will be scaled to fit the screen and displayed using a 16:9 ratio. • L.Box: Keeps the original signal aspect ratio and zooms in by 1.333 times. • Anamorphic 2.35:1: Stretches the image vertically to fit anamorphic lens...

User Guide
Page 30
... card. Tracking Synchronizes the signal timing of your computer's graphics card. Note: "HDMI Color Range" and "HDMI Scan Info" are not supported under video mode. If you experience a vertical flickering bar in the projected image, use this function to reveal more details. Position", "V. Reset Press "ENTER" after choosing "Yes" to return the display parameters on the HDMI image. English 20 Frequency Changes the projector's refresh rate to the factory default settings.
... card. Tracking Synchronizes the signal timing of your computer's graphics card. Note: "HDMI Color Range" and "HDMI Scan Info" are not supported under video mode. If you experience a vertical flickering bar in the projected image, use this function to reveal more details. Position", "V. Reset Press "ENTER" after choosing "Yes" to return the display parameters on the HDMI image. English 20 Frequency Changes the projector's refresh rate to the factory default settings.

User Guide
Page 31
... time. • Choose "Off" to disable the function. Press "ENTER" after choosing "Yes" to return all items on the display screen. 21 Setting English Source Lock Auto Screen HDMI CEC LAN Control PIP PBP Information Reset Selecting "On" enables the function and when switching input signals, you need to press "SOURCE" on the control panel or remote control, or the direct source key on Setting menu to the factory default settings. PIP Size Choose the PIP secondary signal size...
... time. • Choose "Off" to disable the function. Press "ENTER" after choosing "Yes" to return all items on the display screen. 21 Setting English Source Lock Auto Screen HDMI CEC LAN Control PIP PBP Information Reset Selecting "On" enables the function and when switching input signals, you need to press "SOURCE" on the control panel or remote control, or the direct source key on Setting menu to the factory default settings. PIP Size Choose the PIP secondary signal size...

User Guide
Page 33
... hours before end of time the OSD menu Menu Display Time (Seconds) • will automatically turn on the upper right corner. Language Language Sets a language for the OSD menus. Manual: The OSD menu remains active. English 23 Management ECO Mode Choose "On" to the normal mode. Choose "Off" to return to dim the projector lamp, which will show or hide warning message Lamp Reminding when the changing lamp message is supplied...
... hours before end of time the OSD menu Menu Display Time (Seconds) • will automatically turn on the upper right corner. Language Language Sets a language for the OSD menus. Manual: The OSD menu remains active. English 23 Management ECO Mode Choose "On" to the normal mode. Choose "Off" to return to dim the projector lamp, which will show or hide warning message Lamp Reminding when the changing lamp message is supplied...
User Guide
Page 35
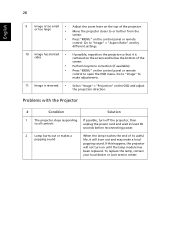
... the projection screen is within the required distance: 2.9 m - 9.0 m (9.4' - 29.5') Refer to the "How to Get a Preferred Image Size by Adjusting Distance and Zoom" section for more information. 8 Image is stretched When you play a 4:3 format DVD title, please change the format to 4:3 with the projector. 7 Image is out of focus • Adjust the focus ring on the control panel or remote or incorrectly displayed image (For notebooks) control. • For an incorrectly displayed image...
... the projection screen is within the required distance: 2.9 m - 9.0 m (9.4' - 29.5') Refer to the "How to Get a Preferred Image Size by Adjusting Distance and Zoom" section for more information. 8 Image is stretched When you play a 4:3 format DVD title, please change the format to 4:3 with the projector. 7 Image is out of focus • Adjust the focus ring on the control panel or remote or incorrectly displayed image (For notebooks) control. • For an incorrectly displayed image...
User Guide
Page 36
...; Adjust the zoom lever on the top of the screen. • Perform keystone correction (if available). • Press "MENU" on the control panel or remote control to "Image" > "Aspect Ratio" and try different settings. 10 Image has slanted • If possible, reposition the projector so that it will not turn on until the lamp module has been replaced. To replace the lamp, contact your local dealer or Acer service center. Problems...
...; Adjust the zoom lever on the top of the screen. • Perform keystone correction (if available). • Press "MENU" on the control panel or remote control to "Image" > "Aspect Ratio" and try different settings. 10 Image has slanted • If possible, reposition the projector so that it will not turn on until the lamp module has been replaced. To replace the lamp, contact your local dealer or Acer service center. Problems...

User Guide
Page 37
... Messages # Condition 1 Message Message Reminder Fan Fail - Lamp is clogged with dust, please clean it. Projector Overheated - If the dust filter is approaching the end of its maximum lifetime. Lamp will automatically turn off soon. the projector has exceeded its recommended operating temperature and must be allowed to reach its useful life in full power operation. Projector Overheated. the system fan is used. Replacement suggested! Fan Fail. Lamp will automatically turn off soon. Replace the lamp - Please also check...
... Messages # Condition 1 Message Message Reminder Fan Fail - Lamp is clogged with dust, please clean it. Projector Overheated - If the dust filter is approaching the end of its maximum lifetime. Lamp will automatically turn off soon. the projector has exceeded its recommended operating temperature and must be allowed to reach its useful life in full power operation. Projector Overheated. the system fan is used. Replacement suggested! Fan Fail. Lamp will automatically turn off soon. Replace the lamp - Please also check...

User Guide
Page 38
V -- Quick flashing V V V Quick flashing -- --- -- Error (Lamp breakdown) -- V LAMP LED Red -- --- -- V -- V -- --- failure) V V V Quick flashing TEMP LED Red -- --- -- V Quick flashing --- Error (Color wheel -- 28 LED & Alarm Definition Listing LED Messages English Message Standby (Power cord plugged in) Power on Lamp retry Turning off (Cooling state) Firmware download Turning off (Cooling completed) Error (Thermal failure) Error (Fan lock failure) Power LED Red Blue V -- ---
V -- Quick flashing V V V Quick flashing -- --- -- Error (Lamp breakdown) -- V LAMP LED Red -- --- -- V -- V -- --- failure) V V V Quick flashing TEMP LED Red -- --- -- V Quick flashing --- Error (Color wheel -- 28 LED & Alarm Definition Listing LED Messages English Message Standby (Power cord plugged in) Power on Lamp retry Turning off (Cooling state) Firmware download Turning off (Cooling completed) Error (Thermal failure) Error (Fan lock failure) Power LED Red Blue V -- ---
User Guide
Page 41
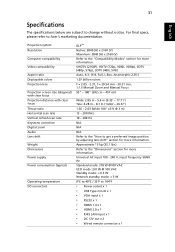
Projection system Resolution Computer compatibility Video compatibility Aspect ratio Displayable colors Projection lens Projection screen size (diagonal) with clear focus Projection distance with clear focus Throw ratio Horizontal scan rate Vertical refresh scan rate Keystone correction Digital zoom Audio Lens shift Weight Dimensions Power supply Power consumption (typical) Operating temperature I/O connectors DLP™ Native: 3840 (H) x 2160 (V) Maximum: 3840 (H) x 2160 (V) Refer to get a preferred image position by adjusting lens shift" section for more information. UHDTV (2160P), HDTV ...
Projection system Resolution Computer compatibility Video compatibility Aspect ratio Displayable colors Projection lens Projection screen size (diagonal) with clear focus Projection distance with clear focus Throw ratio Horizontal scan rate Vertical refresh scan rate Keystone correction Digital zoom Audio Lens shift Weight Dimensions Power supply Power consumption (typical) Operating temperature I/O connectors DLP™ Native: 3840 (H) x 2160 (V) Maximum: 3840 (H) x 2160 (V) Refer to get a preferred image position by adjusting lens shift" section for more information. UHDTV (2160P), HDTV ...


