
Safety Guide
Page 10
...operation, particularly when plugged in contact with exposed skin can cause discomfort or burns. Do not pack your computer carefully Use a quality carrying case that could be blocked or covered. 10 - These openings must not be seriously damaged. • Slots and openings are provided for using your skin or body. • Your device...to ensure reliable operation of internal components and to prevent battery leakage, do not come in to protect it under sporting, exercising, or any kind into the product. • To avoid damage of the product and to AC power. If the ...
...operation, particularly when plugged in contact with exposed skin can cause discomfort or burns. Do not pack your computer carefully Use a quality carrying case that could be blocked or covered. 10 - These openings must not be seriously damaged. • Slots and openings are provided for using your skin or body. • Your device...to ensure reliable operation of internal components and to prevent battery leakage, do not come in to protect it under sporting, exercising, or any kind into the product. • To avoid damage of the product and to AC power. If the ...

Safety Guide
Page 12
... of static electricity from the power supplies. If you plug into is easily accessible and located as close to the power supply unit: Install the power supply unit before removing the power supply unit from the system by touching an unpainted metal surface. Disconnect the AC adapter. 3. Disconnecting the power source Observe the following guidelines when connecting and disconnecting power to the equipment operator as possible. Prevent Electrostatic...
... of static electricity from the power supplies. If you plug into is easily accessible and located as close to the power supply unit: Install the power supply unit before removing the power supply unit from the system by touching an unpainted metal surface. Disconnect the AC adapter. 3. Disconnecting the power source Observe the following guidelines when connecting and disconnecting power to the equipment operator as possible. Prevent Electrostatic...

Safety Guide
Page 21
... "sleep" mode. To successfully transmit data files or messages, this section may be erased. marks Wireless adapter regulatory information Radio frequency interference Warning For safety reasons, turn off your laptop under the following conditions. This device meets RF exposure guidelines when used normally. In some cases, transmission of the device are magnetic. Metallic materials may not apply to the network. Acer...
... "sleep" mode. To successfully transmit data files or messages, this section may be erased. marks Wireless adapter regulatory information Radio frequency interference Warning For safety reasons, turn off your laptop under the following conditions. This device meets RF exposure guidelines when used normally. In some cases, transmission of the device are magnetic. Metallic materials may not apply to the network. Acer...

Safety Guide
Page 23
... set forth by the Federal Aviation Administration (FAA). • The use of the 5.25 to 5.35 GHz and 5.65 to 5.725 GHz frequency ranges. This device is restricted to Part 15.407 of the FCC rules. Warnings and regulatory information - 23 supplement C, 2001, and ANSI/IEEE C95.1, 1992. No configuration controls are allocated as primary users of wireless adapters...
... set forth by the Federal Aviation Administration (FAA). • The use of the 5.25 to 5.35 GHz and 5.65 to 5.725 GHz frequency ranges. This device is restricted to Part 15.407 of the FCC rules. Warnings and regulatory information - 23 supplement C, 2001, and ANSI/IEEE C95.1, 1992. No configuration controls are allocated as primary users of wireless adapters...

User Manual
Page 3
... 16 Using passwords 16 Entering passwords 16 BIOS utility 18 Boot sequence 18 Setting passwords 18 Power management 19 Saving power 19 Ports and connectors 21 Information on USB 3.0 21 Rear panel audio ports 22 Universal Serial Bus (USB) 23 USB Type-C port 24 HDMI 25 SD card reader 26 Video and audio connectors 27 Connecting a monitor 27 Headphones and microphone 27 Frequently asked questions 29 Requesting service 31 Tips and hints for using Windows 10 ..... 32 How do I get to Start 32 How do I turn off...
... 16 Using passwords 16 Entering passwords 16 BIOS utility 18 Boot sequence 18 Setting passwords 18 Power management 19 Saving power 19 Ports and connectors 21 Information on USB 3.0 21 Rear panel audio ports 22 Universal Serial Bus (USB) 23 USB Type-C port 24 HDMI 25 SD card reader 26 Video and audio connectors 27 Connecting a monitor 27 Headphones and microphone 27 Frequently asked questions 29 Requesting service 31 Tips and hints for using Windows 10 ..... 32 How do I get to Start 32 How do I turn off...

User Manual
Page 5
... recovery, expansion options and troubleshooting. The link will open the Acer Support webpage. 2. For more productive, please refer to the User's Manual. Once you have connected to the internet, you can download updates for your computer from: http://go.acer.com/?id=17883 1. Basic care and tips for using your computer Turning your computer off To turn the power off , the Setup Guide (or Setup Poster) helps you get started with setting...
... recovery, expansion options and troubleshooting. The link will open the Acer Support webpage. 2. For more productive, please refer to the User's Manual. Once you have connected to the internet, you can download updates for your computer from: http://go.acer.com/?id=17883 1. Basic care and tips for using your computer Turning your computer off To turn the power off , the Setup Guide (or Setup Poster) helps you get started with setting...
User Manual
Page 9
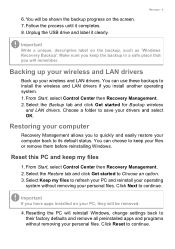
... files. Select Keep my files to quickly and easily restore your wireless and LAN drivers. Unplug the USB drive and label it completes. 8. Select the Restore tab and click Get started for Backup wireless and LAN drivers. From Start, select Control Center then Recovery Management. 2. Important If you to refresh your PC and reinstall your operating system without removing your PC, they will reinstall Windows, change settings back to Choose an option. 3. 6.
... files. Select Keep my files to quickly and easily restore your wireless and LAN drivers. Unplug the USB drive and label it completes. 8. Select the Restore tab and click Get started for Backup wireless and LAN drivers. From Start, select Control Center then Recovery Management. 2. Important If you to refresh your PC and reinstall your operating system without removing your PC, they will reinstall Windows, change settings back to Choose an option. 3. 6.
User Manual
Page 10
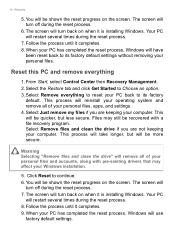
... reset process. 7. From Start, select Control Center then Recovery Management. 2. Select the Restore tab and click Get Started to its factory default settings without removing your personal files. This process will take longer, but less secure. You will turn off during the reset process. 8. When your personal files and accounts, along with pre-existing drivers that may still be shown the reset progress on the screen. The screen...
... reset process. 7. From Start, select Control Center then Recovery Management. 2. Select the Restore tab and click Get Started to its factory default settings without removing your personal files. This process will take longer, but less secure. You will turn off during the reset process. 8. When your personal files and accounts, along with pre-existing drivers that may still be shown the reset progress on the screen. The screen...

User Manual
Page 11
... to Network connections on types of available networks during setup. Connecting to a wireless network Connecting to a wireless LAN A wireless LAN (or WLAN) is a wireless local area network, which can also share files, other devices, and even your wireless network on/off or control what is turned on connecting to sign up for details on by default and Windows will have a wireless router/access point and current internet connection through the ISP of the wireless network's name and password (if necessary). Connecting...
... to Network connections on types of available networks during setup. Connecting to a wireless network Connecting to a wireless LAN A wireless LAN (or WLAN) is a wireless local area network, which can also share files, other devices, and even your wireless network on/off or control what is turned on connecting to sign up for details on by default and Windows will have a wireless router/access point and current internet connection through the ISP of the wireless network's name and password (if necessary). Connecting...
User Manual
Page 12
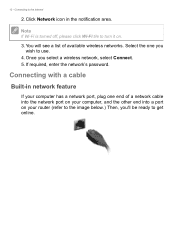
..., enter the network's password. Note If Wi-Fi is turned off, please click Wi-Fi tile to use. 4. Once you wish to turn it on your computer has a network port, plug one you select a wireless network, select Connect. 5. Connecting with a cable Built-in the notification area. Click Network icon in network feature If your router (refer to the image below.) Then, you'll be ready to the Internet...
..., enter the network's password. Note If Wi-Fi is turned off, please click Wi-Fi tile to use. 4. Once you wish to turn it on your computer has a network port, plug one you select a wireless network, select Connect. 5. Connecting with a cable Built-in the notification area. Click Network icon in network feature If your router (refer to the image below.) Then, you'll be ready to the Internet...

User Manual
Page 14
Please refer to setting up the parameters for Acer ProShield. Personal secure drive, file and folder encryption. • Data Removal - Click Start to use words that you can click Next to proceed to your device from unauthorized access and intrusion. Once you have all -in a dictionary. Setting up Acer ProShield The first time you run Acer ProShield, you to set a password, and can be found...
Please refer to setting up the parameters for Acer ProShield. Personal secure drive, file and folder encryption. • Data Removal - Click Start to use words that you can click Next to proceed to your device from unauthorized access and intrusion. Once you have all -in a dictionary. Setting up Acer ProShield The first time you run Acer ProShield, you to set a password, and can be found...

User Manual
Page 15
... you can set and manage your Personal Secure Drive. You can only get access to manage your computer or make recovering the data impossible. You can change your hard disk where you have shredded a file or folder, it is impossible to make changes. Acer ProShield - 15 Personal Secure Drive The Personal Secure Disk (PSD) is a secure section of your ProShield passwords, back up or restore credential...
... you can set and manage your Personal Secure Drive. You can only get access to manage your computer or make recovering the data impossible. You can change your hard disk where you have shredded a file or folder, it is impossible to make changes. Acer ProShield - 15 Personal Secure Drive The Personal Secure Disk (PSD) is a secure section of your ProShield passwords, back up or restore credential...

User Manual
Page 18
... of the screen. Remember to select F10 to properly save and exit the BIOS utility when you do not normally need to run it. Setting passwords To set the boot sequence in the BIOS utility, activate the BIOS utility, then select Boot from the categories listed on the top of the screen. Your computer is already properly configured and optimized, and you are done making changes. BIOS utility BIOS UTILITY The BIOS utility is being displayed.
... of the screen. Remember to select F10 to properly save and exit the BIOS utility when you do not normally need to run it. Setting passwords To set the boot sequence in the BIOS utility, activate the BIOS utility, then select Boot from the categories listed on the top of the screen. Your computer is already properly configured and optimized, and you are done making changes. BIOS utility BIOS UTILITY The BIOS utility is being displayed.
User Manual
Page 19
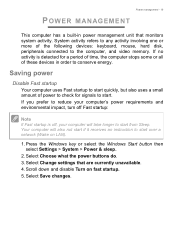
... take longer to start quickly, but also uses a small amount of the following devices: keyboard, mouse, hard disk, peripherals connected to start over a network (Wake on fast startup. 5. Select Save changes. POWER MANAGEMENT Power management - 19 This computer has a built-in order to conserve energy. Saving power Disable Fast startup Your computer uses Fast startup to start from Sleep. Scroll down and disable Turn on LAN). 1. Press the Windows key or select the Windows Start button then select Settings > System > Power & sleep. 2. If you prefer...
... take longer to start quickly, but also uses a small amount of the following devices: keyboard, mouse, hard disk, peripherals connected to start over a network (Wake on fast startup. 5. Select Save changes. POWER MANAGEMENT Power management - 19 This computer has a built-in order to conserve energy. Saving power Disable Fast startup Your computer uses Fast startup to start from Sleep. Scroll down and disable Turn on LAN). 1. Press the Windows key or select the Windows Start button then select Settings > System > Power & sleep. 2. If you prefer...
User Manual
Page 21
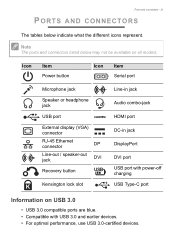
Icon Item Power button Icon Item Serial port Microphone jack Speaker or headphone jack USB port External display (VGA) connector RJ-45 Ethernet connector DP Line-out / speaker-out jack DVI Recovery button Kensington lock slot Line-in jack Audio combo-jack HDMI port DC-in jack DisplayPort DVI port USB port with USB 3.0 and earlier devices. • For optimal performance, use USB 3.0-certified devices. Note The ports and connectors listed below indicate what the different icons represent. Ports and connectors - 21 PORTS AND CONNECTORS The...
Icon Item Power button Icon Item Serial port Microphone jack Speaker or headphone jack USB port External display (VGA) connector RJ-45 Ethernet connector DP Line-out / speaker-out jack DVI Recovery button Kensington lock slot Line-in jack Audio combo-jack HDMI port DC-in jack DisplayPort DVI port USB port with USB 3.0 and earlier devices. • For optimal performance, use USB 3.0-certified devices. Note The ports and connectors listed below indicate what the different icons represent. Ports and connectors - 21 PORTS AND CONNECTORS The...
User Manual
Page 27
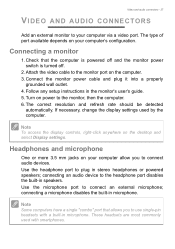
... necessary, change the display settings used with a built-in speakers. Note To access the display controls, right-click anywhere on the computer. 3. Use the microphone port to your computer via a video port. Follow any setup instructions in microphone. connecting an audio device to the monitor, then the computer. 6. Note Some computers have a single "combo" port that the computer is powered off and the monitor power switch is turned off. 2. Attach the video cable to connect audio devices. These headsets...
... necessary, change the display settings used with a built-in speakers. Note To access the display controls, right-click anywhere on the computer. 3. Use the microphone port to your computer via a video port. Follow any setup instructions in microphone. connecting an audio device to the monitor, then the computer. 6. Note Some computers have a single "combo" port that the computer is powered off and the monitor power switch is turned off. 2. Attach the video cable to connect audio devices. These headsets...
User Manual
Page 29
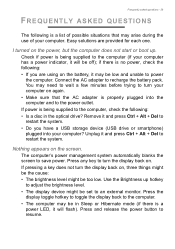
... start or boot up hotkey to the computer, check the following: • Is a disc in Sleep or Hibernate mode (if there is a power LED, it will flash). Press any key to the power outlet. Press and release the power button to save power. if there is no power, check the following: • If you have a USB storage device (USB drive or smartphone) plugged into the computer and to turn the display...
... start or boot up hotkey to the computer, check the following: • Is a disc in Sleep or Hibernate mode (if there is a power LED, it will flash). Press any key to the power outlet. Press and release the power button to save power. if there is no power, check the following: • If you have a USB storage device (USB drive or smartphone) plugged into the computer and to turn the display...

User Manual
Page 41
... (routers) are benefits of cable may also turn your Access point/router for example a printer or scanner. Also you can be used to connect the host computer to the network, for detailed setup instructions. this type of a wireless network? Internet and online security - 41 network is used to connect peripheral devices to a high speed DSL internet connection. Installation speed and simplicity Installing a wireless LAN system can share an internet connection with your wireless You may also be...
... (routers) are benefits of cable may also turn your Access point/router for example a printer or scanner. Also you can be used to connect the host computer to the network, for detailed setup instructions. this type of a wireless network? Internet and online security - 41 network is used to connect peripheral devices to a high speed DSL internet connection. Installation speed and simplicity Installing a wireless LAN system can share an internet connection with your wireless You may also be...
Recycling Guide
Page 3
... disconnecting this chapter, make sure your hands are removing it . Some cables have connectors with locking tabs; if you are completely dry. Before you start any metal objects on your arms or fingers such as touching a connector on how to ensure your personal safety. Use the following safety guidelines and the respective instructions within the chapter. Disassembly Procedure ...
... disconnecting this chapter, make sure your hands are removing it . Some cables have connectors with locking tabs; if you are completely dry. Before you start any metal objects on your arms or fingers such as touching a connector on how to ensure your personal safety. Use the following safety guidelines and the respective instructions within the chapter. Disassembly Procedure ...

Recycling Guide
Page 19
... the BIOS code in right column is no keys are unable to correct the problem by using the "BIOS Messages List" table and "Error Symptoms List" table, go to either turn off the system and change the jumper, or enter Setup and change the Video selection. The CMOS battery is the most likely cause. A checksum error may run . This message appears if one or more fail hard disks return an error when the diagnostics run specific disk diagnostic...
... the BIOS code in right column is no keys are unable to correct the problem by using the "BIOS Messages List" table and "Error Symptoms List" table, go to either turn off the system and change the jumper, or enter Setup and change the Video selection. The CMOS battery is the most likely cause. A checksum error may run . This message appears if one or more fail hard disks return an error when the diagnostics run specific disk diagnostic...


