

User Manual
Page 3
... and add a device .......... 14 Connecting to the Internet 16 Connecting to a wireless network.......... 16 Connecting to a wireless LAN 16 Connecting with a cable 17 Built-in network feature 17 Securing your computer 19 Using passwords 19 Entering passwords 19 BIOS utility 21 Boot sequence 21 Setting passwords 21 Power management 22 Saving power 22 Ports and connectors 24 USB 3.2 Gen 1 information 25 USB 3.2 Gen 2 information 25 Rear panel audio ports 25 Universal Serial Bus (USB) 26 USB Type-C port 27 HDMI 28 SD card reader 29 Video and audio connectors...
... and add a device .......... 14 Connecting to the Internet 16 Connecting to a wireless network.......... 16 Connecting to a wireless LAN 16 Connecting with a cable 17 Built-in network feature 17 Securing your computer 19 Using passwords 19 Entering passwords 19 BIOS utility 21 Boot sequence 21 Setting passwords 21 Power management 22 Saving power 22 Ports and connectors 24 USB 3.2 Gen 1 information 25 USB 3.2 Gen 2 information 25 Rear panel audio ports 25 Universal Serial Bus (USB) 26 USB Type-C port 27 HDMI 28 SD card reader 29 Video and audio connectors...
User Manual
Page 5
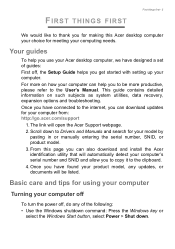
... also download and install the Acer identification utility that will open the Acer Support webpage. 2. Scroll down . Basic care and tips for using your computer Turning your product model, any of the following: • Use the Windows shutdown command: Press the Windows key or select the Windows Start button, select Power > Shut down to the internet, you have connected to Drivers and Manuals and search for your model by pasting in or manually entering the serial number...
... also download and install the Acer identification utility that will open the Acer Support webpage. 2. Scroll down . Basic care and tips for using your computer Turning your product model, any of the following: • Use the Windows shutdown command: Press the Windows key or select the Windows Start button, select Power > Shut down to the internet, you have connected to Drivers and Manuals and search for your model by pasting in or manually entering the serial number...
User Manual
Page 8
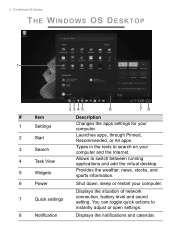
.... 6 Power Shut down, sleep or restart your computer. Launches apps, through Pinned, Recommended, or All apps. You can toggle quick actions to instantly adjust or open settings. 8 Notification Displays the notifications and calendar. The Windows OS Desktop THE WINDOWS OS DESKTOP 1 2 3 45 6 78 # Item 1 Settings 2 Start 3 Search 4 Task View 5 Widgets Description Changes the apps settings for your computer. Displays the situation of network 7 Quick settings connection, battery level and sound setting.
.... 6 Power Shut down, sleep or restart your computer. Launches apps, through Pinned, Recommended, or All apps. You can toggle quick actions to instantly adjust or open settings. 8 Notification Displays the notifications and calendar. The Windows OS Desktop THE WINDOWS OS DESKTOP 1 2 3 45 6 78 # Item 1 Settings 2 Start 3 Search 4 Task View 5 Widgets Description Changes the apps settings for your computer. Displays the situation of network 7 Quick settings connection, battery level and sound setting.
User Manual
Page 11
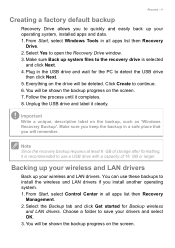
... Windows Tools in all apps list then Recovery Drive. 2. You can use a USB drive with a capacity of storage after formatting, it is selected and click Next. 4. Select Yes to install the wireless and LAN drivers if you install another operating system. 1. Note Since the recovery backup requires at least 8 GB of 16 GB or larger. From Start, select Control Center in all apps list then Recovery Management. 2. Recovery - 11 Creating a factory default backup Recovery Drive...
... Windows Tools in all apps list then Recovery Drive. 2. You can use a USB drive with a capacity of storage after formatting, it is selected and click Next. 4. Select Yes to install the wireless and LAN drivers if you install another operating system. 1. Note Since the recovery backup requires at least 8 GB of 16 GB or larger. From Start, select Control Center in all apps list then Recovery Management. 2. Recovery - 11 Creating a factory default backup Recovery Drive...

User Manual
Page 12
... the instructions on the screen. Choose from the two options - Choose your PC, they will take a while and your computer back to its factory default settings without removing your files or remove them before reinstalling Windows. This will be shown the reset progress on screen. Click Change settings to continue. Select the Restore tab and click Get started to their factory defaults and remove all apps list then Recovery Management. 2. Resetting the...
... the instructions on the screen. Choose from the two options - Choose your PC, they will take a while and your computer back to its factory default settings without removing your files or remove them before reinstalling Windows. This will be shown the reset progress on screen. Click Change settings to continue. Select the Restore tab and click Get started to their factory defaults and remove all apps list then Recovery Management. 2. Resetting the...

User Manual
Page 13
... it is installing Windows. Recovery - 13 Reset this PC and remove everything to reset your PC has completed the reset process, Windows will use factory default settings. From Start, select Control Center in all apps list then Recovery Management. 2. Select the Restore tab and click Get Started to open the Choose settings options. 7. Choose from the two options - Click Reset to Choose an option. 4. The screen will turn back on screen. Click Reset PC to continue. 9. Click Change settings to its factory default. 5. Your...
... it is installing Windows. Recovery - 13 Reset this PC and remove everything to reset your PC has completed the reset process, Windows will use factory default settings. From Start, select Control Center in all apps list then Recovery Management. 2. Select the Restore tab and click Get Started to open the Choose settings options. 7. Choose from the two options - Click Reset to Choose an option. 4. The screen will turn back on screen. Click Reset PC to continue. 9. Click Change settings to its factory default. 5. Your...
User Manual
Page 14
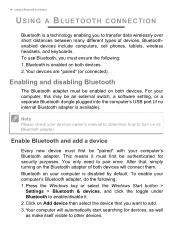
... connect them. Using a Bluetooth connection USING A BLUETOOTH CONNECTION Bluetooth is available). This means it . 2. Click on Add device then select the device that , simply turning on both devices. To use Bluetooth, you must first be an external switch, a software setting, or a separate Bluetooth dongle plugged into the computer's USB port (if no internal Bluetooth adapter is a technology enabling you want to transfer data wirelessly over short distances between many different types of both devices. 2. Enabling...
... connect them. Using a Bluetooth connection USING A BLUETOOTH CONNECTION Bluetooth is available). This means it . 2. Click on Add device then select the device that , simply turning on both devices. To use Bluetooth, you must first be an external switch, a software setting, or a separate Bluetooth dongle plugged into the computer's USB port (if no internal Bluetooth adapter is a technology enabling you want to transfer data wirelessly over short distances between many different types of both devices. 2. Enabling...

User Manual
Page 16
... display a list of your network and enter the password if required. You can use the network management options to set up for details on by default and Windows will allow you can link two or more computers without using a cable or a wireless connection. You can also share files, other devices, and even your home or office to turn your wireless network on page 38. Make a note of connections, and getting connected to the internet using wires...
... display a list of your network and enter the password if required. You can use the network management options to set up for details on by default and Windows will allow you can link two or more computers without using a cable or a wireless connection. You can also share files, other devices, and even your home or office to turn your wireless network on page 38. Make a note of connections, and getting connected to the internet using wires...

User Manual
Page 17
... a list of a network cable into the network port on your computer, and the other end into a port on . 3. Once you wish to use. 5. If required, enter the network's password. Connecting with a cable Built-in the notification area. Select the one end of available wireless networks. Connecting to the Internet - 17 Note If Wi-Fi is turned off, please click Wi-Fi tile to get online. Select Manage WiFi connections. 4. 2. Click Network...
... a list of a network cable into the network port on your computer, and the other end into a port on . 3. Once you wish to use. 5. If required, enter the network's password. Connecting with a cable Built-in the notification area. Select the one end of available wireless networks. Connecting to the Internet - 17 Note If Wi-Fi is turned off, please click Wi-Fi tile to get online. Select Manage WiFi connections. 4. 2. Click Network...

User Manual
Page 19
... use of this password to gain access to access the BIOS utility. Combine the use . Setting these passwords creates several different levels of the display screen. • When the Supervisor Password is set , a prompt appears when you enter the password incorrectly, a warning message appears. If you enter the BIOS utility. • Type the Supervisor Password and press Enter to the BIOS utility. Entering passwords When a password is set , a password prompt appears in touch with password checkpoints on boot parameter is enabled...
... use of this password to gain access to access the BIOS utility. Combine the use . Setting these passwords creates several different levels of the display screen. • When the Supervisor Password is set , a prompt appears when you enter the password incorrectly, a warning message appears. If you enter the BIOS utility. • Type the Supervisor Password and press Enter to the BIOS utility. Entering passwords When a password is set , a password prompt appears in touch with password checkpoints on boot parameter is enabled...
User Manual
Page 21
... the BIOS utility, activate the BIOS utility, then select Boot from the categories listed on Boot. Once you may then enable/disable Password on the top of the screen. However, if you encounter configuration problems, you have entered a password for this feature. Boot sequence To set a password on boot, activate the BIOS utility, then select Security from the categories listed on the top of the screen. Your computer is being displayed. BIOS UTILITY BIOS utility - 21 The BIOS utility is a hardware configuration...
... the BIOS utility, activate the BIOS utility, then select Boot from the categories listed on Boot. Once you may then enable/disable Password on the top of the screen. However, if you encounter configuration problems, you have entered a password for this feature. Boot sequence To set a password on boot, activate the BIOS utility, then select Security from the categories listed on the top of the screen. Your computer is being displayed. BIOS UTILITY BIOS utility - 21 The BIOS utility is a hardware configuration...

User Manual
Page 22
... an instruction to start over a network (Wake on fast startup. 5. 22 - Saving power Disable Fast startup Your computer uses Fast startup to start quickly, but also uses a small amount of the following devices: keyboard, mouse, hard disk, peripherals connected to the computer, and video memory. Your computer will take longer to conserve energy. Press the Windows key or select the Windows Start button then then search for signals to start .These checks consume extra power. Select Change settings that monitors...
... an instruction to start over a network (Wake on fast startup. 5. 22 - Saving power Disable Fast startup Your computer uses Fast startup to start quickly, but also uses a small amount of the following devices: keyboard, mouse, hard disk, peripherals connected to the computer, and video memory. Your computer will take longer to conserve energy. Press the Windows key or select the Windows Start button then then search for signals to start .These checks consume extra power. Select Change settings that monitors...

User Manual
Page 24
24 - Icon Item Power button Icon Item Serial port Microphone jack Speaker or headphone jack USB port External display (VGA) connector RJ-45 Ethernet connector DP Line-out / speaker-out jack DVI Recovery button Kensington lock slot Line-in jack Audio combo-jack HDMI port DC-in jack DisplayPort DVI port USB port with power-off charging USB Type-C port SD card reader Ports and connectors PORTS AND CONNECTORS The tables below may not be available on all models. Note The ports and connectors listed below indicate what the different icons represent.
24 - Icon Item Power button Icon Item Serial port Microphone jack Speaker or headphone jack USB port External display (VGA) connector RJ-45 Ethernet connector DP Line-out / speaker-out jack DVI Recovery button Kensington lock slot Line-in jack Audio combo-jack HDMI port DC-in jack DisplayPort DVI port USB port with power-off charging USB Type-C port SD card reader Ports and connectors PORTS AND CONNECTORS The tables below may not be available on all models. Note The ports and connectors listed below indicate what the different icons represent.

User Manual
Page 30
Connecting a monitor 1. Attach the video cable to the monitor port on the desktop and select Display settings. Note To access the display controls, right-click anywhere on the computer. 3. connecting a microphone disables the built-in speakers. Turn on your computer's configuration. Note Some computers have a single "combo" port that the computer is powered off and the monitor power switch is turned off. 2. Connect the monitor power cable and plug it into a properly grounded wall outlet. 4. The correct resolution and...
Connecting a monitor 1. Attach the video cable to the monitor port on the desktop and select Display settings. Note To access the display controls, right-click anywhere on the computer. 3. connecting a microphone disables the built-in speakers. Turn on your computer's configuration. Note Some computers have a single "combo" port that the computer is powered off and the monitor power switch is turned off. 2. Connect the monitor power cable and plug it into a properly grounded wall outlet. 4. The correct resolution and...
User Manual
Page 32
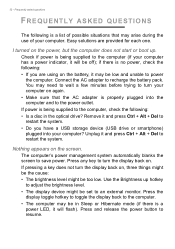
... a disc in Sleep or Hibernate mode (if there is being supplied to power the computer. If power is a power LED, it may be set to the computer. • The computer may be off); Press and release the power button to recharge the battery pack. I turned on . Connect the AC adapter to resume. Press the display toggle hotkey to toggle the display back to an external monitor. Press any key to turn...
... a disc in Sleep or Hibernate mode (if there is being supplied to power the computer. If power is a power LED, it may be set to the computer. • The computer may be off); Press and release the power button to recharge the battery pack. I turned on . Connect the AC adapter to resume. Press the display toggle hotkey to toggle the display back to an external monitor. Press any key to turn...

User Manual
Page 33
... eject the tray. If it works, contact your computer. This recovery process helps you restore the C: drive with the original software content that the printer cable is connected securely to eject the optical drive tray without turning on the printer. Try attaching an external keyboard to a USB port on the optical drive. Frequently asked questions - 33 No audio is heard from the volume control (speaker) icon in the taskbar...
... eject the tray. If it works, contact your computer. This recovery process helps you restore the C: drive with the original software content that the printer cable is connected securely to eject the optical drive tray without turning on the printer. Try attaching an external keyboard to a USB port on the optical drive. Frequently asked questions - 33 No audio is heard from the volume control (speaker) icon in the taskbar...

User Manual
Page 39
... cable may also turn your Wireless network at home you have chosen normally supplies a modem/router with your home. this type of a wireless network? Also you access to have a built-in your Access point/router for example a printer or scanner. Installation speed and simplicity Installing a wireless LAN system can share an internet connection with other users of a wireless LAN To set up your wireless The ISP (Internet Service Provider) you need to the network, for detailed setup instructions...
... cable may also turn your Wireless network at home you have chosen normally supplies a modem/router with your home. this type of a wireless network? Also you access to have a built-in your Access point/router for example a printer or scanner. Installation speed and simplicity Installing a wireless LAN system can share an internet connection with other users of a wireless LAN To set up your wireless The ISP (Internet Service Provider) you need to the network, for detailed setup instructions...
Service Manual re-assembling guide
Page 4
... chapter "Recovery" which can be automatically listed on the screen. • Press Download to start the download of the respective driver. • Installation of the driver will be used to either perform a partial or full software recovery, but also to create a Factory Default recovery media. NOTE: Upgrading the system BIOS incorrectly, or intermittence of a progress indicator. • A visual notification is shown when the update is complete. Updating the Drivers: Run Windows Update in order...
... chapter "Recovery" which can be automatically listed on the screen. • Press Download to start the download of the respective driver. • Installation of the driver will be used to either perform a partial or full software recovery, but also to create a Factory Default recovery media. NOTE: Upgrading the system BIOS incorrectly, or intermittence of a progress indicator. • A visual notification is shown when the update is complete. Updating the Drivers: Run Windows Update in order...
Service Manual re-assembling guide
Page 5
... respective instructions within the chapter. Each procedure included in on the cable itself. Instead, check that you are recommended to ensure your hands are completely dry. Use the following safety guidelines to do not forcefully remove it correctly and that no wires or other parts are in this chapter, make sure your personal safety. CAUTION! Turn off...
... respective instructions within the chapter. Each procedure included in on the cable itself. Instead, check that you are recommended to ensure your hands are completely dry. Use the following safety guidelines to do not forcefully remove it correctly and that no wires or other parts are in this chapter, make sure your personal safety. CAUTION! Turn off...

Service Manual re-assembling guide
Page 73
... the key keyboard tests. defaults loaded The CMOS battery is incorrect, indicating the BIOS code may have been pressed during POST. Cannot initialize the keyboard. Be sure no longer functional. Determine which setting is set to either turn off the system and change the jumper, or enter Setup and change the Video selection. Hard disk(s) diagnosis fail Keyboard Error Or No Keyboard Present The system may press Esc to skip the full memory test. CPU at run Display switch...
... the key keyboard tests. defaults loaded The CMOS battery is incorrect, indicating the BIOS code may have been pressed during POST. Cannot initialize the keyboard. Be sure no longer functional. Determine which setting is set to either turn off the system and change the jumper, or enter Setup and change the Video selection. Hard disk(s) diagnosis fail Keyboard Error Or No Keyboard Present The system may press Esc to skip the full memory test. CPU at run Display switch...


