

User Manual (3D)
Page 3
... turn off , otherwise the image may help you can press, and an LED that may not be shown a reminder that came with NVIDIA 3D Vision certified projectors when using NVIDIA 3D glasses. Using NVIDIA 3D Vision technology Only available with your graphics card is a power switch on one of the page that indicates if the glasses are powered. If you have connected...
... turn off , otherwise the image may help you can press, and an LED that may not be shown a reminder that came with NVIDIA 3D Vision certified projectors when using NVIDIA 3D glasses. Using NVIDIA 3D Vision technology Only available with your graphics card is a power switch on one of the page that indicates if the glasses are powered. If you have connected...

User Manual (3D)
Page 4
... Control Panel. This will need to purchase additional software. 4 Ensure you have installed the drivers, you will open the setup Wizard if you have the NVIDIA 3D glasses and IR-transmitter. Note: You may need to set up a 3D environment Once you haven't previously set up the 3D environment. 3 Follow the onscreen instructions to set up the environment. 1 Position the infra-red...
... Control Panel. This will need to purchase additional software. 4 Ensure you have installed the drivers, you will open the setup Wizard if you have the NVIDIA 3D glasses and IR-transmitter. Note: You may need to set up a 3D environment Once you haven't previously set up the 3D environment. 3 Follow the onscreen instructions to set up the environment. 1 Position the infra-red...

User Manual (3D)
Page 7
... set the viewing method by going to the NVIDIA 3DTV Play website: www.nvidia.com/3dtv. Note: Please refer to get the 3D effects. To download software and use an NVIDIA 3DTV Play ready projector with DLP glasses, refer to View > Viewing Method > NVIDIA 3D Vision. 2 Open the 3D content in order to your graphics card's documentation. 2 Download and install the latest drivers...
... set the viewing method by going to the NVIDIA 3DTV Play website: www.nvidia.com/3dtv. Note: Please refer to get the 3D effects. To download software and use an NVIDIA 3DTV Play ready projector with DLP glasses, refer to View > Viewing Method > NVIDIA 3D Vision. 2 Open the 3D content in order to your graphics card's documentation. 2 Download and install the latest drivers...

User Manual
Page 5
... not use non-compliant parts when adding or changing components. At least 50cm clearance from the wall outlet and refer servicing to qualified service personnel when: • the power cord or plug is damaged, cut or frayed • liquid was exposed to normal condition. Consult your projector. Your device and its enhancements may become excessively high, such as opening or removing covers...
... not use non-compliant parts when adding or changing components. At least 50cm clearance from the wall outlet and refer servicing to qualified service personnel when: • the power cord or plug is damaged, cut or frayed • liquid was exposed to normal condition. Consult your projector. Your device and its enhancements may become excessively high, such as opening or removing covers...

User Manual
Page 6
...; Always open the lens shutter or remove the lens cap when the projector is on end vertically. The only user serviceable part is showing warning message. • When changing the lamp, please allow unit to cool down, and follow all changing instructions. • Reset the "Lamp Hour Reset" function from the Onscreen display "Management" menu after replacing the lamp module. • Do not attempt to break on the remote control. • The lamp becomes extremely...
...; Always open the lens shutter or remove the lens cap when the projector is on end vertically. The only user serviceable part is showing warning message. • When changing the lamp, please allow unit to cool down, and follow all changing instructions. • Reset the "Lamp Hour Reset" function from the Onscreen display "Management" menu after replacing the lamp module. • Do not attempt to break on the remote control. • The lamp becomes extremely...

User Manual
Page 8
... not open or disassemble the product as recommended in operation. • When the lamp reaches the end of its life, it shows warning messages. • Reset the "Lamp Hour Reset" function from the Onscreen display "Management" menu after replacing the lamp module. • When switching the projector off, please ensure the projector completes its cooling cycle before cleaning. • Use a soft cloth moistened with mild detergent to clean the display housing...
... not open or disassemble the product as recommended in operation. • When the lamp reaches the end of its life, it shows warning messages. • Reset the "Lamp Hour Reset" function from the Onscreen display "Management" menu after replacing the lamp module. • When switching the projector off, please ensure the projector completes its cooling cycle before cleaning. • Use a soft cloth moistened with mild detergent to clean the display housing...

User Manual
Page 9
... 1 Package Overview 2 Projector Overview 3 Projector Outlook 3 Control Panel 4 Remote Control Layout 5 Getting Started 7 Connecting the Projector 7 Turning the Projector On/Off 8 Turning on the Projector 8 Turning the projector off 9 Adjusting the Projected Image 10 Adjusting the Height of Projected Image 10 How to optimize image size and distance 11 How to get a preferred image size by adjusting distance and zoom 13 User Controls 15 Installation menu 15 Onscreen Display (OSD) Menus 16 Color 17 Image 19 Setting 21 Management 23 Audio 24 3D 25...
... 1 Package Overview 2 Projector Overview 3 Projector Outlook 3 Control Panel 4 Remote Control Layout 5 Getting Started 7 Connecting the Projector 7 Turning the Projector On/Off 8 Turning on the Projector 8 Turning the projector off 9 Adjusting the Projected Image 10 Adjusting the Height of Projected Image 10 How to optimize image size and distance 11 How to get a preferred image size by adjusting distance and zoom 13 User Controls 15 Installation menu 15 Onscreen Display (OSD) Menus 16 Color 17 Image 19 Setting 21 Management 23 Audio 24 3D 25...

User Manual
Page 11
...) mode extends lamp life • Acer EcoProjeciton Technology delivers Intelligent power management approach and physical efficiency improvement • Equipped with HDMI™ connection supporting HDCP • Advanced digital keystone correction optimizes presentations • Smart detection delivers quick, intelligent source detection • Multi-language onscreen display (OSD) menus • X1278H/M216/PE-X27/FNX1502 series: Manual focus projection lens zooms up to 1.1x X1378WH/M226/PE-W27/FWX1501 series: Manual focus projection lens zooms...
...) mode extends lamp life • Acer EcoProjeciton Technology delivers Intelligent power management approach and physical efficiency improvement • Equipped with HDMI™ connection supporting HDCP • Advanced digital keystone correction optimizes presentations • Smart detection delivers quick, intelligent source detection • Multi-language onscreen display (OSD) menus • X1278H/M216/PE-X27/FNX1502 series: Manual focus projection lens zooms up to 1.1x X1378WH/M226/PE-W27/FWX1501 series: Manual focus projection lens zooms...
User Manual
Page 14
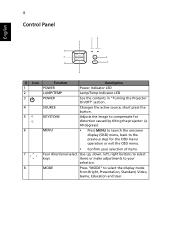
4 Control Panel English 12 5 6 7 3 8 4 5 # Icon Function Description 1 POWER Power Indicator LED 2 LAMP/TEMP Lamp/Temp Indicator LED 3 POWER See the contents in "Turning the Projector On/Off" section. 4 SOURCE Changes the active source, short press the button. 5 KEYSTONE Adjusts the image to compensate for distortion caused by tilting the projector (± 40 degrees). 6 MENU • Press MENU to launch the onscreen display (OSD) menu, back to the previous step for the OSD menu operation or exit the OSD menu. • Confirm...
4 Control Panel English 12 5 6 7 3 8 4 5 # Icon Function Description 1 POWER Power Indicator LED 2 LAMP/TEMP Lamp/Temp Indicator LED 3 POWER See the contents in "Turning the Projector On/Off" section. 4 SOURCE Changes the active source, short press the button. 5 KEYSTONE Adjusts the image to compensate for distortion caused by tilting the projector (± 40 degrees). 6 MENU • Press MENU to launch the onscreen display (OSD) menu, back to the previous step for the OSD menu operation or exit the OSD menu. • Confirm...
User Manual
Page 16
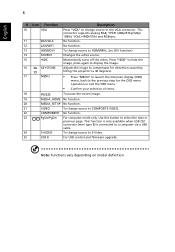
.... 11 SD/USB A No function. 12 LAN/WiFi No function. 13 HDMI/DVI To change source to COMPOSITE VIDEO. 22 COMPONENT No function. 23 PgUp/PgDn For computer mode only. Press "HIDE" to hide the image, press again to display the image. 16 KEYSTONE Adjusts the image to compensate for distortion caused by tilting the projector (± 40 degrees). 17 MENU • Press "MENU" to launch...
.... 11 SD/USB A No function. 12 LAN/WiFi No function. 13 HDMI/DVI To change source to COMPOSITE VIDEO. 22 COMPONENT No function. 23 PgUp/PgDn For computer mode only. Press "HIDE" to hide the image, press again to display the image. 16 KEYSTONE Adjusts the image to compensate for distortion caused by tilting the projector (± 40 degrees). 17 MENU • Press "MENU" to launch...

User Manual
Page 19
... the power button again to ensure that the projector has overheated. Warning indicators: • "Projector Overheated. This onscreen message indicates that the system cools properly. (only supported under "Instant Resume" mode) 3 As long as the power cord remains plugged in, you can press the power button to turn the projector immediately back on model definition. The lamp with automatically turn solid red to indicate standby mode. 5 It is turned off, and the fan(s) will continue to operate for...
... the power button again to ensure that the projector has overheated. Warning indicators: • "Projector Overheated. This onscreen message indicates that the system cools properly. (only supported under "Instant Resume" mode) 3 As long as the power cord remains plugged in, you can press the power button to turn the projector immediately back on model definition. The lamp with automatically turn solid red to indicate standby mode. 5 It is turned off, and the fan(s) will continue to operate for...

User Manual
Page 25
... screen. Installation Projection Keystone Language Reset English Press Select Adjust Exit 3 The background pattern acts as a guide to adjusting the calibration and alignment settings, such as screen size and distance, focus and more . 1 Turn on the projector by pressing "Power" button on the control pad. 2 Press the "MENU" button to launch the OSD for screen size and distance, focus, keystone correction and more . 4 The Installation menu includes the following options: •Projection •Keystone settings •Language settings •Reset to factory default function Use...
... screen. Installation Projection Keystone Language Reset English Press Select Adjust Exit 3 The background pattern acts as a guide to adjusting the calibration and alignment settings, such as screen size and distance, focus and more . 1 Turn on the projector by pressing "Power" button on the control pad. 2 Press the "MENU" button to launch the OSD for screen size and distance, focus, keystone correction and more . 4 The Installation menu includes the following options: •Projection •Keystone settings •Language settings •Reset to factory default function Use...
User Manual
Page 27
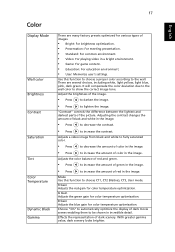
... "On" to choose CT1, CT2 (Native), CT3, User mode. 17 English Color Display Mode Wall color Brightness Contrast Saturation Tint Color Temperature Dynamic Black Gamma There are several choices, including white, light yellow, light blue, pink, dark green. There are many factory presets optimized for various types of the picture. "Contrast" controls the difference between the lightest and darkest parts of images. • Bright: For brightness optimization. • Presentation...
... "On" to choose CT1, CT2 (Native), CT3, User mode. 17 English Color Display Mode Wall color Brightness Contrast Saturation Tint Color Temperature Dynamic Black Gamma There are several choices, including white, light yellow, light blue, pink, dark green. There are many factory presets optimized for various types of the picture. "Contrast" controls the difference between the lightest and darkest parts of images. • Bright: For brightness optimization. • Presentation...

User Manual
Page 29
... projector reverses and inverts the image at same time. Automatically adjusts vertical image. to fit the width of the projector with ceiling mounted projection. Aspect Ratio Auto Keystone Manual Keystone • Front-Ceiling: When you select this function to make the necessary adjustments. If you experience an unstable or flickering image, use this function to fit full screen by tilting projection. (±40 degrees) Sharpeness The Manual Keystone function is only available for ceiling-mounted projection...
... projector reverses and inverts the image at same time. Automatically adjusts vertical image. to fit the width of the projector with ceiling mounted projection. Aspect Ratio Auto Keystone Manual Keystone • Front-Ceiling: When you select this function to make the necessary adjustments. If you experience an unstable or flickering image, use this function to fit full screen by tilting projection. (±40 degrees) Sharpeness The Manual Keystone function is only available for ceiling-mounted projection...

User Manual
Page 31
... is enabled, the projector will request user to enter password when switch on all menus to turn on the remote control for the next channel. Security This projector provides a useful security function for the administrator to change the "Security" setting. Select "Off" to the factory default settings. Setting Source Lock Closed Caption Reset Security 21 When source lock is turned "Off", the projector will search for other signals if the current input signal is NTSC.
... is enabled, the projector will request user to enter password when switch on all menus to turn on the remote control for the next channel. Security This projector provides a useful security function for the administrator to change the "Security" setting. Select "Off" to the factory default settings. Setting Source Lock Closed Caption Reset Security 21 When source lock is turned "Off", the projector will search for other signals if the current input signal is NTSC.

User Manual
Page 32
... power supply function This feature supports Google® Chromecast™. Note: Functions vary depending on model definition. If you select "Always request password while projector turns on.", the user has to enter the password every time when the projector is turned on. English 22 DC 5V OUT (Standby) HDMI CEC User Password • Press to setup or change the "User Password". • Press number keys to set your password on the remote control and press "MENU...
... power supply function This feature supports Google® Chromecast™. Note: Functions vary depending on model definition. If you select "Always request password while projector turns on.", the user has to enter the password every time when the projector is turned on. English 22 DC 5V OUT (Standby) HDMI CEC User Password • Press to setup or change the "User Password". • Press number keys to set your password on the remote control and press "MENU...

User Manual
Page 33
... projector lamp which will automatically shutdown when there is no signal input after the allocated time. (default is 120 minutes) When this function to display a reminder to 0 hours. English 23 Management ECO Mode High Altitude Turn Off Mode Auto Shutdown AC Power On Lamp Hour Elapse Lamp Reminding Lamp Hour Reset Choose "On" to return normal mode. Choose "On" to turn the lamp hour counter to change the lamp 30 hours before its expected end-of ceiling mounted projectors with a wall power switch...
... projector lamp which will automatically shutdown when there is no signal input after the allocated time. (default is 120 minutes) When this function to display a reminder to 0 hours. English 23 Management ECO Mode High Altitude Turn Off Mode Auto Shutdown AC Power On Lamp Hour Elapse Lamp Reminding Lamp Hour Reset Choose "On" to return normal mode. Choose "On" to turn the lamp hour counter to change the lamp 30 hours before its expected end-of ceiling mounted projectors with a wall power switch...

User Manual
Page 36
..." button. Windows 8)) • Verify that the resolution setting is lower than or equal to the following troubleshooting guide. 26 Appendices English Troubleshooting If you are bent or broken. • Check if the projector lamp has been securely installed. If the problem persists, please contact your display resolution setting is switched on. 2 Partial, scrolling • For an incorrectly displayed image: or incorrectly displayed image (for PC (Windows • Open "My Computer", open the "Control Panel", and...
..." button. Windows 8)) • Verify that the resolution setting is lower than or equal to the following troubleshooting guide. 26 Appendices English Troubleshooting If you are bent or broken. • Check if the projector lamp has been securely installed. If the problem persists, please contact your display resolution setting is switched on. 2 Partial, scrolling • For an incorrectly displayed image: or incorrectly displayed image (for PC (Windows • Open "My Computer", open the "Control Panel", and...

User Manual
Page 37
... using an Apple® Mac® OS based notebook: In System Preferences, open Display and select Video Mirroring "On". 5 Image is unstable • Adjust the "Tracking" to correct it compatible with the projector. 7 Image is out of focus • Make sure the lens cap is removed. • Adjusts the focus ring on the projector lens. • Make sure the projection screen is not displaying your computer. 6 Image has vertical • Use...
... using an Apple® Mac® OS based notebook: In System Preferences, open Display and select Video Mirroring "On". 5 Image is unstable • Adjust the "Tracking" to correct it compatible with the projector. 7 Image is out of focus • Make sure the lens cap is removed. • Adjusts the focus ring on the projector lens. • Make sure the projection screen is not displaying your computer. 6 Image has vertical • Use...
User Manual
Page 46
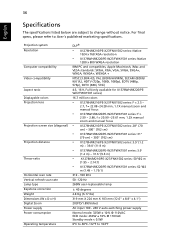
For final specs, please refer to 104ºF Projection system Resolution Computer compatibility Video compatibility Aspect ratio Displayable colors Projection lens Projection screen size (diagonal) Projection distance Throw ratio Horizontal scan rate Vertical refresh scan rate Lamp type Keystone correction Weight Dimensions (W x D x H) Digital Zoom Power supply Power consumption Operating temperature DLP® • X1278H/M216/PE-X27/FNX1502 series: Native 1024 x 768 XGA resolution • X1378WH/M226/PE-W27/FWX1501 series: Native 1280 x 800 WXGA resolution IBM PC...
For final specs, please refer to 104ºF Projection system Resolution Computer compatibility Video compatibility Aspect ratio Displayable colors Projection lens Projection screen size (diagonal) Projection distance Throw ratio Horizontal scan rate Vertical refresh scan rate Lamp type Keystone correction Weight Dimensions (W x D x H) Digital Zoom Power supply Power consumption Operating temperature DLP® • X1278H/M216/PE-X27/FNX1502 series: Native 1024 x 768 XGA resolution • X1378WH/M226/PE-W27/FWX1501 series: Native 1280 x 800 WXGA resolution IBM PC...


