

User Manual (3D)
Page 3
..., you have connected your projector to a computer, please read "Watching 3D DVD or Blu-ray content" on page 11. Using NVIDIA 3D Vision technology Only available with your glasses for instructions how to turn them on and how to change the battery. Before you can view 3D content, you should turn off , otherwise the image may help you are unsure...
..., you have connected your projector to a computer, please read "Watching 3D DVD or Blu-ray content" on page 11. Using NVIDIA 3D Vision technology Only available with your glasses for instructions how to turn them on and how to change the battery. Before you can view 3D content, you should turn off , otherwise the image may help you are unsure...

User Manual (3D)
Page 4
Plug the USB cable in to view 3D content. Note: You may need to set up the 3D environment. Setting up a 3D environment Once you have installed the drivers, you will open the setup Wizard if you have the NVIDIA 3D glasses and IR-transmitter. This will need to purchase additional software. 4 Ensure you haven't previously set up the 3D environment. 3 Follow...
Plug the USB cable in to view 3D content. Note: You may need to set up the 3D environment. Setting up a 3D environment Once you have installed the drivers, you will open the setup Wizard if you have the NVIDIA 3D glasses and IR-transmitter. This will need to purchase additional software. 4 Ensure you haven't previously set up the 3D environment. 3 Follow...

User Manual (3D)
Page 7
To download software and use an NVIDIA 3DTV Play ready projector with DLP glasses, refer to View > Viewing Method > NVIDIA 3D Vision. 2 Open the 3D content in order to your graphics card vendor's website for your graphics card supports 3D playback. English 7 1 Open the stereoscopic player and set the viewing method by going to the NVIDIA 3DTV Play website: www.nvidia.com/3dtv...
To download software and use an NVIDIA 3DTV Play ready projector with DLP glasses, refer to View > Viewing Method > NVIDIA 3D Vision. 2 Open the 3D content in order to your graphics card vendor's website for your graphics card supports 3D playback. English 7 1 Open the stereoscopic player and set the viewing method by going to the NVIDIA 3DTV Play website: www.nvidia.com/3dtv...

User Manual
Page 5
... from walls and free flow of air around the projector is necessary. • Locations where temperatures may become excessively high, such as opening or removing covers may contain small parts. The bright may hurt your eyes. • Turn on . Consult your projector. Additional safety information • Do not look into the product • the product was exposed to qualified service personnel. At least...
... from walls and free flow of air around the projector is necessary. • Locations where temperatures may become excessively high, such as opening or removing covers may contain small parts. The bright may hurt your eyes. • Turn on . Consult your projector. Additional safety information • Do not look into the product • the product was exposed to qualified service personnel. At least...

User Manual
Page 6
... not frequently turn off the main power abruptly or unplug the projector during operation. The only user serviceable part is unplugged. • The product will detect the life of displaying inverted images for mounting the projector and ensure it is showing warning message. • When changing the lamp, please allow unit to cool down, and follow all changing instructions. • Reset the "Lamp Hour Reset" function from the Onscreen display "Management" menu after replacing the lamp module...
... not frequently turn off the main power abruptly or unplug the projector during operation. The only user serviceable part is unplugged. • The product will detect the life of displaying inverted images for mounting the projector and ensure it is showing warning message. • When changing the lamp, please allow unit to cool down, and follow all changing instructions. • Reset the "Lamp Hour Reset" function from the Onscreen display "Management" menu after replacing the lamp module...
User Manual
Page 8
...: • Turn off , please ensure the projector completes its life, it shows warning messages. • Reset the "Lamp Hour Reset" function from the Onscreen display "Management" menu after replacing the lamp module. • When switching the projector off the product before cleaning. • Use a soft cloth moistened with mild detergent to clean the display housing. • Disconnect the power plug from AC outlet if the product is in this user's guide to...
...: • Turn off , please ensure the projector completes its life, it shows warning messages. • Reset the "Lamp Hour Reset" function from the Onscreen display "Management" menu after replacing the lamp module. • When switching the projector off the product before cleaning. • Use a soft cloth moistened with mild detergent to clean the display housing. • Disconnect the power plug from AC outlet if the product is in this user's guide to...

User Manual
Page 11
...) mode extends lamp life • Acer EcoProjeciton Technology delivers Intelligent power management approach and physical efficiency improvement • Equipped with HDMI™ & MHL connection supporting HDCP • Advanced digital keystone correction optimizes presentations • Smart detection delivers quick, intelligent source detection • Multi-language onscreen display (OSD) menus • Manual focus projection lens zooms up to 1.2x • 2X(PC)/1.8X(Video) digital zoom and pan function • Microsoft® Windows...
...) mode extends lamp life • Acer EcoProjeciton Technology delivers Intelligent power management approach and physical efficiency improvement • Equipped with HDMI™ & MHL connection supporting HDCP • Advanced digital keystone correction optimizes presentations • Smart detection delivers quick, intelligent source detection • Multi-language onscreen display (OSD) menus • Manual focus projection lens zooms up to 1.2x • 2X(PC)/1.8X(Video) digital zoom and pan function • Microsoft® Windows...

User Manual
Page 15
..., left, right buttons to select items or make directional adjustments to input a password in the "Security" OSD. Next/Fast forward No function. 9 KeyPad 0~9 Press "0~9" to your selection. select keys 5 RATIO To choose the desired aspect ratio. 6 MODE Press "MODE" to select the display mode from Bright, Presentation, Standard, Video, Game, Education and User. 7 3D Press "3D" to the projector. English 5 Remote Control Layout...
..., left, right buttons to select items or make directional adjustments to input a password in the "Security" OSD. Next/Fast forward No function. 9 KeyPad 0~9 Press "0~9" to your selection. select keys 5 RATIO To choose the desired aspect ratio. 6 MODE Press "MODE" to select the display mode from Bright, Presentation, Standard, Video, Game, Education and User. 7 3D Press "3D" to the projector. English 5 Remote Control Layout...

User Manual
Page 16
... menu. • Confirm your selection of items. 18 FREEZE To pause the screen image. 19 MEDIA_HOME No function. 20 MEDIA_SETUP No function. 21 VIDEO To change source to the VGA connector. Note: Functions vary depending on model definition. Use this button to S-Video. 25 USB B For USB control and firmware upgrade. This function is only available when USB Ctrl connector (mini type B) is connected to a computer via a USB cable. 24 S-VIDEO...
... menu. • Confirm your selection of items. 18 FREEZE To pause the screen image. 19 MEDIA_HOME No function. 20 MEDIA_SETUP No function. 21 VIDEO To change source to the VGA connector. Note: Functions vary depending on model definition. Use this button to S-Video. 25 USB B For USB control and firmware upgrade. This function is only available when USB Ctrl connector (mini type B) is connected to a computer via a USB cable. 24 S-VIDEO...
User Manual
Page 19
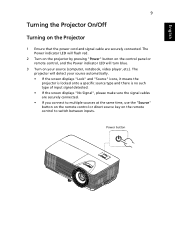
... locked onto a specific source type and there is no such type of input signal detected. • If the screen displays "No Signal", please make sure the signal cables are securely connected. • If you connect to multiple sources at the same time, use the "Source" button on the remote control or direct source key on the Projector 1 Ensure that the power cord and signal cable are securely connected. The Power indicator LED will flash red. 2 Turn on the projector by pressing "Power" button on the control panel...
... locked onto a specific source type and there is no such type of input signal detected. • If the screen displays "No Signal", please make sure the signal cables are securely connected. • If you connect to multiple sources at the same time, use the "Source" button on the remote control or direct source key on the Projector 1 Ensure that the power cord and signal cable are securely connected. The Power indicator LED will flash red. 2 Turn on the projector by pressing "Power" button on the control panel...

User Manual
Page 20
... the power cord remains plugged in, you can press the power button to turn the projector immediately back on model definition. Warning indicators: • "Projector Overheated. The lamp will automatically turn off , and the fan(s) will continue to operate for about 2 minutes to ensure that the system cools properly. (only supported under "Instant Resume" mode) 4 Once the system has finished cooling, the LED power indicator will stop blinking and turn solid red to indicate standby mode...
... the power cord remains plugged in, you can press the power button to turn the projector immediately back on model definition. Warning indicators: • "Projector Overheated. The lamp will automatically turn off , and the fan(s) will continue to operate for about 2 minutes to ensure that the system cools properly. (only supported under "Instant Resume" mode) 4 Once the system has finished cooling, the LED power indicator will stop blinking and turn solid red to indicate standby mode...
User Manual
Page 24
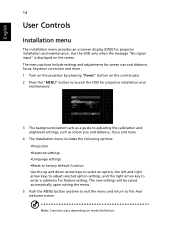
... screen size and distance, focus and more . 1 Turn on the projector by pressing "Power" button on the screen. Installation Projection Keystone Language Reset English Press Select Adjust Exit 3 The background pattern acts as a guide to enter a submenu for feature setting. Use the OSD only when the message "No signal input" is displayed on the control pad. 2 Press the "MENU" button to the Acer welcome screen. English 14 User Controls Installation menu The installation menu provides an onscreen display (OSD) for projector installation and maintenance. The new settings...
... screen size and distance, focus and more . 1 Turn on the projector by pressing "Power" button on the screen. Installation Projection Keystone Language Reset English Press Select Adjust Exit 3 The background pattern acts as a guide to enter a submenu for feature setting. Use the OSD only when the message "No signal input" is displayed on the control pad. 2 Press the "MENU" button to the Acer welcome screen. English 14 User Controls Installation menu The installation menu provides an onscreen display (OSD) for projector installation and maintenance. The new settings...

User Manual
Page 26
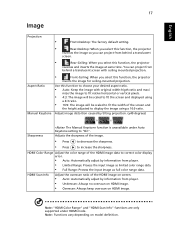
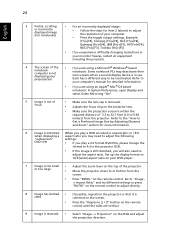
..., including white, light yellow, light blue, pink, dark green. Use this function to automatically optimize the display of black and white in incredible detail. It will compensate the color deviation due to the wall color to the wall. With greater gamma value, dark scenery looks brighter. Note: Functions vary depending on model definition. There are many factory presets optimized for color temperature optimization. "Contrast" controls the...
..., including white, light yellow, light blue, pink, dark green. Use this function to automatically optimize the display of black and white in incredible detail. It will compensate the color deviation due to the wall color to the wall. With greater gamma value, dark scenery looks brighter. Note: Functions vary depending on model definition. There are many factory presets optimized for color temperature optimization. "Contrast" controls the...
User Manual
Page 27
... the screen and displayed using a 16:9 ratio. Note: "HDMI Color Range" and "HDMI Scan Info" functions are only supported under Auto Keystone setting to increase the sharpness. Adjust image distortion caused by information from player. • Underscan: Always no overscan on HDMI image. • Overscan: Always keep overscan on model definition. Note: Functions vary depending on HDMI image. Adjusts the sharpness of the HDMI image data to correct color display error. • Auto: Automatically adjust by tilting projection...
... the screen and displayed using a 16:9 ratio. Note: "HDMI Color Range" and "HDMI Scan Info" functions are only supported under Auto Keystone setting to increase the sharpness. Adjust image distortion caused by information from player. • Underscan: Always no overscan on HDMI image. • Overscan: Always keep overscan on model definition. Note: Functions vary depending on HDMI image. Adjusts the sharpness of the HDMI image data to correct color display error. • Auto: Automatically adjust by tilting projection...
User Manual
Page 28
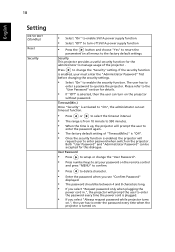
... set timeout function. • Press or to select the timeout interval. • The range is from 10 minute to 990 minutes. • When the time is turned on. 18 English Setting DC 5V OUT (Standby) Reset Security • Select "On" to enable 5V/1A power supply function. • Select "Off" to turn on the projector without password. User Password • Press to the factory default settings...
... set timeout function. • Press or to select the timeout interval. • The range is from 10 minute to 990 minutes. • When the time is turned on. 18 English Setting DC 5V OUT (Standby) Reset Security • Select "On" to enable 5V/1A power supply function. • Select "Off" to turn on the projector without password. User Password • Press to the factory default settings...

User Manual
Page 30
... control of ceiling mounted projectors with a wall power switch. Press the button and choose "Yes" to turn on model definition. The projector will lower power consumption, extend the lamp life and reduce noise. Displays the lamp's elapsed operating time (in hours). English 20 Management ECO Mode High Altitude Turn Off Mode Auto Shutdown AC Power On Lamp Hour Elapse Lamp Reminding Lamp Hour Reset Choose "On" to dim the projector lamp which will automatically shutdown when there is no signal input after the allocated time. (default...
... control of ceiling mounted projectors with a wall power switch. Press the button and choose "Yes" to turn on model definition. The projector will lower power consumption, extend the lamp life and reduce noise. Displays the lamp's elapsed operating time (in hours). English 20 Management ECO Mode High Altitude Turn Off Mode Auto Shutdown AC Power On Lamp Hour Elapse Lamp Reminding Lamp Hour Reset Choose "On" to dim the projector lamp which will automatically shutdown when there is no signal input after the allocated time. (default...

User Manual
Page 33
... to WUXGA-RB (1920 x 1200). If the problem still appears, change the monitor display you are bent or broken. • Check if the projector lamp has been securely installed. 23 Appendices English Troubleshooting If you experience a problem with your local reseller or service center. Windows 8)) • Verify that the resolution setting of the connector pins are using and follow the steps below: • Verify...
... to WUXGA-RB (1920 x 1200). If the problem still appears, change the monitor display you are bent or broken. • Check if the projector lamp has been securely installed. 23 Appendices English Troubleshooting If you experience a problem with your local reseller or service center. Windows 8)) • Verify that the resolution setting of the connector pins are using and follow the steps below: • Verify...
User Manual
Page 34
... the screen. • Press "MENU" on the projector lens. • Make sure the projection screen is within the required distance of the projector. Set up the display format to 16:9 (wide) aspect ratio on your notebook: Some notebook PCs may need to adjust the aspect ratio. Go to "Image - -> Aspect Ratio" and try different settings or press "RATIO" on the remote control to adjust directly. 8 Image has...
... the screen. • Press "MENU" on the projector lens. • Make sure the projection screen is within the required distance of the projector. Set up the display format to 16:9 (wide) aspect ratio on your notebook: Some notebook PCs may need to adjust the aspect ratio. Go to "Image - -> Aspect Ratio" and try different settings or press "RATIO" on the remote control to adjust directly. 8 Image has...

User Manual
Page 35
... been replaced. Projector Overheated - Prepare to reach its useful life in the "Replacing the Lamp" section. Lamp will not turn off the projector, then to cool down before reconnecting power. 2 Lamp burns out or makes a popping sound When the lamp reaches the end of its maximum lifetime. the system fan is approaching the end of its recommended operating temperature and must be allowed to all controls unplug the power cord...
... been replaced. Projector Overheated - Prepare to reach its useful life in the "Replacing the Lamp" section. Lamp will not turn off the projector, then to cool down before reconnecting power. 2 Lamp burns out or makes a popping sound When the lamp reaches the end of its maximum lifetime. the system fan is approaching the end of its recommended operating temperature and must be allowed to all controls unplug the power cord...

User Manual
Page 42
... mm audio jack output x 1 • Mini USB x1 (for firmware upgrade) • USB type A x1 (5V/1A power supply) • HDMI x 1 • HDMI with MHL x 1 Projection system Resolution Computer compatibility Video compatibility Aspect ratio Displayable colors Projection lens Projection screen size (diagonal) Projection distance Throw ratio Horizontal scan rate Vertical refresh scan rate Lamp type Keystone correction Weight Dimensions (W x D x H) Digital Zoom Power supply Power consumption Operating temperature Standard package contents I/O connectors DLP® 1920x1080 1080p resolution IBM...
... mm audio jack output x 1 • Mini USB x1 (for firmware upgrade) • USB type A x1 (5V/1A power supply) • HDMI x 1 • HDMI with MHL x 1 Projection system Resolution Computer compatibility Video compatibility Aspect ratio Displayable colors Projection lens Projection screen size (diagonal) Projection distance Throw ratio Horizontal scan rate Vertical refresh scan rate Lamp type Keystone correction Weight Dimensions (W x D x H) Digital Zoom Power supply Power consumption Operating temperature Standard package contents I/O connectors DLP® 1920x1080 1080p resolution IBM...


