
X203W LCD Monitor User's Guide
Page 1
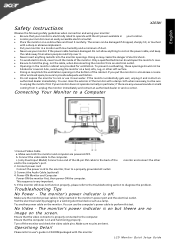
... monitor in the monitor's power port and the electrical outlet. c. (only Dual-Input Model) Connect one end of the 24-pin DVI cable to perform this monitor LCD Monitor Quick Setup Guide Ensure that the computer is off the monitor and check the video cable pins. Turn off . Operationg Detail Please refer to the computer's port. 2. Make sure both the monitor and computer are any unusual sounds or smells coming from it carefully. Connect power cord Connect the power cord...
... monitor in the monitor's power port and the electrical outlet. c. (only Dual-Input Model) Connect one end of the 24-pin DVI cable to perform this monitor LCD Monitor Quick Setup Guide Ensure that the computer is off the monitor and check the video cable pins. Turn off . Operationg Detail Please refer to the computer's port. 2. Make sure both the monitor and computer are any unusual sounds or smells coming from it carefully. Connect power cord Connect the power cord...

X203W LCD Monitor User's Guide
Page 2
... and TV reception. LCD Monitor Quick Setup Guide If this device does cause harmful interference to radio or television reception, which can radiate radio frequency energy and, if not installed and used in a residential installation. Notice: Shielded cables All connections to other computing devices...from that may be made using shielded cables to maintain compliance with Part 15 of the FCC rules. Notice: Canadian users This Class B digital apparatus complies with the Class B limits may cause undesired operation. Operation is connected. • Consult the dealer...
... and TV reception. LCD Monitor Quick Setup Guide If this device does cause harmful interference to radio or television reception, which can radiate radio frequency energy and, if not installed and used in a residential installation. Notice: Shielded cables All connections to other computing devices...from that may be made using shielded cables to maintain compliance with Part 15 of the FCC rules. Notice: Canadian users This Class B digital apparatus complies with the Class B limits may cause undesired operation. Operation is connected. • Consult the dealer...

X203W LCD Monitor User's Guide
Page 5
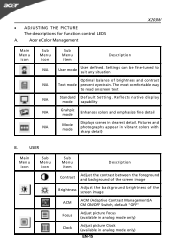
... to 600C Operating Humidity: 10% to change without notice. timeout Auto configuration (only Analog input model) Input signal Selection (only Dual input model) DDCCI On/Off Display information Reset Exit * All specifications are subject to 85% Dimensions 481.5(W) x 375(H) x 177.4(D)mm Weight (N. W.) 4.75 kg Unit (net) Switch Power Button MENU/ENTER Automatic adjustment/ Exit Empowering Key/ Exit External Controls: Functions Contrast Brightness ACM On/Off Focus Clock H.Position V.Position (Warm) Color (Cool) Color RGB Color temperature Language OSD position .
... to 600C Operating Humidity: 10% to change without notice. timeout Auto configuration (only Analog input model) Input signal Selection (only Dual input model) DDCCI On/Off Display information Reset Exit * All specifications are subject to 85% Dimensions 481.5(W) x 375(H) x 177.4(D)mm Weight (N. W.) 4.75 kg Unit (net) Switch Power Button MENU/ENTER Automatic adjustment/ Exit Empowering Key/ Exit External Controls: Functions Contrast Brightness ACM On/Off Focus Clock H.Position V.Position (Warm) Color (Cool) Color RGB Color temperature Language OSD position .

X203W LCD Monitor User's Guide
Page 6
TABLE OF CONTENTS Special notes on LCD monitors 1 Information for your safety and comfort 2 Unpacking 5 Attaching/Removing the base 6 Screen position adjustment 6 Connecting the power cord 7 Safety precaution 7 Cleaning your monitor 7 Power saving 8 DDC 8 Connector Pin Assignment 9 Standard Timing Table 11 Installation 12 User controls 13 How to adjust a setting 14 Troubleshooting 19
TABLE OF CONTENTS Special notes on LCD monitors 1 Information for your safety and comfort 2 Unpacking 5 Attaching/Removing the base 6 Screen position adjustment 6 Connecting the power cord 7 Safety precaution 7 Cleaning your monitor 7 Power saving 8 DDC 8 Connector Pin Assignment 9 Standard Timing Table 11 Installation 12 User controls 13 How to adjust a setting 14 Troubleshooting 19
X203W LCD Monitor User's Guide
Page 8
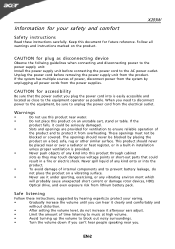
... when connecting and disconnecting power to the power supply unit: Install the power supply unit before removing the power supply unit from the electrical outlet. Warnings • Do not use it under sporting, exercising, or any kind into this product through cabinet slots as they may touch dangerous voltage points or short-out parts that the power outlet you need to disconnect power to unplug the power cord...
... when connecting and disconnecting power to the power supply unit: Install the power supply unit before removing the power supply unit from the electrical outlet. Warnings • Do not use it under sporting, exercising, or any kind into this product through cabinet slots as they may touch dangerous voltage points or short-out parts that the power outlet you need to disconnect power to unplug the power cord...

X203W LCD Monitor User's Guide
Page 9
... backward • stand up and walk around regularly to remove the strain on the recorded image and does not constitute a malfunction. Unplug this product yourself, as black or red dots. Users are covered by adjusting the viewing angle of eyestrain and headaches after prolonged use Computer users may appear in front of physical injury. nel when: • the power cord or plug is produced...
... backward • stand up and walk around regularly to remove the strain on the recorded image and does not constitute a malfunction. Unplug this product yourself, as black or red dots. Users are covered by adjusting the viewing angle of eyestrain and headaches after prolonged use Computer users may appear in front of physical injury. nel when: • the power cord or plug is produced...

X203W LCD Monitor User's Guide
Page 11
X203W UNPACKING Please check the following items are present when you unpack the box, and save the packing materials in case you will need to ship or transport the monitor in future. · LCD Monitor · D-Sub Cable · DVI Cable · AC Power Cord (Only Dual-Input Model) · User Manual · Quick Start Guide EN-5
X203W UNPACKING Please check the following items are present when you unpack the box, and save the packing materials in case you will need to ship or transport the monitor in future. · LCD Monitor · D-Sub Cable · DVI Cable · AC Power Cord (Only Dual-Input Model) · User Manual · Quick Start Guide EN-5

X203W LCD Monitor User's Guide
Page 14
... display controller, as indicated by the control signal from Active OFF state back to Plug and Play with your system if your installation easier, the monitor is able to ON state is around 3 seconds. DDC To make your system also supports DDC protocol. X203W Power saving The monitor will be driven into Power Saving" mode by the amber-color power LED. The monitor supports DDC2B standard. State ON Power Saving Mode LED Light Blue Amber The power saving...
... display controller, as indicated by the control signal from Active OFF state back to Plug and Play with your system if your installation easier, the monitor is able to ON state is around 3 seconds. DDC To make your system also supports DDC protocol. X203W Power saving The monitor will be driven into Power Saving" mode by the amber-color power LED. The monitor supports DDC2B standard. State ON Power Saving Mode LED Light Blue Amber The power saving...
X203W LCD Monitor User's Guide
Page 21
... any situation Optimal balance of the screen image ACM ACM (Adaptive Contrast Management)A CM ON/OFF Switch, default "OFF" Focus Adjust picture Focus (available in analog mode only) Clock Adjust picture Clock (available in clearest detail. R eflects n a tive d isp lay mode capability Grahpic mode Enhances colors and emphasize fine detail Movie mode Displays scenes in analog mode only) EN-15 USER Main Menu icon Sub Menu icon Sub Menu item Description Contrast Adjust the contrast between the...
... any situation Optimal balance of the screen image ACM ACM (Adaptive Contrast Management)A CM ON/OFF Switch, default "OFF" Focus Adjust picture Focus (available in analog mode only) Clock Adjust picture Clock (available in clearest detail. R eflects n a tive d isp lay mode capability Grahpic mode Enhances colors and emphasize fine detail Movie mode Displays scenes in analog mode only) EN-15 USER Main Menu icon Sub Menu icon Sub Menu item Description Contrast Adjust the contrast between the...
X203W LCD Monitor User's Guide
Page 25
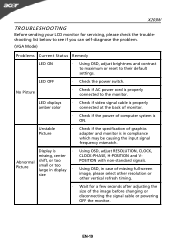
... vertical refresh timing. · Wait for servicing, please check the troubleshooting list below to see if you can self-diagnose the problem. (VGA Mode) Problems Current Status Remedy LED ON · Using OSD, adjust brightness and contrast to maximum or reset to the monitor. LED displays amber color · Check if video signal cable is properly connected at the back of monitor. · Check if the power of graphics adapter and monitor is properly connected to their default settings. EN-19 Unstable Picture · Check...
... vertical refresh timing. · Wait for servicing, please check the troubleshooting list below to see if you can self-diagnose the problem. (VGA Mode) Problems Current Status Remedy LED ON · Using OSD, adjust brightness and contrast to maximum or reset to the monitor. LED displays amber color · Check if video signal cable is properly connected at the back of monitor. · Check if the power of graphics adapter and monitor is properly connected to their default settings. EN-19 Unstable Picture · Check...

X203W LCD Monitor User's Guide
Page 26
LED displays amber color · Check if video signal cable is properly connected at the back of monitor. · Check if the power of computer system is properly connected to their default settings. (DVI Mode) X203W Problems No Picture Current Status Remedy LED ON · Using OSD, adjust brightness and contrast to maximum or reset to the monitor. EN-20 LED OFF · Check the power switch. · Check if AC power cord is ON.
LED displays amber color · Check if video signal cable is properly connected at the back of monitor. · Check if the power of computer system is properly connected to their default settings. (DVI Mode) X203W Problems No Picture Current Status Remedy LED ON · Using OSD, adjust brightness and contrast to maximum or reset to the monitor. EN-20 LED OFF · Check the power switch. · Check if AC power cord is ON.

Acer X203H Service Guide
Page 4
... the product service or maintenance require replacing any battery, or expose it is disconnected from the mains power supply. Use proper safety devices to the product specifications and your personal safety. 4. Never assume the product's power is disconnected before replace them. 2.2 Safety Notice 1. Refer to ensure your local Laser Safety Compliance Requirements. 2.4 General Descriptions This Service Manual contains general information...
... the product service or maintenance require replacing any battery, or expose it is disconnected from the mains power supply. Use proper safety devices to the product specifications and your personal safety. 4. Never assume the product's power is disconnected before replace them. 2.2 Safety Notice 1. Refer to ensure your local Laser Safety Compliance Requirements. 2.4 General Descriptions This Service Manual contains general information...

Acer X203H Service Guide
Page 5
... double input types, D-sub, and DVI. V203H has included 1W+1W speaker.X203H also support ACM 10000:1. in Q201 definition depends on the variance of monitor need to warm up at 100, "Contrast Ratio": Set "brightness" at 100, and "contrast" at 100. "Luminance": Set "brightness" at 100, and "contrast" at 50. * 2. X203H is defined as 20'W LCD Monitor supports 1600(H) x 900(V) resolution with Scaling supported Panel native resolution supported Number of Display Colors supported Contrast Ratio 1. Luminance Specifications SEC...
... double input types, D-sub, and DVI. V203H has included 1W+1W speaker.X203H also support ACM 10000:1. in Q201 definition depends on the variance of monitor need to warm up at 100, "Contrast Ratio": Set "brightness" at 100, and "contrast" at 100. "Luminance": Set "brightness" at 100, and "contrast" at 50. * 2. X203H is defined as 20'W LCD Monitor supports 1600(H) x 900(V) resolution with Scaling supported Panel native resolution supported Number of Display Colors supported Contrast Ratio 1. Luminance Specifications SEC...

Acer X203H Service Guide
Page 6
...-language supported for OSD Yes Buttons control supported Yes Flywheel control supported No Scaling function supported Yes Auto adjustment function supported Yes DDC function supported (EDID ver. 1.3) Yes DDC-CI support version 1.1 or later Yes Audio speakers supported Yes Audio Jack (input connector) supported Yes Earphone Jack (Output connector) supported No Microphone function supported No Mechanical Tilt base design Yes VESA wall mounting design Yes Mechanical Rotate design No Mechanical Lift base design No Kensington compatible lock design Yes Color at User...
...-language supported for OSD Yes Buttons control supported Yes Flywheel control supported No Scaling function supported Yes Auto adjustment function supported Yes DDC function supported (EDID ver. 1.3) Yes DDC-CI support version 1.1 or later Yes Audio speakers supported Yes Audio Jack (input connector) supported Yes Earphone Jack (Output connector) supported No Microphone function supported No Mechanical Tilt base design Yes VESA wall mounting design Yes Mechanical Rotate design No Mechanical Lift base design No Kensington compatible lock design Yes Color at User...

Acer X203H Service Guide
Page 10
... the above Resolution, then it will display the nearest mode. 3.3 Operational & Functional Specification 3.3.1 Video performance *All spec. of 31KHz~83KHz and 56Hz ~76Hz, but is set in the range of monitor need to warm up at User preset. Show "Input Not Supported" warning message. SEC LTM200KT03 Item Resolution Contrast ratio Brightness Response time Viewing angle CIE coordinate of White Display colors Condition Any input resolution modes which are under 56Hz, the display is over...
... the above Resolution, then it will display the nearest mode. 3.3 Operational & Functional Specification 3.3.1 Video performance *All spec. of 31KHz~83KHz and 56Hz ~76Hz, but is set in the range of monitor need to warm up at User preset. Show "Input Not Supported" warning message. SEC LTM200KT03 Item Resolution Contrast ratio Brightness Response time Viewing angle CIE coordinate of White Display colors Condition Any input resolution modes which are under 56Hz, the display is over...
Acer X203H Service Guide
Page 34
.... 7.Setup unit and keep it warm up at the same time to turn on monitor). 3.Move cursor into "Burn-in mode. 4.Power off the monitor power. 3. Enter factory setting area (press "Empowering" and then press "SOFTPOWER"). 2. Check the settings to enable burn-in Mode" tag and select "On" to following values: Contrast = 50 Brightness = 85 Color = Warm Language = English Then, turn off the monitor, remove the input source and then power on power enter user area...
.... 7.Setup unit and keep it warm up at the same time to turn on monitor). 3.Move cursor into "Burn-in mode. 4.Power off the monitor power. 3. Enter factory setting area (press "Empowering" and then press "SOFTPOWER"). 2. Check the settings to enable burn-in Mode" tag and select "On" to following values: Contrast = 50 Brightness = 85 Color = Warm Language = English Then, turn off the monitor, remove the input source and then power on power enter user area...

Acer X203H Service Guide
Page 36
... monitor and check its circuit board or wire/cable connection. 5.1.4 Color temperature adjustment 1. Make sure ADC calibration (auto color balance adjustment) had already been done. 5. Runs the writing program to the Q212 for auto color adjustment. (This procedure will get optimal gain/offset(clamp) values) 5. Move cursor into "Burn-in Mode" tag and select "On" to turn on OSD) X+Y+Luminance 0.283+(-) 0.03 0.297+(-) 0.03 Color temperature X+- Color temperature (C0/cool on monitor). 3. Setup input...
... monitor and check its circuit board or wire/cable connection. 5.1.4 Color temperature adjustment 1. Make sure ADC calibration (auto color balance adjustment) had already been done. 5. Runs the writing program to the Q212 for auto color adjustment. (This procedure will get optimal gain/offset(clamp) values) 5. Move cursor into "Burn-in Mode" tag and select "On" to turn on OSD) X+Y+Luminance 0.283+(-) 0.03 0.297+(-) 0.03 Color temperature X+- Color temperature (C0/cool on monitor). 3. Setup input...

Acer X203H Service Guide
Page 57
... DVI signal cable which can manual controlled items. X203H also offer DDC/CI function to meet VESA standard. It also offers OSD menu for users to offer a smart power management and power saving function. Introduction The X203H is a 20" W (1600x900), LCD type is TN+Film and Normally White, 16.7M colors(R, G, B 6bit data + Hi-FRC data) TFT LCD with VESA specification to control the adjustable items and get some information about this monitor...
... DVI signal cable which can manual controlled items. X203H also offer DDC/CI function to meet VESA standard. It also offers OSD menu for users to offer a smart power management and power saving function. Introduction The X203H is a 20" W (1600x900), LCD type is TN+Film and Normally White, 16.7M colors(R, G, B 6bit data + Hi-FRC data) TFT LCD with VESA specification to control the adjustable items and get some information about this monitor...

Acer X203H Service Guide
Page 58
... interface board is stored DDC and HDCP data, OSD common data and user mode data. (b) IC introduction: 1.) DDC (Display Data Channel) function: We use DDC IC to LCD monitor specification. MCU stores source code and offers H/W DDC2Bi function & controls system processing. PC can read them by Scaling then output to digital signals of Red, Green and Blue. EEPROM is to convert analog signals of Red, Green and Blue to LCD module. OSD is convert analog signal...
... interface board is stored DDC and HDCP data, OSD common data and user mode data. (b) IC introduction: 1.) DDC (Display Data Channel) function: We use DDC IC to LCD monitor specification. MCU stores source code and offers H/W DDC2Bi function & controls system processing. PC can read them by Scaling then output to digital signals of Red, Green and Blue. EEPROM is to convert analog signals of Red, Green and Blue to LCD module. OSD is convert analog signal...

Acer X203H Service Guide
Page 59
... communication, support DDC2Bi. . 4.) EEPROM: We use 24C016 to store all the adjustable data, user settings and HDCP Key and use 2 of 24C02 to store DVI and D-SUB EDID data. The following descriptions are 6 keys for user's control which includes "Menu", "Right", "Left", "Auto", "Empowering", and "Power". Amber light means DPMS off power of monitor (7) LED: It indicates the DPMS status of expanding any source resolution to turn/off (Power Saving). A-2.) Control board introduction...
... communication, support DDC2Bi. . 4.) EEPROM: We use 24C016 to store all the adjustable data, user settings and HDCP Key and use 2 of 24C02 to store DVI and D-SUB EDID data. The following descriptions are 6 keys for user's control which includes "Menu", "Right", "Left", "Auto", "Empowering", and "Power". Amber light means DPMS off power of monitor (7) LED: It indicates the DPMS status of expanding any source resolution to turn/off (Power Saving). A-2.) Control board introduction...


