

User Manual
Page 3
... a few hours. Keep this case, the screen is recovered slowly by unplugging all power cords from the power supplies. Cleaning your safety and comfort Safety instructions Read these guidelines when cleaning the monitor: • Always unplug the monitor before cleaning. • Use a soft cloth to wipe the screen and cabinet front and sides. Turn off the power switch for your monitor Please carefully follow these instructions carefully. It may...
... a few hours. Keep this case, the screen is recovered slowly by unplugging all power cords from the power supplies. Cleaning your safety and comfort Safety instructions Read these guidelines when cleaning the monitor: • Always unplug the monitor before cleaning. • Use a soft cloth to wipe the screen and cabinet front and sides. Turn off the power switch for your monitor Please carefully follow these instructions carefully. It may...
User Manual
Page 4
... blocked or covered. Never spill liquid of any kind into this product, make sure that the total Do not locate this product on the marking label. iv Accessibility Be sure that the power outlet you plug the power cord into is easily accessible and located as close to block out noisy surroundings. • Turn the volume down if...
... blocked or covered. Never spill liquid of any kind into this product, make sure that the total Do not locate this product on the marking label. iv Accessibility Be sure that the power outlet you plug the power cord into is easily accessible and located as close to block out noisy surroundings. • Turn the volume down if...

User Manual
Page 5
... injury. Do not insert the plug into the extension cord does not exceed the extension cord ampere rating. If power strips are used, the load should not exceed 80% of the power strip's input rating. • This product's power cord is a safety feature. The grounding pin is equipped with the supplied power supply cord set , make sure that the total rating of all servicing to dangerous voltage points or...
... injury. Do not insert the plug into the extension cord does not exceed the extension cord ampere rating. If power strips are used, the load should not exceed 80% of the power strip's input rating. • This product's power cord is a safety feature. The grounding pin is equipped with the supplied power supply cord set , make sure that the total rating of all servicing to dangerous voltage points or...

User Manual
Page 6
...Adjust only those controls that are covered by the operating instructions, since improper adjustment of our other controls may contain small parts. They include below deck on the features and benefits of other products. Potentially explosive atmospheres include areas where you would normally be advised to turn... effects of our business and strive to identify and provide the best working procedures to environmental protection and views recycling, in minimizing the burden placed on the use of small children. acer-group .com for further information on boats, chemical transfer or ...
...Adjust only those controls that are covered by the operating instructions, since improper adjustment of our other controls may contain small parts. They include below deck on the features and benefits of other products. Potentially explosive atmospheres include areas where you would normally be advised to turn... effects of our business and strive to identify and provide the best working procedures to environmental protection and views recycling, in minimizing the burden placed on the use of small children. acer-group .com for further information on boats, chemical transfer or ...
User Manual
Page 8
... sitting height to remove the strain on your leg muscles The following section provides tips for comfortable use Computer users may lead to computer use, consult a physician immediately and inform your comfort zone by pushing the power button. Tips and information for more comfortable computer use . Observe the following tips: • refrain from Sleep mode by adjusting the viewing angle of working conditions...
... sitting height to remove the strain on your leg muscles The following section provides tips for comfortable use Computer users may lead to computer use, consult a physician immediately and inform your comfort zone by pushing the power button. Tips and information for more comfortable computer use . Observe the following tips: • refrain from Sleep mode by adjusting the viewing angle of working conditions...
User Manual
Page 9
... from the monitor and focusing on how to reduce eyestrain. Developing good work habits Develop the following sections provide suggestions on a distant point. • Blink frequently to keep your eyes. Eyes • Rest your eyes frequently. • Give your eyes regular breaks by using drapes, shades or blinds • using a task light • changing the display's viewing angle • using a glare...
... from the monitor and focusing on how to reduce eyestrain. Developing good work habits Develop the following sections provide suggestions on a distant point. • Blink frequently to keep your eyes. Eyes • Rest your eyes frequently. • Give your eyes regular breaks by using drapes, shades or blinds • using a task light • changing the display's viewing angle • using a glare...
User Manual
Page 10
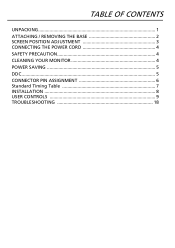
TABLE OF CONTENTS UNPACKING 1 ATTACHING / REMOVING THE BASE 2 SCREEN POSITION ADJUSTMENT 3 CONNECTING THE POWER CORD 4 SAFETY PRECAUTION 4 CLEANING YOUR MONITOR 4 POWER SAVING 5 DDC...5 CONNECTOR PIN ASSIGNMENT 6 Standard Timing Table 7 INSTALLATION 8 USER CONTROLS 9 TROUBLESHOOTING 18
TABLE OF CONTENTS UNPACKING 1 ATTACHING / REMOVING THE BASE 2 SCREEN POSITION ADJUSTMENT 3 CONNECTING THE POWER CORD 4 SAFETY PRECAUTION 4 CLEANING YOUR MONITOR 4 POWER SAVING 5 DDC...5 CONNECTOR PIN ASSIGNMENT 6 Standard Timing Table 7 INSTALLATION 8 USER CONTROLS 9 TROUBLESHOOTING 18
User Manual
Page 11
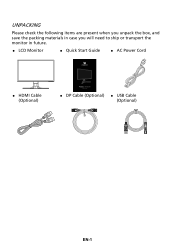
UNPACKING Please check the following items are present when you unpack the box, and save the packing materials in case you will need to ship or transport the monitor in future. LCD Monitor Quick Start Guide AC Power Cord HDMI Cable (Optional) Predato XB321HK Quick Guide DP Cable (Optional) USB Cable (Optional) EN-1
UNPACKING Please check the following items are present when you unpack the box, and save the packing materials in case you will need to ship or transport the monitor in future. LCD Monitor Quick Start Guide AC Power Cord HDMI Cable (Optional) Predato XB321HK Quick Guide DP Cable (Optional) USB Cable (Optional) EN-1
User Manual
Page 13
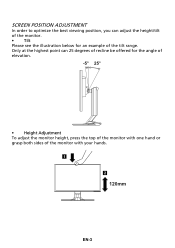
Only at the highest point can adjust the height/tilt of the monitor. • Tilt Please see the illustration below for the angle of elevation. -5° 25° • Height Adjustment To adjust the monitor height, press the top of the monitor with one hand or grasp both sides of the tilt range. SCREEN POSITION ADJUSTMENT In order to optimize the best viewing position, you can 25 degrees of recline be offered for an example of the monitor with your hands. 1 2 120mm EN-3
Only at the highest point can adjust the height/tilt of the monitor. • Tilt Please see the illustration below for the angle of elevation. -5° 25° • Height Adjustment To adjust the monitor height, press the top of the monitor with one hand or grasp both sides of the tilt range. SCREEN POSITION ADJUSTMENT In order to optimize the best viewing position, you can 25 degrees of recline be offered for an example of the monitor with your hands. 1 2 120mm EN-3
User Manual
Page 14
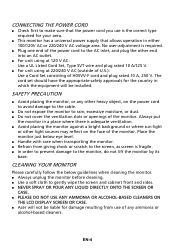
... AMMONIA OR ALCOHOL-BASED CLEANERS ON THE LCD DISPLAY SCREEN OR CASE. Acer will be liable for your area. This monitor has a universal power supply that the power cord you use of any other light sources may reflect on the power cord to avoid damage to the cable. Do not expose the monitor to the monitor, do not lift the monitor by its base. No user-adjustment is fragile...
... AMMONIA OR ALCOHOL-BASED CLEANERS ON THE LCD DISPLAY SCREEN OR CASE. Acer will be liable for your area. This monitor has a universal power supply that the power cord you use of any other light sources may reflect on the power cord to avoid damage to the cable. Do not expose the monitor to the monitor, do not lift the monitor by its base. No user-adjustment is fragile...
User Manual
Page 15
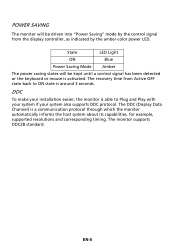
...-color power LED. The monitor supports DDC2B standard. EN-5 DDC To make your system also supports DDC protocol. State LED Light ON Blue Power Saving Mode Amber The power saving states will be kept until a control signal has been detected or the keyboard or mouse is activated. POWER SAVING The monitor will be driven into "Power Saving" mode by the control signal from Active OFF state back to Plug and Play with your system if your installation...
...-color power LED. The monitor supports DDC2B standard. EN-5 DDC To make your system also supports DDC protocol. State LED Light ON Blue Power Saving Mode Amber The power saving states will be kept until a control signal has been detected or the keyboard or mouse is activated. POWER SAVING The monitor will be driven into "Power Saving" mode by the control signal from Active OFF state back to Plug and Play with your system if your installation...
User Manual
Page 16
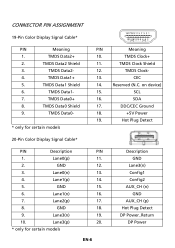
...) SCL SDA DDC/CEC Ground +5V Power Hot Plug Detect Description GND Lane3(n) Config1 Config2 AUX_CH (n) GND AUX_CH (p) Hot Plug Detect DP Power_Return DP Power GND 9. TMDS Data0+ 16. 8. Lane3(n) 10. Lane0(p) 2. GND 3. TMDS Data2+ 10. 2. TMDS Data1- 15. 7. TMDS Data1 Shield 14. 6. Lane3(p) * only for certain models 20-Pin Color Display Signal Cable* PIN Description 1. TMDS Data0- 18...
...) SCL SDA DDC/CEC Ground +5V Power Hot Plug Detect Description GND Lane3(n) Config1 Config2 AUX_CH (n) GND AUX_CH (p) Hot Plug Detect DP Power_Return DP Power GND 9. TMDS Data0+ 16. 8. Lane3(n) 10. Lane0(p) 2. GND 3. TMDS Data2+ 10. 2. TMDS Data1- 15. 7. TMDS Data1 Shield 14. 6. Lane3(p) * only for certain models 20-Pin Color Display Signal Cable* PIN Description 1. TMDS Data0- 18...

User Manual
Page 18
... using HDMI, you can press any button, excluding the Power button, to the computer. Insert the monitor power cable into a nearby electrical outlet. 5. Make sure both the monitor and computer are powered-OFF. Plug the power cords of your computer and your host system, please follow the steps as the equalizer to port for fast charge. Connect the HDMI cable to trigger the I/O port source. 1-2 Connect DP Cable (Default input) (Only DP-input model) a. INSTALLATION To install the monitor...
... using HDMI, you can press any button, excluding the Power button, to the computer. Insert the monitor power cable into a nearby electrical outlet. 5. Make sure both the monitor and computer are powered-OFF. Plug the power cords of your computer and your host system, please follow the steps as the equalizer to port for fast charge. Connect the HDMI cable to trigger the I/O port source. 1-2 Connect DP Cable (Default input) (Only DP-input model) a. INSTALLATION To install the monitor...
User Manual
Page 19
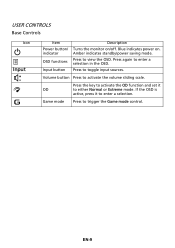
If the OSD is active, press it OD to trigger the Game mode control. Press to enter a selection. Press again to activate the volume sliding scale. Volume button Press to enter a selection in the OSD. EN-9 Game mode Press to either Normal or Extreme mode. Blue indicates power on /off. Press the key to activate the OD function and set it to view the OSD. USER CONTROLS Base Controls Icon Input Item Power button/ indicator OSD functions Input button Description Turns the monitor on . Amber indicates standby/power saving mode. Press to toggle input sources.
If the OSD is active, press it OD to trigger the Game mode control. Press to enter a selection. Press again to activate the volume sliding scale. Volume button Press to enter a selection in the OSD. EN-9 Game mode Press to either Normal or Extreme mode. Blue indicates power on /off. Press the key to activate the OD function and set it to view the OSD. USER CONTROLS Base Controls Icon Input Item Power button/ indicator OSD functions Input button Description Turns the monitor on . Amber indicates standby/power saving mode. Press to toggle input sources.
User Manual
Page 20
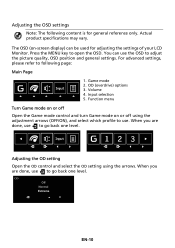
... adjust the picture quality, OSD position and general settings. Volume 4. When you are done, use the OSD to following content is for adjusting the settings of your LCD Monitor. Adjusting the OD setting Open the OD control and select the OD setting using the adjustment arrows (OFF/ON), and select which profile to open the OSD. The OSD (on or off using the arrows. Game mode 2. When you are done, use . Press the MENU key to use...
... adjust the picture quality, OSD position and general settings. Volume 4. When you are done, use the OSD to following content is for adjusting the settings of your LCD Monitor. Adjusting the OD setting Open the OD control and select the OD setting using the adjustment arrows (OFF/ON), and select which profile to open the OSD. The OSD (on or off using the arrows. Game mode 2. When you are done, use . Press the MENU key to use...
User Manual
Page 23
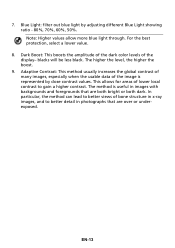
... bright or both dark. In particular, the method can lead to better views of the image is useful in photographs that are over or underexposed. For the best protection, select a lower value. 8. The method is represented by adjusting different Blue Light showing ratio - 80%, 70%, 60%, 50%. blacks will be less black. Adaptive Contrast: This method usually increases the global contrast of many images...
... bright or both dark. In particular, the method can lead to better views of the image is useful in photographs that are over or underexposed. For the best protection, select a lower value. 8. The method is represented by adjusting different Blue Light showing ratio - 80%, 70%, 60%, 50%. blacks will be less black. Adaptive Contrast: This method usually increases the global contrast of many images...
User Manual
Page 24
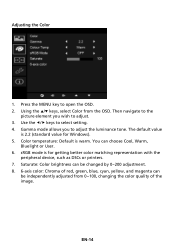
... Gamma mode allows you wish to adjust the luminance tone. Using the / keys, select Color from 0~100, changing the color quality of red, green, blue, cyan, yellow, and magenta can choose Cool, Warm, Bluelight or User. 6. Saturate: Color brightness can be changed by 0~200 adjustment. 8. 6-axis color: Chroma of the image. Use the / keys to open the OSD. 2. The default value is warm. Press the MENU key...
... Gamma mode allows you wish to adjust the luminance tone. Using the / keys, select Color from 0~100, changing the color quality of red, green, blue, cyan, yellow, and magenta can choose Cool, Warm, Bluelight or User. 6. Saturate: Color brightness can be changed by 0~200 adjustment. 8. 6-axis color: Chroma of the image. Use the / keys to open the OSD. 2. The default value is warm. Press the MENU key...
User Manual
Page 25
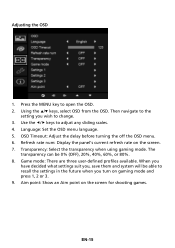
...%. 8. Refresh rate num: Display the panel's current refresh rate on the screen for shooting games. Game mode: There are three user-defined profiles available. Aim point: Show an Aim point on the screen. 7. The transparency can be able to change. 3. Language: Set the OSD menu language. 5. When you have decided what settings suit you turn on gaming mode and press 1, 2 or 3. 9. Transparency: Select the transparency when using gaming mode. EN-15 Using...
...%. 8. Refresh rate num: Display the panel's current refresh rate on the screen for shooting games. Game mode: There are three user-defined profiles available. Aim point: Show an Aim point on the screen. 7. The transparency can be able to change. 3. Language: Set the OSD menu language. 5. When you have decided what settings suit you turn on gaming mode and press 1, 2 or 3. 9. Transparency: Select the transparency when using gaming mode. EN-15 Using...
User Manual
Page 26
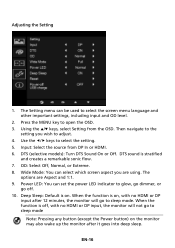
... In or HDMI. 6. The options are using. Deep Sleep: Default is on, with no HDMI or DP input after 12 minutes, the monitor will not go to sleep mode Note: Pressing any button (except the Power button) on . Use the / keys to open the OSD. 3. Input: Select the source from the OSD. When the function is stratified and creates a remarkable sonic flow. 7. Adjusting the Setting 1. DTS (selective models): Turn DTS Sound On...
... In or HDMI. 6. The options are using. Deep Sleep: Default is on, with no HDMI or DP input after 12 minutes, the monitor will not go to sleep mode Note: Pressing any button (except the Power button) on . Use the / keys to open the OSD. 3. Input: Select the source from the OSD. When the function is stratified and creates a remarkable sonic flow. 7. Adjusting the Setting 1. DTS (selective models): Turn DTS Sound On...
User Manual
Page 28
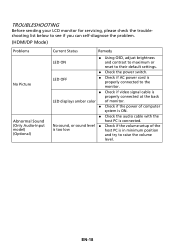
... the monitor. Check if video signal cable is properly connected at the back LED displays amber color of monitor. Check if the power of the is too low host PC is connected. EN-18 TROUBLESHOOTING Before sending your LCD monitor for servicing, please check the troubleshooting list below to see if you can self-diagnose the problem. (HDMI/DP Mode) Problems No Picture Abnormal Sound (Only Audio-Input model) (Optional) Current Status Remedy LED ON Using OSD, adjust brightness and contrast...
... the monitor. Check if video signal cable is properly connected at the back LED displays amber color of monitor. Check if the power of the is too low host PC is connected. EN-18 TROUBLESHOOTING Before sending your LCD monitor for servicing, please check the troubleshooting list below to see if you can self-diagnose the problem. (HDMI/DP Mode) Problems No Picture Abnormal Sound (Only Audio-Input model) (Optional) Current Status Remedy LED ON Using OSD, adjust brightness and contrast...


