User Manual
Page 2
...used herein for a particular purpose. Acer LCD Monitor User's Guide Model number Serial number Date of purchase Place of purchase Acer and the Acer logo are recorded on the label affixed to the contents hereof and specifically disclaims the implied warranties of Acer Incorporated. Such changes will be ...in any form or by photocopy, recording or otherwise, without the prior written permission of such revisions or changes. Acer LCD Monitor User's Guide Original Issue: 10/2015 Changes may be made periodically to notify any means, electronically, mechanically, by any person of...
...used herein for a particular purpose. Acer LCD Monitor User's Guide Model number Serial number Date of purchase Place of purchase Acer and the Acer logo are recorded on the label affixed to the contents hereof and specifically disclaims the implied warranties of Acer Incorporated. Such changes will be ...in any form or by photocopy, recording or otherwise, without the prior written permission of such revisions or changes. Acer LCD Monitor User's Guide Original Issue: 10/2015 Changes may be made periodically to notify any means, electronically, mechanically, by any person of...

User Manual
Page 3
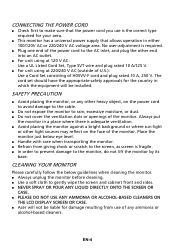
... 99.99% or more effective pixels. Connecting/disconnecting the device Observe the following are turned off the power switch for your monitor Please carefully follow these instructions carefully. It may remain after switching the image, when the same image is recovered slowly by ...lit all power cords from the power supplies. Cleaning your safety and comfort Safety instructions Read these guidelines when cleaning the monitor: • Always unplug the monitor before connecting any cable or unplugging the power cord. • If the system has multiple sources of power, disconnect...
... 99.99% or more effective pixels. Connecting/disconnecting the device Observe the following are turned off the power switch for your monitor Please carefully follow these instructions carefully. It may remain after switching the image, when the same image is recovered slowly by ...lit all power cords from the power supplies. Cleaning your safety and comfort Safety instructions Read these guidelines when cleaning the monitor: • Always unplug the monitor before connecting any cable or unplugging the power cord. • If the system has multiple sources of power, disconnect...
User Manual
Page 8
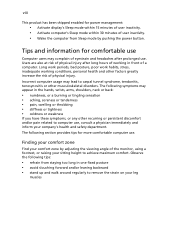
... or persistent discomfort and/or pain related to computer use . The following tips: • refrain from Sleep mode by adjusting the viewing angle of the monitor, using a footrest, or raising your leg muscles Observe the following section provides tips for more comfortable computer use , consult a physician immediately and inform your company...
... or persistent discomfort and/or pain related to computer use . The following tips: • refrain from Sleep mode by adjusting the viewing angle of the monitor, using a footrest, or raising your leg muscles Observe the following section provides tips for more comfortable computer use , consult a physician immediately and inform your company...
User Manual
Page 9
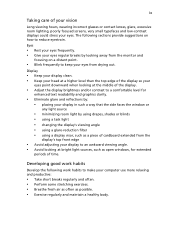
... clean. • Keep your head at a higher level than the top edge of the display so your eyes point downward when looking away from the monitor and focusing on how to keep your eyes from the display's top front edge • Avoid adjusting your display to make your display in such...
... clean. • Keep your head at a higher level than the top edge of the display so your eyes point downward when looking away from the monitor and focusing on how to keep your eyes from the display's top front edge • Avoid adjusting your display to make your display in such...
User Manual
Page 10
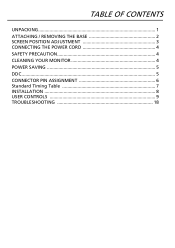
TABLE OF CONTENTS UNPACKING 1 ATTACHING / REMOVING THE BASE 2 SCREEN POSITION ADJUSTMENT 3 CONNECTING THE POWER CORD 4 SAFETY PRECAUTION 4 CLEANING YOUR MONITOR 4 POWER SAVING 5 DDC...5 CONNECTOR PIN ASSIGNMENT 6 Standard Timing Table 7 INSTALLATION 8 USER CONTROLS 9 TROUBLESHOOTING 18
TABLE OF CONTENTS UNPACKING 1 ATTACHING / REMOVING THE BASE 2 SCREEN POSITION ADJUSTMENT 3 CONNECTING THE POWER CORD 4 SAFETY PRECAUTION 4 CLEANING YOUR MONITOR 4 POWER SAVING 5 DDC...5 CONNECTOR PIN ASSIGNMENT 6 Standard Timing Table 7 INSTALLATION 8 USER CONTROLS 9 TROUBLESHOOTING 18
User Manual
Page 11
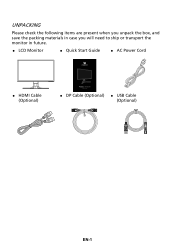
UNPACKING Please check the following items are present when you unpack the box, and save the packing materials in case you will need to ship or transport the monitor in future. LCD Monitor Quick Start Guide AC Power Cord HDMI Cable (Optional) Predato XB321HK Quick Guide DP Cable (Optional) USB Cable (Optional) EN-1
UNPACKING Please check the following items are present when you unpack the box, and save the packing materials in case you will need to ship or transport the monitor in future. LCD Monitor Quick Start Guide AC Power Cord HDMI Cable (Optional) Predato XB321HK Quick Guide DP Cable (Optional) USB Cable (Optional) EN-1
User Manual
Page 12
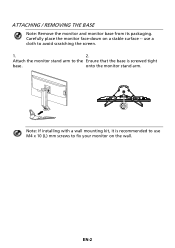
ATTACHING / REMOVING THE BASE Note: Remove the monitor and monitor base from its packaging. Attach the monitor stand arm to the Ensure that the base is recommended to use a cloth to fix your monitor on a stable surface -- onto the monitor stand arm. Note: If installing with a wall mounting kit, it is screwed tight base. use M4 x 10 (L) mm screws to avoid scratching the screen. 1. 2. Carefully place the monitor face-down on the wall. EN-2
ATTACHING / REMOVING THE BASE Note: Remove the monitor and monitor base from its packaging. Attach the monitor stand arm to the Ensure that the base is recommended to use a cloth to fix your monitor on a stable surface -- onto the monitor stand arm. Note: If installing with a wall mounting kit, it is screwed tight base. use M4 x 10 (L) mm screws to avoid scratching the screen. 1. 2. Carefully place the monitor face-down on the wall. EN-2
User Manual
Page 13
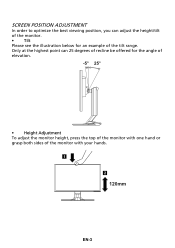
Only at the highest point can adjust the height/tilt of the monitor. • Tilt Please see the illustration below for the angle of elevation. -5° 25° • Height Adjustment To adjust the monitor height, press the top of the monitor with one hand or grasp both sides of the tilt range. SCREEN POSITION ADJUSTMENT In order to optimize the best viewing position, you can 25 degrees of recline be offered for an example of the monitor with your hands. 1 2 120mm EN-3
Only at the highest point can adjust the height/tilt of the monitor. • Tilt Please see the illustration below for the angle of elevation. -5° 25° • Height Adjustment To adjust the monitor height, press the top of the monitor with one hand or grasp both sides of the tilt range. SCREEN POSITION ADJUSTMENT In order to optimize the best viewing position, you can 25 degrees of recline be offered for an example of the monitor with your hands. 1 2 120mm EN-3
User Manual
Page 14
... the monitor before cleaning. Use a soft cloth to gently wipe the screen and cabinet front and sides. NEVER SPRAY OR POUR ANY LIQUID DIRECTLY ONTO THE SCREEN OR CASE. PLEASE DO NOT USE ANY AMMONIA OR ALCOHOL-BASED CLEANERS ON THE LCD DISPLAY SCREEN OR CASE. Acer will... be liable for your area. This monitor has a universal power supply that the power cord you use of any other heavy object, on the face of H05VV-F cord...
... the monitor before cleaning. Use a soft cloth to gently wipe the screen and cabinet front and sides. NEVER SPRAY OR POUR ANY LIQUID DIRECTLY ONTO THE SCREEN OR CASE. PLEASE DO NOT USE ANY AMMONIA OR ALCOHOL-BASED CLEANERS ON THE LCD DISPLAY SCREEN OR CASE. Acer will... be liable for your area. This monitor has a universal power supply that the power cord you use of any other heavy object, on the face of H05VV-F cord...
User Manual
Page 15
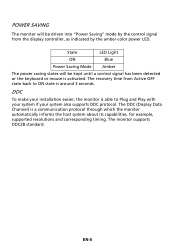
... around 3 seconds. The recovery time from the display controller, as indicated by the amber-color power LED. EN-5 POWER SAVING The monitor will be driven into "Power Saving" mode by the control signal from Active OFF state back to Plug and Play with your system ... signal has been detected or the keyboard or mouse is activated. DDC To make your installation easier, the monitor is able to ON state is a communication protocol through which the monitor automatically informs the host system about its capabilities, for example, supported resolutions and corresponding timing.
... around 3 seconds. The recovery time from the display controller, as indicated by the amber-color power LED. EN-5 POWER SAVING The monitor will be driven into "Power Saving" mode by the control signal from Active OFF state back to Plug and Play with your system ... signal has been detected or the keyboard or mouse is activated. DDC To make your installation easier, the monitor is able to ON state is a communication protocol through which the monitor automatically informs the host system about its capabilities, for example, supported resolutions and corresponding timing.
User Manual
Page 18
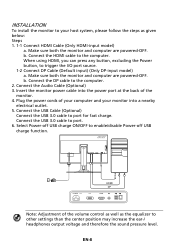
... can press any button, excluding the Power button, to port for fast charge. b. Connect the USB 3.0 cable to the computer. Insert the monitor power cable into a nearby electrical outlet. 5. Plug the power cords of your computer and your host system, please follow the steps as the ...charge ON/OFF to the computer. 2. Make sure both the monitor and computer are powered-OFF. b. EN-8 POWER DP HDMI POWER HDMI DP DP HDMI Note: Adjustment of the monitor. 4. INSTALLATION To install the monitor to your monitor into the power port at the back of the volume control ...
... can press any button, excluding the Power button, to port for fast charge. b. Connect the USB 3.0 cable to the computer. Insert the monitor power cable into a nearby electrical outlet. 5. Plug the power cords of your computer and your host system, please follow the steps as the ...charge ON/OFF to the computer. 2. Make sure both the monitor and computer are powered-OFF. b. EN-8 POWER DP HDMI POWER HDMI DP DP HDMI Note: Adjustment of the monitor. 4. INSTALLATION To install the monitor to your monitor into the power port at the back of the volume control ...
User Manual
Page 19
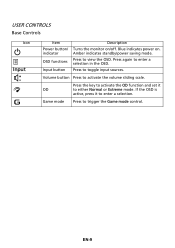
Amber indicates standby/power saving mode. Volume button Press to either Normal or Extreme mode. Press the key to activate the OD function and set it to toggle input sources. Press again to trigger the Game mode control. Game mode Press to enter a selection in the OSD. EN-9 USER CONTROLS Base Controls Icon Input Item Power button/ indicator OSD functions Input button Description Turns the monitor on . Press to enter a selection. If the OSD is active, press it OD to activate the volume sliding scale. Press to view the OSD. Blue indicates power on /off.
Amber indicates standby/power saving mode. Volume button Press to either Normal or Extreme mode. Press the key to activate the OD function and set it to toggle input sources. Press again to trigger the Game mode control. Game mode Press to enter a selection in the OSD. EN-9 USER CONTROLS Base Controls Icon Input Item Power button/ indicator OSD functions Input button Description Turns the monitor on . Press to enter a selection. If the OSD is active, press it OD to activate the volume sliding scale. Press to view the OSD. Blue indicates power on /off.
User Manual
Page 20
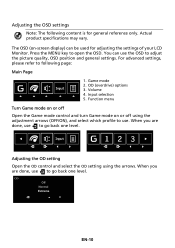
... control and turn Game mode on -screen display) can use the OSD to use to following content is for adjusting the settings of your LCD Monitor. Function menu Turn Game mode on or off using the arrows. You can be used for general reference only. For advanced settings, please refer to...
... control and turn Game mode on -screen display) can use the OSD to use to following content is for adjusting the settings of your LCD Monitor. Function menu Turn Game mode on or off using the arrows. You can be used for general reference only. For advanced settings, please refer to...
User Manual
Page 22
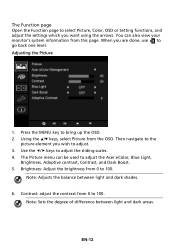
Using the / keys, select Picture from 0 to 100. The Picture menu can also view your monitor's system information from 0 to 100. Note: Sets the degree of difference between light and dark shades. 6. EN-12 Adjusting the Picture 1. Use the /&#... adjust the sliding scales. 4. You can be used to adjust. 3. Note: Adjusts the balance between light and dark areas. When you wish to adjust the Acer eColor, Blue Light, Brightness, Adaptive contrast, Contrast, and Dark Boost. 5. Then navigate to the picture element you are done, use to select Picture, Color,...
Using the / keys, select Picture from 0 to 100. The Picture menu can also view your monitor's system information from 0 to 100. Note: Sets the degree of difference between light and dark shades. 6. EN-12 Adjusting the Picture 1. Use the /&#... adjust the sliding scales. 4. You can be used to adjust. 3. Note: Adjusts the balance between light and dark areas. When you wish to adjust the Acer eColor, Blue Light, Brightness, Adaptive contrast, Contrast, and Dark Boost. 5. Then navigate to the picture element you are done, use to select Picture, Color,...
User Manual
Page 26
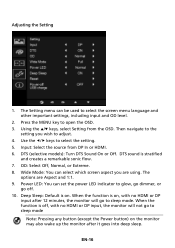
..., or go to sleep mode Note: Pressing any button (except the Power button) on the monitor may also wake up the monitor after 12 minutes, the monitor will not go off , with no HDMI or DP input, the monitor will go to the setting you are Aspect and 1:1. 9. Use the / keys to...
..., or go to sleep mode Note: Pressing any button (except the Power button) on the monitor may also wake up the monitor after 12 minutes, the monitor will not go off , with no HDMI or DP input, the monitor will go to the setting you are Aspect and 1:1. 9. Use the / keys to...
User Manual
Page 27
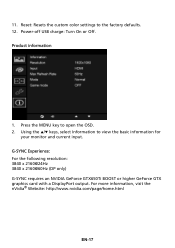
... EN-17 11. Power-off USB charge: Turn On or Off. Using the / keys, select Information to view the basic information for your monitor and current input.
... EN-17 11. Power-off USB charge: Turn On or Off. Using the / keys, select Information to view the basic information for your monitor and current input.
User Manual
Page 28
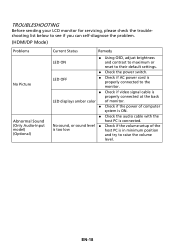
...; Check if video signal cable is properly connected at the back LED displays amber color of monitor. Check if the power of the is too low host PC is connected. No sound, or sound level Check if the volume setup ... the host PC is in minimum position and try to their default settings. Check the power switch. EN-18 TROUBLESHOOTING Before sending your LCD monitor for servicing, please check the troubleshooting list below to see if you can self-diagnose the problem. (HDMI/DP Mode) Problems No Picture Abnormal Sound...
...; Check if video signal cable is properly connected at the back LED displays amber color of monitor. Check if the power of the is too low host PC is connected. No sound, or sound level Check if the volume setup ... the host PC is in minimum position and try to their default settings. Check the power switch. EN-18 TROUBLESHOOTING Before sending your LCD monitor for servicing, please check the troubleshooting list below to see if you can self-diagnose the problem. (HDMI/DP Mode) Problems No Picture Abnormal Sound...
User Manual
Page 30
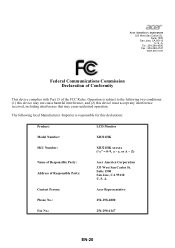
... the following two conditions: (1) this device may not cause harmful interference, and (2) this declaration: Product: LCD Monitor Model Number: XB321HK SKU Number: XB321HK xxxxxx ("x" = 0~9, a ~ z, or A ~ Z) Name of Responsible Party: Address of the FCC Rules. A. S. Contact Person: Acer Representative Phone No.: 254-298-4000 Fax No.: 254-298-4147 EN-20 Operation is responsible for...
... the following two conditions: (1) this device may not cause harmful interference, and (2) this declaration: Product: LCD Monitor Model Number: XB321HK SKU Number: XB321HK xxxxxx ("x" = 0~9, a ~ z, or A ~ Z) Name of Responsible Party: Address of the FCC Rules. A. S. Contact Person: Acer Representative Phone No.: 254-298-4000 Fax No.: 254-298-4147 EN-20 Operation is responsible for...

User Manual
Page 31
... conserve energy and improve the quality of our environment. More information refers to http://www.energystar.gov or http:// www.energystar.gov/powermangement Acer ENERGY STAR qualified products: • Produce less heat and reduce cooling loads, and warmer climates. • Automatically go into "display ...sleep" and "computer sleep" mode within 15 and 30 minute of inactivity respectively. • Wake the monitor when it is proud to offer products and services worldwide that are registered U.S. marks EN-21 Products that help customers save more than ...
... conserve energy and improve the quality of our environment. More information refers to http://www.energystar.gov or http:// www.energystar.gov/powermangement Acer ENERGY STAR qualified products: • Produce less heat and reduce cooling loads, and warmer climates. • Automatically go into "display ...sleep" and "computer sleep" mode within 15 and 30 minute of inactivity respectively. • Wake the monitor when it is proud to offer products and services worldwide that are registered U.S. marks EN-21 Products that help customers save more than ...


