
User Manual
Page 3
... your monitor Please carefully follow these instructions. • Gradually increase the volume until you can 't hear people speaking near you plug the power cord into is displayed for a few hours. Turn off the power switch for hours. Cleaning your ears have adjusted. • Limit the amount of 0.01% or less such as possible. Keep this case, the screen is recovered slowly by changing the image or turning...
... your monitor Please carefully follow these instructions. • Gradually increase the volume until you can 't hear people speaking near you plug the power cord into is displayed for a few hours. Turn off the power switch for hours. Cleaning your ears have adjusted. • Limit the amount of 0.01% or less such as possible. Keep this case, the screen is recovered slowly by changing the image or turning...
User Manual
Page 4
... product does not operate normally after following the operating instructions iv Unplug this product from the wall outlet and refer servicing to qualified service personnel when: • the power cord or plug is used , the load should be blocked or covered. These openings must not exceed 80% of the branch circuit rating. Never spill liquid of any kind onto or into...
... product does not operate normally after following the operating instructions iv Unplug this product from the wall outlet and refer servicing to qualified service personnel when: • the power cord or plug is used , the load should be blocked or covered. These openings must not exceed 80% of the branch circuit rating. Never spill liquid of any kind onto or into...
User Manual
Page 5
...instructions Do not throw this website: https://www.acer-group.com/sustainability/en/our-products-environment.html Visit www.acer-group.com for video and visual display of information obtained from Electrical and Electronics Equipment (WEEE) regulations, visit https://www.acer-group.com/sustainability/en/our-products-environment.html Acer monitor is strongly committed to environmental protection and views...strive to identify and provide the best working procedures to reduce the environmental impact of used equipment, as grain, dust or metal powders. v Switch off your device in fuel ...
...instructions Do not throw this website: https://www.acer-group.com/sustainability/en/our-products-environment.html Visit www.acer-group.com for video and visual display of information obtained from Electrical and Electronics Equipment (WEEE) regulations, visit https://www.acer-group.com/sustainability/en/our-products-environment.html Acer monitor is strongly committed to environmental protection and views...strive to identify and provide the best working procedures to reduce the environmental impact of used equipment, as grain, dust or metal powders. v Switch off your device in fuel ...

User Manual
Page 6
... use . Eyes • Rest your eyes frequently. • Give your eyes regular breaks by adjusting the viewing angle of your vision Long viewing hours, wearing incorrect glasses or contact lenses, glare, excessive room lighting, poorly focused screens, very small typefaces and low-contrast displays could stress your eyes. Long work periods, bad posture, poor work habits, stress, inadequate working in one fixed...
... use . Eyes • Rest your eyes frequently. • Give your eyes regular breaks by adjusting the viewing angle of your vision Long viewing hours, wearing incorrect glasses or contact lenses, glare, excessive room lighting, poorly focused screens, very small typefaces and low-contrast displays could stress your eyes. Long work periods, bad posture, poor work habits, stress, inadequate working in one fixed...
User Manual
Page 7
... LCD Monitor or its controls. • If the existing LCD Monitor is not overhanging the edge of the supporting furniture. • Not placing the LCD Monitor on tall furniture (for extended periods of time. English Display • Keep your display clean. • Keep your head at a higher level than the top edge of the display so your eyes point downward when looking at bright light sources, such as open windows...
... LCD Monitor or its controls. • If the existing LCD Monitor is not overhanging the edge of the supporting furniture. • Not placing the LCD Monitor on tall furniture (for extended periods of time. English Display • Keep your display clean. • Keep your head at a higher level than the top edge of the display so your eyes point downward when looking at bright light sources, such as open windows...
User Manual
Page 10
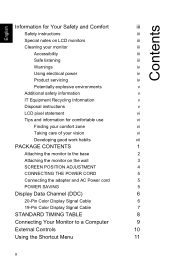
... v Disposal instructions v LCD pixel statement vi Tips and information for comfortable use vi Finding your comfort zone vi Taking care of your vision vi Developing good work habits vii PACKAGE CONTENTS 1 Attaching the monitor to the base 2 Attaching the monitor on the wall 3 SCREEN POSITION ADJUSTMENT 4 CONNECTING THE POWER CORD 5 Connecting the adapter and AC Power cord 5 POWER SAVING 5 Display Data Channel (DDC) 6 20-Pin Color Display Signal Cable 6 19-Pin Color Display Signal Cable 7 STANDARD TIMING TABLE 8 Connecting Your Monitor to...
... v Disposal instructions v LCD pixel statement vi Tips and information for comfortable use vi Finding your comfort zone vi Taking care of your vision vi Developing good work habits vii PACKAGE CONTENTS 1 Attaching the monitor to the base 2 Attaching the monitor on the wall 3 SCREEN POSITION ADJUSTMENT 4 CONNECTING THE POWER CORD 5 Connecting the adapter and AC Power cord 5 POWER SAVING 5 Display Data Channel (DDC) 6 20-Pin Color Display Signal Cable 6 19-Pin Color Display Signal Cable 7 STANDARD TIMING TABLE 8 Connecting Your Monitor to...
User Manual
Page 15
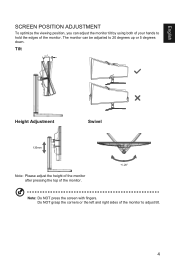
Tilt 31!!!.!! Height Adjustment Swivel 120mm Note: Please adjust the height of the monitor after pressing the top of the monitor. English SCREEN POSITION ADJUSTMENT To optimize the viewing position, you can be adjusted to adjust tilt. 4 The monitor can adjust the monitor tilt by using both of your hands to hold the edges of the monitor. +/- 20° Note: Do NOT press the screen with fingers. Do NOT grasp the corners or the left and right sides of the monitor to 20 degrees up or 5 degrees down.
Tilt 31!!!.!! Height Adjustment Swivel 120mm Note: Please adjust the height of the monitor after pressing the top of the monitor. English SCREEN POSITION ADJUSTMENT To optimize the viewing position, you can be adjusted to adjust tilt. 4 The monitor can adjust the monitor tilt by using both of your hands to hold the edges of the monitor. +/- 20° Note: Do NOT press the screen with fingers. Do NOT grasp the corners or the left and right sides of the monitor to 20 degrees up or 5 degrees down.
User Manual
Page 16
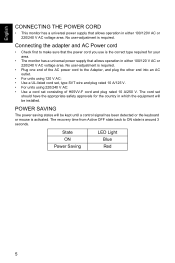
Connecting the adapter and AC Power cord • Check first to make sure that the power cord you use is required. The cord set consisting of H05VV-F cord and plug rated 10 A/250 V. State ON Power Saving LED Light Blue Red 5 English CONNECTING THE POWER CORD • This monitor has a universal power supply that allows operation in which the equipment will be installed. No user-adjustment is the correct type required for the country in either 100/120 V AC or 220...
Connecting the adapter and AC Power cord • Check first to make sure that the power cord you use is required. The cord set consisting of H05VV-F cord and plug rated 10 A/250 V. State ON Power Saving LED Light Blue Red 5 English CONNECTING THE POWER CORD • This monitor has a universal power supply that allows operation in which the equipment will be installed. No user-adjustment is the correct type required for the country in either 100/120 V AC or 220...

User Manual
Page 17
The DDC (Display Data Channel) is able to Plug and Play with your system if your system also supports DDC protocol. English Display Data Channel (DDC) To make your installation easier, the monitor is a communication protocol through which the monitor automatically informs the host system about its capabilities, for example, supported resolutions and corresponding timing. The monitor supports DDC2B standard. 20-Pin Color Display Signal Cable PIN NO...
The DDC (Display Data Channel) is able to Plug and Play with your system if your system also supports DDC protocol. English Display Data Channel (DDC) To make your installation easier, the monitor is a communication protocol through which the monitor automatically informs the host system about its capabilities, for example, supported resolutions and corresponding timing. The monitor supports DDC2B standard. 20-Pin Color Display Signal Cable PIN NO...

User Manual
Page 21
Move the cursor, with four direction. English External Controls Icon Function description Main menu OSD Hot key 1 (default: Mode) Hot key 2 (default: Brightness) Input source Power key: Press to turn the power on typical content frame rates for power efficient, virtually stutter free and low-latency display. 10 Four directions key: Press to any directions key to dynamically adjust display refresh rate based on or off. FreeSync Premium (DP/HDMI1/HDMI2/HDMI3 all support): It can allow a FreeSync Premium supported graphics source to display first menu.
Move the cursor, with four direction. English External Controls Icon Function description Main menu OSD Hot key 1 (default: Mode) Hot key 2 (default: Brightness) Input source Power key: Press to turn the power on typical content frame rates for power efficient, virtually stutter free and low-latency display. 10 Four directions key: Press to any directions key to dynamically adjust display refresh rate based on or off. FreeSync Premium (DP/HDMI1/HDMI2/HDMI3 all support): It can allow a FreeSync Premium supported graphics source to display first menu.

User Manual
Page 22
... settings. Hot Key1: Brightness, Volume, Gamma, Contrast, Low Blue Light, Over Drive, PIP/PBP, VRB C. HDMI(2.0) Exit 11 Hot Key2: Brightness, Volume, Gamma, Contrast, Low Blue Light, Over Drive, PIP/PBP, VRB D. Input Input Open the Input control and select DP or HDMI input source. Actual product specifications may vary. Main Menu B. English Using the Shortcut Menu The following page: Main page A Menu B Mode Standard C Brightness 80 D Input HDMI1(2.0) A. Press the key to adjust the settings of your LCD monitor. The OSD (On Screen Display) can use...
... settings. Hot Key1: Brightness, Volume, Gamma, Contrast, Low Blue Light, Over Drive, PIP/PBP, VRB C. HDMI(2.0) Exit 11 Hot Key2: Brightness, Volume, Gamma, Contrast, Low Blue Light, Over Drive, PIP/PBP, VRB D. Input Input Open the Input control and select DP or HDMI input source. Actual product specifications may vary. Main Menu B. English Using the Shortcut Menu The following page: Main page A Menu B Mode Standard C Brightness 80 D Input HDMI1(2.0) A. Press the key to adjust the settings of your LCD monitor. The OSD (On Screen Display) can use...

User Manual
Page 24
... to adjust Brightness, Contrast, Black boost, Low Blue Light, ACM, HDR and Super Sharpness. 5. English Ř Ř Main Menu The Function page Open the Function page to adjust the sliding scales. You can also view your monitor's system information from the OSD. Picture Picture Color Audio Gaming OSD System Information Mode - Using the !Ř 0 Ř button, select Picture from this setting will be less black. Then navigate to the setting you want using the arrows. Open the Picture...
... to adjust Brightness, Contrast, Black boost, Low Blue Light, ACM, HDR and Super Sharpness. 5. English Ř Ř Main Menu The Function page Open the Function page to adjust the sliding scales. You can also view your monitor's system information from the OSD. Picture Picture Color Audio Gaming OSD System Information Mode - Using the !Ř 0 Ř button, select Picture from this setting will be less black. Then navigate to the setting you want using the arrows. Open the Picture...

User Manual
Page 25
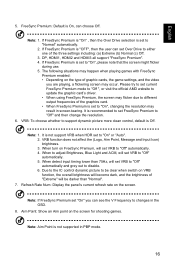
..., User, Low Blue Light, Cool and Warm. 6. Press the MENU key to select the setting. 4. Use the / button to open the OSD. 2. You can simulate high-resolution images by adjusting different Low Blue Light showing ratio Level1, Level2, Level3, Level4. Color Space: You can make image sharper and clear. Note: 1. If Color Space not "HDR", then Modes is set to "Standard". 14 ACM: Turn ACM on or off / HDR400 / Auto) the default is...
..., User, Low Blue Light, Cool and Warm. 6. Press the MENU key to select the setting. 4. Use the / button to open the OSD. 2. You can simulate high-resolution images by adjusting different Low Blue Light showing ratio Level1, Level2, Level3, Level4. Color Space: You can make image sharper and clear. Note: 1. If Color Space not "HDR", then Modes is set to "Standard". 14 ACM: Turn ACM on or off / HDR400 / Auto) the default is...

User Manual
Page 26
... from the OSD. Use the / button to open the OSD. 2. English 8. Standard Picture Volume 50 Color Mute Audio Gaming OSD System Information Adjust OK Ř Ř 1. Gaming Picture Color Audio Gaming OSD System Information Mode - Over Drive: Select Off, Normal, or Extreme. Ř Ř 15 Standard Over Drive FreeSync Premium VRB Refresh Rate Num AimPoint Normal On Off Off Off Adjust OK 1. The default is off. 9. 6-axis Hue: Adjust the red, green, blue, yellow, magenta...
... from the OSD. Use the / button to open the OSD. 2. English 8. Standard Picture Volume 50 Color Mute Audio Gaming OSD System Information Adjust OK Ř Ř 1. Gaming Picture Color Audio Gaming OSD System Information Mode - Over Drive: Select Off, Normal, or Extreme. Ř Ř 15 Standard Over Drive FreeSync Premium VRB Refresh Rate Num AimPoint Normal On Off Off Off Adjust OK 1. The default is off. 9. 6-axis Hue: Adjust the red, green, blue, yellow, magenta...
User Manual
Page 27
... "Auto". 2. It is recommended to set to support dynamic picture more clean control, default is not supported in PBP mode. 16 When detect input timing lower than "Normal". 7. Due to the IC control dynamic picture to "On", please note that the screen might flicker during use. 5. If FreeSync Premium is set to be clear when switch on the screen. Refresh Rate Num: Display the panel's current refresh rate on VRB function, the overall brightness will...
... "Auto". 2. It is recommended to set to support dynamic picture more clean control, default is not supported in PBP mode. 16 When detect input timing lower than "Normal". 7. Due to the IC control dynamic picture to "On", please note that the screen might flicker during use. 5. If FreeSync Premium is set to be clear when switch on the screen. Refresh Rate Num: Display the panel's current refresh rate on VRB function, the overall brightness will...
User Manual
Page 28
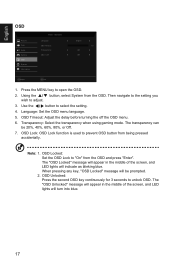
.... OSD Lock: OSD Lock function is used to unlock OSD. The transparency can be prompted. 2. When pressing any key, "OSD Locked" message will turn into blue. 17 Language: Set the OSD menu language. 5. OSD Locked: Set the OSD Lock to open the OSD. 2. Standard Language OSD Timeout Transparency OSD Lock English 10 Adjust OK 1. English Ř Ř OSD Picture Color Audio Gaming OSD System Information Mode - Press the MENU key to "On" from the OSD. The "OSD Locked" message will appear in the middle of the screen, and LED lights will indicate as blinking blue.
.... OSD Lock: OSD Lock function is used to unlock OSD. The transparency can be prompted. 2. When pressing any key, "OSD Locked" message will turn into blue. 17 Language: Set the OSD menu language. 5. OSD Locked: Set the OSD Lock to open the OSD. 2. Standard Language OSD Timeout Transparency OSD Lock English 10 Adjust OK 1. English Ř Ř OSD Picture Color Audio Gaming OSD System Information Mode - Press the MENU key to "On" from the OSD. The "OSD Locked" message will appear in the middle of the screen, and LED lights will indicate as blinking blue.
User Manual
Page 29
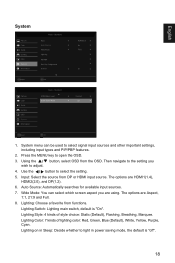
...344; button, select OSD from DP or HDMI input source. Input: Select the source from the OSD. Auto Source: Automatically searches for available input sources. 7. English System () Adjust OK Adjust OK Ř Ř 1. Lighting Switch: Lighting main switch, default is "off". 18 Lighting on in Sleep: Decide whether to light in power saving mode, the default is "On". Lighting Style: 4 kinds of lighting color: Red, Green, Blue (Default), White, Yellow, Purple, Cyan. Wide Mode: You can be used to open the OSD. 3. Press the MENU key to select signal input sources and...
...344; button, select OSD from DP or HDMI input source. Input: Select the source from the OSD. Auto Source: Automatically searches for available input sources. 7. English System () Adjust OK Adjust OK Ř Ř 1. Lighting Switch: Lighting main switch, default is "off". 18 Lighting on in Sleep: Decide whether to light in power saving mode, the default is "On". Lighting Style: 4 kinds of lighting color: Red, Green, Blue (Default), White, Yellow, Purple, Cyan. Wide Mode: You can be used to open the OSD. 3. Press the MENU key to select signal input sources and...

User Manual
Page 30
.../Command Interface, which allows monitor controls to be set through the software on to open the OSD. 2. Quick Start Mode: Select Off or On. Using the !Ř 0 Ř keys, select Information to the factory defaults. 19 The default is "On". 10. Turn on the PC. Reset All Settings: Reset all settings to view the basic information for your monitor and current input. 3. Note: PIP/PBP is not supported while FreeSync Premium is...
.../Command Interface, which allows monitor controls to be set through the software on to open the OSD. 2. Quick Start Mode: Select Off or On. Using the !Ř 0 Ř keys, select Information to the factory defaults. 19 The default is "On". 10. Turn on the PC. Reset All Settings: Reset all settings to view the basic information for your monitor and current input. 3. Note: PIP/PBP is not supported while FreeSync Premium is...
User Manual
Page 31
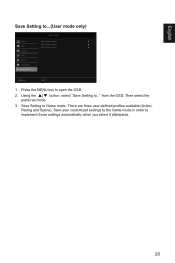
User Game Mode: Action Game Mode: Racing Game Mode: Sports Adjust OK 1. from the OSD. Press the MENU key to ... English Save Setting to...(User mode only) Picture Color Gaming OSD System Information Save Settings to open the OSD. 2. Using the !Ř 0 Ř button, select "Save Setting to Game mode: There are three user-defined profiles available (Action, Racing and Sports). Then select the preferred mode. 3. Save Setting to ..." Save your customized settings to the Game mode in order to implement those settings automatically when you select it afterwards. 20 Mode -
User Game Mode: Action Game Mode: Racing Game Mode: Sports Adjust OK 1. from the OSD. Press the MENU key to ... English Save Setting to...(User mode only) Picture Color Gaming OSD System Information Save Settings to open the OSD. 2. Using the !Ř 0 Ř button, select "Save Setting to Game mode: There are three user-defined profiles available (Action, Racing and Sports). Then select the preferred mode. 3. Save Setting to ..." Save your customized settings to the Game mode in order to implement those settings automatically when you select it afterwards. 20 Mode -

User Manual
Page 32
... the cable. HDMI/DP Mode (Optional) Problems No Picture Current Status Blue Red LED OFF Remedy Using OSD, adjust brightness and contrast to maximum or reset to the monitor. Check if signal cable is properly connected, which can click the mouse or tap any key on the keyboard. Check if AC power cord is functioning properly or in the Hibernate mode. Check the power switch. Check if the PC is properly connected to their default settings. English TROUBLESHOOTING Before sending your LCD monitor for...
... the cable. HDMI/DP Mode (Optional) Problems No Picture Current Status Blue Red LED OFF Remedy Using OSD, adjust brightness and contrast to maximum or reset to the monitor. Check if signal cable is properly connected, which can click the mouse or tap any key on the keyboard. Check if AC power cord is functioning properly or in the Hibernate mode. Check the power switch. Check if the PC is properly connected to their default settings. English TROUBLESHOOTING Before sending your LCD monitor for...

