
User Guide
Page 2
... have been made in this document to change without notification to its accuracy, Adaptec, Inc. ii assumes no liability resulting from the use of this document is for information only and is subject to assure its users. No part of this document, or from errors or omissions in some jurisdictions. Adaptec reserves the right to make changes in any form or by...
... have been made in this document to change without notification to its accuracy, Adaptec, Inc. ii assumes no liability resulting from the use of this document is for information only and is subject to assure its users. No part of this document, or from errors or omissions in some jurisdictions. Adaptec reserves the right to make changes in any form or by...
User Guide
Page 3
... provide more efficient service by accurately identifying your questions here. To speak with your computer in front of your product and support status. to 5:00 P.M., Pacific Time. iii I For Hardware products call +1 408-957-2550, 24 hours per day, 7 days per week. North America I For information about installing or using your Adaptec product, check this document first-you will...
... provide more efficient service by accurately identifying your questions here. To speak with your computer in front of your product and support status. to 5:00 P.M., Pacific Time. iii I For Hardware products call +1 408-957-2550, 24 hours per day, 7 days per week. North America I For information about installing or using your Adaptec product, check this document first-you will...

User Guide
Page 4
... 3470 I French: +32 2 352 3460 To expedite your service, have your computer in front of the following numbers, Monday to Thursday, 10:00 to 12:30 and 13:30 to Friday, 10:00 A.M. I To speak with a Technical Support Specialist, call +65 245 7470, Monday to 17:30; ...with a Technical Support Specialist, call +612 9416 0698, Monday to 12:00 P.M and 1:00 P.M. I Visit our Web site at http://www.adaptec-europe.com. to 16:30; Singapore I To order Adaptec products, including accessories and cables, call +81 3 5308 6120 Monday-Friday, 9:00 A.M. To expedite your service, have your ...
... 3470 I French: +32 2 352 3460 To expedite your service, have your computer in front of the following numbers, Monday to Thursday, 10:00 to 12:30 and 13:30 to Friday, 10:00 A.M. I To speak with a Technical Support Specialist, call +65 245 7470, Monday to 17:30; ...with a Technical Support Specialist, call +612 9416 0698, Monday to 12:00 P.M and 1:00 P.M. I Visit our Web site at http://www.adaptec-europe.com. to 16:30; Singapore I To order Adaptec products, including accessories and cables, call +81 3 5308 6120 Monday-Friday, 9:00 A.M. To expedite your service, have your ...

User Guide
Page 5
Limited 5-Year Hardware Warranty 1. Repair or replacement parts or products will be furnished on how to Adaptec and providing proof of unauthorized service or parts. 3. THIS WARRANTY IS IN LIEU OF ALL OTHER EXPRESS WARRANTIES WHICH NOW OR HEREAFTER MIGHT OTHERWISE ARISE RESPECT TO THIS PRODUCT. IMPLIED ... THE PURCHASER'S EXCLUSIVE REMEDY SHALL BE REPAIR, REPLACEMENT OR REFUND AS PROVIDED ABOVE. This warranty gives you specific legal rights, and you may also have other costs, excluding labor and parts, necessary to Adaptec. 2. SOME STATES DO NOT ALLOW THE EXCLUSION OR LIMITATION...
Limited 5-Year Hardware Warranty 1. Repair or replacement parts or products will be furnished on how to Adaptec and providing proof of unauthorized service or parts. 3. THIS WARRANTY IS IN LIEU OF ALL OTHER EXPRESS WARRANTIES WHICH NOW OR HEREAFTER MIGHT OTHERWISE ARISE RESPECT TO THIS PRODUCT. IMPLIED ... THE PURCHASER'S EXCLUSIVE REMEDY SHALL BE REPAIR, REPLACEMENT OR REFUND AS PROVIDED ABOVE. This warranty gives you specific legal rights, and you may also have other costs, excluding labor and parts, necessary to Adaptec. 2. SOME STATES DO NOT ALLOW THE EXCLUSION OR LIMITATION...

User Guide
Page 6
... Adaptec RAID controller and may make available the Software, or any proprietary legends. 2. This license is licensed only in connection with the use of the Software to preclude access of Section 4. Where a database is included with all reasonable precautions to perform disc creation, and that it is not a sale of the form or media in any termination, including termination by multiple users from multiple...
... Adaptec RAID controller and may make available the Software, or any proprietary legends. 2. This license is licensed only in connection with the use of the Software to preclude access of Section 4. Where a database is included with all reasonable precautions to perform disc creation, and that it is not a sale of the form or media in any termination, including termination by multiple users from multiple...

User Guide
Page 7
...691 South Milpitas Boulevard Milpitas, California 95035. ADAPTEC AND ITS LICENSORS DO NOT AND CANNOT WARRANT THE PERFORMANCE OR RESULTS YOU MAY OBTAIN BY USING THE SOFTWARE OR DOCUMENTATION. EXCEPT FOR THE FOREGOING LIMITED WARRANTY, ADAPTEC AND ITS LICENSORS MAKE NO WARRANTIES, EXPRESSED OR IMPLIED, INCLUDING, BUT NOT LIMITED,... PROFITS, LOST SAVINGS, OR LOSS OF DATA, EVEN IF ADAPTEC OR A LICENSOR HAS BEEN ADVISED OF THE POSSIBILITY OF SUCH DAMAGES, OR FOR ANY CLAIM BY ANY OTHER PARTY. All rights in the Software not specifically granted in this Agreement be declared unenforceable in...
...691 South Milpitas Boulevard Milpitas, California 95035. ADAPTEC AND ITS LICENSORS DO NOT AND CANNOT WARRANT THE PERFORMANCE OR RESULTS YOU MAY OBTAIN BY USING THE SOFTWARE OR DOCUMENTATION. EXCEPT FOR THE FOREGOING LIMITED WARRANTY, ADAPTEC AND ITS LICENSORS MAKE NO WARRANTIES, EXPRESSED OR IMPLIED, INCLUDING, BUT NOT LIMITED,... PROFITS, LOST SAVINGS, OR LOSS OF DATA, EVEN IF ADAPTEC OR A LICENSOR HAS BEEN ADVISED OF THE POSSIBILITY OF SUCH DAMAGES, OR FOR ANY CLAIM BY ANY OTHER PARTY. All rights in the Software not specifically granted in this Agreement be declared unenforceable in...

User Guide
Page 8
... not installed and used in accordance with the limits for help. Operation is connected. viii I Consult the dealer or an experienced radio/television technician for a Class B digital device, pursuant to the Australian/New Zealand standard AS/NZS 3548 set out by the Spectrum Management Agency. This equipment has been tested and found to comply with the instruction manual, may...
... not installed and used in accordance with the limits for help. Operation is connected. viii I Consult the dealer or an experienced radio/television technician for a Class B digital device, pursuant to the Australian/New Zealand standard AS/NZS 3548 set out by the Spectrum Management Agency. This equipment has been tested and found to comply with the instruction manual, may...
User Guide
Page 10
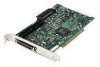
... 2930 4 Installing the PowerDomain 2930 4 Preparing the SCSI Devices 6 Connecting Internal SCSI Devices 6 Connecting External SCSI Devices 10 Troubleshooting 12 With PowerDomain 2930, you can connect up to seven SCSI devices to your computer, you plan to connect more than two internal SCSI devices, or one or more external SCSI devices to any Macintosh computer that has Bus Mastering PCI expansion slots. Mac OS 9.x 2 Installing the Driver - Kit Contents Your PowerDomain 2930 package includes: I PowerDomain 2930 I Standard 50-pin internal SCSI cable I PowerDomain 2930...
... 2930 4 Installing the PowerDomain 2930 4 Preparing the SCSI Devices 6 Connecting Internal SCSI Devices 6 Connecting External SCSI Devices 10 Troubleshooting 12 With PowerDomain 2930, you can connect up to seven SCSI devices to your computer, you plan to connect more than two internal SCSI devices, or one or more external SCSI devices to any Macintosh computer that has Bus Mastering PCI expansion slots. Mac OS 9.x 2 Installing the Driver - Kit Contents Your PowerDomain 2930 package includes: I PowerDomain 2930 I Standard 50-pin internal SCSI cable I PowerDomain 2930...
User Guide
Page 11
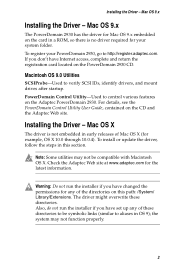
... 9.x Installing the Driver - For details, see the PowerDomain Control Utility User Guide, contained on the PowerDomain 2930 CD. Mac OS X The driver is no driver required for the latest information. Check the Adaptec Web site at www.adaptec.com for your PowerDomain 2930, go to control various features on the card in OS 9); the system may not be symbolic links (similar to verify SCSI IDs, identify drivers, and...
... 9.x Installing the Driver - For details, see the PowerDomain Control Utility User Guide, contained on the PowerDomain 2930 CD. Mac OS X The driver is no driver required for the latest information. Check the Adaptec Web site at www.adaptec.com for your PowerDomain 2930, go to control various features on the card in OS 9); the system may not be symbolic links (similar to verify SCSI IDs, identify drivers, and...

User Guide
Page 12
... system disk. Uninstalling the PowerDomain 2930 Driver To remove the Adaptec SCSI driver: 1 Go to the Mac OS X folder on the screen. The script will prompt you don't have Internet access, complete and return the registration card located on as an administrator to uninstall the driver for an administrator password. The installer will be logged on the PowerDomain 2930 CD. If you for the PowerDomain 2930. Verifying...
... system disk. Uninstalling the PowerDomain 2930 Driver To remove the Adaptec SCSI driver: 1 Go to the Mac OS X folder on the screen. The script will prompt you don't have Internet access, complete and return the registration card located on as an administrator to uninstall the driver for an administrator password. The installer will be logged on the PowerDomain 2930 CD. If you for the PowerDomain 2930. Verifying...

User Guide
Page 13
... power cord, and ground yourself by touching the chassis. 2 Remove the computer cabinet, following the manufacturer's instructions. 4 If you are installing the PowerDomain 2930 on an older Macintosh, you need to cover both pins, as shown. Jumper The jumper is now ready for installation. Preparing the PowerDomain 2930 Preparing the PowerDomain 2930 Your PowerDomain 2930 is configured to a jumper (connector) on the board before you install it. To change...
... power cord, and ground yourself by touching the chassis. 2 Remove the computer cabinet, following the manufacturer's instructions. 4 If you are installing the PowerDomain 2930 on an older Macintosh, you need to cover both pins, as shown. Jumper The jumper is now ready for installation. Preparing the PowerDomain 2930 Preparing the PowerDomain 2930 Your PowerDomain 2930 is configured to a jumper (connector) on the board before you install it. To change...

User Guide
Page 14
Always handle the card by its antistatic packaging. Installing the PowerDomain 2930 3 Find an unused PCI expansion slot (typically white or ivory) in Step 3. Screw Bracket Card bracket 5 Unscrew the expansion slot cover screw and remove the slot cover to provide an opening, as shown. Expansion slot cover PCI expansion slots 4 Remove the PowerDomain 2930 card from its edges. 5 Place the PowerDomain 2930 in the slot and press it down firmly until the connector fingers are fully seated. 6 Secure the card bracket with the screw you removed in the computer.
Always handle the card by its antistatic packaging. Installing the PowerDomain 2930 3 Find an unused PCI expansion slot (typically white or ivory) in Step 3. Screw Bracket Card bracket 5 Unscrew the expansion slot cover screw and remove the slot cover to provide an opening, as shown. Expansion slot cover PCI expansion slots 4 Remove the PowerDomain 2930 card from its edges. 5 Place the PowerDomain 2930 in the slot and press it down firmly until the connector fingers are fully seated. 6 Secure the card bracket with the screw you removed in the computer.

User Guide
Page 15
... SCSI Devices Preparing the SCSI Devices Setting up SCSI devices typically involves setting SCSI IDs and termination, mounting internal SCSI devices inside your computer cabinet, and see Connecting Internal SCSI Devices on SCSI devices that each cable, or the end of the device. Setup varies for specific instructions. The PowerDomain 2930 is preset to ID 7 and should not be removed or disabled on page 6. The IDs for setup: I Terminate the Ends of each SCSI device. If you are installing internal SCSI devices, see Connecting External SCSI Devices...
... SCSI Devices Preparing the SCSI Devices Setting up SCSI devices typically involves setting SCSI IDs and termination, mounting internal SCSI devices inside your computer cabinet, and see Connecting Internal SCSI Devices on SCSI devices that each cable, or the end of the device. Setup varies for specific instructions. The PowerDomain 2930 is preset to ID 7 and should not be removed or disabled on page 6. The IDs for setup: I Terminate the Ends of each SCSI device. If you are installing internal SCSI devices, see Connecting External SCSI Devices...
User Guide
Page 16
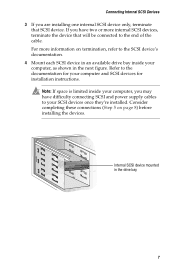
... connecting SCSI and power supply cables to the end of the cable. For more internal SCSI devices, terminate the device that SCSI device. Internal SCSI device mounted in the drive bay 7 Note: If space is limited inside your computer, you are installing one internal SCSI device only, terminate that will be connected to your SCSI devices once they're installed. Consider completing these connections (Step 5 on termination, refer to the documentation for installation instructions. Refer to the SCSI device's documentation. 4 Mount each SCSI device...
... connecting SCSI and power supply cables to the end of the cable. For more internal SCSI devices, terminate the device that SCSI device. Internal SCSI device mounted in the drive bay 7 Note: If space is limited inside your computer, you are installing one internal SCSI device only, terminate that will be connected to your SCSI devices once they're installed. Consider completing these connections (Step 5 on termination, refer to the documentation for installation instructions. Refer to the SCSI device's documentation. 4 Mount each SCSI device...

User Guide
Page 17
....) Make sure Pin 1 on the cable aligns with enough connectors for all devices. 6 Connect the other end of the cable to the PowerDomain 2930 internal SCSI connector, as shown in the next figure. Connecting Internal SCSI Devices 5 Connect one end of the internal SCSI device connector. Blue or red stripe denotes Pin 1 Standard 50-pin internal SCSI cable (included in kit) Key Pin 1 marking Internal SCSI connector To connect more than two internal SCSI devices, you will need an internal SCSI cable with Pin 1 of the internal SCSI cable to the last internal SCSI device...
....) Make sure Pin 1 on the cable aligns with enough connectors for all devices. 6 Connect the other end of the cable to the PowerDomain 2930 internal SCSI connector, as shown in the next figure. Connecting Internal SCSI Devices 5 Connect one end of the internal SCSI device connector. Blue or red stripe denotes Pin 1 Standard 50-pin internal SCSI cable (included in kit) Key Pin 1 marking Internal SCSI connector To connect more than two internal SCSI devices, you will need an internal SCSI cable with Pin 1 of the internal SCSI cable to the last internal SCSI device...
User Guide
Page 18
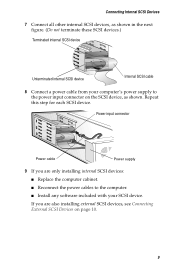
... are also installing external SCSI devices, see Connecting External SCSI Devices on the SCSI device, as shown in the next figure. (Do not terminate these SCSI devices.) Terminated internal SCSI device Unterminated internal SCSI device Internal SCSI cable 8 Connect a power cable from your SCSI device. Power input connector Power cable Power supply 9 If you are only installing internal SCSI devices: I Replace the computer cabinet. I Install any software included with your computer's power supply to the computer. I Reconnect the power cables to the power input connector on page...
... are also installing external SCSI devices, see Connecting External SCSI Devices on the SCSI device, as shown in the next figure. (Do not terminate these SCSI devices.) Terminated internal SCSI device Unterminated internal SCSI device Internal SCSI cable 8 Connect a power cable from your SCSI device. Power input connector Power cable Power supply 9 If you are only installing internal SCSI devices: I Replace the computer cabinet. I Install any software included with your computer's power supply to the computer. I Reconnect the power cables to the power input connector on page...
User Guide
Page 19
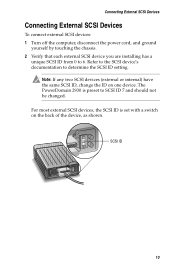
Refer to the SCSI device's documentation to SCSI ID 7 and should not be changed. The PowerDomain 2930 is set with a switch on one device. SCSI ID 10 Connecting External SCSI Devices Connecting External SCSI Devices To connect external SCSI devices: 1 Turn off the computer, disconnect the power cord, and ground yourself by touching the chassis. 2 Verify that each external SCSI device you are installing has a unique SCSI ID from 0 to 6. For most external SCSI devices, the SCSI ID is preset to determine the SCSI ID setting. Note...
Refer to the SCSI device's documentation to SCSI ID 7 and should not be changed. The PowerDomain 2930 is set with a switch on one device. SCSI ID 10 Connecting External SCSI Devices Connecting External SCSI Devices To connect external SCSI devices: 1 Turn off the computer, disconnect the power cord, and ground yourself by touching the chassis. 2 Verify that each external SCSI device you are installing has a unique SCSI ID from 0 to 6. For most external SCSI devices, the SCSI ID is preset to determine the SCSI ID setting. Note...
User Guide
Page 20
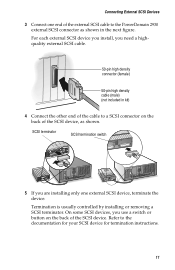
... external SCSI device you install, you use a switch or button on the back of the external SCSI cable to the documentation for your SCSI device for termination instructions. 11 On some SCSI devices, you need a highquality external SCSI cable. 50-pin high density connector (female) 50-pin high density cable (male) (not included in the next figure. Connecting External SCSI Devices 3 Connect one external SCSI device, terminate the device. SCSI terminator SCSI termination switch 4 4 5 If you are installing only one end of the SCSI device...
... external SCSI device you install, you use a switch or button on the back of the external SCSI cable to the documentation for your SCSI device for termination instructions. 11 On some SCSI devices, you need a highquality external SCSI cable. 50-pin high density connector (female) 50-pin high density cable (male) (not included in the next figure. Connecting External SCSI Devices 3 Connect one external SCSI device, terminate the device. SCSI terminator SCSI termination switch 4 4 5 If you are installing only one end of the SCSI device...

User Guide
Page 21
.... Turn off the power before checking the card. If you encounter any software included with your device documentation and to your SCSI devices. Refer to the related sections in the PCI expansion slot? I Is the PowerDomain 2930 firmly seated and secured in this User's Guide. I Are all external SCSI devices and allow them to the previous one, as shown. Troubleshooting 6 Connect other external SCSI devices by cabling each device on the SCSI bus have a unique SCSI ID? Terminate only the SCSI device...
.... Turn off the power before checking the card. If you encounter any software included with your device documentation and to your SCSI devices. Refer to the related sections in the PCI expansion slot? I Is the PowerDomain 2930 firmly seated and secured in this User's Guide. I Are all external SCSI devices and allow them to the previous one, as shown. Troubleshooting 6 Connect other external SCSI devices by cabling each device on the SCSI bus have a unique SCSI ID? Terminate only the SCSI device...

User Guide
Page 22
Part Number: 513046-06, Ver. AA LW 10/01 which may be registered in some jurisdictions. Adaptec and the Adaptec logo are trademarks of Adaptec, Inc. All rights reserved. R Adaptec, Inc. 691 South Milpitas Boulevard Milpitas, CA 95035 USA © 2001 Adaptec, Inc.
Part Number: 513046-06, Ver. AA LW 10/01 which may be registered in some jurisdictions. Adaptec and the Adaptec logo are trademarks of Adaptec, Inc. All rights reserved. R Adaptec, Inc. 691 South Milpitas Boulevard Milpitas, CA 95035 USA © 2001 Adaptec, Inc.


