
User Manual
Page 2
... of Contents 1. Viewing Images ...16 The IP Camera is ready for use now 17 7. Video...26 8.1.3 Management - Network 27 8.1.5 Management - Wireless 30 WEP Encryption ...32 WPA-PSK Encryption ...33 8.2.4 Configuration - Reset...40 8.3.4 Tools - Factory Reset ...40 8.3.5 Tools - About...42 9. Gathering Information ...8 5. Using the Setup Wizard ...9 6. Date & Time 36 8.2.7 Configuration - Upload 37...
... of Contents 1. Viewing Images ...16 The IP Camera is ready for use now 17 7. Video...26 8.1.3 Management - Network 27 8.1.5 Management - Wireless 30 WEP Encryption ...32 WPA-PSK Encryption ...33 8.2.4 Configuration - Reset...40 8.3.4 Tools - Factory Reset ...40 8.3.5 Tools - About...42 9. Gathering Information ...8 5. Using the Setup Wizard ...9 6. Date & Time 36 8.2.7 Configuration - Upload 37...
User Manual
Page 13
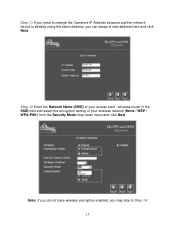
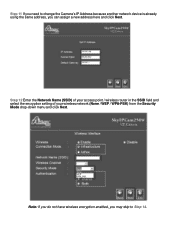
Note: If you do not have wireless encryption enabled, you can assign a new address here and click Next. Step 11 If you need to change the Camera's IP Address because another network device is already using the same address, you may skip to Step 14. 13 Step 12 Enter the Network Name (SSID) of your access point / wireless router in the SSID field and select the encryption setting of your wireless network (None / WEP / WPA-PSK) from the Security Mode drop-down menu and click Next.
Note: If you do not have wireless encryption enabled, you can assign a new address here and click Next. Step 11 If you need to change the Camera's IP Address because another network device is already using the same address, you may skip to Step 14. 13 Step 12 Enter the Network Name (SSID) of your access point / wireless router in the SSID field and select the encryption setting of your wireless network (None / WEP / WPA-PSK) from the Security Mode drop-down menu and click Next.
User Manual
Page 14
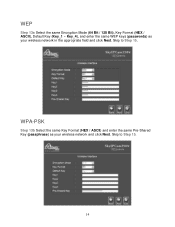
Skip to Step 15. 14 Skip to Step 15. WPA-PSK Step 13b Select the same Key Format (HEX / ASCII) and enter the same Pre-Shared Key (passphrase) as your wireless network and click Next. WEP Step 13a Select the same Encryption Mode (64 Bit / 128 Bit), Key Format (HEX / ASCII), Default Key (Key_1 ~ Key_4), and enter the same WEP keys (passwords) as your wireless network in the appropriate field and click Next.
Skip to Step 15. 14 Skip to Step 15. WPA-PSK Step 13b Select the same Key Format (HEX / ASCII) and enter the same Pre-Shared Key (passphrase) as your wireless network and click Next. WEP Step 13a Select the same Encryption Mode (64 Bit / 128 Bit), Key Format (HEX / ASCII), Default Key (Key_1 ~ Key_4), and enter the same WEP keys (passwords) as your wireless network in the appropriate field and click Next.
User Manual
Page 33
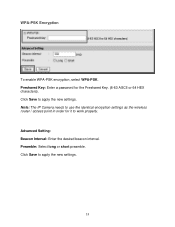
Note: The IP Camera needs to use the identical encryption settings as the wireless router / access point in order for the Preshared Key. (8-63 ASCII or 64 HEX characters). Click Save to work properly. Click Save to apply the new settings. 33 Advanced Setting: Beacon Interval: Enter the desired beacon interval. WPA-PSK Encryption To enable WPA-PSK encryption, select WPA-PSK. Preamble: Select long or short preamble. Preshared Key: Enter a password for it to apply the new settings.
Note: The IP Camera needs to use the identical encryption settings as the wireless router / access point in order for the Preshared Key. (8-63 ASCII or 64 HEX characters). Click Save to work properly. Click Save to apply the new settings. 33 Advanced Setting: Beacon Interval: Enter the desired beacon interval. WPA-PSK Encryption To enable WPA-PSK encryption, select WPA-PSK. Preamble: Select long or short preamble. Preshared Key: Enter a password for it to apply the new settings.
Quick Installation Guide
Page 10
Step 12 Enter the Network Name (SSID) of your access point / wireless router in the SSID field and select the encryption setting of your wireless network (None / WEP / WPA-PSK) from the Security Mode drop-down menu and click Next. Note: If you do not have wireless encryption enabled, you may skip to change the Camera's IP Address because another network device is already using the same address, you need to Step 14. Step 11 If you can assign a new address here and click Next.
Step 12 Enter the Network Name (SSID) of your access point / wireless router in the SSID field and select the encryption setting of your wireless network (None / WEP / WPA-PSK) from the Security Mode drop-down menu and click Next. Note: If you do not have wireless encryption enabled, you may skip to change the Camera's IP Address because another network device is already using the same address, you need to Step 14. Step 11 If you can assign a new address here and click Next.
Quick Installation Guide
Page 11
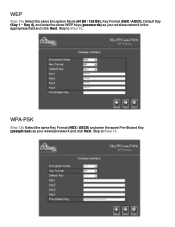
WEP Step 13a Select the same Encryption Mode (64 Bit / 128 Bit), Key Format (HEX / ASCII), Default Key (Key 1 ~ Key 4), and enter the same WEP keys (passwords) as your wireless network in the appropriate field and click Next. Skip to Step 15. WPA-PSK Step 13b Select the same Key Format (HEX / ASCII) and enter the same Pre-Shared Key (passphrase) as your wireless network and click Next. Skip to Step 15.
WEP Step 13a Select the same Encryption Mode (64 Bit / 128 Bit), Key Format (HEX / ASCII), Default Key (Key 1 ~ Key 4), and enter the same WEP keys (passwords) as your wireless network in the appropriate field and click Next. Skip to Step 15. WPA-PSK Step 13b Select the same Key Format (HEX / ASCII) and enter the same Pre-Shared Key (passphrase) as your wireless network and click Next. Skip to Step 15.