

User Manual
Page 2
... 5 CHAPTER 2 ...6 HARDWARE INSTALLATION 6 2.1 Installing the Wall Mount Kit 6 2.2 Connecting the Camera to LAN 6 2.3 Applications of the Camera 7 CHAPTER 3 ...8 SOFTWARE INSTALLATION 8 3.1 Installing SkyIPCam Utility 8 3.2 Using SkyIPCam Utility 9 3.3 Viewing Images 14 3.4 Using SkyIPCam View 18 CHAPTER 4 ...31 CONFIGURATION ...31 4.1 Using the Web Configuration 31 4.2 Basic Setup ...31 4.3 Network Settings 34 4.4 Pan/Tilt Settings 37 4.5 Setting...
... 5 CHAPTER 2 ...6 HARDWARE INSTALLATION 6 2.1 Installing the Wall Mount Kit 6 2.2 Connecting the Camera to LAN 6 2.3 Applications of the Camera 7 CHAPTER 3 ...8 SOFTWARE INSTALLATION 8 3.1 Installing SkyIPCam Utility 8 3.2 Using SkyIPCam Utility 9 3.3 Viewing Images 14 3.4 Using SkyIPCam View 18 CHAPTER 4 ...31 CONFIGURATION ...31 4.1 Using the Web Configuration 31 4.2 Basic Setup ...31 4.3 Network Settings 34 4.4 Pan/Tilt Settings 37 4.5 Setting...

User Manual
Page 6
... can capture both still images and video clips, so that you can easily change the configuration of Web Configuration. „ Remote Control Supported By using SkyIPCam View Platform: Microsoft® Windows® 2000/XP/Vista Hardware Requirement: 1 camera connected: Intel Pentium III 800MHz; 512MB RAM 2 ~ 4 cameras connected: ... or above Apple Safari 2 or above Mozilla Firefox 2 or above „ Accessing the Camera using a standard Web browser or the bundled SkyIPCam View software application, the administrator can use the camera in the hospital, offices and banks, and more.
... can capture both still images and video clips, so that you can easily change the configuration of Web Configuration. „ Remote Control Supported By using SkyIPCam View Platform: Microsoft® Windows® 2000/XP/Vista Hardware Requirement: 1 camera connected: Intel Pentium III 800MHz; 512MB RAM 2 ~ 4 cameras connected: ... or above Apple Safari 2 or above Mozilla Firefox 2 or above „ Accessing the Camera using a standard Web browser or the bundled SkyIPCam View software application, the administrator can use the camera in the hospital, offices and banks, and more.
User Manual
Page 9
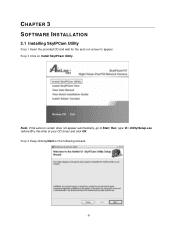
Note: If the autorun screen does not appear automatically, go to appear. Step 3 Keep clicking Next on Install SkyIPCam Utility. CHAPTER 3 SOFTWARE INSTALLATION 3.1 Installing SkyIPCam Utility Step 1 Insert the provided CD and wait for the auto-run screen to Start, Run, type D:\ Utility\Setup.exe (where D is the letter of your CD drive) and click OK. Step 2 Click on the following screens. -8-
Note: If the autorun screen does not appear automatically, go to appear. Step 3 Keep clicking Next on Install SkyIPCam Utility. CHAPTER 3 SOFTWARE INSTALLATION 3.1 Installing SkyIPCam Utility Step 1 Insert the provided CD and wait for the auto-run screen to Start, Run, type D:\ Utility\Setup.exe (where D is the letter of your CD drive) and click OK. Step 2 Click on the following screens. -8-

User Manual
Page 10
Step 4 Click Close to complete the installation. 3.2 Using SkyIPCam Utility Step 1 Go to Start > (All) Programs > AirLink101 > AirLink101 SkyIPCam Utiliy Step 2 Select the IP Camera you want to the same network as your computer is, and then click on the Change IP button. Note: If the Camera's IP address does not show up in the window, make sure the camera is properly connected to configure from the list and click on the Search button. -9-
Step 4 Click Close to complete the installation. 3.2 Using SkyIPCam Utility Step 1 Go to Start > (All) Programs > AirLink101 > AirLink101 SkyIPCam Utiliy Step 2 Select the IP Camera you want to the same network as your computer is, and then click on the Change IP button. Note: If the Camera's IP address does not show up in the window, make sure the camera is properly connected to configure from the list and click on the Search button. -9-

User Manual
Page 18
Step 2 Select your camera from SkyIPCam Utility Step 1 Go to Step 5 mentioned in Method 1. - 17 - Method 2 --- Access from the list and click Link Step 3 Follow Step 3 to Start > (All) Programs > AirLink101 > AirLink101 SkyIPCam Utiliy, and open the Airlink101 SkyIPCam Utility.
Step 2 Select your camera from SkyIPCam Utility Step 1 Go to Step 5 mentioned in Method 1. - 17 - Method 2 --- Access from the list and click Link Step 3 Follow Step 3 to Start > (All) Programs > AirLink101 > AirLink101 SkyIPCam Utiliy, and open the Airlink101 SkyIPCam Utility.
User Manual
Page 19
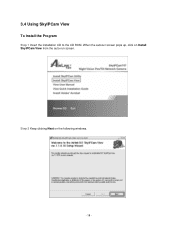
Step 2 Keep clicking Next on Install SkyIPCam View from the auto-run screen. When the autorun screen pops up, click on the following windows. - 18 - 3.4 Using SkyIPCam View To Install the Program Step 1 Insert the installation CD to the CD ROM.
Step 2 Keep clicking Next on Install SkyIPCam View from the auto-run screen. When the autorun screen pops up, click on the following windows. - 18 - 3.4 Using SkyIPCam View To Install the Program Step 1 Insert the installation CD to the CD ROM.

User Manual
Page 20
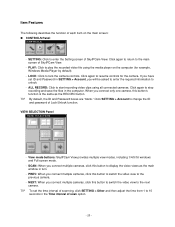
otherwise, the displayed main screen may be distorted. - 19 - To Launch the Program This section describes the user interface and operating instructions of SkyIPCam View. To launch the program, click Start > Programs > AirLink101 > AirLink101 SkyIPCam View, and the main screen will appear as below: NOTE: Please set the resolution to complete the installation. Step 3 Click Close to 1024x768 or above on your computer while using SkyIPCam View;
otherwise, the displayed main screen may be distorted. - 19 - To Launch the Program This section describes the user interface and operating instructions of SkyIPCam View. To launch the program, click Start > Programs > AirLink101 > AirLink101 SkyIPCam View, and the main screen will appear as below: NOTE: Please set the resolution to complete the installation. Step 3 Click Close to 1024x768 or above on your computer while using SkyIPCam View;
User Manual
Page 21
PLAY: Click to resume controls for example, Windows Media Player by default). - LOCK: Click to the main screen of SkyIPCam View. - Click again to play the recorded video file using all connected cameras. When you connect only one camera, this button to switch the video ...view to change the ID and password of SkyIPCam View. Click SETTING > Account to the next camera. ALL RECORD: Click to the previous camera. - SCAN: When you will be asked to enter the required...
PLAY: Click to resume controls for example, Windows Media Player by default). - LOCK: Click to the main screen of SkyIPCam View. - Click again to play the recorded video file using all connected cameras. When you connect only one camera, this button to switch the video ...view to change the ID and password of SkyIPCam View. Click SETTING > Account to the next camera. ALL RECORD: Click to the previous camera. - SCAN: When you will be asked to enter the required...

User Manual
Page 25
... Web Configuration of the selected camera is to click the RECORD/ALL RECORD button to start recording triggered by the motion detected. To Record Video SkyIPCam View provides three methods to record video clips: one is enabled, you can configure the camera to record manually; the third is to stop. To...
... Web Configuration of the selected camera is to click the RECORD/ALL RECORD button to start recording triggered by the motion detected. To Record Video SkyIPCam View provides three methods to record video clips: one is enabled, you can configure the camera to record manually; the third is to stop. To...

User Manual
Page 32
... the main page of the camera by the camera. „ Indication LED This item allows you through the Web browser and the provided software application SkyIPCam View. This chapter describes the Web Configuration, and guides you to set the LED illumination as the Camera Name, Location, Date & Time, and User management...
... the main page of the camera by the camera. „ Indication LED This item allows you through the Web browser and the provided software application SkyIPCam View. This chapter describes the Web Configuration, and guides you to set the LED illumination as the Camera Name, Location, Date & Time, and User management...

User Manual
Page 35
... recommended that provide the network settings for the camera directly. IP Subnet Mask Default Gateway Enter the IP address of the camera. You can use SkyIPCam Utility to select the IP address mode and set a static IP so that the IP address will never change and you to obtain the related...
... recommended that provide the network settings for the camera directly. IP Subnet Mask Default Gateway Enter the IP address of the camera. You can use SkyIPCam Utility to select the IP address mode and set a static IP so that the IP address will never change and you to obtain the related...

User Manual
Page 52
... B, CE Class B A.2 GPIO Terminal Application Typically used in association with programming scripts for developing applications for playback/recording/ configuration features „ Operating Environment Temperature - Software "SkyIPCam View" for motion detection, event triggering, alarm notification via e-mail, and a variety of connecting the sensor device (IN) and controlled device (OUT). Operation: 0°C ~ 45...
... B, CE Class B A.2 GPIO Terminal Application Typically used in association with programming scripts for developing applications for playback/recording/ configuration features „ Operating Environment Temperature - Software "SkyIPCam View" for motion detection, event triggering, alarm notification via e-mail, and a variety of connecting the sensor device (IN) and controlled device (OUT). Operation: 0°C ~ 45...
Quick Installation Guide
Page 3
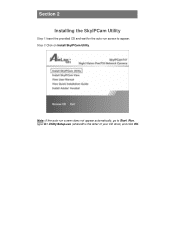
Step 2 Click on Install SkyIPCam Utility. Note: If the auto-run screen to Start, Run, type: D:\ Utility\Setup.exe (where D is the letter of your CD drive) and click OK. Section 2 Installing the SkyIPCam Utility Step 1 Insert the provided CD and wait for the auto-run screen does not appear automatically, go to appear.
Step 2 Click on Install SkyIPCam Utility. Note: If the auto-run screen to Start, Run, type: D:\ Utility\Setup.exe (where D is the letter of your CD drive) and click OK. Section 2 Installing the SkyIPCam Utility Step 1 Insert the provided CD and wait for the auto-run screen does not appear automatically, go to appear.
Quick Installation Guide
Page 5
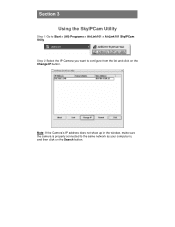
Note: If the Camera's IP address does not show up in the window, make sure the camera is properly connected to configure from the list and click on the Search button. Section 3 Using the SkyIPCam Utility Step 1 Go to Start > (All) Programs > AirLink101 > AirLink101 SkyIPCam Utiliy Step 2 Select the IP Camera you want to the same network as your computer is, and then click on the Change IP button.
Note: If the Camera's IP address does not show up in the window, make sure the camera is properly connected to configure from the list and click on the Search button. Section 3 Using the SkyIPCam Utility Step 1 Go to Start > (All) Programs > AirLink101 > AirLink101 SkyIPCam Utiliy Step 2 Select the IP Camera you want to the same network as your computer is, and then click on the Change IP button.

Quick Installation Guide
Page 14
Step 2 Select your camera from "SkyIPCam Utility" Step 1 Go to Step 6 mentioned in Method 1. Method 2 --- Access from the list and click Link Step 3 Follow Step 3 to Start > (All) Programs > AirLink101 > AirLink101 SkyIPCam Utiliy, and open the Airlink101 SkyIPCam Utility.
Step 2 Select your camera from "SkyIPCam Utility" Step 1 Go to Step 6 mentioned in Method 1. Method 2 --- Access from the list and click Link Step 3 Follow Step 3 to Start > (All) Programs > AirLink101 > AirLink101 SkyIPCam Utiliy, and open the Airlink101 SkyIPCam Utility.