User Manual
Page 1
Wireless N 150 Green Router Model # AR570Wv2 User's Manual Ver. 1A
Wireless N 150 Green Router Model # AR570Wv2 User's Manual Ver. 1A

User Manual
Page 3
......5 2.2 CONFIGURE THE ROUTER WITH EZ SETUP WIZARD 7 2.3 CONFIGURE THE ROUTER WITH WEB CONFIGURATION UTILITY 16 2.4 CONNECT TO ROUTER WIRELESSLY ...24 CHAPTER 3 ADVANCED CONFIGURATION ...25 3.1 BASIC SETTING ...27 3.1.1 Primary Setup ...28 3.1.2 DHCP Server ...39 3.1.3 Wireless ...41 3.1.4 Change Password...54 3.2 FORWARDING RULES...55 3.2.1 Virtual Server ...55 3.2.2 Special Applications...57 3.2.3 Miscellaneous...58 3.3 SECURITY SETTING ...60...
......5 2.2 CONFIGURE THE ROUTER WITH EZ SETUP WIZARD 7 2.3 CONFIGURE THE ROUTER WITH WEB CONFIGURATION UTILITY 16 2.4 CONNECT TO ROUTER WIRELESSLY ...24 CHAPTER 3 ADVANCED CONFIGURATION ...25 3.1 BASIC SETTING ...27 3.1.1 Primary Setup ...28 3.1.2 DHCP Server ...39 3.1.3 Wireless ...41 3.1.4 Change Password...54 3.2 FORWARDING RULES...55 3.2.1 Virtual Server ...55 3.2.2 Special Applications...57 3.2.3 Miscellaneous...58 3.3 SECURITY SETTING ...60...

User Manual
Page 4
3.4.7 Schedule Rule...84 3.5 TOOLBOX ...86 3.5.1 View Log...87 3.5.2 Firmware Upgrade...88 3.5.3 Backup Setting...89 3.5.4 Reset to Default...89 3.5.5 Reboot ...90 3.5.6 Miscellaneous...90 CHAPTER 4 STATUS...91 4.1 SYSTEM STATUS...92 4.2 WIRELESS STATUS...92 4.3 STATISTICS INFORMATION ...92 4.4 NAT STATUS ...93 CHAPTER 5 APPENDIX ...94 5.1 HARDWARE SPECIFICATION...94 TECHNICAL SUPPORT...95
3.4.7 Schedule Rule...84 3.5 TOOLBOX ...86 3.5.1 View Log...87 3.5.2 Firmware Upgrade...88 3.5.3 Backup Setting...89 3.5.4 Reset to Default...89 3.5.5 Reboot ...90 3.5.6 Miscellaneous...90 CHAPTER 4 STATUS...91 4.1 SYSTEM STATUS...92 4.2 WIRELESS STATUS...92 4.3 STATISTICS INFORMATION ...92 4.4 NAT STATUS ...93 CHAPTER 5 APPENDIX ...94 5.1 HARDWARE SPECIFICATION...94 TECHNICAL SUPPORT...95

User Manual
Page 5
... and reliable connections for prioritizing multimedia data transmission (i.e. Best of the Airlink101® AR570Wv2 Wireless N 150 Green Router. The high bandwidth combined with AirLink101® Wireless N 150 products to -use user interface. A full range of security features such...Advanced NAT+SPI firewall with the existing wireless products. Other features of this router including: ƒ High wireless data rate of up to another 4 AR570Wv2 routers with WDS (Wireless Distribution System) supported ƒ Establishes secure wireless connection via Easy Setup Button (WPSTM compatible...
... and reliable connections for prioritizing multimedia data transmission (i.e. Best of the Airlink101® AR570Wv2 Wireless N 150 Green Router. The high bandwidth combined with AirLink101® Wireless N 150 products to -use user interface. A full range of security features such...Advanced NAT+SPI firewall with the existing wireless products. Other features of this router including: ƒ High wireless data rate of up to another 4 AR570Wv2 routers with WDS (Wireless Distribution System) supported ƒ Establishes secure wireless connection via Easy Setup Button (WPSTM compatible...

User Manual
Page 6
1.2 Package Contents Before you start using this router, please check if there is anything missing in the package, and contact your dealer of purchase to claim for missing items: 1. Quick Installation Guide 5. Ethernet Cable 2 Wireless N 150 Green Router with one un-detachable Antenna 2. Power Adapter 3. Setup CD 4.
1.2 Package Contents Before you start using this router, please check if there is anything missing in the package, and contact your dealer of purchase to claim for missing items: 1. Quick Installation Guide 5. Ethernet Cable 2 Wireless N 150 Green Router with one un-detachable Antenna 2. Power Adapter 3. Setup CD 4.
User Manual
Page 7
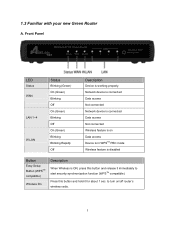
...On (Green) Blinking Off On (Green) Blinking Off On (Green) Blinking Blinking Rapidly Off Description Device is on /off router's wireless radio. 3 to start security synchronization function (WPSTM compatible). Network device is connected Data access Not connected Network device is connected Data access ...this button and release it immediately to turn on Data access Device is in WPSTM PBC mode Wireless feature is disabled Button Easy Setup Button (WPSTM compatible) Wireless On Description When Wireless is ON, press this button and hold it for about 1 sec. 1.3 Familiar with ...
...On (Green) Blinking Off On (Green) Blinking Off On (Green) Blinking Blinking Rapidly Off Description Device is on /off router's wireless radio. 3 to start security synchronization function (WPSTM compatible). Network device is connected Data access Not connected Network device is connected Data access ...this button and release it immediately to turn on Data access Device is in WPSTM PBC mode Wireless feature is disabled Button Easy Setup Button (WPSTM compatible) Wireless On Description When Wireless is ON, press this button and hold it for about 1 sec. 1.3 Familiar with ...

User Manual
Page 9
... modem, and the router. Chapter 2 Configure the Router 2.1 Connect the Router to your network Note: Prior to connecting the router, be sure to connect them wirelessly.) 5 Step 1 Connect one of the LAN ports of the cable to the DSL/Cable modem.
... modem, and the router. Chapter 2 Configure the Router 2.1 Connect the Router to your network Note: Prior to connecting the router, be sure to connect them wirelessly.) 5 Step 1 Connect one of the LAN ports of the cable to the DSL/Cable modem.

User Manual
Page 14
Step 6 Click Next to select WPA2-PSK for best wireless security. Enter 8~63 characters into Key box, then click Next. 10 Airlink101), Channel, Security and Key. The default wireless encryption setting is suggested to select WPA2-PSK for best wireless security. It is disabled. It is suggested to configure the basic wireless settings. Step 7 Configure the SSID (wireless network name, i.e.
Step 6 Click Next to select WPA2-PSK for best wireless security. Enter 8~63 characters into Key box, then click Next. 10 Airlink101), Channel, Security and Key. The default wireless encryption setting is suggested to select WPA2-PSK for best wireless security. It is disabled. It is suggested to configure the basic wireless settings. Step 7 Configure the SSID (wireless network name, i.e.

User Manual
Page 25
Step 9 Set up Wireless Security for your wireless network with it to a desired name, so you can always recognize your router. Step 8 Keep the default SSID (wireless network name: Airlink101) or change it , for example 'myHome'. Select a channel number for security to select WPA2-PSK (AES) for your wireless network from unauthorized users. 21 Click Next. It is recommended to protect your wireless network.
Step 9 Set up Wireless Security for your wireless network with it to a desired name, so you can always recognize your router. Step 8 Keep the default SSID (wireless network name: Airlink101) or change it , for example 'myHome'. Select a channel number for security to select WPA2-PSK (AES) for your wireless network from unauthorized users. 21 Click Next. It is recommended to protect your wireless network.

User Manual
Page 26
Step 10 Verify the information you have configured. WPA2-PSK (AES) is correct, click Apply Settings to 63 characters into Preshare Key box. If everything is the most secure encryption mode for general users but some old wireless adapters may not support it. Therefore, please make sure all wireless devices on your network support this security type. Click Next. Enter 8 to save the settings and reboot router. 22
Step 10 Verify the information you have configured. WPA2-PSK (AES) is correct, click Apply Settings to 63 characters into Preshare Key box. If everything is the most secure encryption mode for general users but some old wireless adapters may not support it. Therefore, please make sure all wireless devices on your network support this security type. Click Next. Enter 8 to save the settings and reboot router. 22

User Manual
Page 27
Congratulations! Please go to 2.4 Connect to the Internet. Click Finish. Step 11 When you see the below window, your router has been successfully connected to the Router Wirelessly. 23 Your router configuration has been finished.
Congratulations! Please go to 2.4 Connect to the Internet. Click Finish. Step 11 When you see the below window, your router has been successfully connected to the Router Wirelessly. 23 Your router configuration has been finished.
User Manual
Page 28
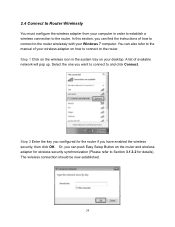
... Select the one you want to connect to Section 3.1.3.2 for the router if you can push Easy Setup Button on the wireless icon in order to establish a wireless connection to the router. A list of your desktop. You can also refer to the manual of available network will pop ...instructions of how to connect to the router wirelessly with your computer in the system tray on your wireless adapter on how to connect to the router. Or, you configured for details). Step 1 Click on the router and wireless adapter for wireless security synchronization (Please refer to and click ...
... Select the one you want to connect to Section 3.1.3.2 for the router if you can push Easy Setup Button on the wireless icon in order to establish a wireless connection to the router. A list of your desktop. You can also refer to the manual of available network will pop ...instructions of how to connect to the router wirelessly with your computer in the system tray on your wireless adapter on how to connect to the router. Or, you configured for details). Step 1 Click on the router and wireless adapter for wireless security synchronization (Please refer to and click ...

User Manual
Page 31
3.1 Basic Setting You can configure LAN, Internet connection type, DHCP, wireless settings and system password for the router in this page. 27
3.1 Basic Setting You can configure LAN, Internet connection type, DHCP, wireless settings and system password for the router in this page. 27

User Manual
Page 45
...You can set up the Schedule Rule. It's recommended to change default SSID value to the one of your own wireless router from others when there are used to identify your wireless network. Please refer to Section 3.4.7 for how to set parameters that is used for you want to disable this ...router. This is the name of the 41 3.1.3 Wireless You can type any alphanumeric characters here, maximum 32 characters. Please select the wireless mode from the drop-down menu and select Enable, then the router will turn on Disable to ...
...You can set up the Schedule Rule. It's recommended to change default SSID value to the one of your own wireless router from others when there are used to identify your wireless network. Please refer to Section 3.4.7 for how to set parameters that is used for you want to disable this ...router. This is the name of the 41 3.1.3 Wireless You can type any alphanumeric characters here, maximum 32 characters. Please select the wireless mode from the drop-down menu and select Enable, then the router will turn on Disable to ...

User Manual
Page 46
... detailed settings will appear after you want to use. Please see below instructions for each Security type for WDS settings. Please see 3.1.3.3 for Wireless Client List information. 42 Select Enable to this router (maximum transfer rate 11Mbps for 802.11b clients, maximum 54Mbps for 802.11g clients, and... clients to connect to this router (maximum transfer rate 54Mbps*). 11n Only: 2.4GHz band, only allows 802.11n wireless network clients to connect to broadcast the SSID so that your wireless client can choose None, WEP, 802.1x and RADIUS, WPA-PSK, WPA2-PSK, WPA, WPA2 for WPS settings....
... detailed settings will appear after you want to use. Please see below instructions for each Security type for WDS settings. Please see 3.1.3.3 for Wireless Client List information. 42 Select Enable to this router (maximum transfer rate 11Mbps for 802.11b clients, maximum 54Mbps for 802.11g clients, and... clients to connect to this router (maximum transfer rate 54Mbps*). 11n Only: 2.4GHz band, only allows 802.11n wireless network clients to connect to broadcast the SSID so that your wireless client can choose None, WEP, 802.1x and RADIUS, WPA-PSK, WPA2-PSK, WPA, WPA2 for WPS settings....

User Manual
Page 47
...". 43 If you select ASCII and 128 bits, enter a 13-digit ASCII key, for example, "12345abcde67890bcdef123456". If you wish to use WEP as your encryption, wireless data rate will drop to 54Mbps (802.11g standard). Select a WEP Key you use and enter key value. If you select ASCII and 64 bits...
...". 43 If you select ASCII and 128 bits, enter a 13-digit ASCII key, for example, "12345abcde67890bcdef123456". If you wish to use WEP as your encryption, wireless data rate will drop to 54Mbps (802.11g standard). Select a WEP Key you use and enter key value. If you select ASCII and 64 bits...

User Manual
Page 48
... Select either AES or TKIP. This can use TKIP as the security key of your encryption, wireless data rate will drop to be broken by hackers. It is suggested to select AES if all your wireless security.WPA2-PSK AES is the most secure setting for general users. Enter 8~63 characters as... your wireless network. 44 WPA-PSK / WPA2-PSK Wi-Fi Protected Access (WPA) is not easy to 54Mbps...
... Select either AES or TKIP. This can use TKIP as the security key of your encryption, wireless data rate will drop to be broken by hackers. It is suggested to select AES if all your wireless security.WPA2-PSK AES is the most secure setting for general users. Enter 8~63 characters as... your wireless network. 44 WPA-PSK / WPA2-PSK Wi-Fi Protected Access (WPA) is not easy to 54Mbps...

User Manual
Page 49
... function is by the RADIUS server and this router first to use the network service. The most common method of implementing 802.1x is enabled, wireless users must authenticate this router. This key value should be consistent with it and get user's authentication profile for comparison. RADIUS Shared Key: Key value...
... function is by the RADIUS server and this router first to use the network service. The most common method of implementing 802.1x is enabled, wireless users must authenticate this router. This key value should be consistent with it and get user's authentication profile for comparison. RADIUS Shared Key: Key value...

User Manual
Page 50
... the RADIUS server. WPA / WPA2 Wi-Fi protected Access (WPA) is suggested to improve data protection and implement access control for Wireless LAN system. Encryption: Select either AES or TKIP. RADIUS Shared Key: Key value shared by the RADIUS server and this encryption mode.... The change will take effect after rebooting the router. 46 After you finished all your wireless devices support this router. Configuring Security - It encrypts frames transmitted through wireless module using the key dynamically obtained from RADIUS Server. RADIUS Server IP: The RADIUS server's IP...
... the RADIUS server. WPA / WPA2 Wi-Fi protected Access (WPA) is suggested to improve data protection and implement access control for Wireless LAN system. Encryption: Select either AES or TKIP. RADIUS Shared Key: Key value shared by the RADIUS server and this encryption mode.... The change will take effect after rebooting the router. 46 After you finished all your wireless devices support this router. Configuring Security - It encrypts frames transmitted through wireless module using the key dynamically obtained from RADIUS Server. RADIUS Server IP: The RADIUS server's IP...

User Manual
Page 51
When WDS is recommended to deploy WDS with solely Airlink101® AR570Wv2. Before you set up WDS bridging: 1) Make sure your wireless computer can be easily extended. 3.1.3.1 WDS The Wireless Distribution System (WDS) provides wireless point-to-point, and point-to work with AR570Wv2. With the WDS feature, the Wireless LAN coverage can associate with individual router/AP. 47 Note: WDS-enabled routers or APs from different manufacturers are not guaranteed to -multipoint bridging for deployment over large area. It is enabled, it only supports None and WEP encryption.
When WDS is recommended to deploy WDS with solely Airlink101® AR570Wv2. Before you set up WDS bridging: 1) Make sure your wireless computer can be easily extended. 3.1.3.1 WDS The Wireless Distribution System (WDS) provides wireless point-to-point, and point-to work with AR570Wv2. With the WDS feature, the Wireless LAN coverage can associate with individual router/AP. 47 Note: WDS-enabled routers or APs from different manufacturers are not guaranteed to -multipoint bridging for deployment over large area. It is enabled, it only supports None and WEP encryption.