
User Manual
Page 1
Wireless N 3G/3.5G Mobile Router Model # AR660W3G User's Manual Ver. 1A
Wireless N 3G/3.5G Mobile Router Model # AR660W3G User's Manual Ver. 1A

User Manual
Page 3
Table of Contents FEDERAL COMMUNICATION COMMISSION INTERFERENCE STATEMENT 2 TABLE OF CONTENTS ...3 CHAPTER 1 INTRODUCTION ...6 1.1 FEATURES ...6 1.2 PACKAGE CONTENTS...6 1.3 ROUTER INTERFACE ...6 CHAPTER 2 CONNECTING THE ROUTER 9 2.1 BUILDING NETWORK CONNECTION 9 2.2 CONFIGURING THE ROUTER - SETUP WIZARD 10 2.3 CONNECTING TO THE ROUTER WIRELESSLY 23 2.4 TROUBLESHOOTING ...26 CHAPTER 3 USING WEB CONFIGURATION UTILITY 28 3.1 NETWORK ...29 3.1.1 WAN ...29 3.1.2 3G/3.5G ...29 3.1.3 LAN...30 3.1.4 DNS...
Table of Contents FEDERAL COMMUNICATION COMMISSION INTERFERENCE STATEMENT 2 TABLE OF CONTENTS ...3 CHAPTER 1 INTRODUCTION ...6 1.1 FEATURES ...6 1.2 PACKAGE CONTENTS...6 1.3 ROUTER INTERFACE ...6 CHAPTER 2 CONNECTING THE ROUTER 9 2.1 BUILDING NETWORK CONNECTION 9 2.2 CONFIGURING THE ROUTER - SETUP WIZARD 10 2.3 CONNECTING TO THE ROUTER WIRELESSLY 23 2.4 TROUBLESHOOTING ...26 CHAPTER 3 USING WEB CONFIGURATION UTILITY 28 3.1 NETWORK ...29 3.1.1 WAN ...29 3.1.2 3G/3.5G ...29 3.1.3 LAN...30 3.1.4 DNS...

User Manual
Page 5
...available. A full range of security features such as WEP, WPA-PSK, and WPA2-PSK provide the highest level of AR660W3G Wireless N 3G/3.5G Mobile Router. The web-based Setup Wizard allows you start to provide the best performance. The high speed of your networking applications...connection • Stronger signal strength increases the reliability and speed of wireless connections • Great for all of up the router with extended wireless coverage delivers fast and reliable connections for environments with higher wireless data traffic requirements • Fully backward-compatible ...
...available. A full range of security features such as WEP, WPA-PSK, and WPA2-PSK provide the highest level of AR660W3G Wireless N 3G/3.5G Mobile Router. The web-based Setup Wizard allows you start to provide the best performance. The high speed of your networking applications...connection • Stronger signal strength increases the reliability and speed of wireless connections • Great for all of up the router with extended wireless coverage delivers fast and reliable connections for environments with higher wireless data traffic requirements • Fully backward-compatible ...
User Manual
Page 6
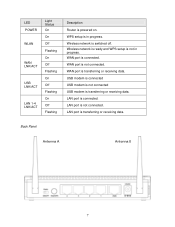
... WAN LNK/ACT USB LNK/ACT LAN 1-4 LNK/ACT Light Status On On Off Flashing On Off Flashing On Off Flashing On Off Flashing Description Router is transferring or receiving data. WAN port is transferring or receiving data.
... WAN LNK/ACT USB LNK/ACT LAN 1-4 LNK/ACT Light Status On On Off Flashing On Off Flashing On Off Flashing On Off Flashing Description Router is transferring or receiving data. WAN port is transferring or receiving data.
User Manual
Page 7
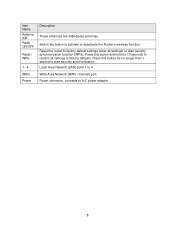
...to restore all settings) or start security synchronization. Press this button for 10 seconds to start security synchronization function (WPS). Reset the router to factory default settings (clear all settings to A/C power adapter. 8 Wide Area Network (WAN / Internet) port. Local Area Network... (LAN) ports 1 to activate or deactivate the Router's wireless function. Switch the button to 4. Power connector, connects to factory defaults. Item Name Antenna A/B Radio ON/OFF Reset / WPS 1 ...
...to restore all settings) or start security synchronization. Press this button for 10 seconds to start security synchronization function (WPS). Reset the router to factory default settings (clear all settings to A/C power adapter. 8 Wide Area Network (WAN / Internet) port. Local Area Network... (LAN) ports 1 to activate or deactivate the Router's wireless function. Switch the button to 4. Power connector, connects to factory defaults. Item Name Antenna A/B Radio ON/OFF Reset / WPS 1 ...

User Manual
Page 8
... sure to power off your computer's Ethernet port and connect the other end of the router. (After setup finishes, you can remove the network cable between the computer and router if you want to use wireless connection.) 9 Step 1 Option 1 Plug the 3G/3.5G USB modem into the USB slot on the modem.... Cable/DSL Modem Step 2 With another network cable, connect one end of a network cable to the WAN port of the router and connect the other end to one of the LAN ports of the cable to your computer, DSL/Cable modem(if applicable), and the...
... sure to power off your computer's Ethernet port and connect the other end of the router. (After setup finishes, you can remove the network cable between the computer and router if you want to use wireless connection.) 9 Step 1 Option 1 Plug the 3G/3.5G USB modem into the USB slot on the modem.... Cable/DSL Modem Step 2 With another network cable, connect one end of a network cable to the WAN port of the router and connect the other end to one of the LAN ports of the cable to your computer, DSL/Cable modem(if applicable), and the...
User Manual
Page 9
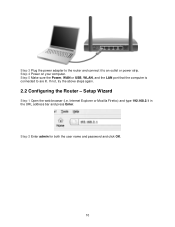
If not, try the above steps again. 2.2 Configuring the Router - Step 3 Plug the power adapter to the router and connect it to are lit. Setup Wizard Step 1 Open the web browser (i.e. Internet Explorer or Mozilla Firefox) and type 192.168.2.1 in the URL address bar and press Enter. Step 5 Make sure the Power, WAN or USB, WLAN, and the LAN port that the computer is connected to an outlet or power strip. Step 2 Enter admin for both the user name and password and click OK. 10 Step 4 Power on your computer.
If not, try the above steps again. 2.2 Configuring the Router - Step 3 Plug the power adapter to the router and connect it to are lit. Setup Wizard Step 1 Open the web browser (i.e. Internet Explorer or Mozilla Firefox) and type 192.168.2.1 in the URL address bar and press Enter. Step 5 Make sure the Power, WAN or USB, WLAN, and the LAN port that the computer is connected to an outlet or power strip. Step 2 Enter admin for both the user name and password and click OK. 10 Step 4 Power on your computer.
User Manual
Page 10
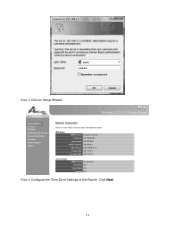
Click Next. 11 Step 3 Click on Setup Wizard. Step 4 Configure the Time Zone Settings of the Router.
Click Next. 11 Step 3 Click on Setup Wizard. Step 4 Configure the Time Zone Settings of the Router.
User Manual
Page 11
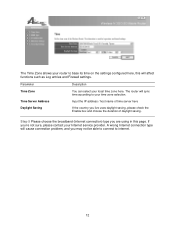
The Time Zone allows your router to your time zone selection. The router will sync time according to base its time on the settings configured here, this page. Step 5 Please choose the broadband (Internet connection) type you are ...
The Time Zone allows your router to your time zone selection. The router will sync time according to base its time on the settings configured here, this page. Step 5 Please choose the broadband (Internet connection) type you are ...
User Manual
Page 19
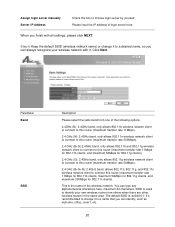
... characters here, maximum 32 characters. When you can identify, such as myhome, office_room1, etc. 20 You can always recognize your own wireless router from one of login server here. Please input the IP address of the following options. 2.4GHz (B): 2.4GHz band, only allows 802.11b... 6 Keep the default SSID (wireless network name) or change it . Assign login server manually Server IP Address Check this box to connect this router (maximum transfer rate 11Mbps for 802.11b clients, maximum 54Mbps for 802.11g clients, and maximum 300Mbps for 802.11g clients). 2.4 GHz (G): ...
... characters here, maximum 32 characters. When you can identify, such as myhome, office_room1, etc. 20 You can always recognize your own wireless router from one of login server here. Please input the IP address of the following options. 2.4GHz (B): 2.4GHz band, only allows 802.11b... 6 Keep the default SSID (wireless network name) or change it . Assign login server manually Server IP Address Check this box to connect this router (maximum transfer rate 11Mbps for 802.11b clients, maximum 54Mbps for 802.11g clients, and maximum 300Mbps for 802.11g clients). 2.4 GHz (G): ...
User Manual
Page 21
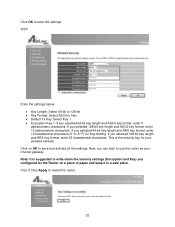
... a safe place. If you selected 128-bit key length and HEX key format, enter 26 hexadecimal characters. Note: It is the security key for the Router on OK to save the settings. If you selected 128-bit key length and ASCII key format, enter 13 alphanumeric characters. Click OK to save... and activate all the settings. Step 8 Click Apply to use the router as your wireless network. WEP Enter the settings below: • Key Length: Select 64-bit or 128-bit • Key Format: Select ASCII or Hex...
... a safe place. If you selected 128-bit key length and HEX key format, enter 26 hexadecimal characters. Note: It is the security key for the Router on OK to save the settings. If you selected 128-bit key length and ASCII key format, enter 13 alphanumeric characters. Click OK to save... and activate all the settings. Step 8 Click Apply to use the router as your wireless network. WEP Enter the settings below: • Key Length: Select 64-bit or 128-bit • Key Format: Select ASCII or Hex...
User Manual
Page 22
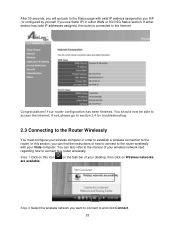
...access the Internet; You can find the instructions of your wireless network card regarding how to connect to and click Connect. 23 Congratulations! Your router configuration has been finished. If either WAN or 3G/3.5G Status section. You should now be able to the Internet. In this icon are.... Step 1 Click on Wireless networks Step 2 Select the wireless network you can also refer to the manual of how to connect to the router wirelessly with valid IP address assigned by you ISP (or configured by yourself if you use Static IP) in order to establish a wireless connection...
...access the Internet; You can find the instructions of your wireless network card regarding how to connect to and click Connect. 23 Congratulations! Your router configuration has been finished. If either WAN or 3G/3.5G Status section. You should now be able to the Internet. In this icon are.... Step 1 Click on Wireless networks Step 2 Select the wireless network you can also refer to the manual of how to connect to the router wirelessly with valid IP address assigned by you ISP (or configured by yourself if you use Static IP) in order to establish a wireless connection...
User Manual
Page 23
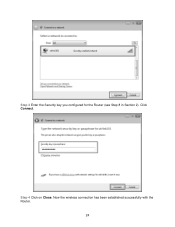
Step 3 Enter the Security key you configured for the Router (see Step 8 in Section 2). Click Connect. Step 4 Click on Close. Now the wireless connection has been established successfully with the Router. 24
Step 3 Enter the Security key you configured for the Router (see Step 8 in Section 2). Click Connect. Step 4 Click on Close. Now the wireless connection has been established successfully with the Router. 24

User Manual
Page 25
...valid numbers assigned to them (instead of all settings are few things your can try the following steps: Step 1 Power off the Cable/DSL modem, router, and computer and wait for 5 minutes. Make sure your computer 3. Please check the compatibility list at www.airlink101.com. 2. Step 4 Turn on... the USB modem should be lit up. 4. Make sure the 3G/3.5G USB modem is compatible with AR660W3G Wireless N 3G/3.5G Router. Step 5 Log in to the router and you configured for the Router, and make sure all 0's). Step 6 Verify that the Internet IP Address, Subnet Mask, and Default Gateway ...
...valid numbers assigned to them (instead of all settings are few things your can try the following steps: Step 1 Power off the Cable/DSL modem, router, and computer and wait for 5 minutes. Make sure your computer 3. Please check the compatibility list at www.airlink101.com. 2. Step 4 Turn on... the USB modem should be lit up. 4. Make sure the 3G/3.5G USB modem is compatible with AR660W3G Wireless N 3G/3.5G Router. Step 5 Log in to the router and you configured for the Router, and make sure all 0's). Step 6 Verify that the Internet IP Address, Subnet Mask, and Default Gateway ...

User Manual
Page 27
...can guide you through . 3.6 Administration The section allows you to specify a time zone, change the system password, save/reload the router configuration, upgrade firmware and so on. 3.7 Status You can see instructions in this section. 28 If you have already configured the Setup...configure any other functions. Chapter 3 Using Web Configuration Utility The Web Configuration Utility contains advanced features that allow you to configure the router to meet your applications. 3.4 Access Restrictions This section allows you to set up the access control rules, such as : Access Control...
...can guide you through . 3.6 Administration The section allows you to specify a time zone, change the system password, save/reload the router configuration, upgrade firmware and so on. 3.7 Status You can see instructions in this section. 28 If you have already configured the Setup...configure any other functions. Chapter 3 Using Web Configuration Utility The Web Configuration Utility contains advanced features that allow you to configure the router to meet your applications. 3.4 Access Restrictions This section allows you to set up the access control rules, such as : Access Control...
User Manual
Page 28
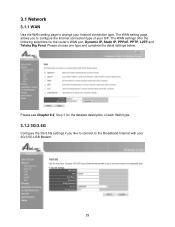
Please choose one type and complete the detail settings below. The WAN settings offer the following selections for the detailed description of each WAN type. 3.1.2 3G/3.5G Configure the 3G/3.5G settings if you to configure the Internet connection type of your ISP. Please see Chapter 2.2, Step 5 for the router's WAN port, Dynamic IP, Static IP, PPPoE, PPTP, L2TP and Telstra Big Pond. 3.1 Network 3.1.1 WAN Use the WAN setting page to change your 3G/3.5G USB Modem. 29 The WAN setting page allows you like to connect to the Broadband Internet with your Internet connection type.
Please choose one type and complete the detail settings below. The WAN settings offer the following selections for the detailed description of each WAN type. 3.1.2 3G/3.5G Configure the 3G/3.5G settings if you to configure the Internet connection type of your ISP. Please see Chapter 2.2, Step 5 for the router's WAN port, Dynamic IP, Static IP, PPPoE, PPTP, L2TP and Telstra Big Pond. 3.1 Network 3.1.1 WAN Use the WAN setting page to change your 3G/3.5G USB Modem. 29 The WAN setting page allows you like to connect to the Broadband Internet with your Internet connection type.

User Manual
Page 29
This field should not be altered except when required by your router, configure the DHCP Server and Static DHCP Lease Table. 30 You may try both service types if you to do so. Note: The setting shown ...
This field should not be altered except when required by your router, configure the DHCP Server and Static DHCP Lease Table. 30 You may try both service types if you to do so. Note: The setting shown ...
User Manual
Page 30
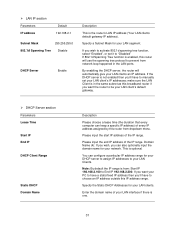
... then you'll have to manually set it to "Disabled" If 802.1d Spanning Tree function is enabled, this router will automatically give your LAN segment. By enablting the DHCP server, the router will use the spanning tree protocol to prevent from network loop happened in the same subnet as this broadband... for your LAN client's IP addresses; Enter the domain name of the IP range. If you 'll have to choose an IP address outside this router from : Start IP 192.168.2.100 to activate 802.1d spanning tree function, select "Enabled", or set your network. make sure the LAN Client is...
... then you'll have to manually set it to "Disabled" If 802.1d Spanning Tree function is enabled, this router will automatically give your LAN segment. By enablting the DHCP server, the router will use the spanning tree protocol to prevent from network loop happened in the same subnet as this broadband... for your LAN client's IP addresses; Enter the domain name of the IP range. If you 'll have to choose an IP address outside this router from : Start IP 192.168.2.100 to activate 802.1d spanning tree function, select "Enabled", or set your network. make sure the LAN Client is...
User Manual
Page 32
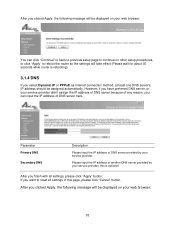
After you clicked Apply, the following message will take effect (Please wait for about 30 seconds while router is rebooting). 3.1.4 DNS If you finish with all settings in this is optional. If you can click "Continue" to back to previous setup page to ... another DNS server provided by your service provider didn't assign the IP address of DNS server because of any reason, you want to reboot the router so the settings will be assigned automatically. After you clicked Apply, the following message will be displayed on your web browser: You can input the...
After you clicked Apply, the following message will take effect (Please wait for about 30 seconds while router is rebooting). 3.1.4 DNS If you finish with all settings in this is optional. If you can click "Continue" to back to previous setup page to ... another DNS server provided by your service provider didn't assign the IP address of DNS server because of any reason, you want to reboot the router so the settings will be assigned automatically. After you clicked Apply, the following message will be displayed on your web browser: You can input the...
User Manual
Page 33
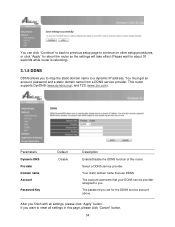
You can click "Continue" to back to previous setup page to continue on other setup procedures, or click "Apply" to reboot the router so the settings will take effect (Please wait for the DDNS service account above. Select a DDNS service provider. Parameters Dynamic DNS Provider Domain ...service provider assigned to reset all settings, please click "Apply" button. After you to map the static domain name to a dynamic IP address. This router supports DynDNS (www.dyndns.org), and TZO (www.tzo.com). The account/username that use DDNS. The password you set for about 30 seconds ...
You can click "Continue" to back to previous setup page to continue on other setup procedures, or click "Apply" to reboot the router so the settings will take effect (Please wait for the DDNS service account above. Select a DDNS service provider. Parameters Dynamic DNS Provider Domain ...service provider assigned to reset all settings, please click "Apply" button. After you to map the static domain name to a dynamic IP address. This router supports DynDNS (www.dyndns.org), and TZO (www.tzo.com). The account/username that use DDNS. The password you set for about 30 seconds ...

